
License management
Important:
File-based licensing system (also referred to as manually managed entitlements), traditionally used for activating various on-premises components, will be End of Life (EOL) on April 15, 2026. License Activation Service (LAS) is the next generation technology for product activations across the suite of Citrix products. LAS will be the only way to activate and license NetScaler instances after April 15, 2026, supporting NetScaler Flexed licenses (CPL/UHMC), legacy NetScaler Pooled licenses, and NetScaler Fixed term Bandwidth licenses. To remain supported, your NetScaler and NetScaler Console deployments must be on a LAS compatible version.
The minimum required NetScaler versions that are LAS compatible are:
-
NetScaler ADCs: 14.1-51.x, 13.1-60.x, 13.1-37.246 (FIPS), 14.1-66.68 (FIPS)
-
NetScaler SVM: 14.1-51.x, 13.1-60.x
-
NetScaler Console Service: Supported from early September 2025.
-
NetScaler Console on-prem: 14.1-51.xNote: LAS support for Console on-prem is from release 14.1-51.x onwards. However, file-based licensing is deprecated as of April 15 2026 from Console on-prem releases 14.1-51.x onwards and 13.1-60.x onwards. If you upgrade to Console on-prem release 14.1-51.x or release 13.1-60.x or later, you can continue using file-based licensing until 15th April 2026. However you must upgrade to Console on-prem release 14.1-51.x or later, and switch to LAS before 15th April 2026 because Console on-prem 13.1 does not support LAS.
All the other forms of legacy NetScaler licenses such as Pooled vCPU, CICO, perpetual will not be supported with LAS. NetScaler instances leveraging perpetual licenses without an active maintenance will become unlicensed upon upgrade to the above mentioned software versions.
LAS based licenses may not be available to customers where prohibited by law or regulations.
If you have questions or concerns, contact Customer Care. Citrix may limit or suspend your Citrix Maintenance for non-compliance with these requirements without liability in addition to any other remedies Citrix may have at law or equity. These requirements don’t apply where prohibited by law or regulation.
Related information
LAS-based license
With License Activation Service (LAS), the entitlements are automatically reflected in the NetScaler Console UI, so no manual action is required.
License server ports
The LAS uses port 443 for all licensing communication.
Note:
To use LAS, add your NetScaler instance as a managed instance.
License expiry information
View license expiry
-
Navigate to NetScaler Licensing > License Management.
-
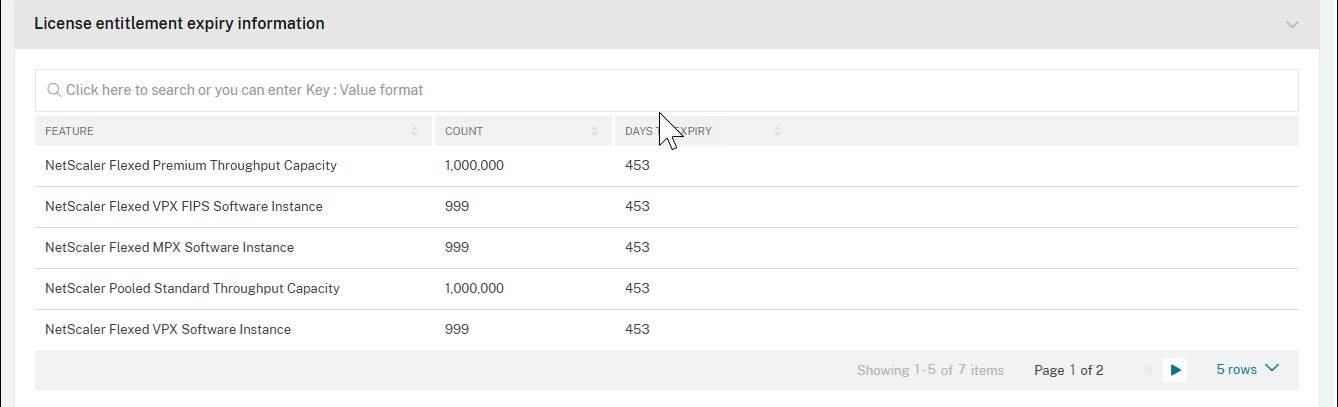
The License entitlement expiry information section provides details on licenses nearing expiration.
-
Feature: Type of license that is going to expire.
-
Count: Number of instances or Bandwidth (in Mbps) that are affected.
-
Days to expiry: Number of days before license expiry (contract end date).
-
Note:
Newly purchased Pooled or Flexed entitlements automatically appear in the License entitlement expiry information section.
License expiry behavior
When a license managed through the NetScaler Console expires, the associated NetScaler instance stops processing traffic, and its configuration might be lost.
Notification email and a pop-up banner on license end date
In the NetScaler Console GUI, a pop-up message appears related to the license end date. By default, you get a pop-up message in the GUI (every time after login) starting 30 days (default) before the license end date.You can configure the number of days in Notification settings > Expiry of license setting.
As an administrator, you also receive a notification email for the license end date if email notification is configured in Notifications settings. A notification email is sent in the frequency of 60, 30, 20, and 10 days before the license end date.
Notification settings
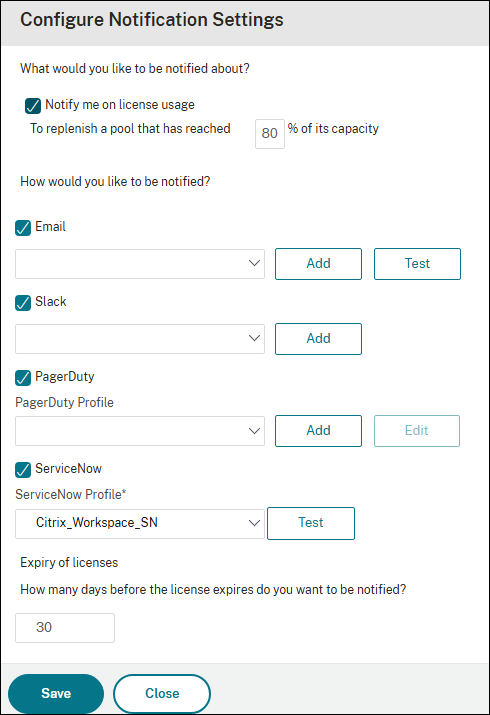
To set up notifications for expiring Flexed or Pooled licenses managed by LAS, follow these steps:
-
Navigate to NetScaler Licenses > License Management > Notification Settings.
-
In the Notification Settings section, select Notify me on license usage. Set the alert threshold as a percentage of flexed or pooled license capacity to be allocated to send a notification.
-
Choose the type of notification that you want to send when licenses reach the threshold, or are about to expire by selecting the appropriate checkbox. The notification types are as follows.
-
Email: Email profile or distribution list for sending notifications. For more information, see Create an email distribution list.
-
Slack: Slack profile details for sending notifications.
-
PagerDuty: PagerDuty profile for sending notifications.
-
ServiceNow: The Citrix ServiceNow profile is specified by default and is the only available option. For more information about creating these profiles, see Configure notifications
-
Select a notification type and click Add to add details. You can also test each notification system before saving your settings.
-
-
Specify the Days to Expiry, which is the number of days before which you would like to be notified about the license expiry.
-
Click Save.
Create an email distribution list
Perform the following steps to create an email distribution list:
-
Select Email and click Add.
-
In Create Email Distribution List, specify the following details:
-
Name - Specify the distribution list name.
-
To - Specify the email addresses to which the NetScaler Console sends the message.
-
Cc - Specify the email addresses to which the NetScaler Console copies the message.
-
Bcc - Specify the email addresses to which the NetScaler Console blind carbon copies (does not display the email address) the message.
-
-
Click Create.
Create a Slack profile
Perform the following steps to create a Slack profile:
-
In Slack, click Add.
-
In Create Slack Profile, specify the following details:
-
Notifications - When enabled, sends alerts and event notifications directly to a designated Slack channel.
-
Notifications with attachments - When enabled, detailed information about triggered alerts and events is sent as an email attachment or a JSON payload within a webhook.
-
Profile Name - Specify the profile name. This name appears in the Slack profile list.
-
Channel Name - Specify the Slack channel name to which the NetScaler Console sends the notification.
-
Webhook URL - Specify the Webhook URL of the channel. Incoming Webhooks are a simple way to post messages from external sources into Slack. The URL is internally linked to the channel name. All event notifications that are sent to this URL are posted on the designated Slack channel. An example of a webhook is as follows:
<https://hooks.slack.com/services/T0******E/B9X55DUMQ/c4tewWAiGVTT51Fl6oEOVirK>.
-
Create a PagerDuty profile
PagerDuty enables you to configure notifications through email, push notifications, and phone calls on a registered number. Before you add a PagerDuty profile in NetScaler Console, ensure that you have completed the required configurations in PagerDuty. To get started with PagerDuty, see the PagerDuty documentation.
Perform the following steps to create a PagerDuty profile:
-
In PagerDuty, click Add.
-
In Create PagerDuty Profile, specify the following details:
-
Profile Name - Specify a profile name. This name is used by different modules, such as event rules and SSL notifications to send PagerDuty alerts.
-
Integration Key - Specify the integration key. You can obtain this key from your PagerDuty portal. When creating a service in PagerDuty for integration, use the Generic Events API Integration option.
-
-
Click Create.
For more information, see Services and Integrations in the PagerDuty documentation.
View the ServiceNow profile
To enable ServiceNow notifications for the NetScaler events, you must integrate NetScaler Console with the ServiceNow using ITSM connector. For more information, see Integrate NetScaler Console with the ServiceNow instance.
Perform the following steps to view and verify the ServiceNow profile:
-
In ServiceNow, Citrix_Workspace_SN profile is selected by default.
-
Click Test to auto-generate a ServiceNow ticket and verify the configuration.
Note
For information about the different types of NetScaler licenses, see Licensing overview.
RBAC support for LAS
You can use Role-Based Access Control (RBAC) to manage LAS application access with the following levels of control:
-
Feature level: Restrict visibility of the licensing feature for specific administrators.
-
Instance level: Limit authorized administrators to apply licenses only to selected NetScaler instances.
For configuration details, see Role-based access control.
Manually managed entitlements (file-based licenses)
The following sections are applicable for manually managed entitlement (file-based licensing).
Note:
When you purchase a Universal Hybrid Multi-Cloud (UHMC) or a Citrix Platform License (CPL), the NetScaler licenses delivered are referred to as Flexed licenses. For more information, see UHMC/CPL offerings.
License files
NetScaler Flexed license includes the following files that you must download from the MyCitrix portal. For more information about transitioning from your current type of NetScaler licensing to Flexed Licensing, see Transition to Flexed licensing.
The license files present on your NetScaler are listed in this section.
| File name contains | Description | Download information | Where to upload/apply the license |
|---|---|---|---|
| NetScaler Flexed VPX SW Instance | Entitles you to VPX/CPX/BLX software instances | Download this file using your NetScaler Console host ID | On NetScaler Console |
| NetScaler Flexed MPX SW Instance | Entitles you to MPX software instances | Download this file using your NetScaler Console host ID | On NetScaler Console |
| NetScaler Flexed SDX SW Instance | Entitles you to SDX software instances | Download this file using your NetScaler Console host ID | On NetScaler Console |
| NetScaler Flexed Platinum BW | Entitles you to Flexed Platinum throughput capacity | Download this file using your NetScaler Console host ID | On NetScaler Console |
| NetScaler Flexed VPX FIPS SW Instance | Entitles you to VPX FIPS software instances | Download this file using your NetScaler Console host ID | On NetScaler Console |
| Zero Capacity MPX-Z Platform License | Entitles you to make your NetScaler MPX HW/NetScaler MPX FIPS HW participate in Flexed licensing | Download this file | On NetScaler MPX |
| Zero Capacity SDX-Z Platform License | Entitles you to make your NetScaler SDX HW/NetScaler SDX FIPS HW participate in Flexed licensing | Download this file | On NetScaler SDX |
Important points to note
-
You can upload license to multiple NetScaler Console service tenants or multiple NetScaler Console on-prem instances.
-
If you are transitioning to flexed license from pooled license and your MPX and SDX instances already have Z-Cap perpetual licenses, then applying the Z-Cap licenses received with flexed license is not required. However, if the current Z-Cap licenses that are applied on NetScaler MPX or NetScaler SDX are valid for a specific duration, then you must apply the Z-Cap licenses received with the flexed license.
-
MPX-Z or SDX-Z platform licenses delivered as part of flexed licenses are perpetual. After the MPX-Z or SDX-Z platform license file is applied on the specific instances, it can be used until the instance End of Life (EOL).
-
You must apply the flexed licenses on NetScaler Console for the NetScaler form factor that you are using in your deployment. For example:Apply the following licenses if you are using NetScaler SDX form factor:|License File|Apply on| |-|-| |NetScaler Flexed SDX SW Instance|NetScaler Console| |NetScaler Flexed VPX SW Instance|NetScaler Console| |NetScaler Flexed Platinum BW|NetScaler Console| |ADC Zero Capacity SDX-Z Platform|NetScaler SDX|Apply the following licenses if you are using NetScaler MPX form factor:|License File|Apply on| |-|-| |NetScaler Flexed MPX SW Instance|NetScaler Console| |NetScaler Flexed Platinum BW|NetScaler Console| |ADC Zero Capacity MPX-Z Platform|NetScaler MPX|Apply the following licenses if you are using NetScaler VPX, NetScaler BLX, or NetScaler CPX form factor:|License File|Apply on| |-|-| |NetScaler Flexed VPX SW Instance|NetScaler Console| |NetScaler Flexed Platinum BW|NetScaler Console|Apply the following licenses if you are using NetScaler VPX FIPS form factor|License File|Apply on| |-|-| |NetScaler Flexed VPX FIPS SW Instance|NetScaler Console| |NetScaler Flexed Platinum BW|NetScaler Console|
Apply a license file
You can add, delete, and download licenses. You must apply licenses before they can be used.
-
Navigate to NetScaler Licensing > License Management.
-
In the License Files section, click Add License File and select one of the following options:
-
Upload license files from a local computer: If a license file is already present on your local computer, you can upload it to the NetScaler Console.
-
Use license access code: Specify the license access code for the license that you have purchased from Citrix. Click Get Licenses and then click Finish.
-
-
Click Finish. The license files are added to NetScaler Console. The License Expiry Information section lists the licenses present in NetScaler Console, count, and the remaining days to expiry.Note:The license end date is the date till your contract is valid and you must renew it before the end date.The following screenshot shows the number of Flexed NetScaler VPX, NetScaler MPX, NetScaler SDX, and NetScaler VPX FIPS software instance licenses, Flexed premium bandwidth capacity present, and the days to expiry (contract end date).
 The following screenshot shows the Pooled Standard, Advanced, and Premium bandwidth available and the days to expiry (contract end date).
-
Select a license file and click Apply licenses.
Delete a license file
To delete a license file, select one or more files and click Delete. When you delete a license, you must first add the license and only then you can apply it.
Download a license file
To download a license file, select a file and click Download. You can save the license file offline as a backup.
License server port settings
Ports are used by NetScaler instances to communicate with the license server. Click the Edit icon and specify values for the following parameters:
-
License Server Port: The proxy server port used by NetScaler instances to access the Citrix licensing portal for license allocation. Default value: 27000.
-
Vendor Daemon Port: The license server port used by NetScaler instances to communicate with the license server. Default value: 7279.
License expiry information
You can configure the license expiry threshold for flexed or pooled capacity licenses. When the threshold is set, NetScaler Console sends notifications through email when a license is due to expire. An SNMP trap and a notification are also sent when the license has expired on NetScaler Console.
An event is generated when a license expiry notification is sent and this event can be viewed on NetScaler Console from Infrastructure > Events.
View license expiry
-
Navigate to NetScaler Licensing > License Management.
-
In the License Settings page, under the License Expiry Information section, you can find the details of the licenses that are going to expire:
-
Feature: Type of license that is going to expire.
-
Count: Number of virtual servers or instances that are affected.
-
Days to expiry: Number of days before license expiry (contract end date).
-
Note:
When you add new licenses to the pool, the NetScaler instances use the new licenses on the expiry of their existing licenses.
Notification email and a pop-up banner on license end date
In the NetScaler Console GUI, a pop-up message appears related to the license end date. As an administrator, you also receive a notification email for the license end date. By default, you get a pop-up message in the GUI (every time after login) 60 days before the license end date and a notification email in the frequency of 60, 30, 20, and 10 days before the license end date.
License expiry behavior
NetScaler instances with expired licenses managed through NetScaler Console stop to process traffic and might result in configuration loss.
Notification settings
Specify the settings based on which notifications will be sent out about license allocation and days to expiry.
-
In the Notification Settings section, click the Edit icon and select Notify me on license usage. Set the alert threshold as a percentage of flexed or pooled license capacity to be allocated to send a notification.
-
Choose the type of notification that you want to send when licenses reach the threshold, or are about to expire by selecting the appropriate checkbox. The notification types are as follows.
-
Email: Email profile or distribution list for sending notifications. For more information, see Create an email distribution list.
-
Slack: Slack profile details for sending notifications.
-
PagerDuty: PagerDuty profile for sending notifications.
-
ServiceNow: The Citrix ServiceNow profile is specified by default and is the only available option. For more information about creating these profiles, see Configure notifications
Select a notification type and click Add to add details. You can also test each notification system before saving your settings. -
-
Specify the Days to Expiry, which is the number of days before which you would like to be notified about the license expiry.
-
Click Save.
Create an email distribution list
Perform the following steps to create an email distribution list:
-
Select Email and click Add.
-
In Create Email Distribution List, specify the following details:
-
Name - Specify the distribution list name.
-
Email Server - Select the email server that sends the email notification. To add an email server, click Add. Specify the server name/IP address and port. Select Authentication to mandate authentication to access the email server. Select Secure if the email server supports SSL authentication. Click Create.
-
From - Specify the email address from which the NetScaler Console sends the message.
-
To - Specify the email addresses to which the NetScaler Console sends the message.
-
Cc - Specify the email addresses to which the NetScaler Console copies the message.
-
Bcc - Specify the email addresses to which the NetScaler Console blind carbon copies (does not display the email address) the message.
-
-
Click Create.
Create a Slack profile
Perform the following steps to create a Slack profile:
-
In Slack, click Add.
-
In Create Slack Profile, specify the following details:
-
Profile Name - Specify the profile name. This name appears in the Slack profile list.
-
Channel Name - Specify the Slack channel name to which the NetScaler Console sends the notification.
-
Webhook URL - Specify the Webhook URL of the channel. Incoming Webhooks are a simple way to post messages from external sources into Slack. The URL is internally linked to the channel name. All event notifications that are sent to this URL are posted on the designated Slack channel. An example of a webhook is as follows:
<https://hooks.slack.com/services/T0******E/B9X55DUMQ/c4tewWAiGVTT51Fl6oEOVirK>.
-
Create a PagerDuty profile
PagerDuty enables you to configure notifications through email, push notifications, and phone calls on a registered number. Before you add a PagerDuty profile in NetScaler Console, ensure that you have completed the required configurations in PagerDuty. To get started with PagerDuty, see the PagerDuty documentation.
Perform the following steps to create a PagerDuty profile:
-
In PagerDuty, click Add.
-
In Create PagerDuty Profile, specify the following details:
-
Profile Name - Specify a profile name. This name is used by different modules, such as event rules and SSL notifications to send PagerDuty alerts.
-
Integration Key - Specify the integration key. You can obtain this key from your PagerDuty portal. When creating a service in PagerDuty for integration, use the Generic Events API Integration option.
-
-
Click Create.
For more information, see Services and Integrations in the PagerDuty documentation.
View the ServiceNow profile
To enable ServiceNow notifications for the NetScaler events, you must integrate NetScaler Console with the ServiceNow using ITSM connector. For more information, see Integrate NetScaler Console with the ServiceNow instance.
Perform the following steps to view and verify the ServiceNow profile:
-
In ServiceNow, Citrix_Workspace_SN profile is selected by default.
-
Click Test to auto-generate a ServiceNow ticket and verify the configuration.
Note:
For information about the different types of NetScaler licenses, see Licensing overview.