
Enable data collection for {{page.citrix-adc-generic}} Gateway appliances deployed in double-hop mode
The {{page.citrix-adc-generic}} Gateway double-hop mode provides extra protection to an organization internal network because an attacker would need to penetrate multiple security zones or Demilitarized zones (DMZ) to reach the servers in the secure network.
As an administrator, using {{page.adm-product-name-short}}, you can analyze:
-
The number of hops ({{page.citrix-adc-generic}} Gateway appliances) through which the ICA connections pass
-
The details about the latency on each TCP connection and how it fairs against the total ICA® latency perceived by the client
The following image indicates that the {{page.adm-product-name-short}} and {{page.citrix-adc-generic}} Gateway in the first DMZ are deployed in the same subnet.
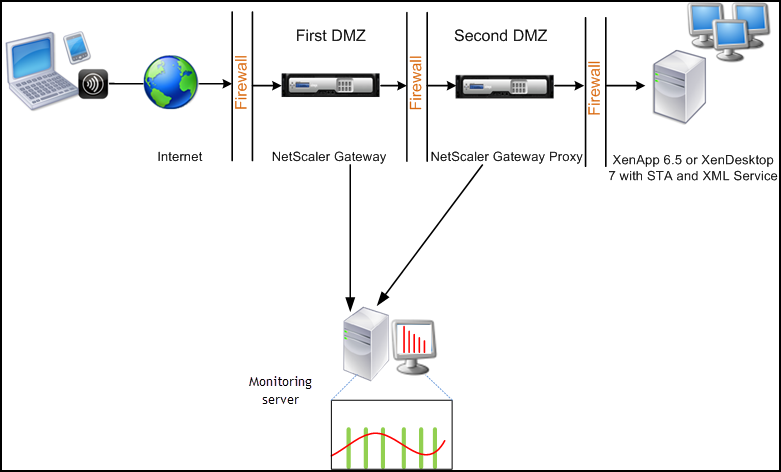
The {{page.citrix-adc-generic}} Gateway in the first DMZ handles user connections and performs the security functions of an SSL VPN. This {{page.citrix-adc-generic}} Gateway encrypts user connections, determines how the users are authenticated, and controls access to the servers in the internal network.
The {{page.citrix-adc-generic}} Gateway in the second DMZ serves as a {{page.citrix-adc-generic}} Gateway proxy device. This {{page.citrix-adc-generic}} Gateway enables the ICA traffic to traverse the second DMZ to complete user connections to the server farm.
The {{page.adm-product-name-short}} can be deployed either in the subnet belonging to the {{page.citrix-adc-generic}} Gateway appliance in the first DMZ or the subnet belonging to the {{page.citrix-adc-generic}} Gateway appliance second DMZ.
In a double-hop mode, {{page.adm-product-name-short}} collects TCP records from one appliance and ICA records from the other appliance. After you add the {{page.citrix-adc-generic}} Gateway appliances to the {{page.adm-product-name-short}} inventory and enable data collection, each appliance export the reports by keeping track of the hop count and connection chain ID.
For {{page.adm-product-name-short}} to identify which appliance is exporting records, each appliance is specified with a hop count and each connection is specified with a connection chain ID. Hop count represents the number of {{page.citrix-adc-generic}} Gateway appliances through which the traffic flows from a client to the servers. The connection chain ID represents the end- to end connections between the client and server.
{{page.adm-product-name-short}} uses the hop count and connection chain ID to co-relate the data from both the {{page.citrix-adc-generic}} Gateway appliances and generates the reports.
To monitor {{page.citrix-adc-generic}} Gateway appliances deployed in this mode, you must first add the {{page.citrix-adc-generic}} Gateway to {{page.adm-product-name-short}} inventory, enable AppFlow on {{page.adm-product-name-short}}, and then view the reports on the {{page.adm-product-name-short}} dashboard.
Related information
Enabling data collection on
If you enable {{page.adm-product-name-short}} to start collecting the ICA details from both the appliances, the details collected are redundant. To overcome this situation, you must enable AppFlow for TCP on the first {{page.citrix-adc-generic}} Gateway appliance, and then enable AppFlow for ICA on the second appliance. By doing so, one of the appliances exports ICA AppFlow records and the other appliance exports TCP AppFlow records. This also saves the processing time on parsing the ICA traffic.
To enable the AppFlow feature from {{page.adm-product-name-short}}:
-
Navigate to Infrastructure > Instances, and select the {{page.citrix-adc-generic}} instance you want to enable analytics.
-
From the Select Action list, select Configure Analytics.
-
Select the virtual servers, and click Enable Security & Analytics.
-
Select Web Insight
-
Click OK.
Configure {{page.citrix-adc-generic}} Gateway appliances to export data
After you install the {{page.citrix-adc-generic}} Gateway appliances, you must configure the following settings on the {{page.citrix-adc-generic}} gateway appliances to export the reports to {{page.adm-product-name-short}}:
-
Configure virtual servers of the {{page.citrix-adc-generic}} Gateway appliances in the first and second DMZ to communicate with each other.
-
Bind the {{page.citrix-adc-generic}} Gateway virtual server in the second DMZ to the {{page.citrix-adc-generic}} Gateway virtual server in the first DMZ.
-
Enable double hop on the {{page.citrix-adc-generic}} Gateway in the second DMZ.
-
Disable authentication on the {{page.citrix-adc-generic}} Gateway virtual server in the second DMZ.
-
Enable one of the {{page.citrix-adc-generic}} Gateway appliances to export ICA records
-
Enable the other {{page.citrix-adc-generic}} Gateway appliance to export TCP records:
-
Enable connection chaining on both the {{page.citrix-adc-generic}} Gateway appliances.
Configure {{page.citrix-adc-generic}} Gateway using the command line interface:
-
Configure the {{page.citrix-adc-generic}} Gateway virtual server in the first DMZ to communicate with the {{page.citrix-adc-generic}} Gateway virtual server in the second DMZ.add vpn nextHopServer \<name\> \<nextHopIP\> \<nextHopPort\> \[-secure (ON|OFF)\] \[-imgGifToPng\] ...
add vpn nextHopServer nh1 10.102.2.33 8443 –secure ON -
Bind the {{page.citrix-adc-generic}} Gateway virtual server in the second DMZ to the {{page.citrix-adc-generic}} Gateway virtual server in the first DMZ. Run the following command on the {{page.citrix-adc-generic}} Gateway in the first DMZ:bind vpn vserver \<name\> -nextHopServer \<name\>
bind vpn vserver vs1 -nextHopServer nh1 -
Enable double hop and AppFlow on the {{page.citrix-adc-generic}} Gateway in the second DMZ.set vpn vserver \<name\> \[- doubleHop ( ENABLED |DISABLED )\] \[- appflowLog ( ENABLED |DISABLED )\]
set vpn vserver vpnhop2 –doubleHop ENABLED –appFlowLog ENABLED -
Disable authentication on the {{page.citrix-adc-generic}} Gateway virtual server in the second DMZ.set vpn vserver\<name\> \[-authentication (ON|OFF)\]
set vpn vserver vs -authentication OFF -
Enable one of the {{page.citrix-adc-generic}} Gateway appliances to export TCP records.bind vpn vserver\<name\> \[-policy\<string\> -priority\<positive\_integer\>\] \[-type\<type\>\]
bind vpn vserver vpn1 -policy appflowpol1 -priority 101 –type OTHERTCP\_REQUEST -
Enable the other {{page.citrix-adc-generic}} Gateway appliance to export ICA records:bind vpn vserver\<name\> \[-policy\<string\> -priority\<positive\_integer\>\] \[-type\<type\>\]
bind vpn vserver vpn2 -policy appflowpol1 -priority 101 -type ICA\_REQUEST -
Enable connection chaining on both the {{page.citrix-adc-generic}} Gateway appliances:set appFlow param \[-connectionChaining (ENABLED|DISABLED)\]
set appflow param -connectionChaining ENABLED
Configuring {{page.citrix-adc-generic}} Gateway using configuration utility:
-
Configure the {{page.citrix-adc-generic}} Gateway in the first DMZ to communicate with the {{page.citrix-adc-generic}} Gateway in the second DMZ and bind the {{page.citrix-adc-generic}} Gateway in the second DMZ to the {{page.citrix-adc-generic}} Gateway in the first DMZ.
-
On the Configuration tab expand {{page.citrix-adc-generic}} Gateway and click Virtual Servers.
-
In the right pane, double-click the virtual server, and in the Advanced group, expand Published Applications.
-
Click Next Hop Server and bind a next hop server to the second {{page.citrix-adc-generic}} Gateway appliance.
-
-
Enable double hop on the {{page.citrix-adc-generic}} Gateway in the second DMZ.
-
On the Configuration tab expand {{page.citrix-adc-generic}} Gateway and click Virtual Servers.
-
In the right pane, double-click the virtual server, and in the Basic Settings group, click the edit icon.
-
Expand More , select Double Hop and click OK.
-
-
Disable authentication on the virtual server on the {{page.citrix-adc-generic}} Gateway in the second DMZ.
-
On the Configuration tab expand {{page.citrix-adc-generic}} Gateway and click Virtual Servers.
-
In the right pane, double-click the virtual server, and in the Basic Settings group, click the edit icon.
-
Expand More, and clear Enable Authentication.
-
-
Enable one of the {{page.citrix-adc-generic}} Gateway appliances to export TCP records.
-
On the Configuration tab expand {{page.citrix-adc-generic}} Gateway and click Virtual Servers.
-
In the right pane, double-click the virtual server, and in the Advanced group, expand Policies.
-
Click the + icon and from the Choose Policy list, select AppFlow® and from the Choose Type list, select Other TCP Request.
-
Click Continue.
-
Add a policy binding, and click Close.
-
-
Enable the other {{page.citrix-adc-generic}} Gateway appliance to export ICA records:
-
On the Configuration tab expand {{page.citrix-adc-generic}} Gateway and click Virtual Servers.
-
In the right pane, double-click the virtual server, and in the Advanced group, expand Policies.
-
Click the + icon and from the Choose Policy list, select AppFlow and from the Choose Type list, select Other TCP Request.
-
Click Continue.
-
Add a policy binding, and click Close.
-
-
Enable connection chaining on both the {{page.citrix-adc-generic}} Gateway appliances.
-
On the Configuration tab, navigate to System > Appflow.
-
In the right Pane, in the Settings group, click Change Appflow Settings.
-
Select Connection Chaining and Click OK.
-