
Provisioning NetScaler VPX instances on Microsoft Azure
Applications or services hosted on Azure require secure traffic management and efficient optimization of network resources along with cloud benefits. NetScaler VPX instances provisioned on Microsoft Azure provide secure traffic management, optimized resource consumption, and reduced web application ownership costs.
NetScaler Console allows you to automate the deployment, setup, and management of the NetScaler VPX instances on Azure. Provisioning NetScaler VPX instances using NetScaler Console combines the elasticity and flexibility of cloud with the control features of NetScaler.
Related information
NetScaler Console Deployment Architecture
The following image provides an overview of how NetScaler Console connects with Azure to provision NetScaler VPX instances in Microsoft Azure.
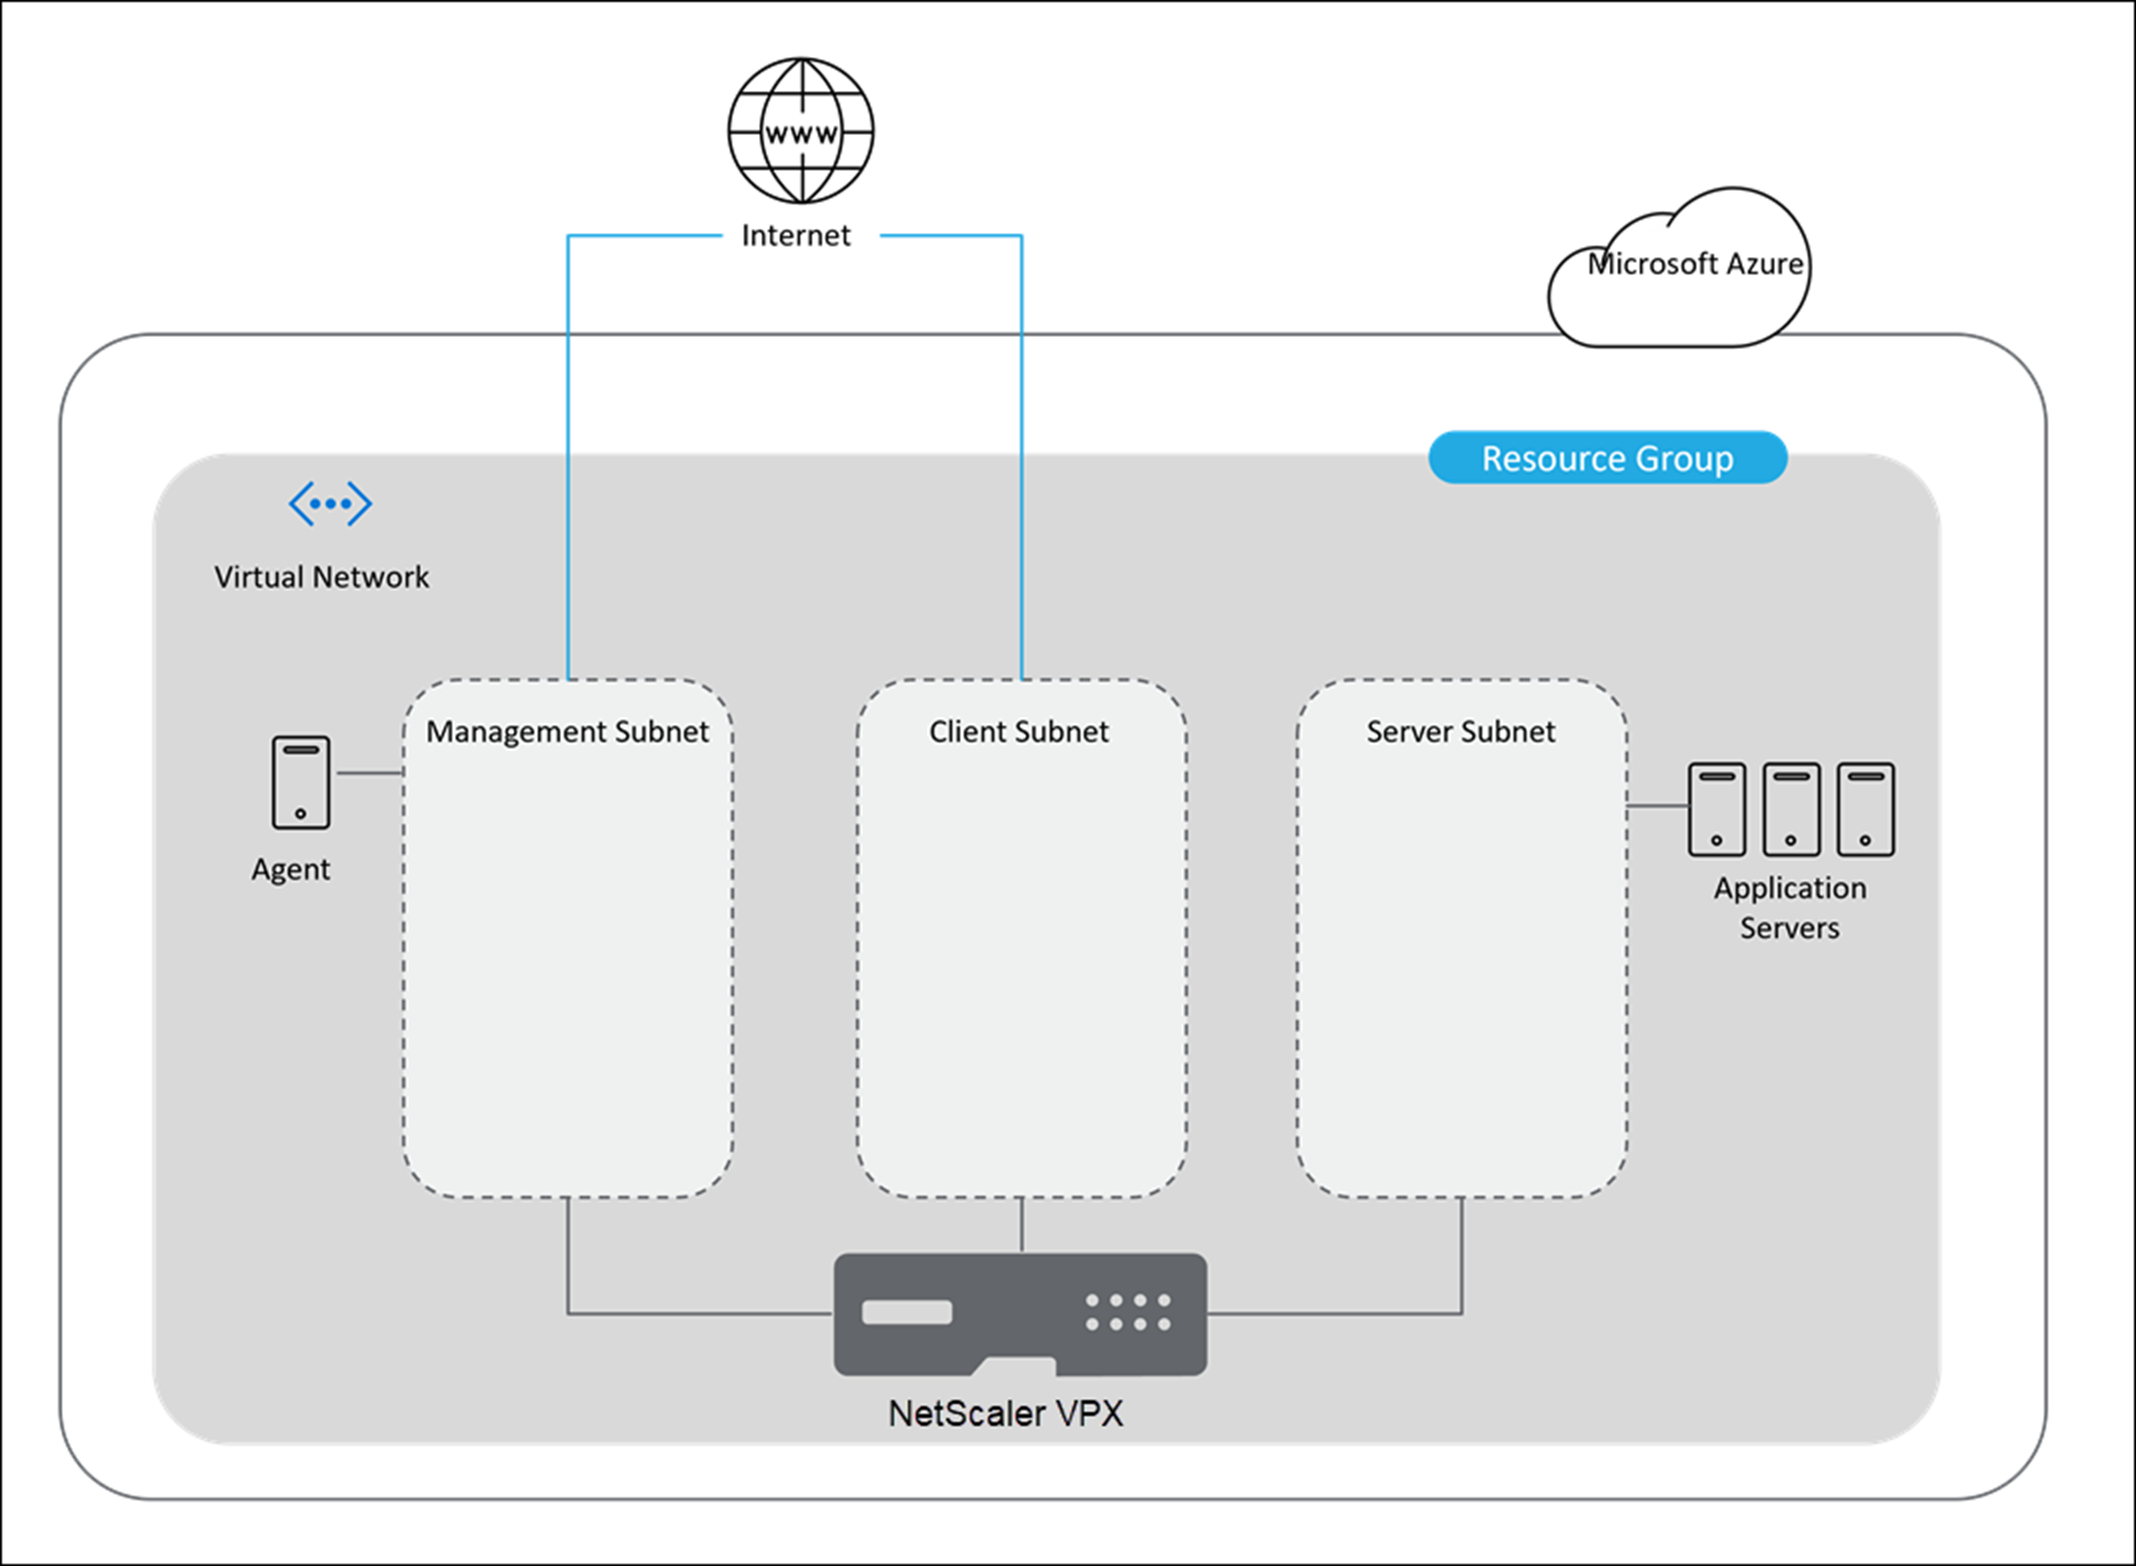
You require to have three subnets to provision and manage the NetScaler VPX instance in Microsoft Azure. A security group must be created for each subnet. The rules specified in the NetScaler Gateway govern the communication across the subnets.
The agent helps you to provision and manage the NetScaler VPX instance.
Prerequisites
This section describes the prerequisites that you must complete in Microsoft Azure and NetScaler Console before you provision NetScaler VPX instances.
This document assumes the following:
-
You possess a Microsoft Azure account that supports the Azure Resource Manager deployment model.
-
You have a resource group in Microsoft Azure.
For more information on how to create an account and other tasks, see Microsoft Azure Documentation.
Set up Microsoft Azure components
Perform the following tasks in Azure before you provision NetScaler VPX instances in NetScaler Console.
Create a virtual network
-
Log on to your Microsoft Azure portal.
-
Select Create a resource.
-
Select Networking and click Virtual Network.
-
Specify the required parameters.
-
In Resource group, you must specify the resource group where you want to deploy the NetScaler VPX product.
-
In Location, you must specify the locations that support availability zones such as:
-
Central US
-
East US2
-
France Central
-
North Europe
-
Southeast Asia
-
West Europe
-
West US2
-
NoteThe application servers present in this resource group. -
-
Click Create.
For more information, see Azure Virtual Network in Microsoft Documentation.
Create security groups
Create three security groups in your virtual network (VNet) - one each for the management, client, and server connections. Create a security group to control inbound and outbound traffic in the NetScaler VPX instance. You can add as many rules as you want.
-
Management: A security group in your account dedicated for the management of NetScaler VPX. NetScaler has to contact Azure services and requires internet access. Inbound rules are allowed on the following TCP and UDP ports.
-
TCP: 80, 22, 443, 3008–3011, 4001
-
UDP: 67, 123, 161, 500, 3003, 4500, 7000
NoteEnsure that the security group allows the agent to access the VPX. -
-
Client: A security group in your account dedicated for client-side communication of NetScaler VPX instances. Typically, inbound rules are allowed on the TCP ports 80, 22, and 443.
-
Server: A security group in your account dedicated for server-side communication of NetScaler VPX.
For more information on how to create a security group in Microsoft Azure, see Create, change, or delete a network security group.
Create subnets
Create three subnets in your virtual network (VNet) - one each for the management, client, and server connections. Specify an address range that is defined in your VNet for each of the subnets. Specify the availability zone in which you want the subnet to reside.
-
Management: A subnet in your Virtual Network (VNet) dedicated for management. NetScaler has to contact Azure services and requires internet access.
-
Client: A subnet in your Virtual Network (VNet) dedicated for the client side. Typically, NetScaler receives client traffic for the application via a public subnet from the internet.
-
Server: A subnet where the application servers are provisioned. All your application servers are present in this subnet and receives application traffic from the NetScaler through this subnet.
Note
Specify an appropriate security group to the subnet while creating a subnet.
For more information on how to create a subnet in Microsoft Azure, see Add, change, or delete a virtual network subnet.
Subscribe to the NetScaler VPX license in Microsoft Azure
-
Log on to your Microsoft Azure portal.
-
Select Create a resource.
-
In the Search the marketplace bar, search
NetScalerand select the required product version. -
In the Select a software plan list, select one of the following license types:
-
Bring your own license
-
Advanced
-
Premium
Note-
If you choose the Bring your own license option, the instance that you want to provision checks out the licenses from the NetScaler Console while provisioning NetScaler instances.
-
In NetScaler Console, the Advanced and Premium are the equivalent license types for Enterprise and Platinum respectively.
-
-
Ensure the programmatic deployment is enabled for the selected NetScaler product.
-
Beside Want to deploy programmatically?, click Get Started.
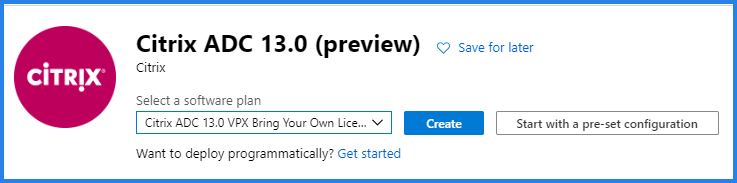
-
In Choose the subscriptions, select Enable to deploy the selected NetScaler VPX edition programmatically.
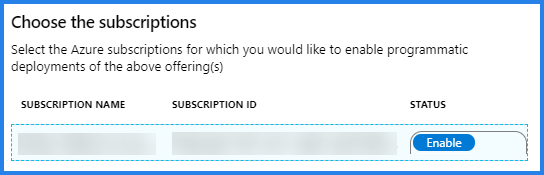 ImportantEnabling the programmatic deployment is required to provision NetScaler VPX instances in Azure.
 -
Click Save.
-
Close Configure Programmatic Deployment.
-
-
Click Create.
Create and register an application
NetScaler Console uses this application to provision NetScaler VPX instances in Azure.
To create and register an application in Azure:
-
In Azure portal, select Azure Active Directory. This option displays your organization's directory.
-
Select App registrations:
-
In Name, specify the name of the application.
-
Select the Application type from the list.
-
In the Sign-on URL, specify the application URL to access the application.
-
-
Click Create.
For more information on App registrations, see Microsoft Documentation.
Azure assigns an application ID to the application. The following is an example application registered in Microsoft Azure:
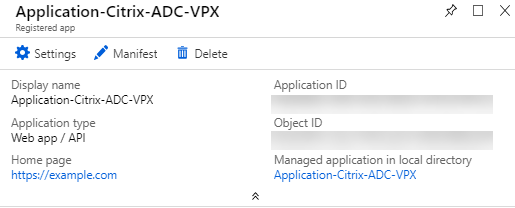
Copy the following IDs and provide these IDs when you are configuring a Cloud Access Profile in NetScaler Console:
-
Application ID: For steps to retrieve the application or client ID.
-
Directory ID: For steps to retrieve the directory or tenant or object ID.
-
Key: For steps to retrieve the key value or client secrets ID.
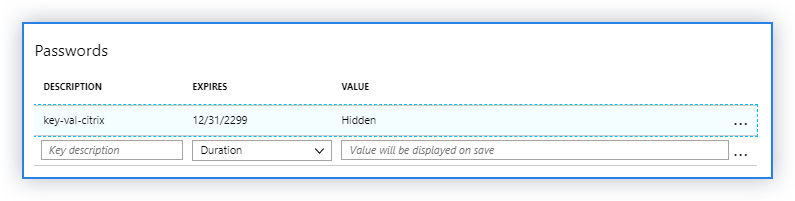
-
Subscription ID: Copy the subscription ID from your storage account.
For more information, see Microsoft Documentation.
Assign the role permission to an application
NetScaler Console uses the application-as-a-service principle to provision NetScaler instances in Microsoft Azure. This permission is applicable only to the selected resource group.
To assign a role permission to your registered application, you have to be the owner of the Microsoft Azure subscription.
-
In the Azure portal, select Resource groups.
-
Select the resource group to which you want to assign role permission.
-
Select Access control (IAM).
-
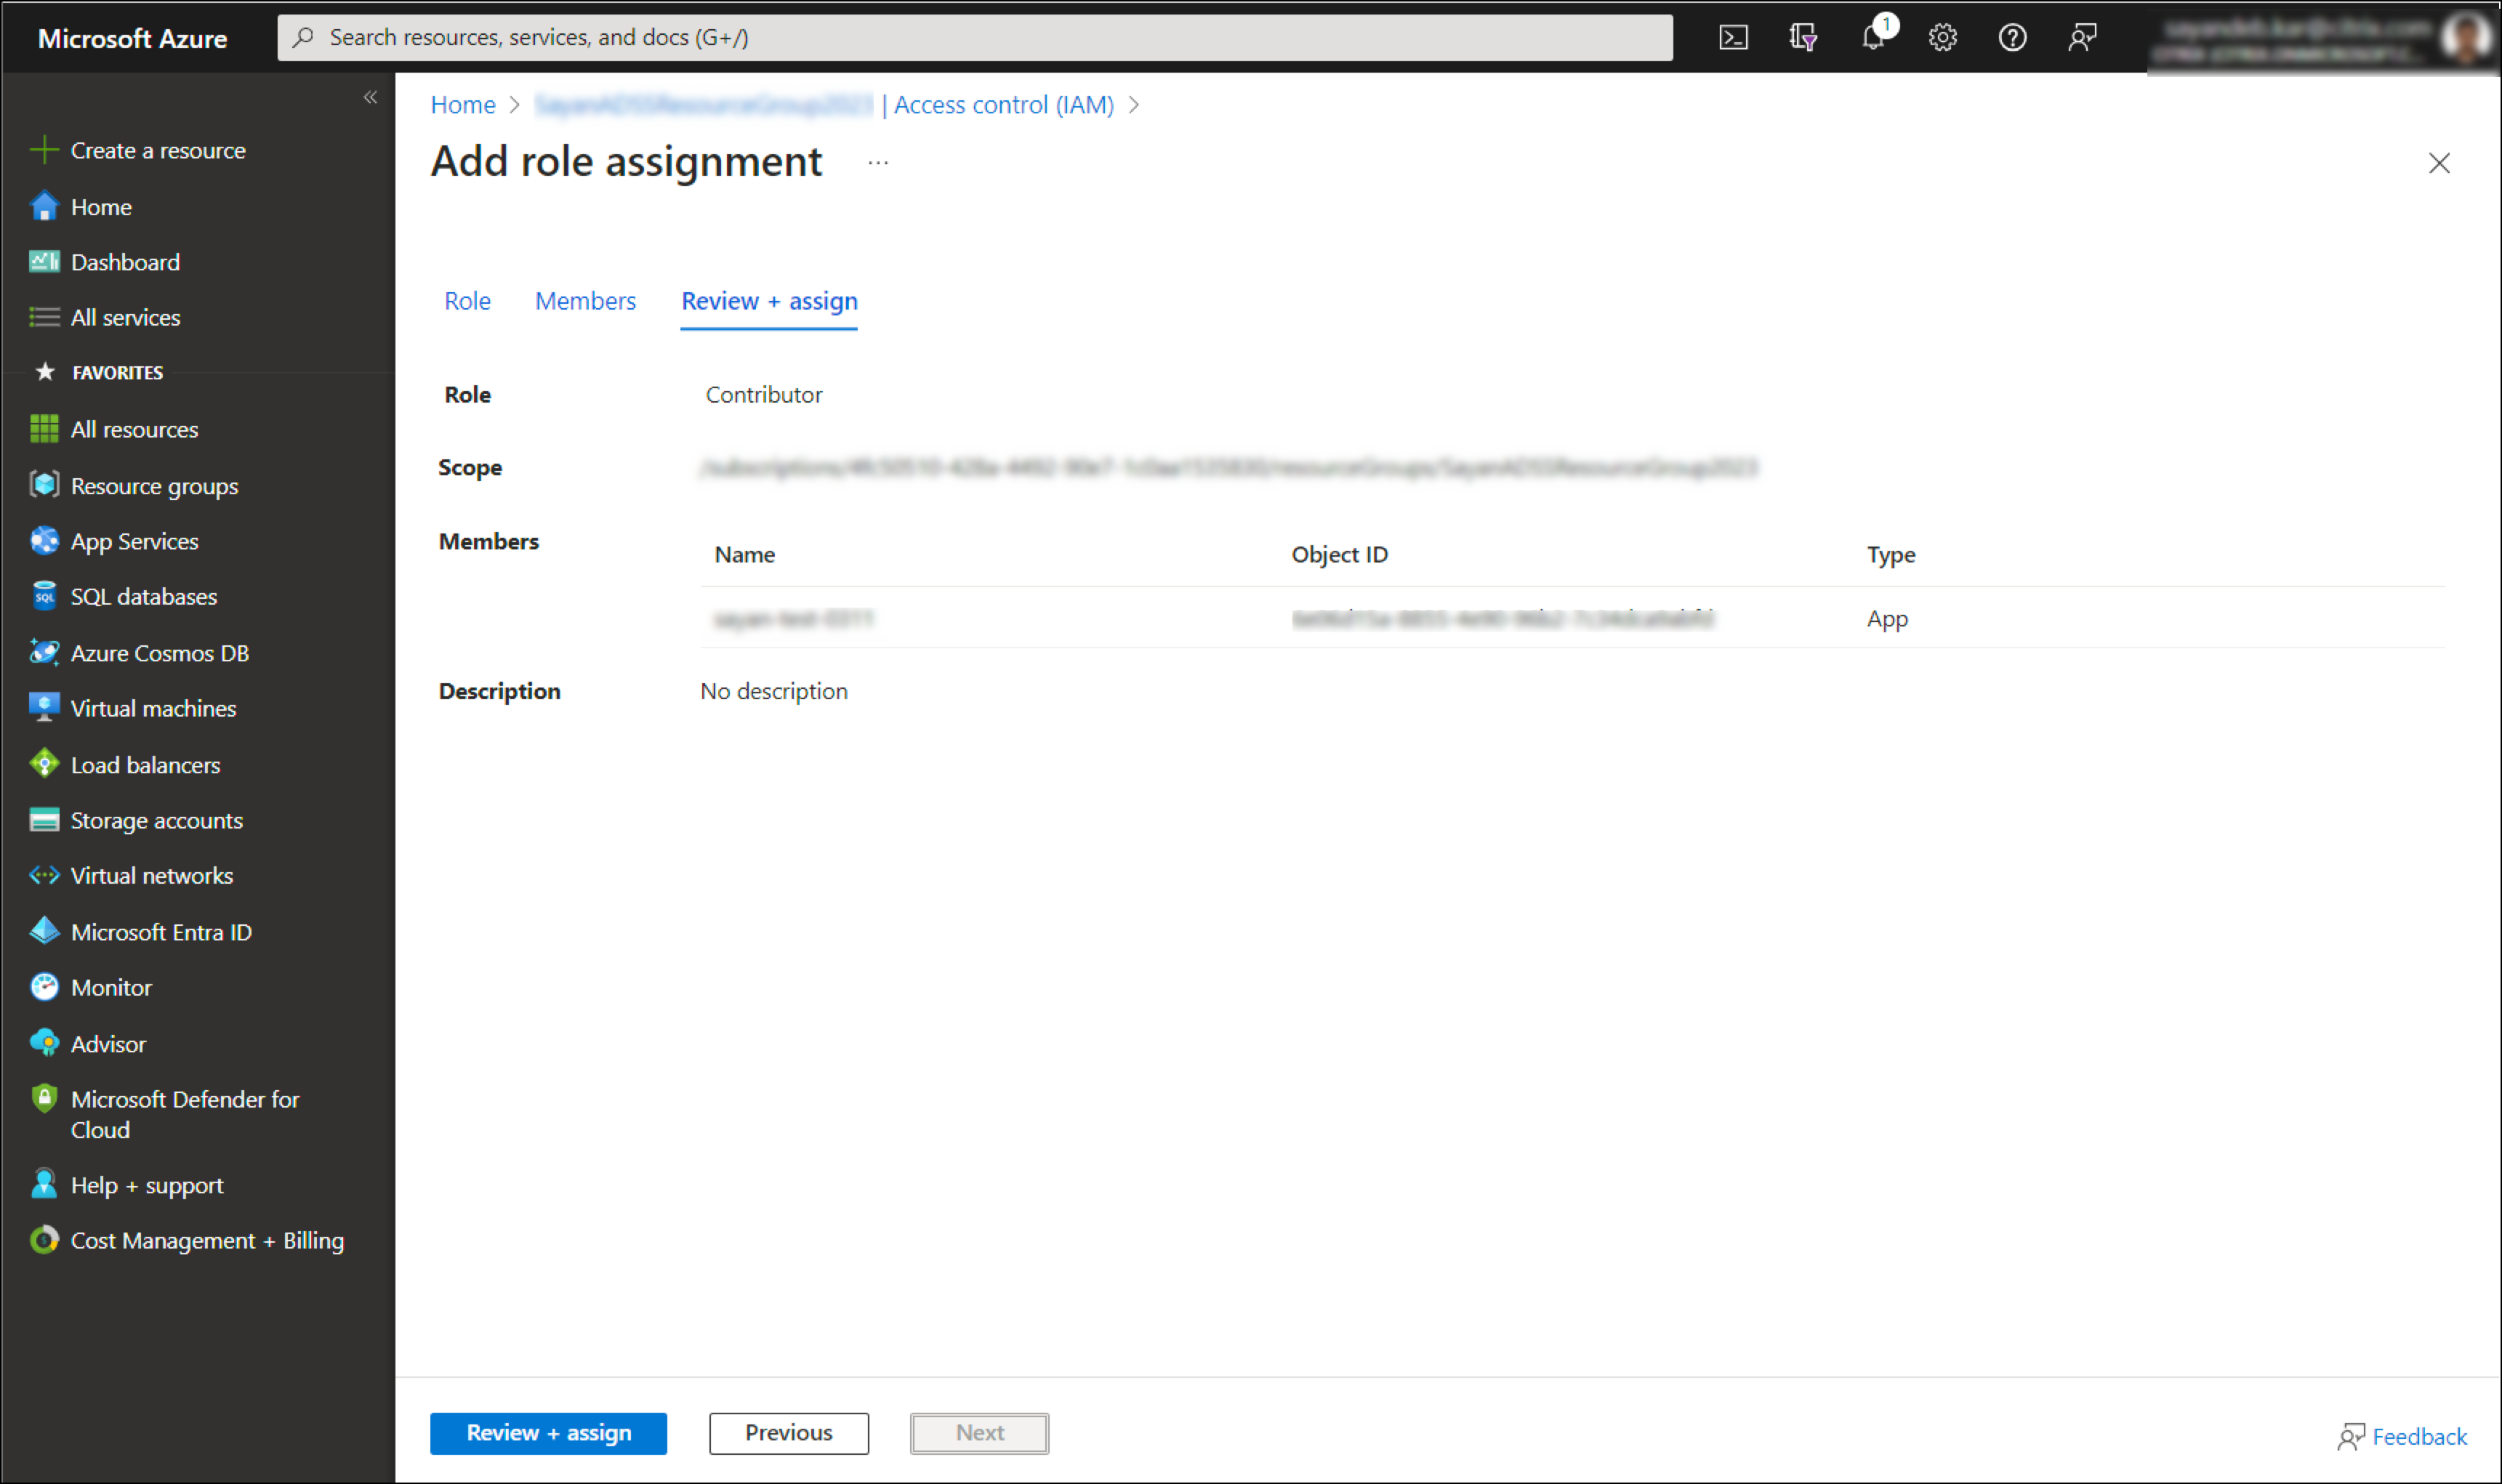
In Role assignments, click Add.
-
Select Owner from the Role list.
-
Select the application that is registered for provisioning NetScaler instances. See, Create, and register an application.
-
Click Save.
Set up a NetScaler agent
Install an agent in the management subnet. This agent works as an intermediary between the NetScaler Console and the managed instances in Microsoft Azure. For more information on how to install an agent on Microsoft Azure, see Install a NetScaler agent on the Microsoft Azure cloud.
Set up NetScaler Console components
Perform the following tasks in Azure before you provision NetScaler VPX instances in NetScaler Console:
Create a site in NetScaler Console
Create a site in NetScaler Console and add the VNet details associated with your Microsoft Azure resource group.
-
In NetScaler Console, navigate to Infrastructure > Instances > Sites .
-
Click Add.
-
In the Select Cloud pane,
-
Select Data Center as a Site type.
-
Choose Azure from the Type list.
-
Check the Fetch VNet from Azure check box.This option helps you to retrieve the existing VNet information from your Microsoft Azure account.
-
Click Next.
-
-
In the Choose Region pane,
-
In Cloud Access Profile, select the profile created for your Microsoft Azure account. If there are no profiles, create a profile.
-
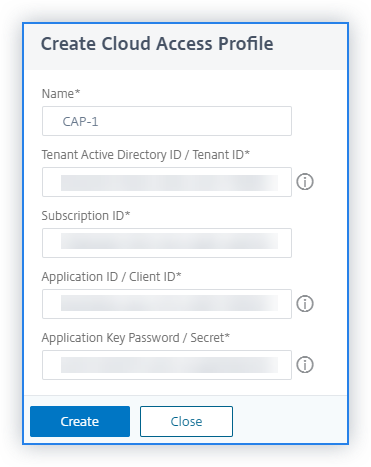
To create a cloud access profile, click Add.
-
In Name, specify a name to identify your Azure account in NetScaler Console.
-
In Tenant Active Directory ID / Tenant ID, specify the Active Directory ID of the tenant or the account in Microsoft Azure.
-
Specify the Subscription ID.
-
Specify the Application ID/Client ID.
-
Specify the Application Key Password / Secret.
-
Click Create.For more information, see Create and register an application and Mapping Cloud access profile to the Azure application.
-
In VNet, select the virtual network containing NetScaler VPX instances that you want to manage.
-
Specify a Site Name.
-
Click Finish.
-
Mapping cloud access profile to Azure application
| NetScaler Console Term | Microsoft Azure Term |
|---|---|
| Tenant Active Directory ID / Tenant ID | Directory ID |
| Subscription ID | Subscription ID |
| Application ID/Client ID | Application ID |
| Application Key Password / Secret | Keys or Certificates or Client Secrets |
Attach the site to an agent
-
In NetScaler Console, navigate to Infrastructure > Instances > Agents.
-
Select the agent for which you want to attach a site.
-
Click Attach Site.
-
Select the site from the list that you want to attach.
-
Click Save.
Configuration tasks
Use the site that you have associated with your Microsoft Azure resource group to provision the NetScaler VPX instances. Provide the agent details to provision those instances that are bound to that agent.
-
In NetScaler Console, navigate to Infrastructure > Instances > NetScaler.
-
In the VPX tab, click Provision.This option displays the Provision NetScaler VPX on Cloud page.
-
Select Microsoft Azure and click Next. Specify the required parameters to provision an instance.
Configure basic parameters
-
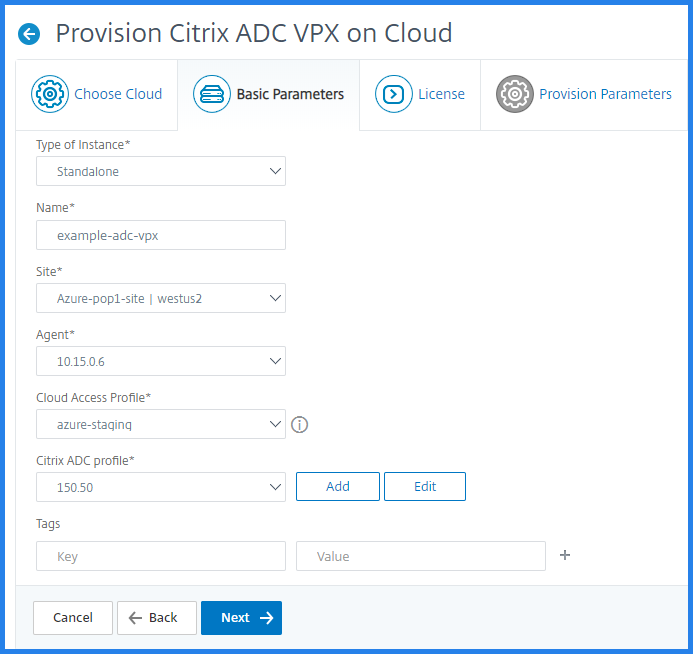
In the Basic Parameters tab, specify the following:
-
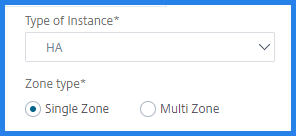
Type of Instance: Select one of the following options from the list.
-
Standalone - This option provisions a standalone NetScaler VPX instance on Microsoft Azure.
-
HA: This option provisions the high availability NetScaler VPX instances on Microsoft Azure.To provision the NetScaler VPX instances in the same zone, select the Single Zone option under Zone Type.To provision the NetScaler VPX instances across multiple zones, select the Multi Zone option under Zone type. In the Cloud Parameters tab, make sure to specify the network details for each zone that are created on Microsoft Azure.
-
-
Name - Specify the name of an NetScaler VPX instance.
-
Site - Select the site that you created earlier.
-
Agent - select the agent that is created to manage the NetScaler VPX instance.
-
Cloud Access Profile - Select the cloud access profile created during site creation.
-
NetScaler Profile - Select the profile to provide authentication.NetScaler Console uses the device profile when it requires to log on to the NetScaler VPX instance.NoteEnsure the selected device profile conforms to Microsoft Azure password rules.
-
-
Click Next.
Configure licenses
Select one of the following modes to apply license to a NetScaler instance:
-
Using NetScaler Console: The instance that you want to provision checks out the licenses from the NetScaler Console.
-
Using Microsoft Azure: The Allocate from Cloud option uses the NetScaler® product licenses available in the Azure Marketplace. The instance that you want to provision uses the licenses from the marketplace.If you choose to use licenses from Azure Marketplace, specify the product or license in the Provision Parameters tab.
For more information, see Licensing Requirements.
Use licenses from NetScaler Console
To use this option, ensure that you have subscribed to the NetScaler product with the Bring your own license software plan in Azure. See, Subscribe to the NetScaler VPX license in Microsoft Azure.
-
In the License tab, select Allocate from NetScaler Console.
-
In License Type, select one of the following options from the list:
-
Bandwidth Licenses: You can select one of the following options from the Bandwidth License Types list:
-
Pooled Capacity: Specify the capacity to allocate to an instance.From the common pool, the NetScaler instance checks out one instance license and only as much bandwidth is specified.
-
VPX Licenses: When a NetScaler VPX instance is provisioned, the instance checks out the license from the NetScaler Console.
-
-
Virtual CPU Licenses: The provisioned NetScaler VPX instance checks out licenses depending on the number of CPUs running in the instance.
NoteWhen the provisioned instances are removed or destroyed, the applied licenses return to the NetScaler Console license pool. These licenses can be reused to provision new instances. -
-
In License Edition, select the license edition. The NetScaler Console uses the specified edition to provision instances.
-
Click Next.
Configure provision parameters
-
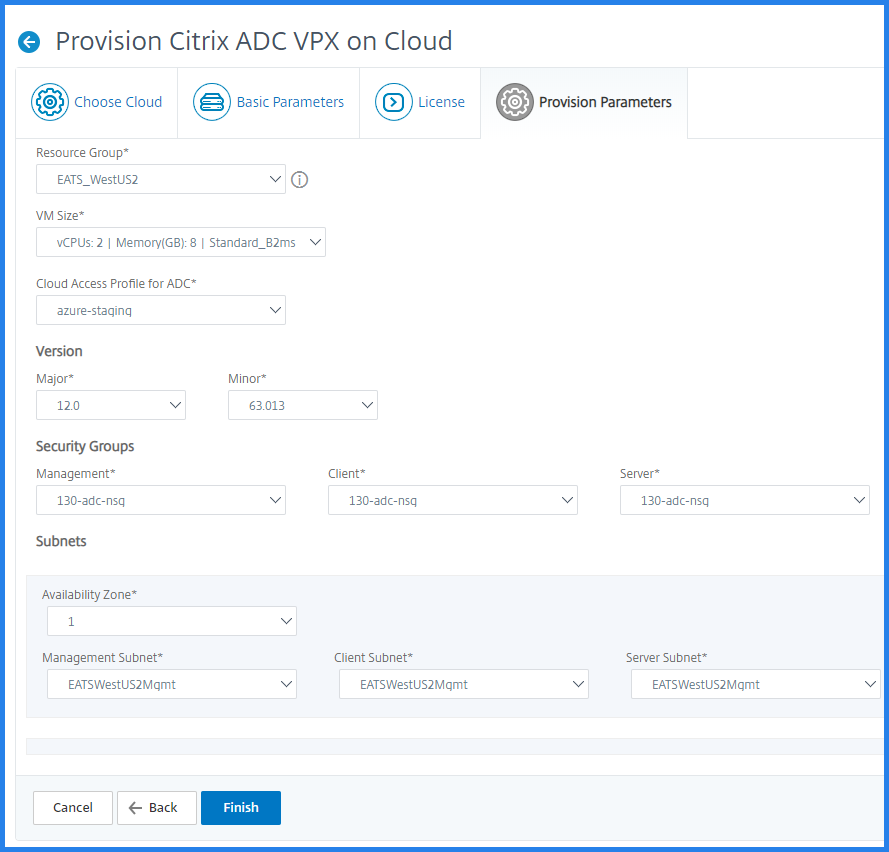
In the Provision Parameters tab, specify the following:
-
Select the Resource Group in which you want to provision the NetScaler VPX instance.
-
Select the supported VM size from the list.NoteThis list displays the supported VM sizes for the selected NetScaler product.
-
Select the Cloud Access Profile for NetScaler.
-
Select the Version of NetScaler that you want to provision. Select both Major and Minor version of NetScaler.
-
In Security Groups, select the Management, Client, and Server security groups that you have created in your virtual network.
-
In Subnets, specify the required number of availability zones in Azure.
-
In Subnets, select the Management, Client, and Server subnets that you have created in your virtual network.
-
Click Finish.
-
The NetScaler VPX instance is now provisioned on Microsoft Azure.
View the provisioned NetScaler VPX instances
To view in NetScaler Console:
-
In NetScaler Console, navigate to Infrastructure > Instances > NetScaler.
-
Select the NetScaler VPX tab.The NetScaler VPX instance provisioned in Microsoft Azure is listed here.
To view in Microsoft Azure:
-
Log on to your Azure portal.
-
Navigate to the resource group that is created to provision the NetScaler VPX instance.This page displays the provisioned NetScaler VPX instance.
Note
The name of the NetScaler VPX instance is the same that you provided while provisioning an instance in the NetScaler Console.