
Back up and restore NetScaler instances
You can back up the current state of a Citrix Application Delivery Controller (NetScaler) instance and later use the backed-up files to restore the NetScaler instance to the same state. You must always back up an instance before you upgrade it or for precautionary reasons. A backup of a stable system enables you to restore it back to a stable point if it becomes unstable. There are multiple ways to perform backups and restores on a NetScaler instance. You can manually backup and restore NetScaler configurations using the GUI, CLI, or you can use NetScaler Console to perform automatic backups and manual restores. NetScaler Console backs up the current state of your managed NetScaler instances by using NITRO calls and the Secure Shell (SSH) and Secure Copy (SCP) protocols.
NetScaler Console creates a complete backup and restores the following NetScaler instance types:
-
NetScaler SDX
-
NetScaler VPX
-
NetScaler MPX
-
NetScaler BLX
For more information, see Backup and restore a NetScaler instance.
Note:
-
From NetScaler Console, you cannot perform the backup and restore operation on a NetScaler cluster.
-
You cannot use the backup file taken from one instance to restore a different instance.
The backed-up files are stored as a compressed TAR file in the following directory:
/var/mps/tenants/root/tenants/<specify-the-tenant-name>/device_backup/
To avoid issues due to non-availability of disk space, you can save a maximum of three backup files in this directory.
To back up and restore NetScaler instances, you must first configure the backup settings on NetScaler Console. After configuring the settings, you can select a single NetScaler instance or multiple instances and create a backup of the configuration files in these instances. If necessary you can also restore the NetScaler instances by using these backed-up files.
Related information
Create a backup for a selected NetScaler instance by using NetScaler Console
Perform this task if you want to back up a selected NetScaler instance or multiple instances:
-
In NetScaler Console, navigate to Infrastructure > Instances. Under Instances, select the type of instances (for example, VPX) to display on the screen.
-
Select the instance that you want to back up.
-
For MPX, VPX, and BLX instance, select Backup/Restore from the Select Action list.
-
For an SDX instance, click Backup/Restore.
-
-
On the Backup Files page, click Back Up.
-
Specify whether to encrypt your backup file for more security. You can either enter your password or use the global password that you previously specified on the Instance Backup Settings page.
-
Click Continue.
Transfer a backup file to an external system
You can transfer a copy of your backup file to another system as a precautionary measure. When you want to restore the configuration, you have to first upload the backup file to the NetScaler Console server and then perform the restore operation.
To transfer a NetScaler Console backup file:
-
Navigate to Infrastructure > Instances > NetScaler and then select the instance type. For example, VPX.
-
Select the instance and from the Select Action list, select Backup/Restore.
-
Select the backup file and then click Transfer.The Transfer Backup File page is displayed. Specify the following parameters:
-
Server - IP address of the system where you want to transfer the back-up file.
-
User name and password – User credentials of the new system, where the backed-up files are being copied.
-
Port – Port number of the system the files are being transferred to.
-
Transfer protocol – Protocol being used to make the backup file transfer. You can select SCP, SFTP, or FTP protocols to transfer the back-up file.
-
Directory path – The location where the backed-up file is being transferred to on the new system.
-
Click OK.
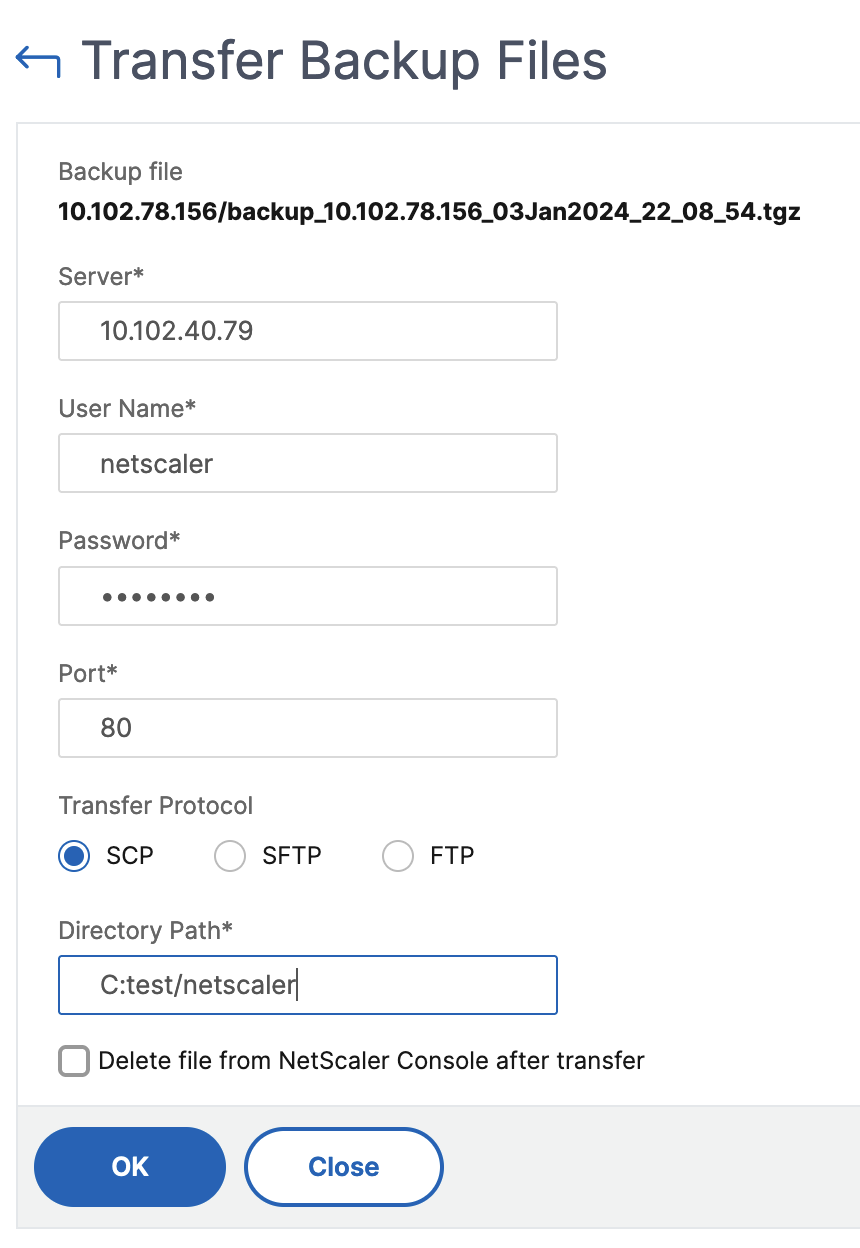
-
Note:
The backup files from the NetScaler Console service are sent to the external server through an agent. If there are many agents, a NetScaler backup file is sent through the same agent which was used to add that NetScaler instance. To know more about the instances associated with an agent, navigate to Infrastructure > NetScaler > Agents.
Restore a NetScaler instance by using NetScaler Console
Note:
If you have NetScaler instances in a HA pair, you need to note the following:
-
Restore the same instance from which the backup file was created. For example, let us consider a scenario that a backup was taken from the primary instance of the HA pair. During the restore process, ensure that you are restoring the same instance, even if it is no longer the primary instance.
-
When you initiate the restore process on the primary NetScaler instance, you cannot access the primary instance and the secondary instance gets changed to STAYSECONDARY. Once the restore process is completed on the primary instance, the secondary NetScaler instance changes from STAYSECONDARY to ENABLED mode and becomes part of the HA pair again. You can expect a possible downtime on the primary instance until the restore process gets completed.
Perform this task to restore a NetScaler instance by using the backup file that you created earlier:
-
Navigate to Infrastructure > Instances, select the instance that you want to restore, and then click View Backup.
-
On the Backup Files page, select the backup file containing the settings that you want to restore, and then click Restore.
Note:
To upload an externally transferred backup file, use the Upload button.
Restore a NetScaler SDX appliance using NetScaler Console
In NetScaler Console, the backup of a NetScaler SDX appliance includes the following:
-
NetScaler instances hosted on the appliance
-
SVM SSL certificates and keys
-
Instance prune settings (in XML format)
-
Instance backup settings (in XML format)
-
SSL certificate poll settings (in XML format)
-
SVM db file
-
NetScaler config files of devices present on SDX
-
NetScaler build images
-
NetScaler XVA images, these images are stored in the following location:
/var/mps/sdx_images/ -
SDX Single Bundle Image (SVM+XS)
-
Third Party instance images (if provisioned)
You must restore your NetScaler SDX appliance to the configuration available in the backup file. During appliance restore, the entire current configuration is deleted.
If you are restoring the NetScaler SDX appliance by using a backup of a different NetScaler SDX appliance, make sure that you add the licenses and configure the appliance's Management Service network settings to match those in the backup file before you start the restore process.
Ensure that the NetScaler SDX platform variant that was backed up was taken is the same as the one on which you are trying to restore. You cannot restore from a different platform variant.
Note:
Before you restore the SDX RMA appliance, ensure that the backed-up version is either the same or higher than the RMA version.
To restore the SDX appliance from the backed-up file:
-
In the NetScaler Console GUI, navigate to Infrastructure > Instances > NetScaler.
-
Click Backup/Restore.
-
Select the backup file of the same instance that you want to restore.
-
Click Repackage Backup.When the SDX appliance is backed up, the XVA files and images are stored separately to save the network bandwidth and the disk space. Therefore, you must repackage the backed-up file before you restore the SDX appliance.When you repackage the backup file, it includes all the backed-up files together to restore the SDX appliance. The repackaged backup file ensures the successful restoration of the SDX appliance.
-
Select the backup file that is repackaged and click Restore.
Export the report of this dashboard
To export the report of this page, click the Export icon on the top right side of this page. On the Export page, you can do one of the following:
-
Select Export Now tab. To view and save the report in PDF, JPEG, PNG, or CSV format.
-
Select Schedule Export tab. To schedule the report daily, weekly, or monthly and send the report over an email or a slack message.
Note
-
If you select Weekly recurrence, ensure that you select the weekdays on which you want the report to be scheduled.
-
If you select Monthly recurrence, ensure that you enter all the days that you want the report to be scheduled separated by commas.