
Use jobs to upgrade {{page.citrix-adc-generic}} instances
In {{page.adm-product-name-short}}, you can upgrade one or more {{page.citrix-adc-generic}} instances. You must know the licensing framework and types of licenses before you upgrade an instance.
NOTE: If you want to upgrade an instance that has classic policies, we recommend that you convert the classic policies to advanced policies before upgrading the instance, using the NSPEPI tool. This is applicable for the features that are supported by the NSPEPI tool. For more information, see Upgrade considerations for configurations with classic policies.
Related information
Prerequisites
{{page.adm-product-name-long}} performs the following pre-validation checks on the instance that you want to upgrade:
-
Check for disk space - Clean up disk space to have a sufficient disk capacity for an instance upgrade. Resolve disk issues if any.
-
Check for disk hardware issues - Resolve the hardware issues if any.
-
Check for customizations - Back up your customizations and delete them from the instances. You can reapply the backed-up customization after the instance upgrade.
-
Policy issues - {{page.citrix-adc-generic}} does not support classic policies from
13.1version. Before upgrading an instance to this version, migrate classic policies to advanced policies.For more information, see Classic and advanced policies. -
Check for STAYPRIMARY and STAYSECONDARY nodes - For a {{page.citrix-adc-generic}} HA, the upgrade is blocked for the nodes in STAYPRIMARY and STAYSECONDARY states. These nodes are identified in the pre-validation check and listed under Instances blocked from upgrade.
Upgrade considerations for customized {{page.citrix-adc-generic}} configurations
It is important that both the upgrade changes and your customizations are applied to an upgraded {{page.citrix-adc-generic}} appliance. So, if you have customized configuration files in the /etc directory, see Upgrade considerations for customized configuration files before you continue with the {{page.citrix-adc-generic}} appliance upgrade. Following are the broad steps that you must perform:
-
Pre upgrade steps in {{page.citrix-adc-generic}}
-
Backup customized file before the upgrade
-
Delete the symlink of the customized file before the upgrade
-
-
Upgrade {{page.citrix-adc-generic}} using ADM. To upgrade, follow the instructions available at the beginning of the page.
-
Post upgrade steps in {{page.citrix-adc-generic}}
Both the pre-upgrade and post upgrade steps are to be performed on each {{page.citrix-adc-generic}} instance. However, in step 2, to upgrade {{page.citrix-adc-generic}} using ADM, all the vulnerable {{page.citrix-adc-generic}} instances can be selected and upgraded together.
{{page.citrix-adc-generic}} high-availability pair
When you upgrade a {{page.citrix-adc-generic}} high-availability pair, note the following:
-
The secondary node is upgraded first.
-
Synchronization and propagation of the nodes are disabled until both the nodes are upgraded successfully.
-
After the successful high-availability pair upgrade, an error message appears in the execution history. This message appears if your nodes in the high-availability pair are on different builds or versions. It indicates that synchronization between primary and secondary nodes is disabled.
You can upgrade a {{page.citrix-adc-generic}} high-availability pair in two stages:
-
Create an upgrade job and run on one of the nodes immediately or schedule later.
-
Schedule the upgrade job to run on the remaining node later. Ensure to schedule this job after the initial node's upgrade.
{{page.citrix-adc-generic}} clusters
When you upgrade an {{page.citrix-adc-generic}} cluster, in the pre-upgrade validation stage, the {{page.adm-product-name-short}} only validates the specified instance. So, check and resolve the following issues on the cluster nodes:
-
Customization
-
Disk usage
-
hardware issues
Create a {{page.citrix-adc-generic}} upgrade job
To create a {{page.citrix-adc-generic}} upgrade job, do the following:
-
Navigate to Infrastructure > Upgrade Jobs.

-
In Create Maintenance Jobs, select Upgrade {{page.citrix-adc-generic}} (Standalone/High-Availability/Cluster) and click Proceed.
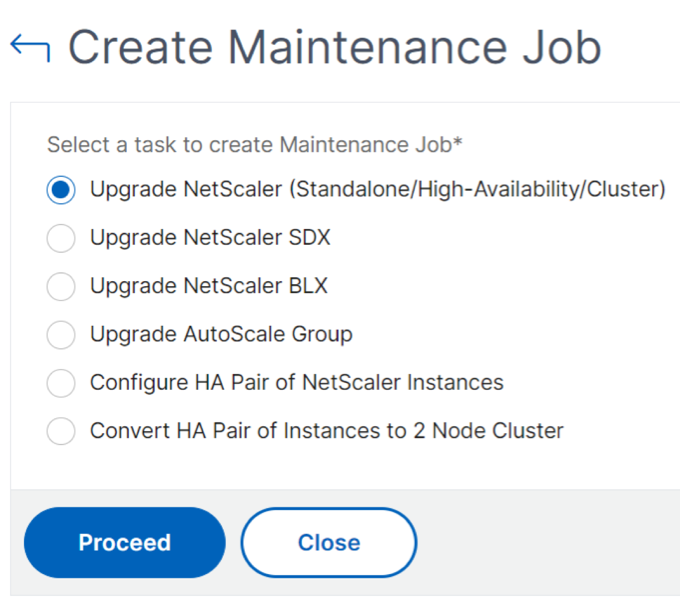 Note:To upgrade Autoscale groups, see Upgrade an Autoscale group.
 -
In the Select Instances tab,
-
Specify a name of your choice for Job Name.
-
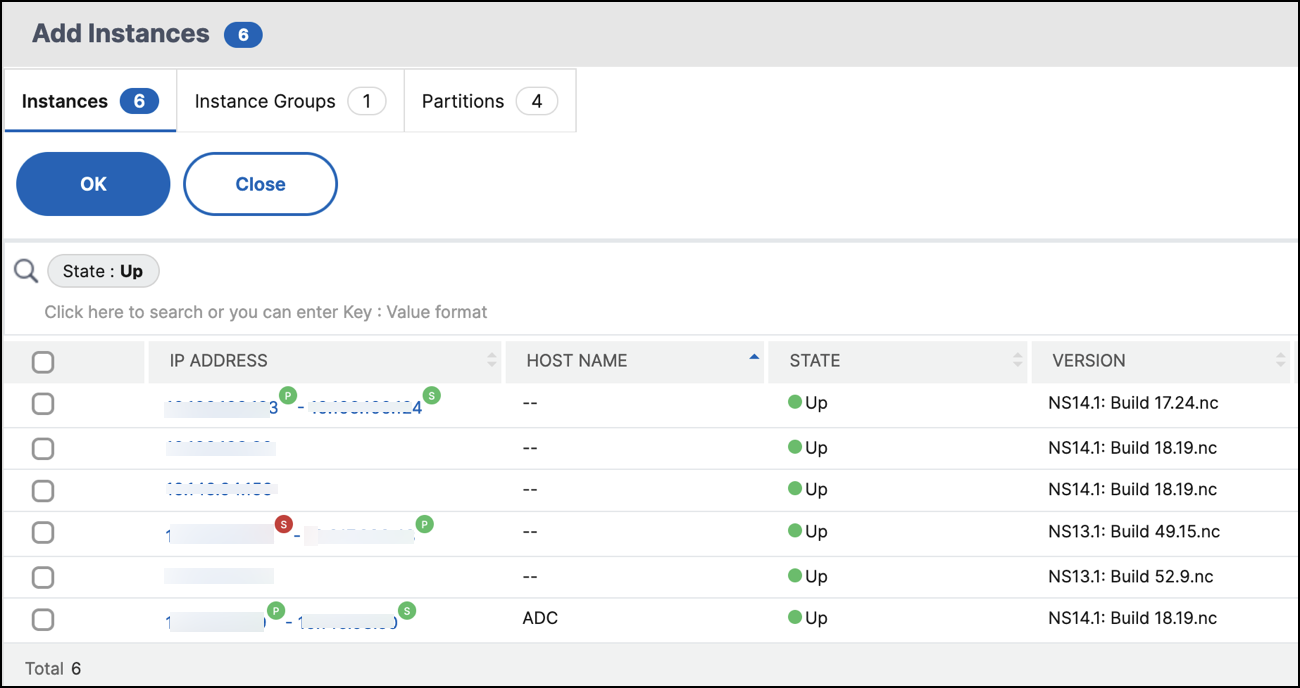
Click Add Instances to add {{page.citrix-adc-generic}} instances that you want to upgrade.
-
To upgrade a {{page.citrix-adc-generic}} high-availability pair, select the IP addresses of the high-availability pair (denoted by the superscript of 'S' and 'P').
-
To upgrade a cluster, select the cluster IP address (denoted by the superscript of 'C').
-
-
Click OK.
-
-
In the Select Image tab, select a {{page.citrix-adc-generic}} image from the image library or local or appliance.
-
Select from Image Library: Select a {{page.citrix-adc-generic}} image from the list. This option lists all {{page.citrix-adc-generic}} images that are available in the NetScaler downloads website.
 The {{page.citrix-adc-generic}} software images display the preferred builds with the star icon. And, most downloaded builds with the bookmark icon.
 -
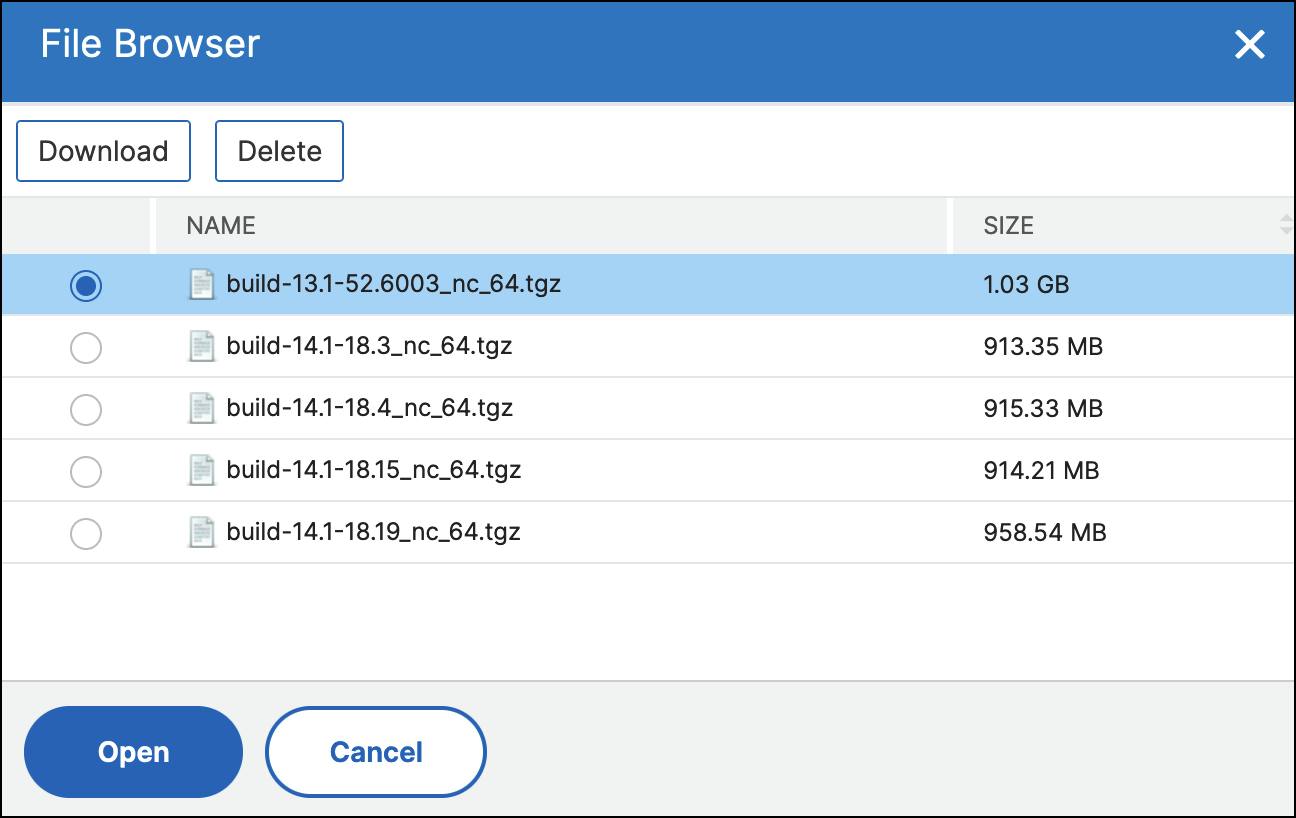
Select from local or appliance: You can upload the image from your local computer or the {{page.citrix-adc-generic}} appliance. When you select {{page.citrix-adc-generic}} appliance, the {{page.adm-product-name-short}} GUI displays the instance files that are present in
/var/mps/ns_images. Select the image from the {{page.adm-product-name-short}} GUI. -
Skip image uploading to {{page.citrix-adc-generic}} if the selected image is already available - This option checks whether the selected image is available in {{page.citrix-adc-generic}}. Upgrade job skips uploading a new image and uses the image available in {{page.citrix-adc-generic}}.
-
Clean software image from {{page.citrix-adc-generic}} on successful upgrade - This option clears the uploaded image in the {{page.citrix-adc-generic}} instance after the instance upgrade.
Click Next to start the pre-upgrade validation on the selected instances.Note:-
The downloaded {{page.citrix-adc-generic}} images are stored in the agent and are present in
/var/mps/adcimages. These cached images can be used for multiple {{page.citrix-adc-generic}} upgrades, thus eliminating the need to download an image each time for an upgrade. -
{{page.adm-product-name-short}} clears the cached NetScaler images every three days based on the last modified time of the images. Only the latest two image files are cached in the agent at a time.
-
-
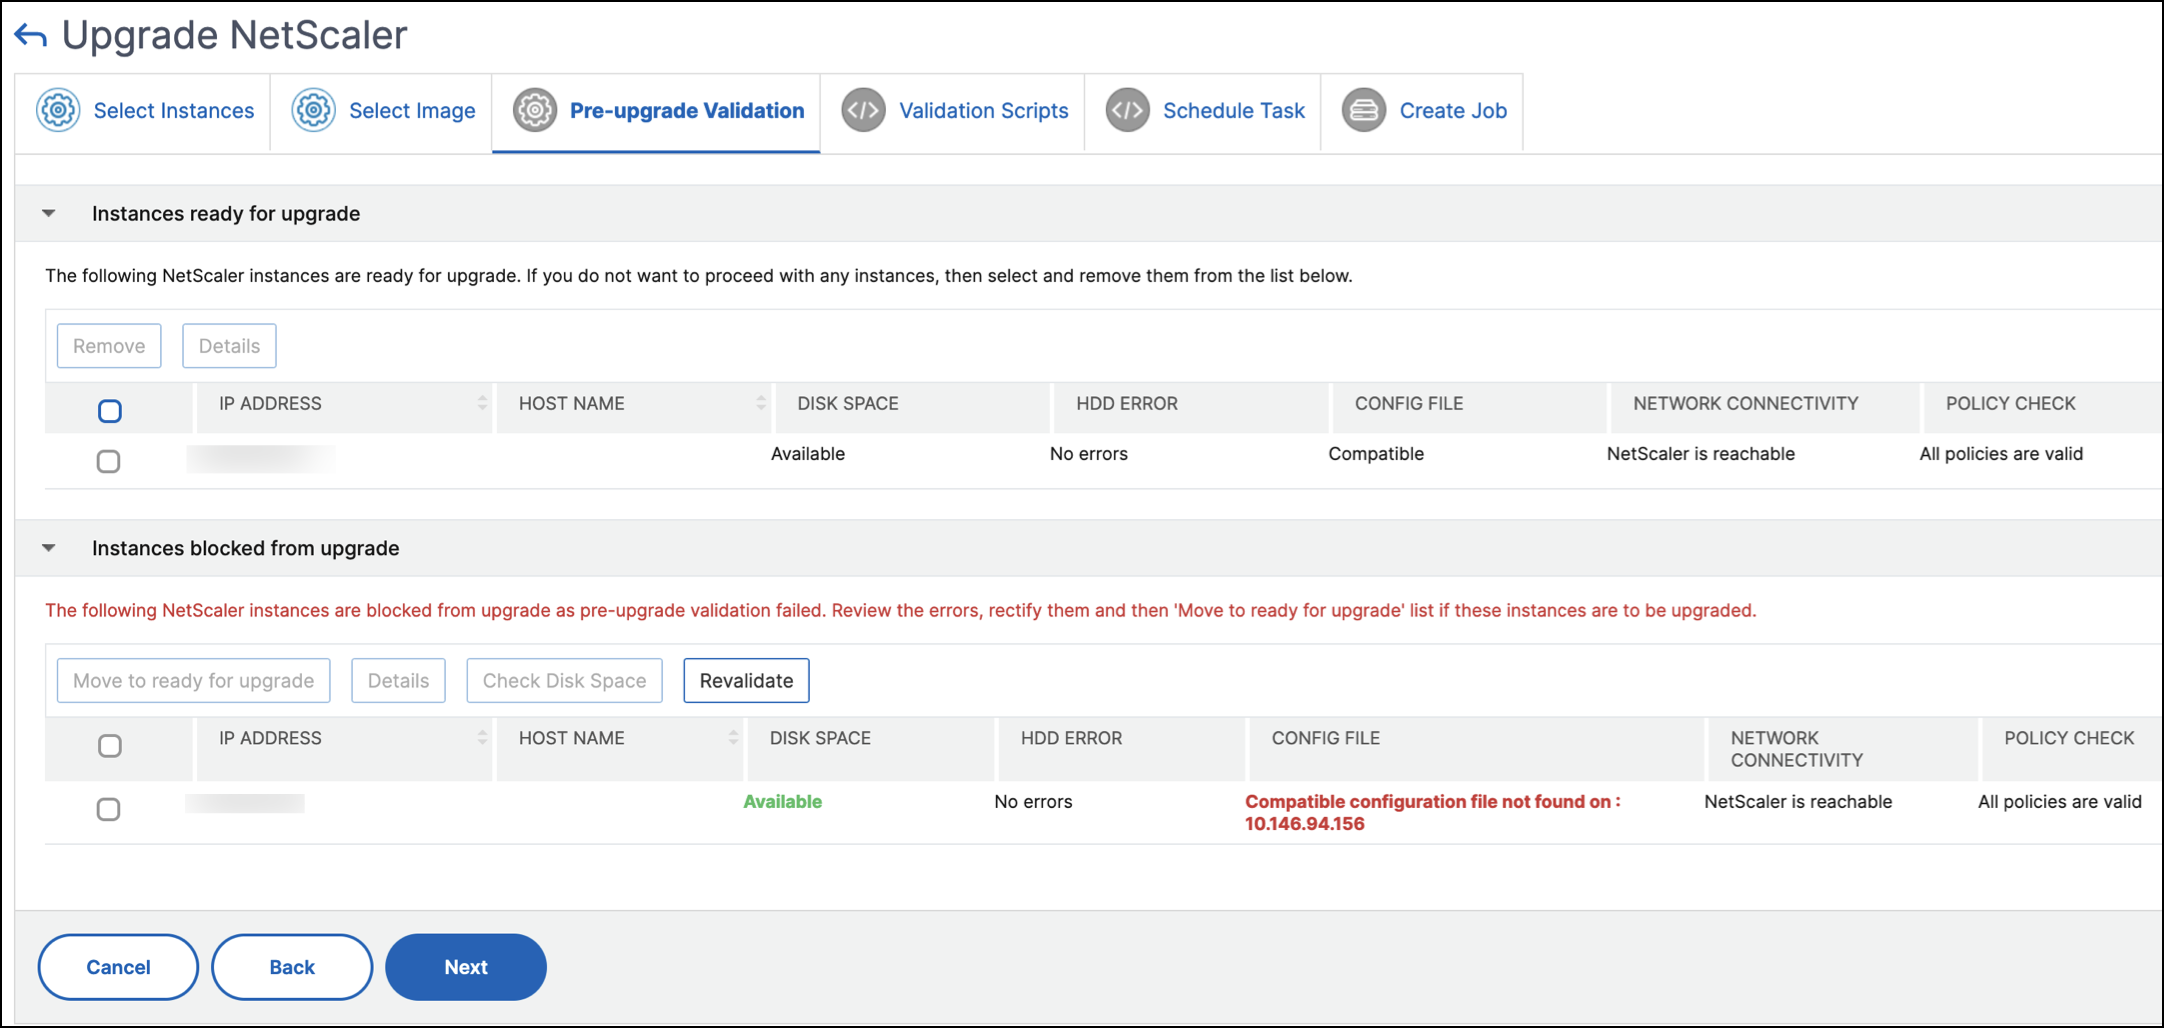
The Pre-upgrade validation tab displays the following sections:
-
Instances ready for upgrade. You can continue with the upgrade of these instances.
-
Instances blocked from upgrade. These {{page.citrix-adc-generic}} instances are blocked from upgrade because of pre-upgrade validation errors.You can review, rectify the errors, and then click Move to ready for upgrade to upgrade them. If you face insufficient disk space on an instance, you can check and clean up the disk space. See, Clean up {{page.citrix-adc-generic}} disk space.
-
Policy Check: If {{page.adm-product-name-short}} finds unsupported classic policies, you can remove such policies to create an upgrade job.
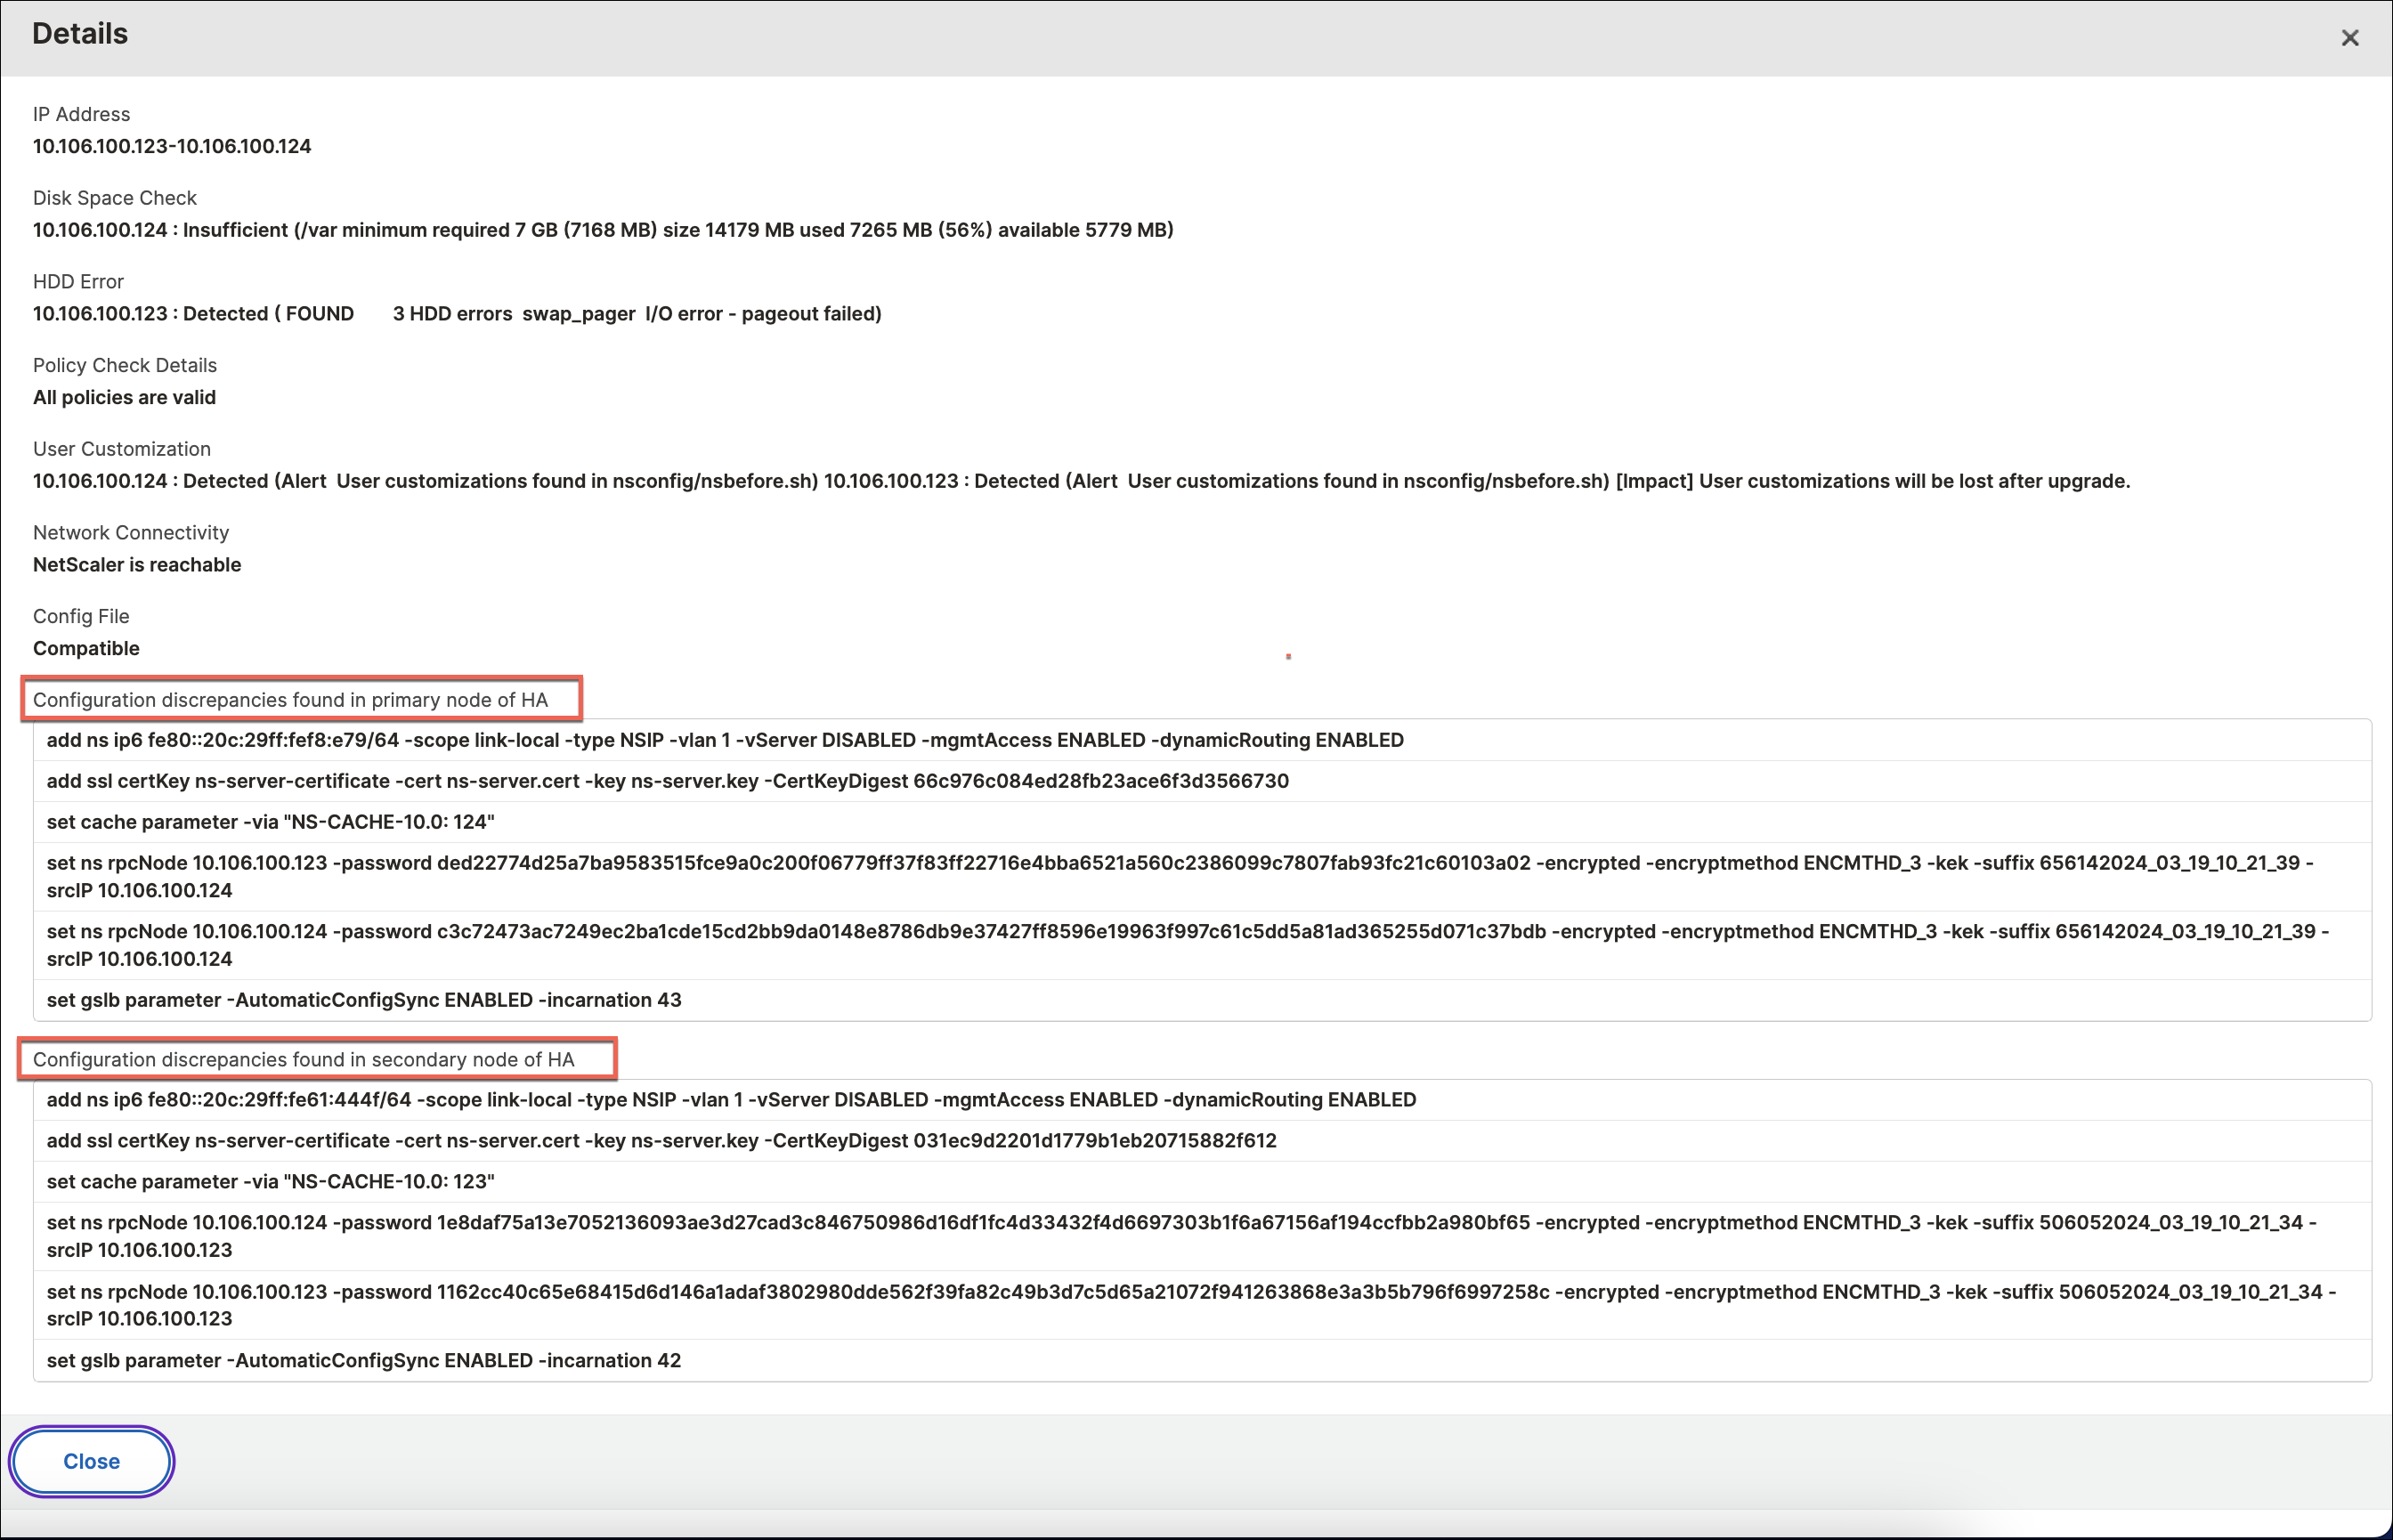
Important:If you specify a cluster IP address, {{page.adm-product-name-short}} does pre-upgrade validation only on the specified instance and not on the other cluster nodes.To view discrepancies between primary and secondary nodes during an upgrade, select the high-availability node, and click Details.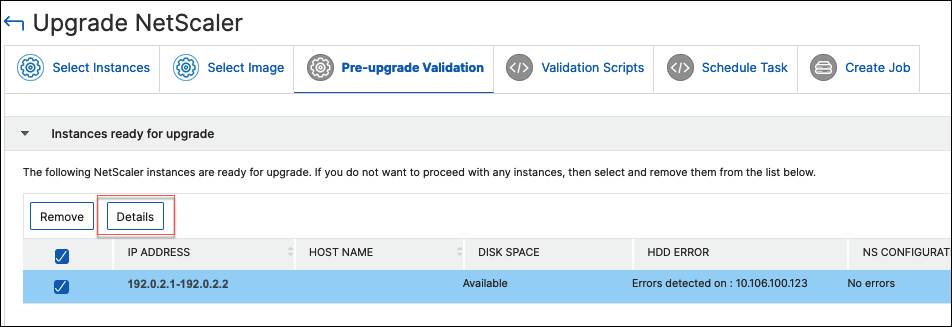
-
Configuration discrepancies found in primary node of HA - Displays all the configurations found in the secondary node of the NetScaler® high-availability pair but missing in the primary node.
-
Configuration discrepancies found in secondary node of HA - Displays all the configurations found in the primary node of the NetScaler high-availability pair but missing in the secondary node.
Note:You can ignore the following discrepancies that may appear in the configuration discrepancies sections:-
Device-specific configurations like IP addresses.
-
Encrypted passwords or certificates, which may differ between nodes, even if the password is the same.
You can review the discrepancies and choose to ignore them if they are not relevant. -
-
In Validation Scripts, specify the scripts to run before and after an instance upgrade. You can do either of the following:
-
Default Validation Scripts - Choose this option to run the predefined validation scripts. These scripts are run both before and after the upgrade job, generating a diff report for the validation script.Note:You cannot change or edit these predefined set of commands.
-
Custom Validation Scripts - Choose this option to run your own validation script. You can specify if you want the scripts to be run before or after the upgrade. A diff report is generated only if the same scripts are selected before and after the upgrade.
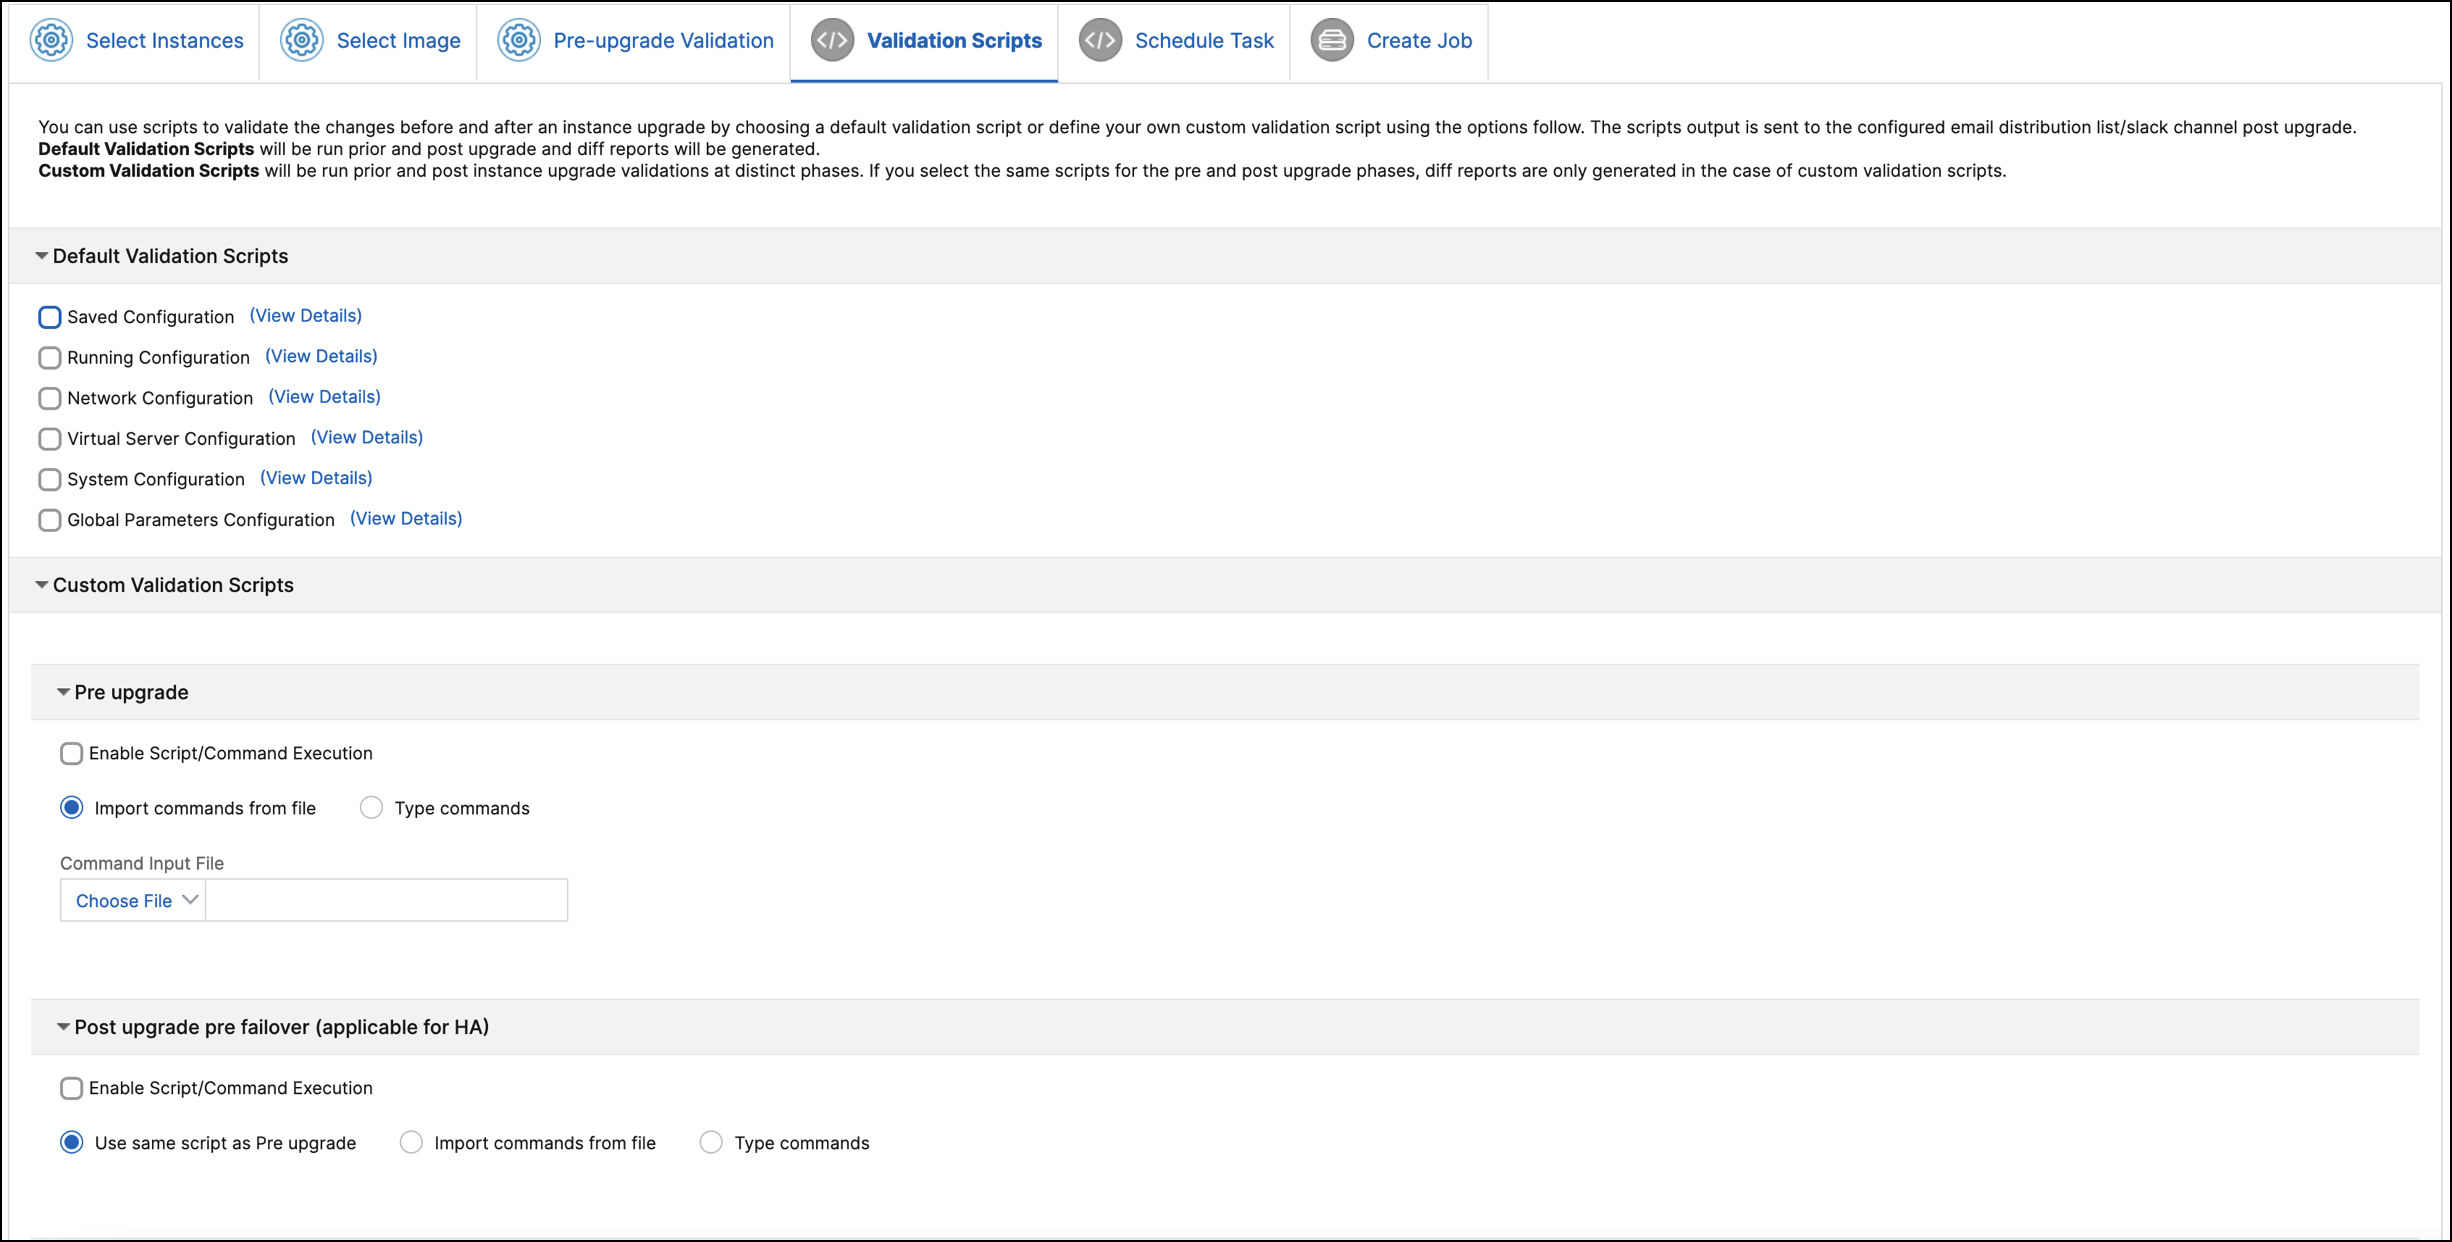 To know the set of commands in each configuration, click View Details. For more information, see Use custom scripts.
 -
-
In Schedule Task, select one of the following options:
-
Upgrade now: The upgrade job runs immediately.
-
Schedule Later: Select this option to run this upgrade job later. Specify the Execution Date and Start Time when you want to upgrade the instances.
If you want to upgrade a {{page.citrix-adc-generic}} high-availability pair in two stages, select Perform two stage upgrade for nodes in high-availability.Specify the Execution Date and Start Time when you want to upgrade another instance in the high-availability pair.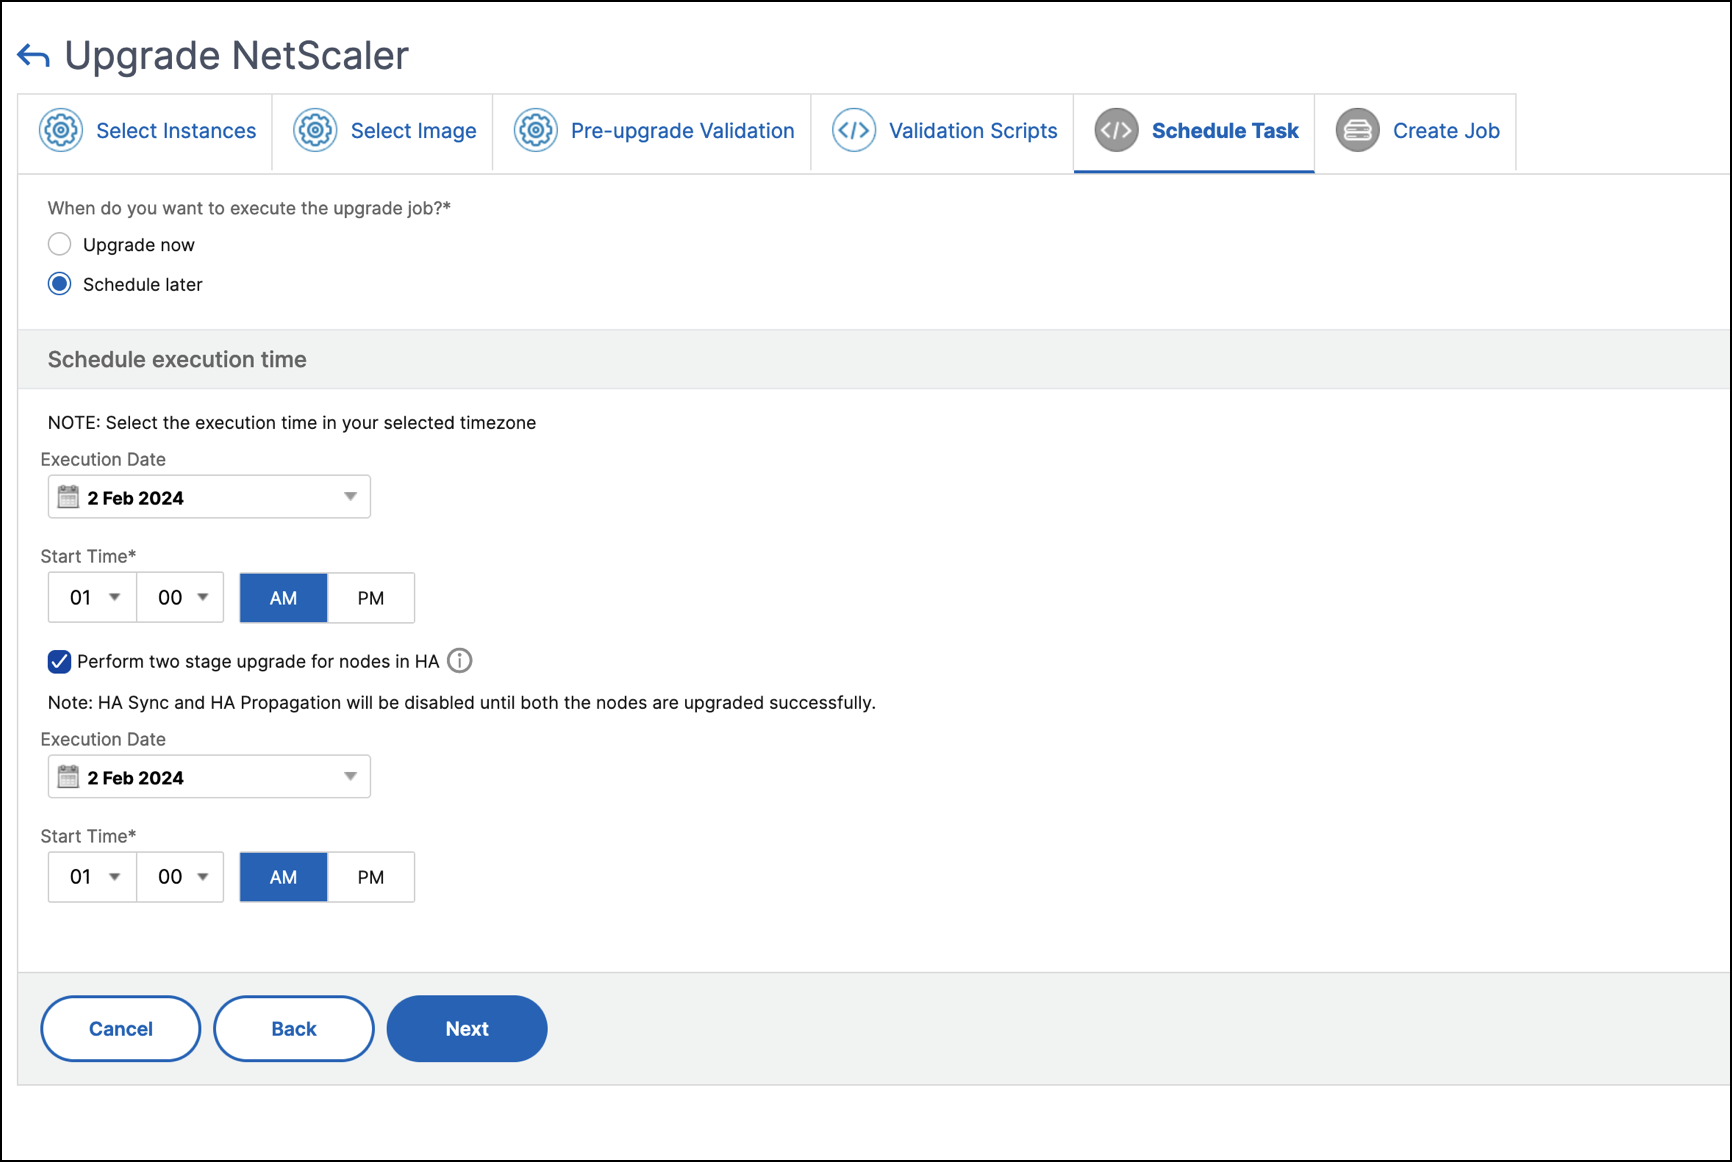 For more information, see {{page.citrix-adc-generic}} high-availability pair.
 -
-
In Create Job, specify the following details:If you schedule the upgrade job, you can specify when you want to upload the image to an instance:
-
Upload now: Select this option to upload the image immediately. However the upgrade job runs at the scheduled time.
-
Upload at the time of execution: Select this option to upload the image at the time of upgrade job execution.
For high-availability pairs, you can specify the nodes on which you want to upload the image:-
Upload to both primary and secondary nodes: Upload the build image file to both the primary and secondary nodes.
-
Upload to secondary node only: Upload the build image file to only the secondary node. After the secondary node is upgraded, a failover occurs and the build image file is uploaded to the new secondary node which was previously, the primary node.
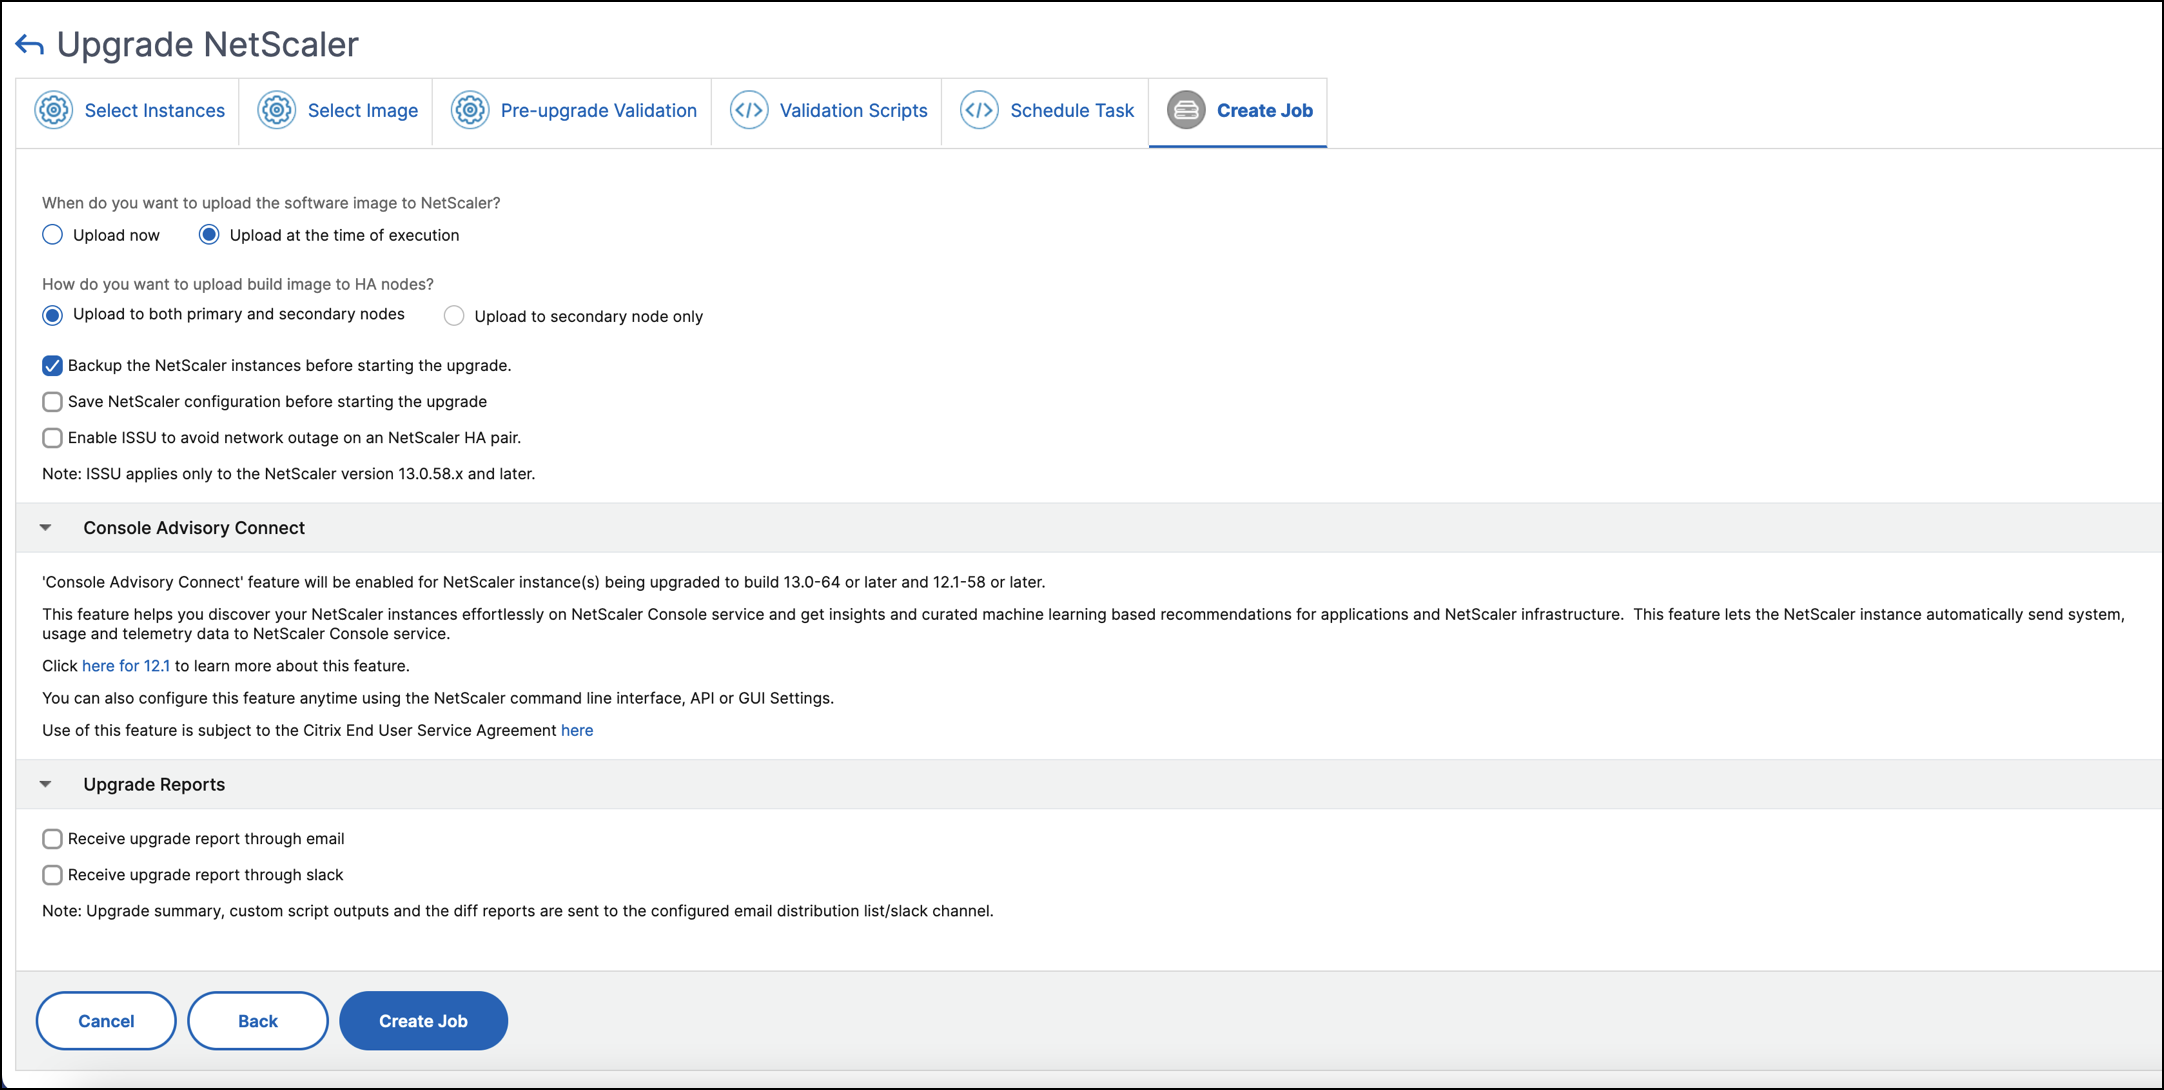 For more information on the available scheduling scenarios for high-availability pair, see Scheduling upgrade jobs for {{page.citrix-adc-generic}} high-availability pair.For more information on other upgrade options, see {{page.citrix-adc-generic}} upgrade options.
 -
-
Click Create Job.
The upgrade job appears in the Infrastructure > Upgrade Jobs. When you edit an existing job, you can switch to any tabs if the required fields are already filled. For example, if you are in the Select Configuration tab, you can switch to the Job Preview tab.
Pause or resume a scheduled upgrade job
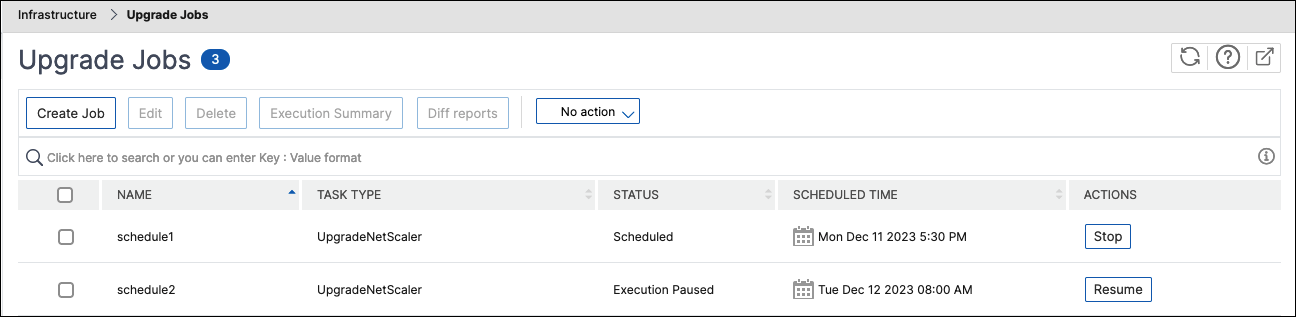
You can also pause your scheduled upgrade job.
To use this feature, navigate to Infrastructure > Upgrade Jobs, select an existing scheduled upgrade job, and click Stop to pause the job. To resume the scheduled upgrade job, click Resume.
Note:
If the scheduled time for the upgrade job has passed after you decided to resume it, you need to create the upgrade job again.
Retry failed upgrade jobs
-
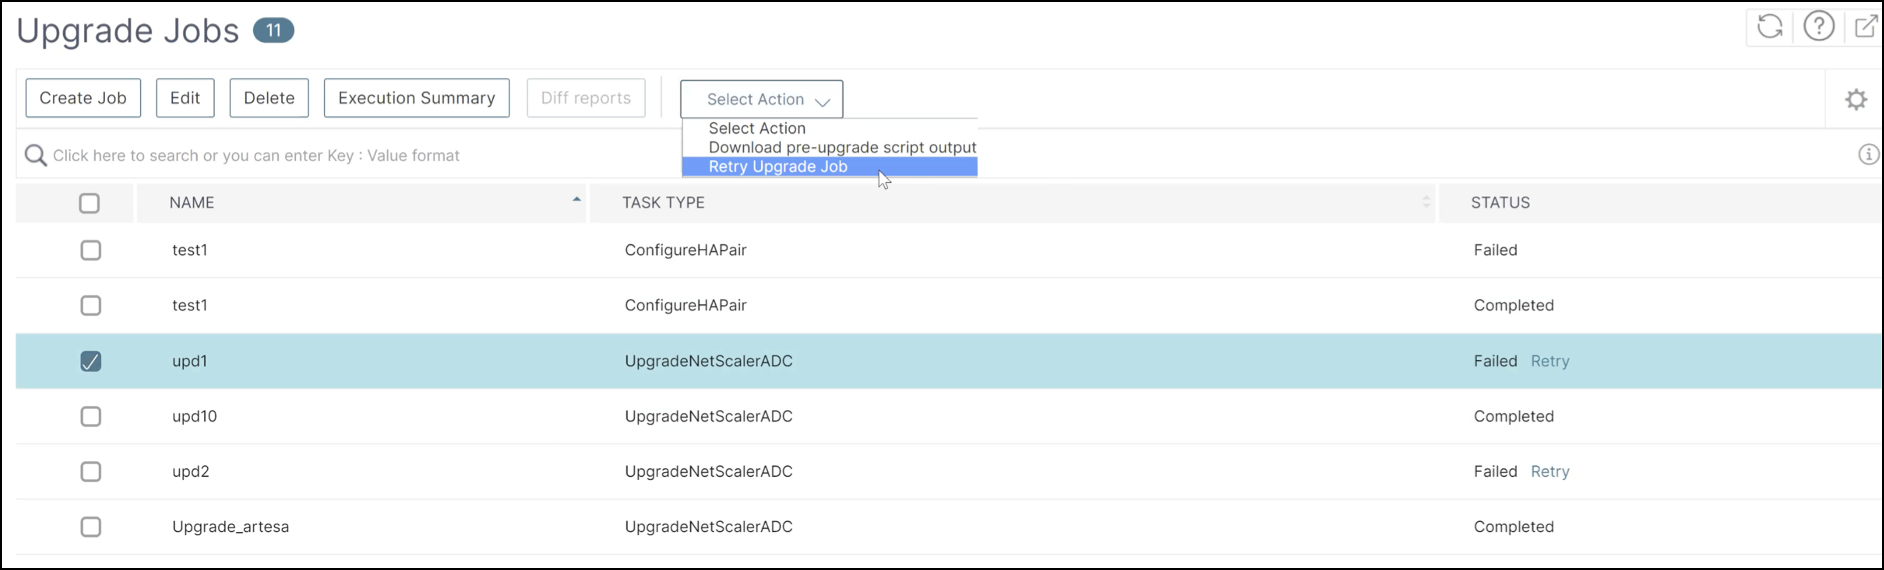
In Infrastructure > Upgrade Jobs, select the failed upgrade job and click Retry. Alternatively, you can also go to Select Action > Retry Upgrade Job to retry a failed job.
-
In Select Instance, specify the following details:
-
Job Name - Enter a name for the upgrade.
-
Select the NetScaler instances that you want to upgrade from the list. To delete any instances, click Remove.
Click Next to begin the validation process.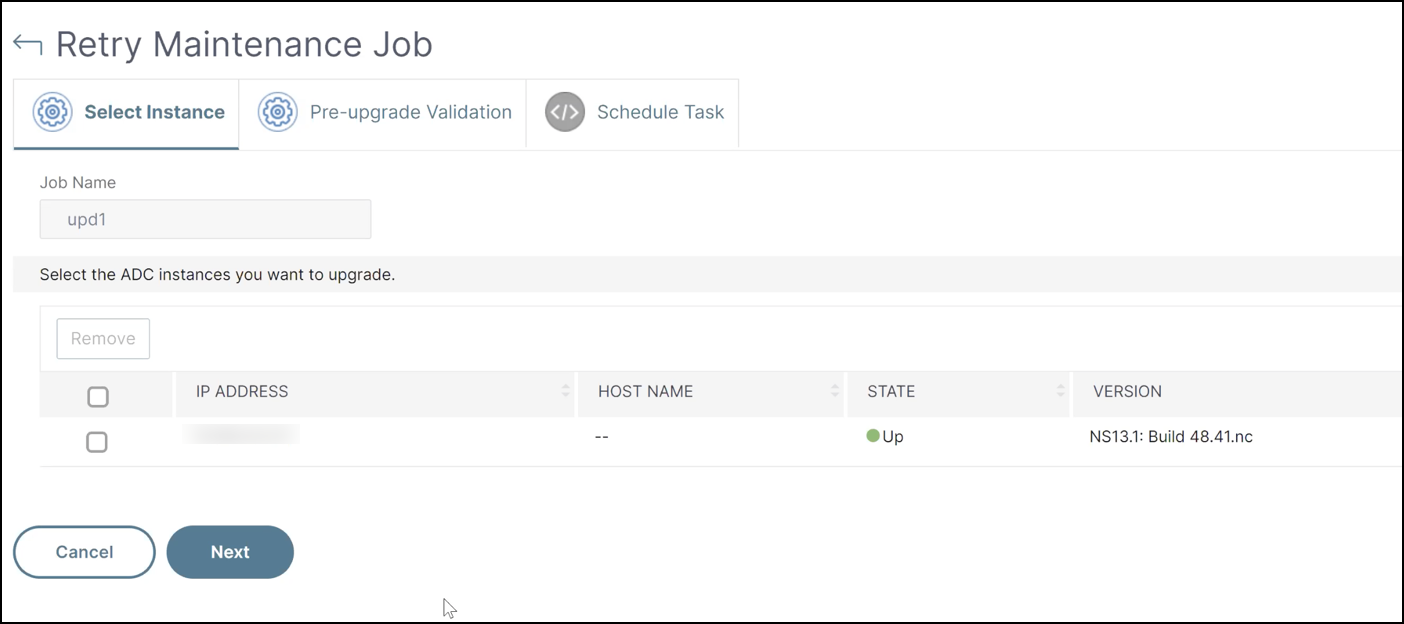
-
-
The Pre-upgrade validation tab displays the following sections:
-
Instances ready for upgrade. You can continue with the upgrade of these instances.
-
Instances blocked from upgrade. These {{page.citrix-adc-generic}} instances are blocked from upgrade because of pre-upgrade validation errors.You can review, rectify the errors, and then click Move to ready for upgrade to upgrade them. If you face insufficient disk space on an instance, you can check and clean up the disk space. See, Clean up {{page.citrix-adc-generic}} disk space.
-
Policy Check: If {{page.adm-product-name-short}} finds unsupported classic policies, you can remove such policies to create an upgrade job.
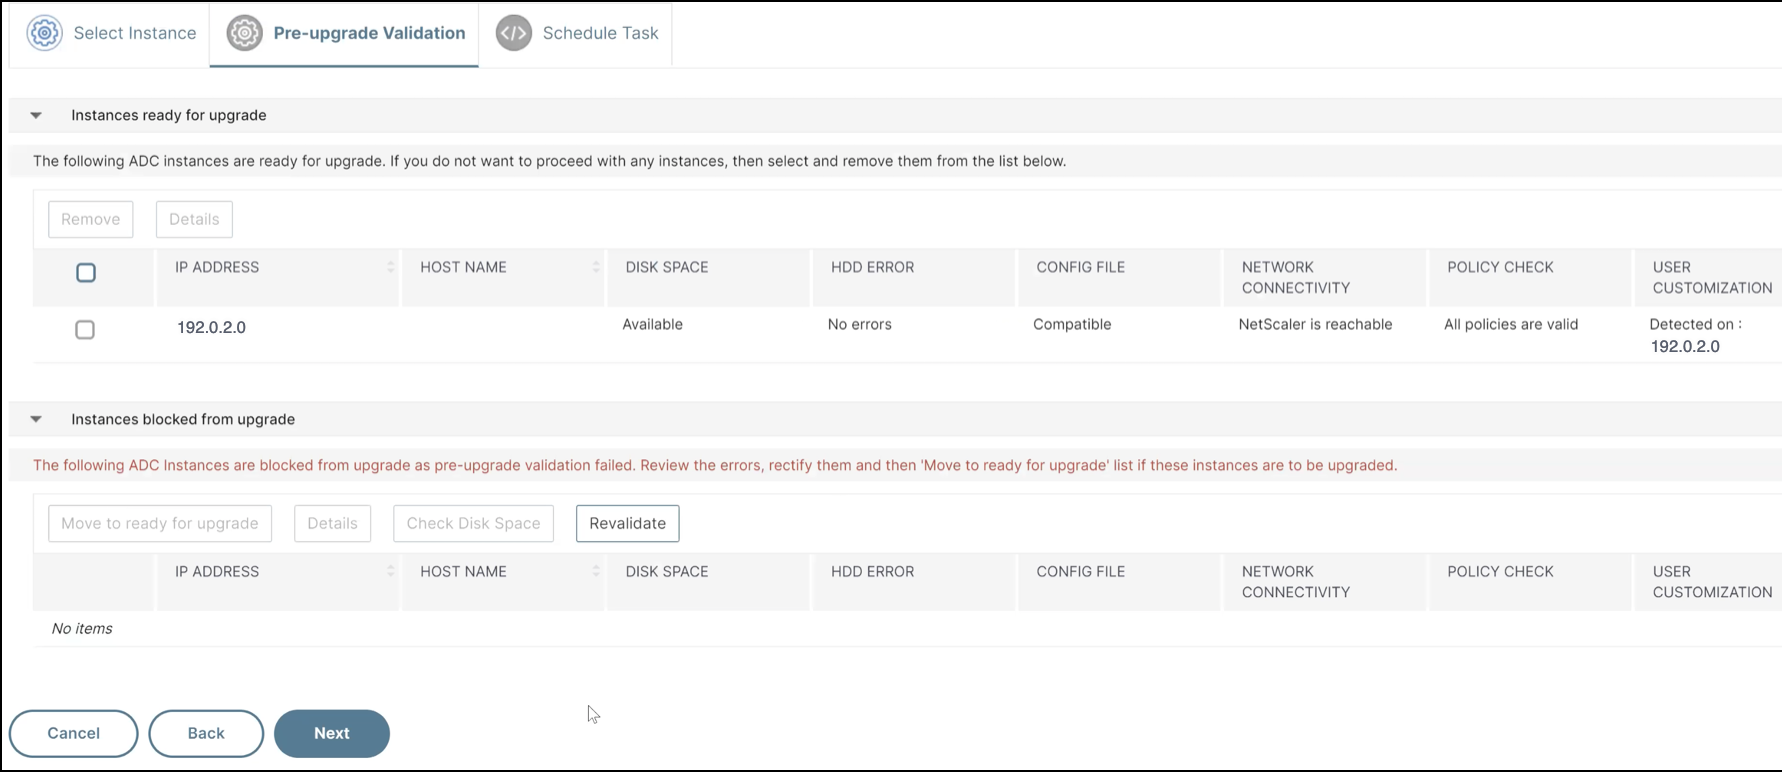 Click Next.
 -
-
In Schedule Task, select one of the following options:
-
Upgrade now: The upgrade job runs immediately.
-
Schedule Later: Select this option to run this upgrade job later. Specify the Execution Date and Start Time when you want to upgrade the instances.
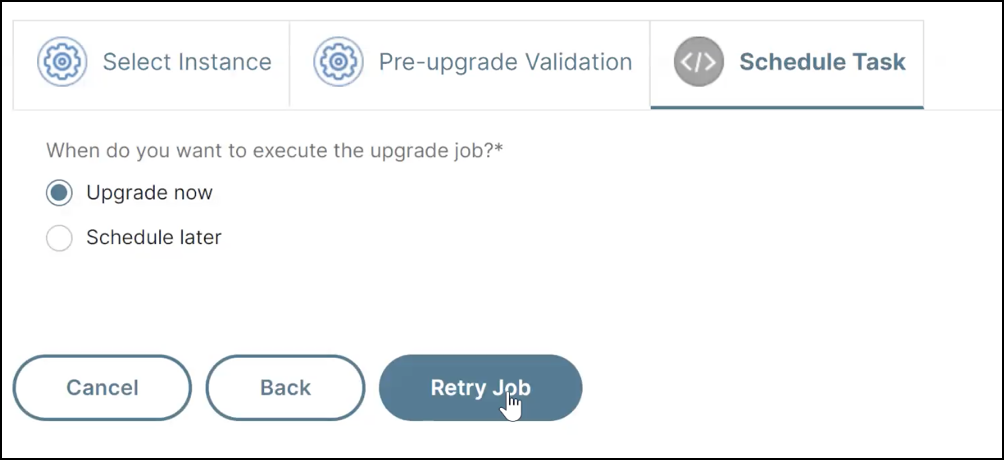 Click Retry.
 -
Clean up the {{page.citrix-adc-generic}} disk space
If you face the insufficient disk space issue while upgrading a {{page.citrix-adc-generic}} instance, clean up the disk space from the {{page.adm-product-name-short}} GUI itself.
-
In the Pre-upgrade validation tab, the Instances blocked from upgrade section displays the instances that failed the upgrade because of Insufficient disk space. Select the instance that has the disk space issue.
-
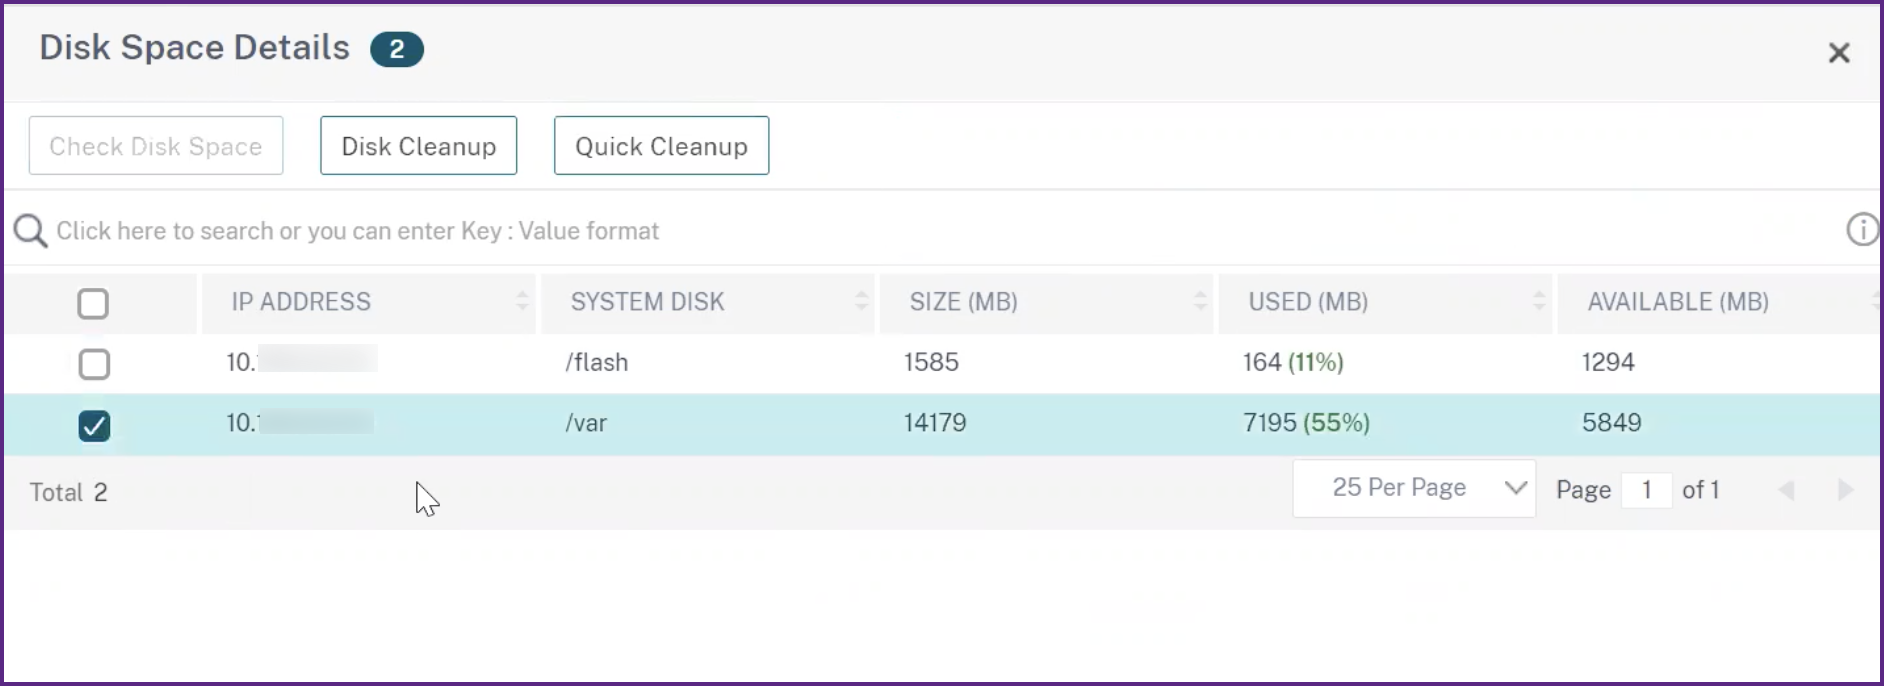
Click Check Disk Space.A Disk Space Details pane appears. This pane displays the instances, used memory, and available memory.
-
In the Disk Space Details pane, select the instance that requires cleanup and do one of the following:
-
Disk Cleanup - Navigate to the required folders or directories and delete them to free up disk space.
-
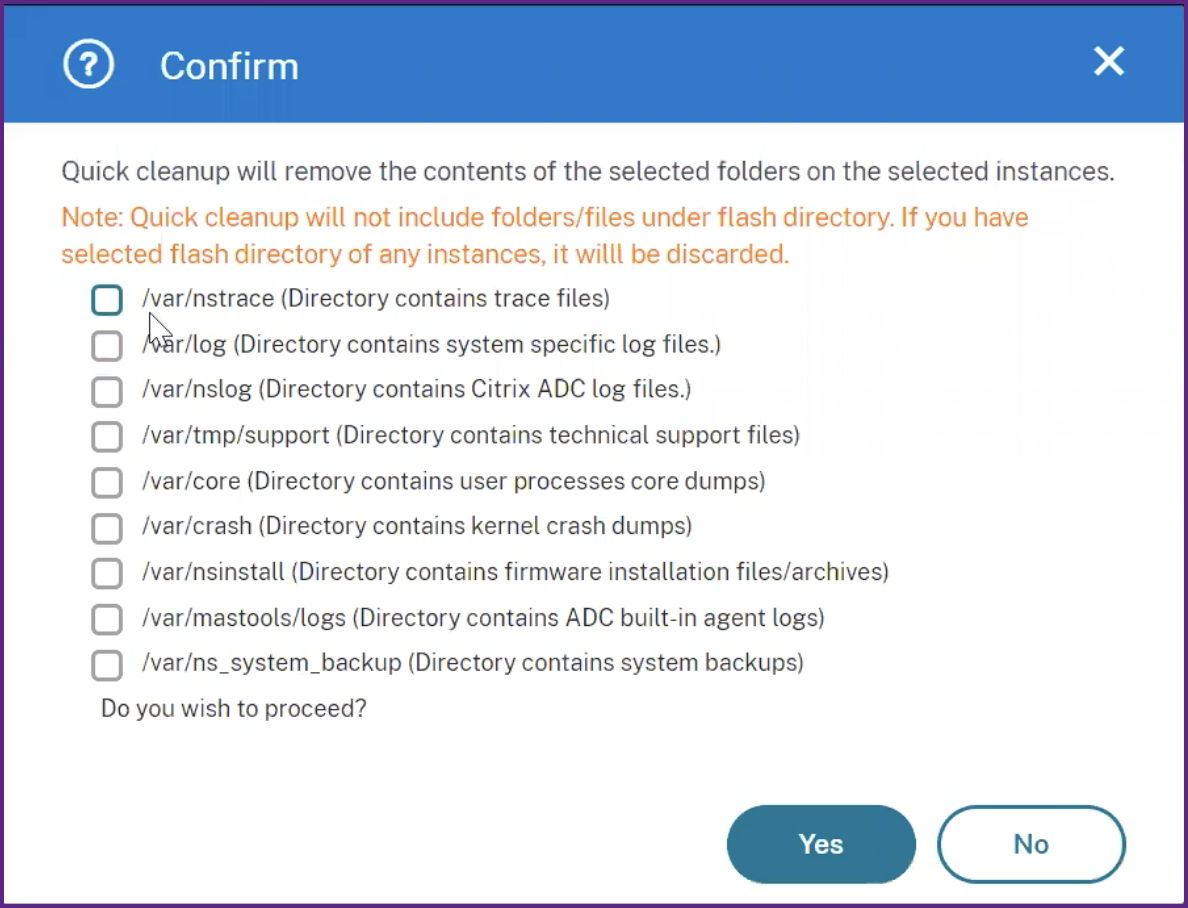
Quick Cleanup - Quickly clear up disk space by deleting multiple folders. In the Confirm pane that appears, select the folders you want to delete, and click Yes.
-
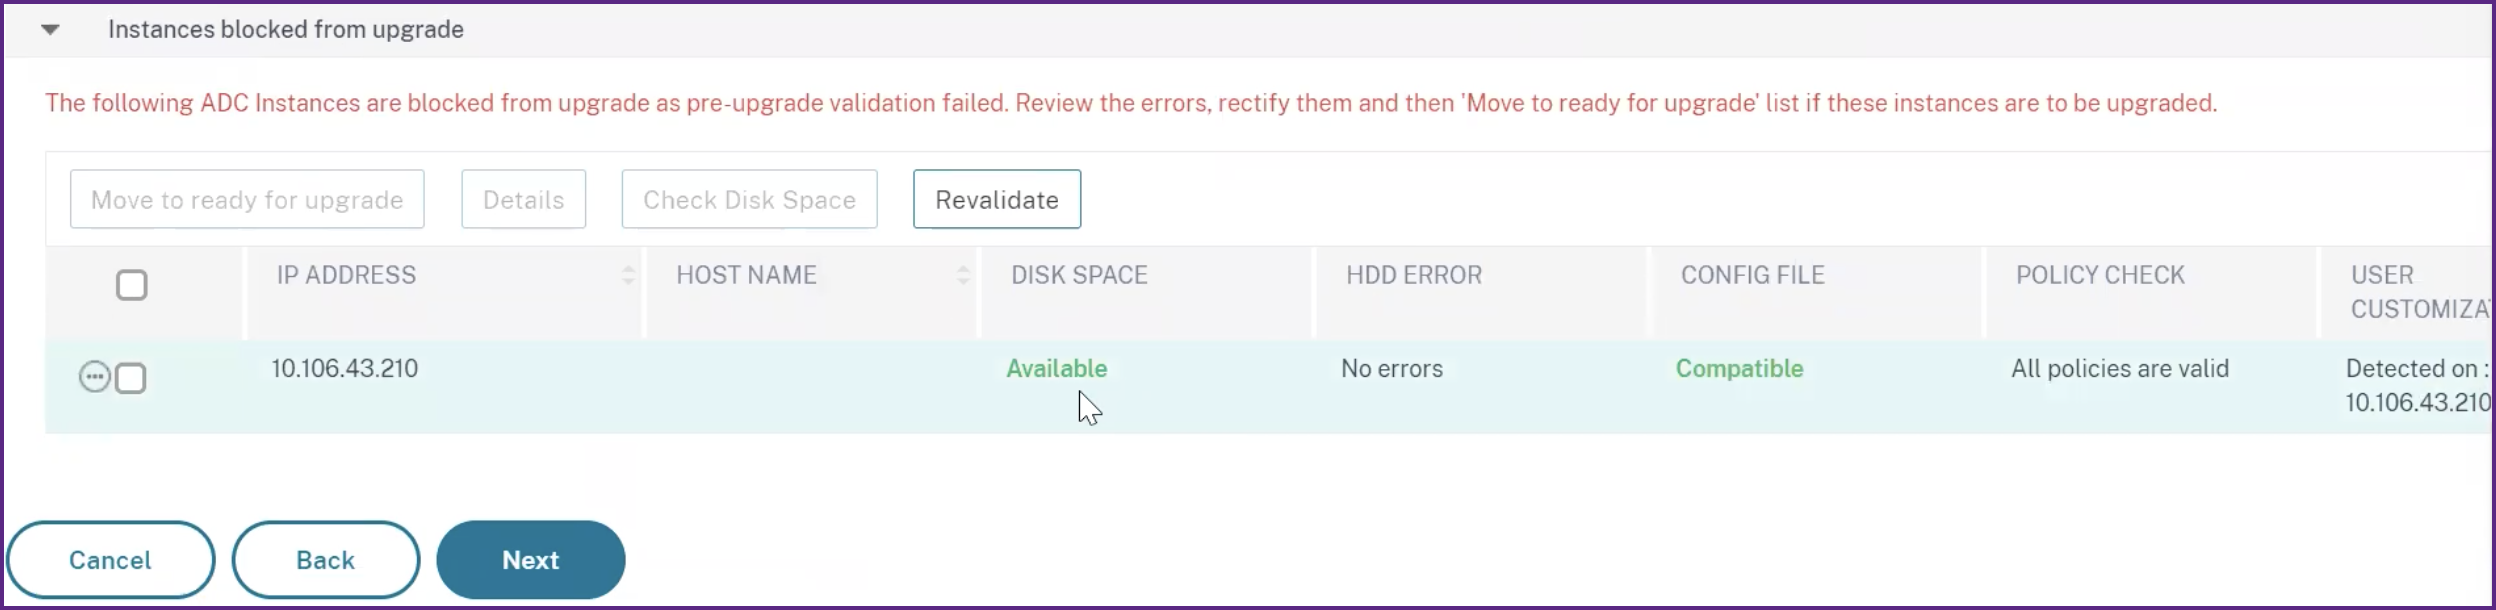
After clearing up the disk space, you can check if sufficient disk space is now available to upgrade the instance. In the Instances blocked from upgrade section, click Revalidate.In the following example, disk space is available. You can now click Move to ready for upgrade to upgrade the instance or click Next to continue to the next step.
-
Use custom scripts
You can specify custom scripts while you create a {{page.citrix-adc-generic}} upgrade job. The custom scripts are used to check the changes before and after a {{page.citrix-adc-generic}} instance upgrade. For example:
-
The instance version before and after the upgrade.
-
The status of interfaces, high-availability nodes, virtual servers, and services before and after upgrade.
-
The statistics of virtual servers and services.
-
The dynamic routes.
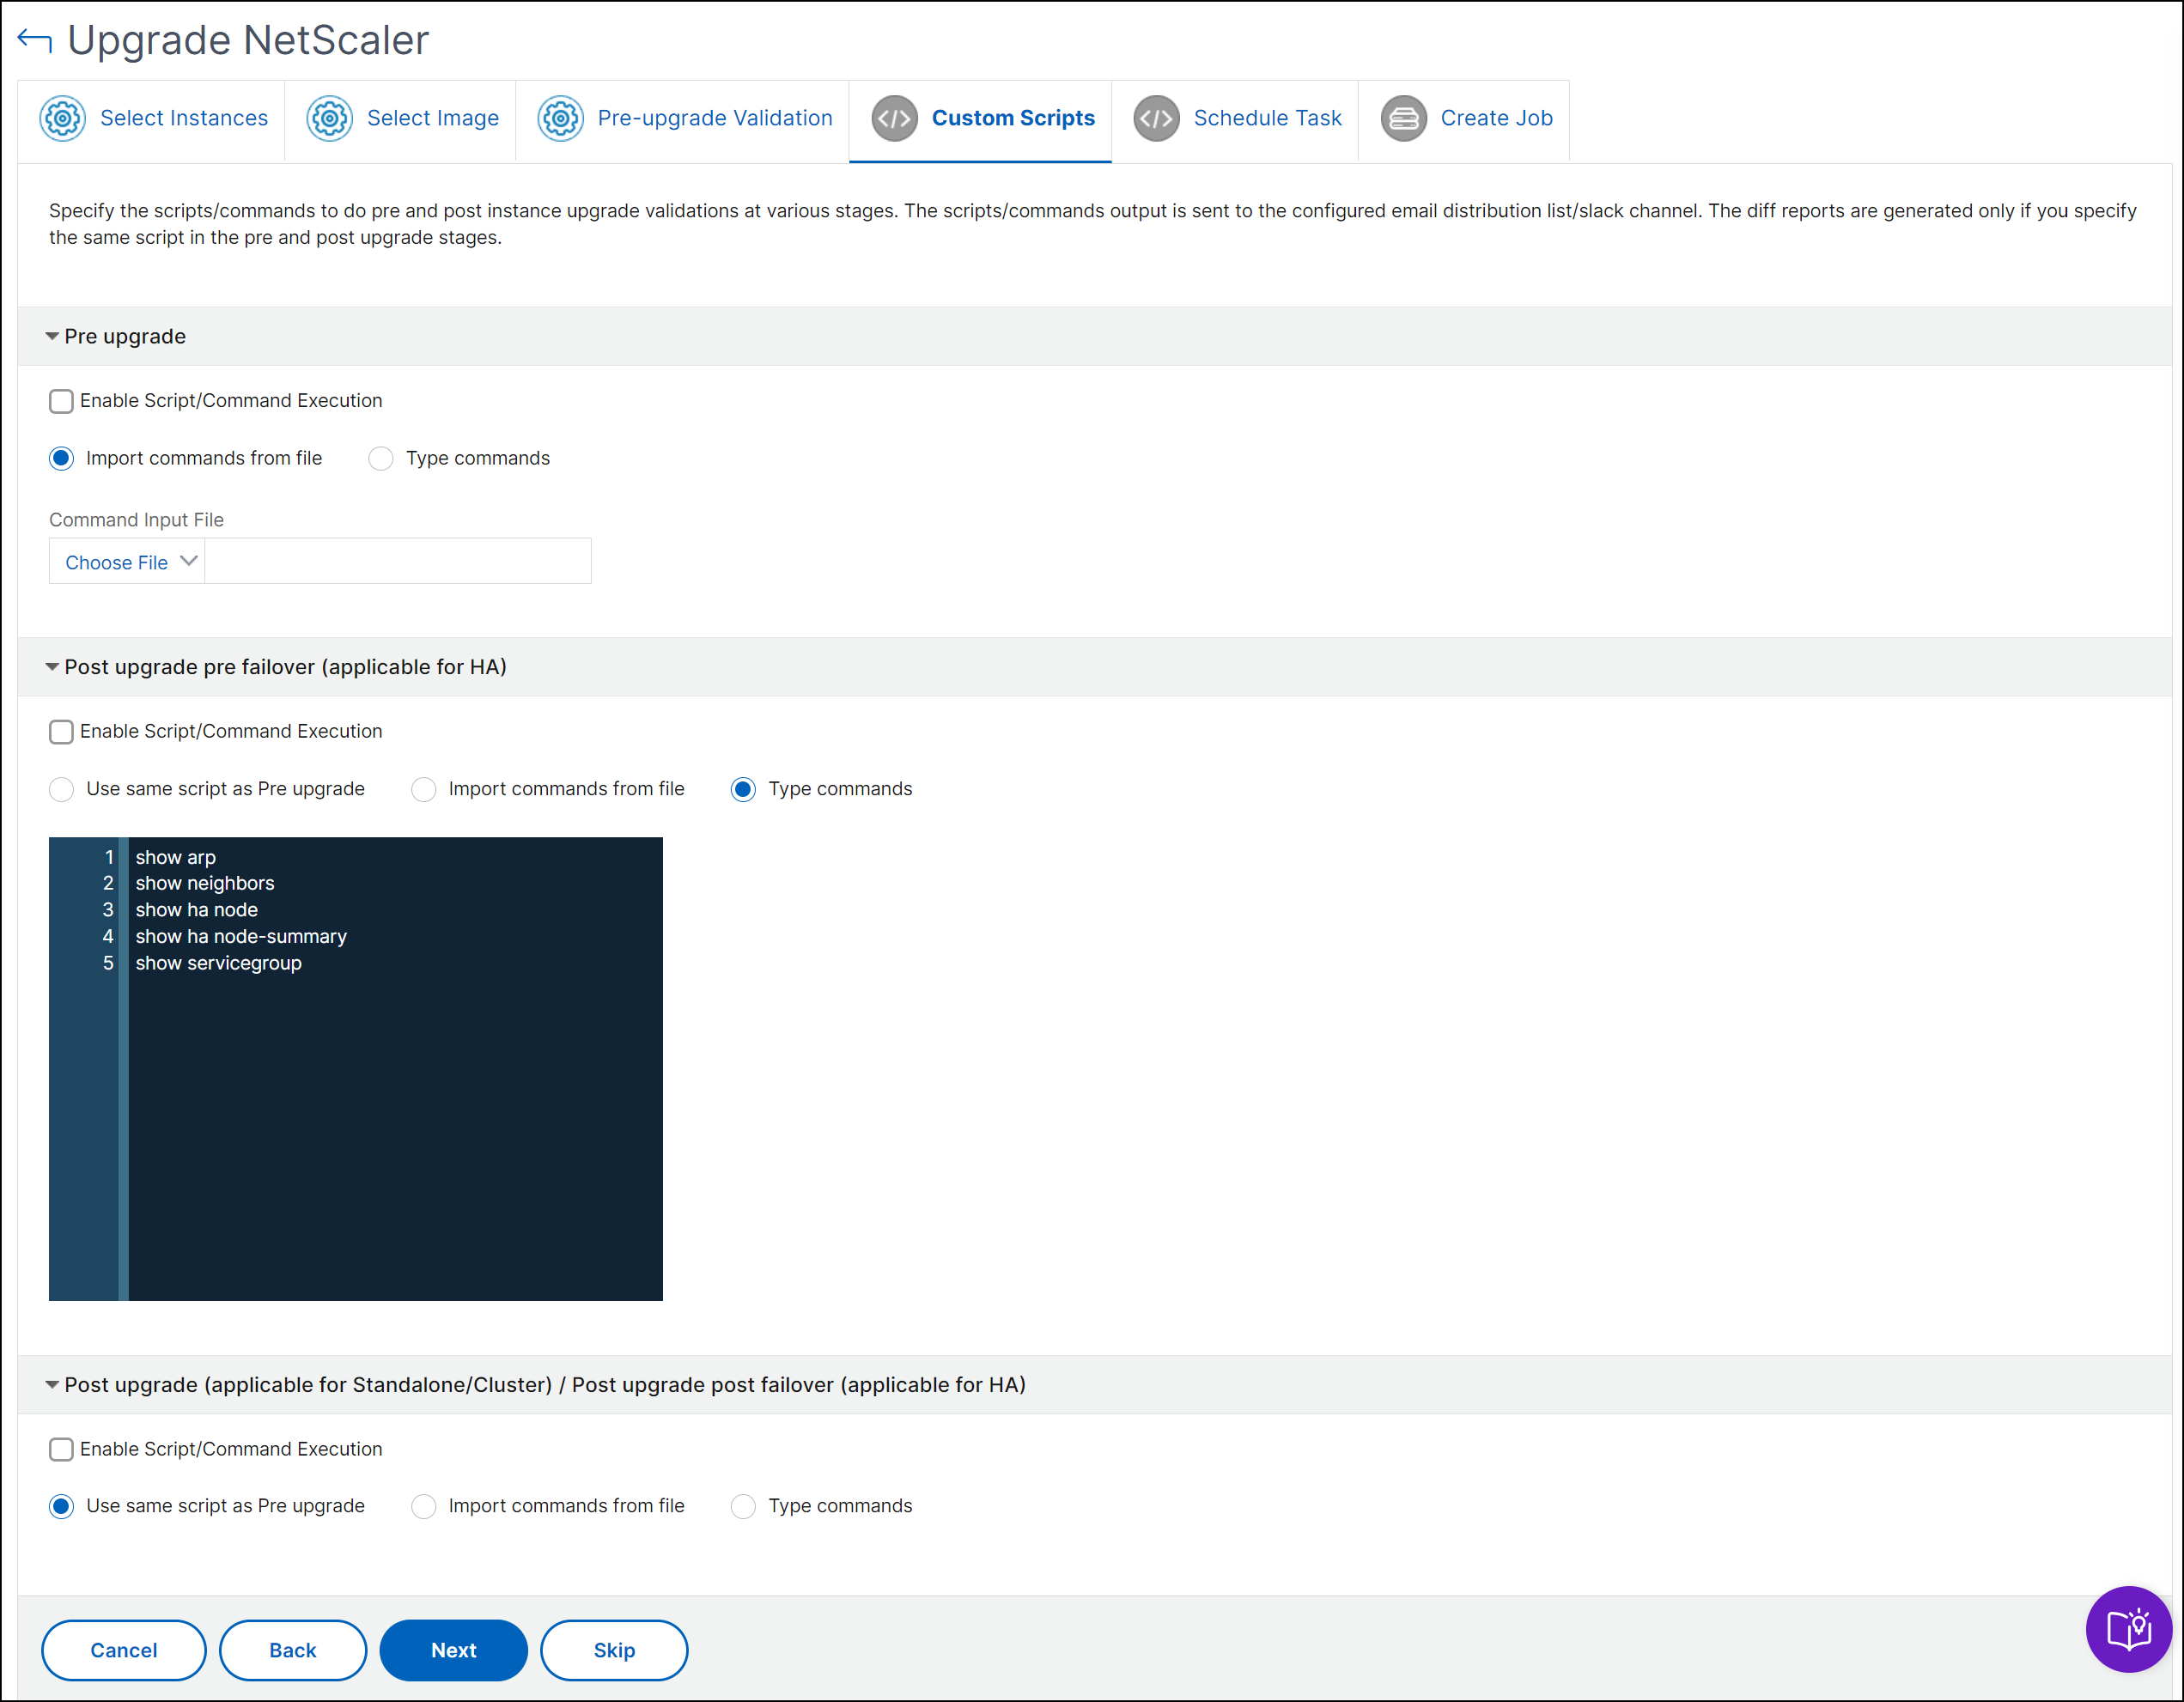
Specify the custom scripts to run in the following stages:
-
Pre upgrade: The specified script runs before upgrading an instance.
-
Post upgrade pre failover (applicable for HA): This stage only applies to the high-availability deployment. The specified script runs after upgrading the nodes, but before their failover.
-
Post upgrade (applicable for standalone) / Post upgrade post failover (applicable for HA): The specified script runs after upgrading an instance in the standalone deployment. In the high-availability deployment, the script runs after upgrading the nodes and their failover.
Note:
-
Ensure to enable script or command execution at the required stages. Otherwise, the specified scripts do not run.
-
The diff report is generated only if you specify the same script in the pre-upgrade and post-upgrade stages. So, ensure to select Use same script as Pre-upgrade in the post-upgrade stages. See, Download a consolidated diff report of a {{page.citrix-adc-generic}} upgrade job.
You can import a script file or type commands directly in the {{page.adm-product-name-short}} GUI.
-
Import commands from file: Select the command input file from your local computer.
-
Type commands: Enter the commands directly on the GUI.
In the post upgrade stage, you can use the same script specified in the pre-upgrade stage.
{{page.citrix-adc-generic}} upgrade options
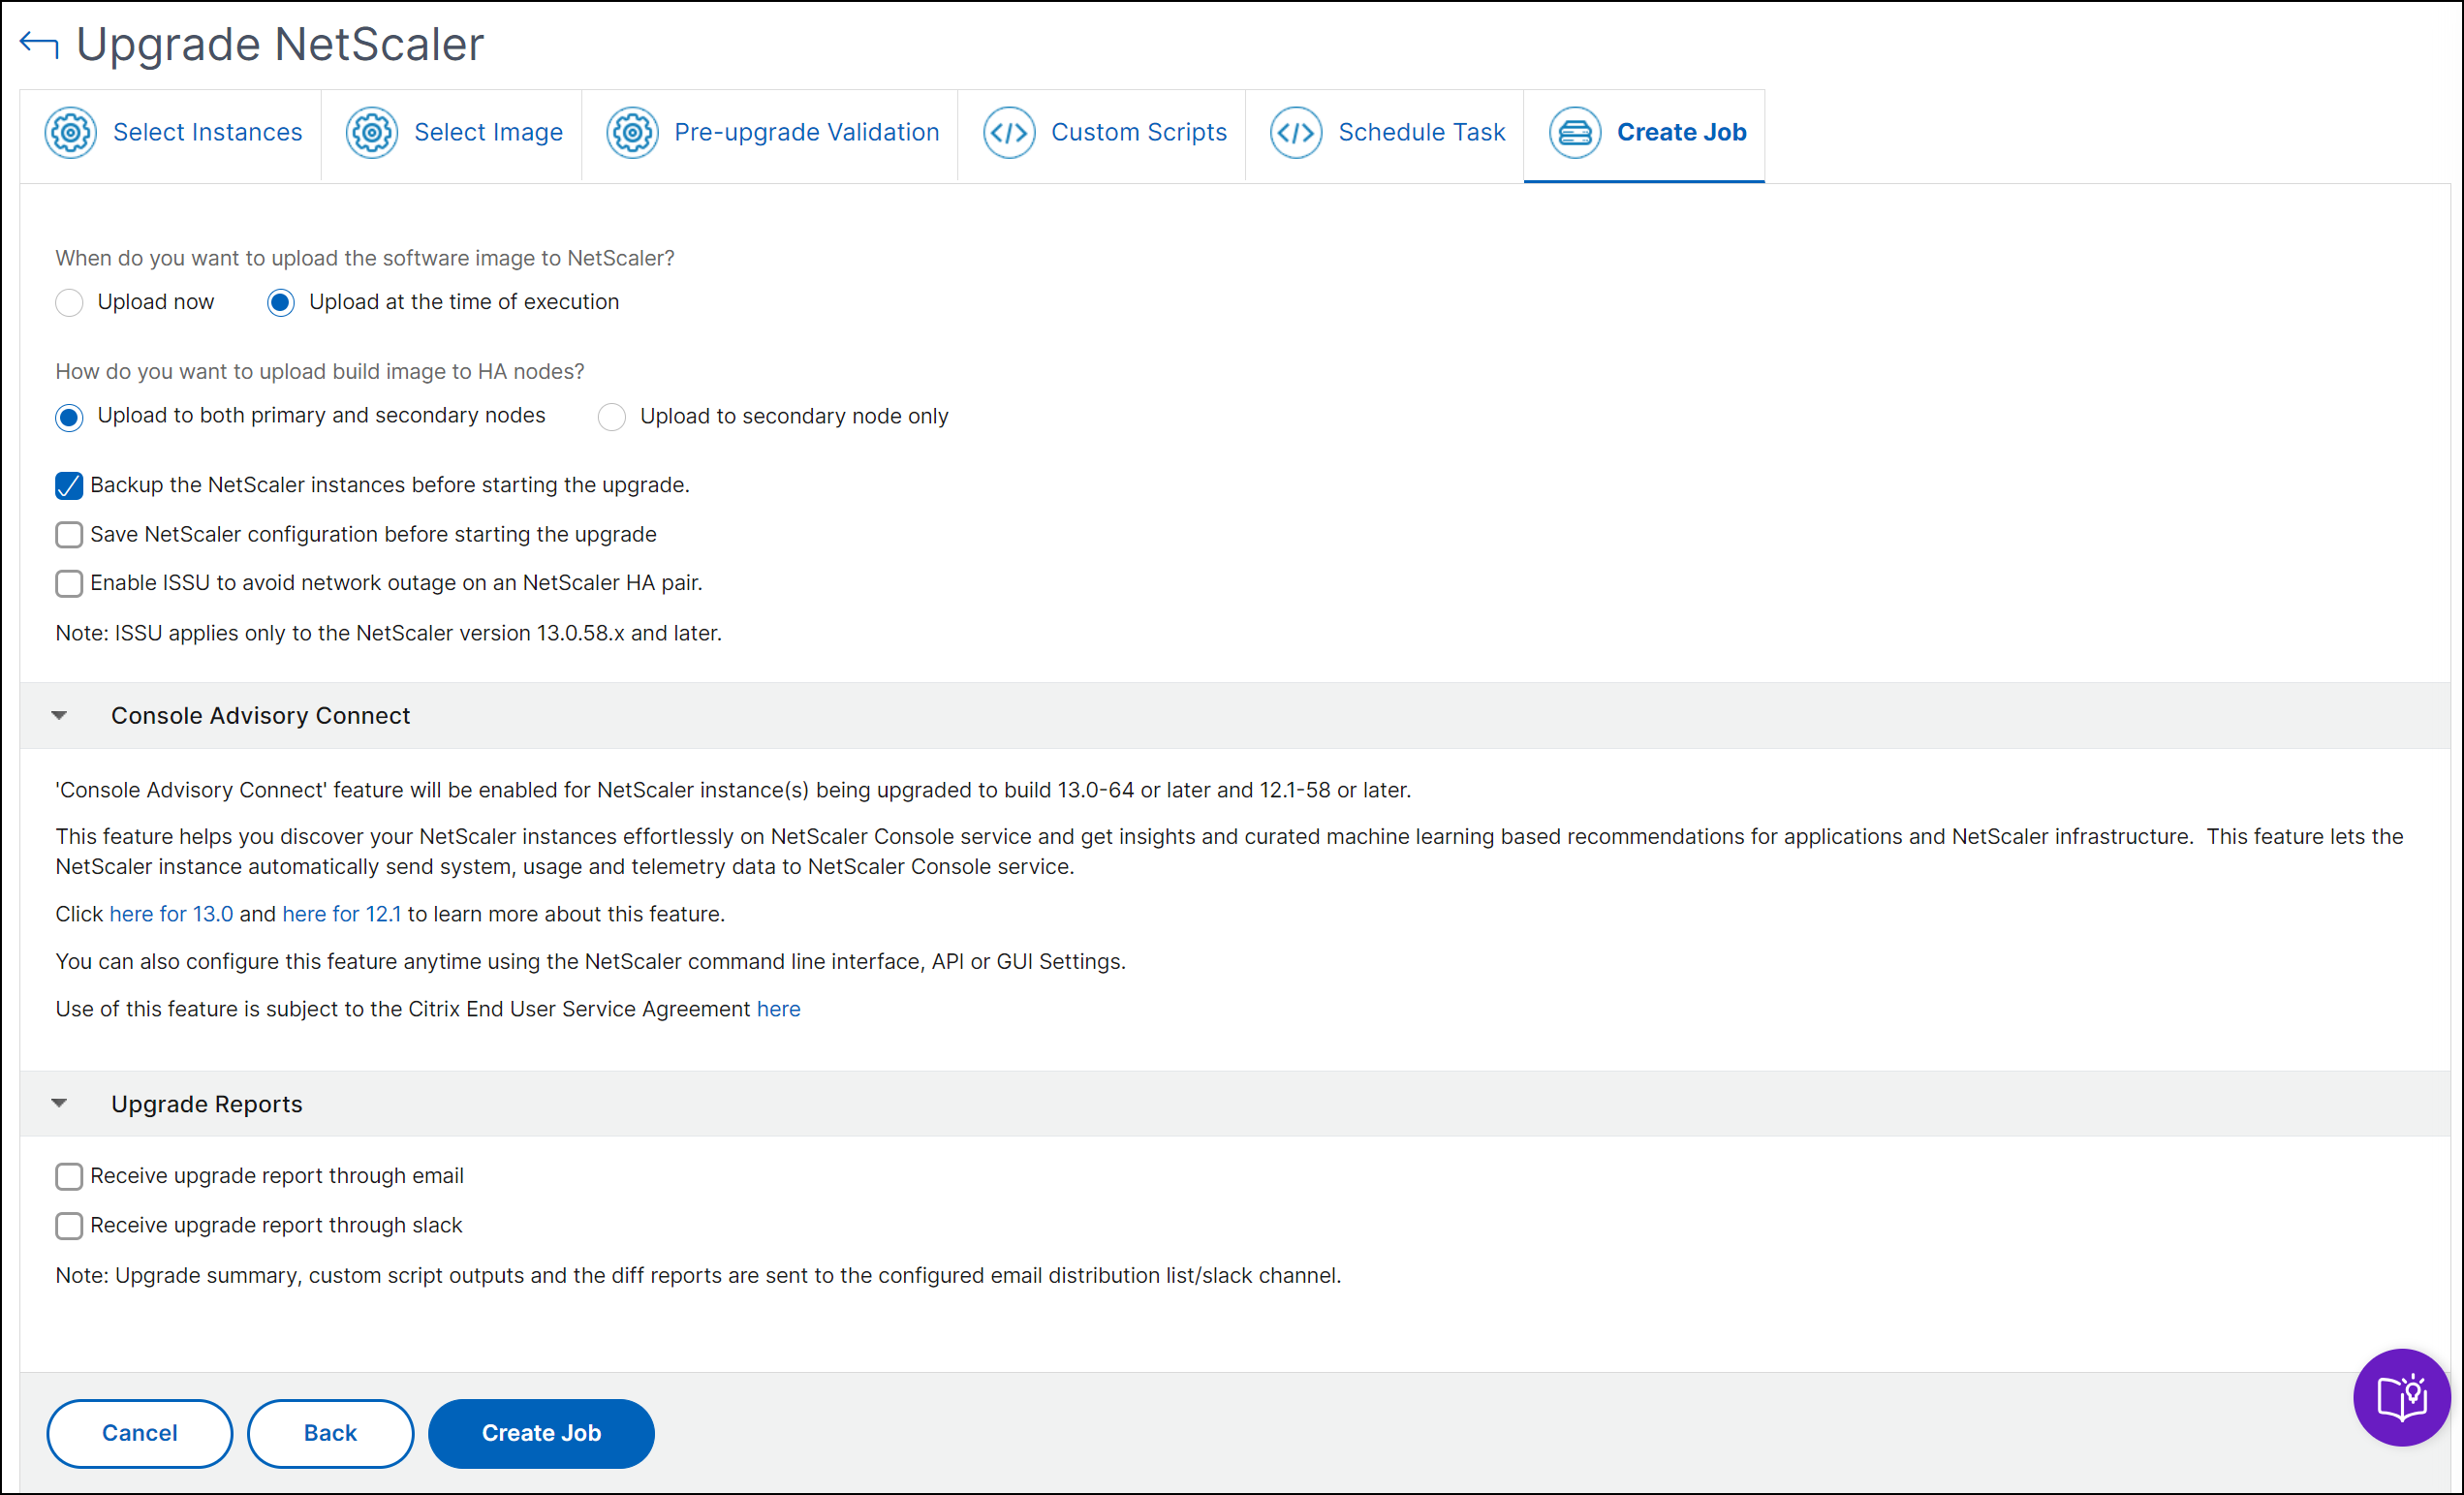
While you create a {{page.citrix-adc-generic}} upgrade job, you can select the following options in the Create Job tab:
-
Backup the {{page.citrix-adc-generic}} instances before starting the upgrade.: Creates a backup of the selected {{page.citrix-adc-generic}} instances.
-
Maintain the primary and secondary status of high-availability nodes after upgrade: Select this option if you want the upgrade job to start a failover after each node's upgrade. In this way, the upgrade job maintains the primary and secondary status of the nodes.
-
Save {{page.citrix-adc-generic}} configuration before starting the upgrade - Saves the running {{page.citrix-adc-generic}} configuration before upgrading the {{page.citrix-adc-generic}} instances.
-
Enable ISSU to avoid network outage on {{page.citrix-adc-generic}} HA pair - ISSU ensures the zero downtime upgrade on a {{page.citrix-adc-generic}} high-availability pair. This option provides a migration functionality that honors the existing connections during upgrade. So, you can upgrade an {{page.citrix-adc-generic}} high-availability pair without downtime. Specify the ISSU migration timeout in minutes.
-
Receive Execution Report through email - Sends the execution report in email. To add an email distribution list, see Create an email distribution list.
-
Receive Execution Report through slack - Sends the execution report in slack. To add a Slack profile, see Create a Slack profile.
Scheduling upgrade jobs for a {{page.citrix-adc-generic}} high-availability pair
The following table lists the different scheduling scenarios in the Schedule Task page and the corresponding upgrade options available in the Create Job page:
|When do you want to execute the upgrade job?|When do you want to upload the software image to {{page.citrix-adc-generic}}?|How do you want to upload build image to HA nodes?| |-|-|-| |Upgrade now|Not applicable|Upload to both primary and secondary nodes (default option)| |||Upload to secondary node only| |Schedule later|Upload at time of execution (default option)|Upload to both primary and secondary nodes (default option)| |||Upload to secondary node only| ||Upload now|Not applicable| |Schedule later (when Perform two stage upgrade for nodes in HA is selected)|Upload at time of execution (default option)|Upload to secondary node only (default and only option)| ||Upload now|Not applicable|
Download a consolidated diff report of a {{page.citrix-adc-generic}} upgrade job
In {{page.adm-product-name-short}}, you can download a diff report of a {{page.citrix-adc-generic}} upgrade job. To do so, the upgrade job must have custom scripts. A diff report contains the differences between the outputs of the pre-upgrade and post-upgrade script. With this report, you can determine what changes occurred on the {{page.citrix-adc-generic}} instance post upgrade.
Note:
The diff report is generated only if you specify the same script in the pre-upgrade and post-upgrade stages.
To download a diff report of an upgrade job, do the following:
-
Navigate to Infrastructure > Configuration Jobs > Maintenance Jobs.
-
Select the upgrade job for which you want to download a diff report.
-
Click Diff Reports.
-
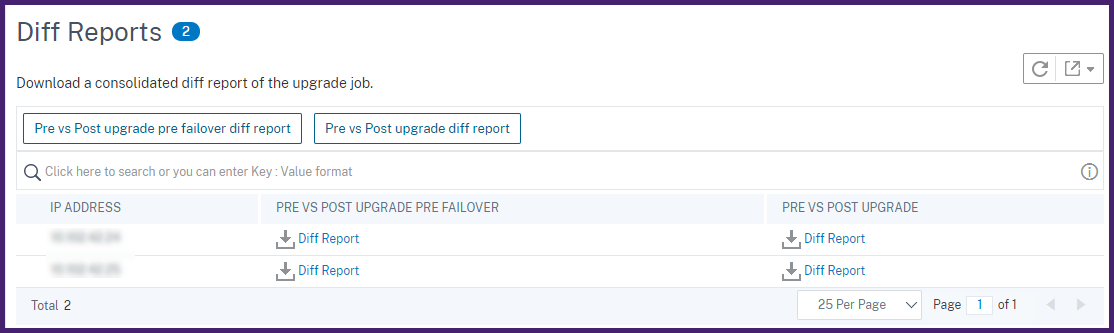
In Diff Reports, download a consolidated diff report of the selected upgrade job.In this page, you can download any of the following diff reports type:
-
Pre vs Post upgrade pre failover diff report
-
Pre vs Post upgrade diff report
-