Getting started
This document walks you through how to get started with onboarding and setting up NetScaler Console for the first time. This document is intended for network and application administrators who manage Citrix network devices (NetScaler, NetScaler Gateway, Citrix Secure Web Gateway, and so on). Follow the steps in this document irrespective of the type of device you plan to manage using NetScaler Console.
Before you begin onboarding, make sure you review the browser requirements, the agent installation requirements, and the port requirements.
Related information
Configure the built-in agent to manage instancesInstall a NetScaler agent on-premisesInstall a NetScaler agent on Microsoft Azure cloudInstall a NetScaler agent on Amazon Web Services (AWS)Install a NetScaler agent on GCPInstall NetScaler agent in Kubernetes cluster using YAMLInstall a NetScaler agent operator using the OpenShift consoleInstall a container-based agent using helm chartHow to Get Help and Support
Step 1: Sign Up for Citrix Cloud™
To start using NetScaler Console, you must first create a Citrix Cloud company account or join an existing one that someone else in your company has created. For detailed processes and instructions on how to proceed, see Signing Up for Citrix Cloud.
Step 2: Manage NetScaler Console with an Express account
After you log on to Citrix Cloud, do the following:
Note:
-
For Japan, you must log on to
citrix.citrixcloud.jp. -
For Government Cloud, you must log on to
citrix.cloud.us.
-
Go to the Available Services section.
-
On the NetScaler® Console tile, click Manage.The NetScaler Console tile moves to the My Services section.
-
Select a region that suits your business need.Important
-
You cannot change the region later.
-
This step is not applicable if you log in from Citrix Cloud Japan (
citrix.citrixcloud.jp) or Citrix Cloud Government (citrix.cloud.us). You must ensure that the endpoint URLs applicable are allowed access. For more information, see System requirements.
-
-
Select roles and use cases that apply to you.
You can log off from the browser while the initialization completes in the background, which might take some time.
Note:
Citrix assigns an Express account to manage NetScaler Console resources. If your NetScaler Console Express account remains inactive for 45 days, the account gets deleted. For more information, see Manage NetScaler Console using Express account.
When you log back on to your Citrix Cloud account, the NetScaler Console GUI screen appears. Click Get Started to begin setting up the service for the first time.
Step 3: Select a NetScaler deployment type
Perform the following steps to deploy or discover NetScaler instances:
-
Select any of the following environments:
-
On-premises
-
AWS
-
Microsoft Azure
-
Google Cloud Platform
-
-
Install the agent to enable communication between the NetScaler Console and the managed instances in your data center or cloud.The Select Agent Type step varies the agent installation options depending on the selected environment.
-
External VM Agent
-
On-premises - If you select On-premises and then select On a Hypervisor, you can install an agent on any of the hypervisors, such as Citrix Hypervisor™ VMware ESXi, Microsoft Hyper-V, or Linux KVM Server.
-
If you select one of the public clouds, such as AWS, Microsoft Azure, or Google Cloud Platform, you can install External agent on the selected cloud.
-
-
As a microservice - To deploy an agent as a Kubernetes application.
-
Built-in agent - To deploy an agent within NetScaler.
-
-
Click NextSteps to install an agent vary for every option. The following links guide you to the specific steps to install an agent:
Install an agent on a hypervisor
Perform the following steps to set up an agent on a hypervisor:
-
Select the hypervisor and click Download Image to download the agent image to your local system.A service URL and an activation code are generated and displayed on the GUI.
-
Copy the service URL and an activation code.
-
Specify the copied service URL and the activation code while installing the agent on your hypervisor.The agent uses the service URL to locate the service and the activation code to register with the service. For detailed instructions about installing an agent on your on-premises hypervisor, see Install an agent on-premises.
-
After successful agent installation, return to the Set Up Agent page and click Register Agent.
Next step: Add instances.
Note
If you do not want to add agents during the initial setup, click Skip to check the features provided by NetScaler Console. You can add the agents and instances later. To add agents later, navigate to Settings > Set up Agents. For instructions about how to add instances later, see Adding Instances.
Install an external VM agent on public cloud
You do not have to download the agent image from the Set Up Agent page. The agent image is available on the respective cloud marketplace.
-
Copy and save the service URL and the activation code to use during agent installation.If you want a new activation code, click Create new Activation Code, and then copy and save the code to use during agent installation.
-
For detailed instructions about installing an agent on Microsoft Azure cloud, see Install an agent on Microsoft Azure Cloud.
-
For detailed instructions about installing an agent on AWS, see Install an agent on AWS.
-
For detailed instructions about installing an agent on Google Cloud, see Install an agent on GCP.
-
-
After successful agent installation, return to the Set Up Agent page and click Register Agent.
Next step: Add instances.
Install an agent as a microservice
You can deploy an agent as a microservice in the Kubernetes cluster to view service graph in NetScaler Console.
For more information to get started with service graph, see Setting up service graph.
-
Specify the following parameters:
-
Application ID – A string id to define the service for the agent in the Kubernetes cluster and distinguish this agent from other agents in the same cluster.
-
Agent Password – Specify a password for CPX to use this password to onboard CPX to NetScaler Console through the agent.
-
Confirm Password – Specify the same password for confirmation.
-
Click Submit.
-
-
After you click Submit, you can download the YAML or Helm Chart.
-
Click Close.For more information, see Install an agent in Kubernetes cluster.
Use the built-in agent
The NetScaler instances in your environment include a built-in agent. You can initiate the built-in agent and use it to establish communication between the instance and NetScaler Console.
-
Copy the generated Service URL and the Activation Code. Save them to use while initiating the built-in agent on your NetScaler instance.For detailed instructions about initiating the built-in agent on your NetScaler instance, see Initiate Built-in Agent on the NetScaler instance.
-
After the built-in agent is initiated, return to the Set Up Agent page and click Register Instance.
Next step: Add instances.
Add instances
Instances are network appliances or virtual appliances that you want to discover, manage, and monitor from NetScaler Console. To manage and monitor these instances, you must add the instances to the service.
After the successful agent installation and registration, the agents are displayed on the Set Up Agent page. When the agent status is in the UP state denoted by a green dot next to it, click Next to start adding instances to the service.
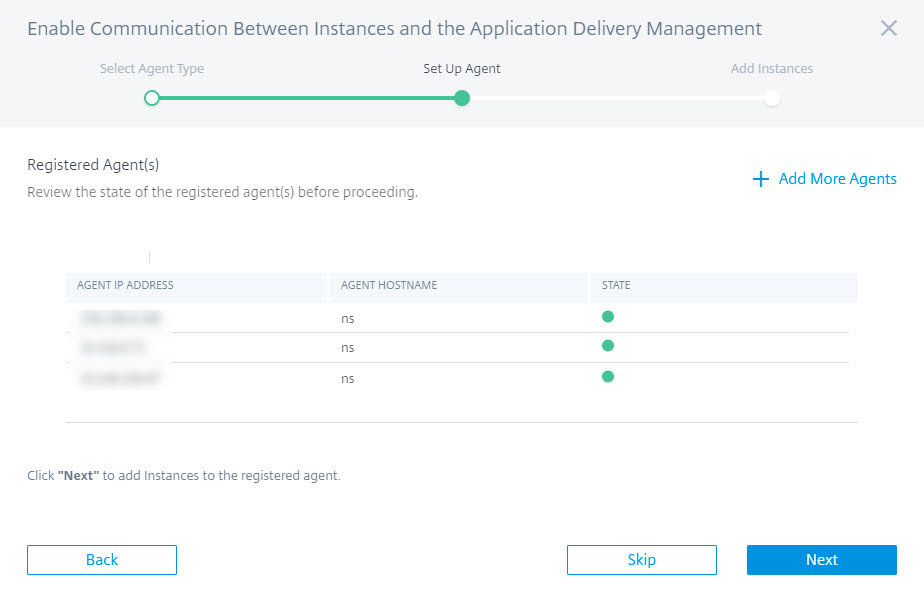
-
In the Add Instances page, view the NetScaler instances that are connected to the registered agent. Ensure that the instance is in the Up status and click Next.
-
Click Done to complete your initial setup and start managing your deployment.
Note
If you do not want to add instances during the initial setup, you can click Done to complete the setup and add the instances later. For instructions about how to add instances later to NetScaler Console, see Adding Instances.
Onboard NetScaler instances by using the NetScaler Console GUI dashboard
If you've skipped onboarding the NetScaler instances in the Getting Started workflow while setting up NetScaler Console for the first time, you can onboard the instances from the NetScaler Console GUI dashboard. If the NetScaler instances are not yet added, the GUI prompts you to add the instances.
When you click any module on the left-hand navigation bar, on the right-hand side a tabular preview of the features and benefits of that module appears. These features and benefits help you better manage NetScaler instances by using NetScaler Console.
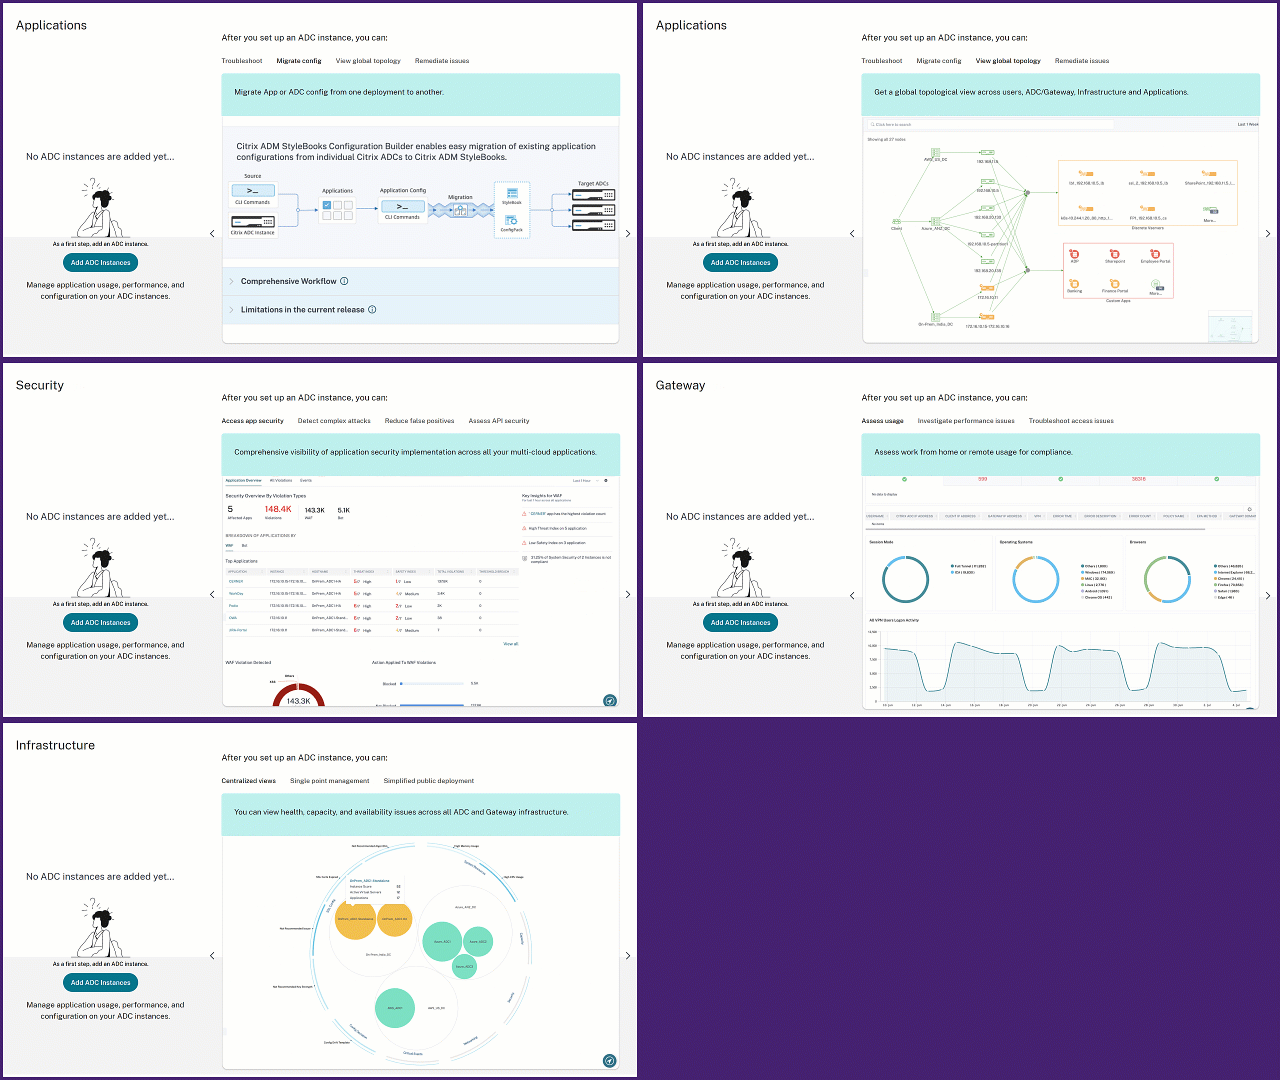
Click Add NetScaler instances to onboard the instances. The Get Started workflow restarts. Follow the steps from Step 3: Select an NetScaler deployment type onwards, given in this document, to onboard the instances. If the NetScaler instances are already onboarded, after you log on to NetScaler Console, you see only the NetScaler Console landing page with the navigation bar on the left.
Agent actions
After you've set up your NetScaler Console, you can apply various actions to an agent. Navigate to Infrastructure > Instances > Agents.

Under Select Action, you can use the following features:
-
Install a new certificate: if you need a different agent certificate to meet your security requirement, you can add one.
-
Change the agent password: to ensure security of your infrastructure, change the default password of an agent.
-
Generate a technical support file: generate a technical support file for a selected agent. You can download this file and send it to Citrix technical support for investigation and troubleshooting.
View agent diagnostics and receive alerts for endpoint verification
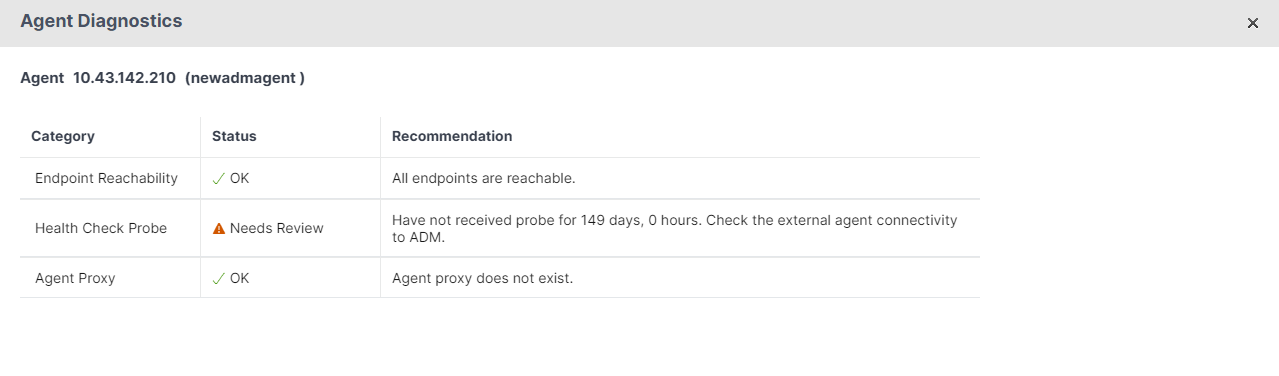
NetScaler Console performs a periodic (every one hour) diagnostic check for the agent and provides the following information:
-
Endpoint reachability – Checks if all endpoints are reachable. The agent uses various endpoints for the communication between NetScaler Console and NetScaler instances. For more information, see Software Requirements.
-
Health check probe – Provides the time stamp of the latest health check.
-
Agent proxy – Checks if the agent proxy exists.
If the agent endpoint reachability status changes (from OK to Needs Review), the super administrator receives an email notification comprising the issue details. Navigate to Infrastructure > Instances > Agents to view the newly added Diagnostics Status option that provides the status such as Needs Review or OK.

Click to view the diagnostic information of an agent.
-
Category. Provides the issue category.
-
Status. Provides the issue status such as Needs Review or OK.
-
Recommendation. Provides the required recommendation to troubleshoot the issue.
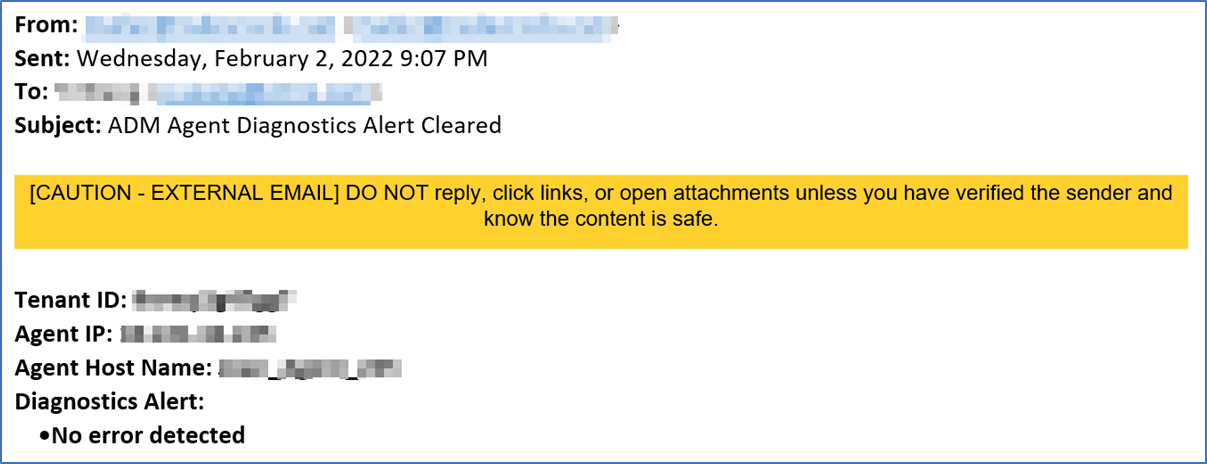
After you troubleshoot and the endpoint reachability status changes from Needs Review to OK, the super administrator receives an email notification mentioning that the issue is resolved.
Email notification
The following example is an email notification after the endpoint reachability status has changed from OK to Needs Review:
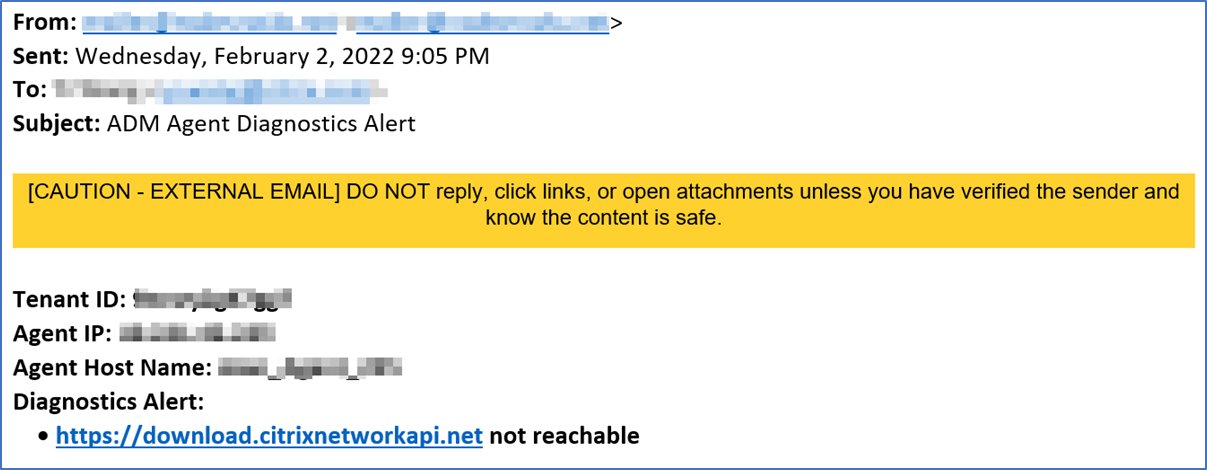
The following example is an email notification after the endpoint reachability status has changed from Needs Review to OK: