
Provision NetScaler VPX instances on SDX
You can provision one or more NetScaler VPX instances on the SDX appliance by using NetScaler Console. The number of instances that you can deploy depends on the license you have purchased. If the number of instances added is equal to the number specified in the license, the NetScaler Console does not allow you to provision more NetScaler instances.
Before you begin, ensure to add an SDX instance in NetScaler Console where you want to provision VPX instances.
To provision a VPX instance, do the following:
-
Navigate to Infrastructure > Instances > NetScaler.
-
In the SDX tab, select an SDX instance where you want to provision a VPX instance.
-
In Select Action, select Provision VPX.
Related information
Step 1 - Add a VPX instance
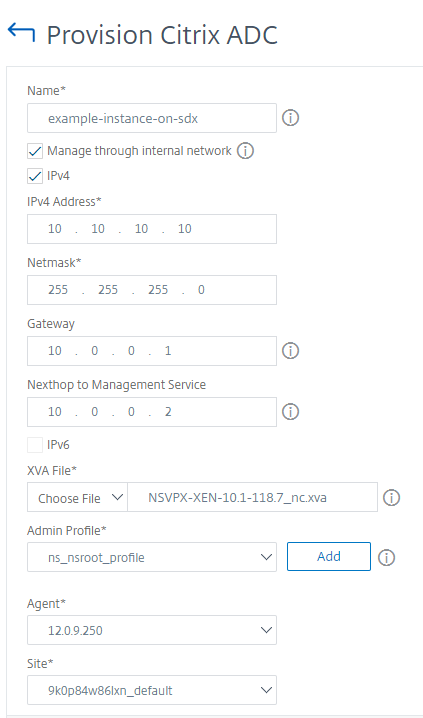
The NetScaler Console uses the following information to configure VPX instances in an SDX appliance:
-
Name - Specify a name to a NetScaler instance.
-
Establish a communication network between SDX and VPX. To do so, select the required options from the list:
-
Manage through internal network - This option establishes an internal network for a communication between the NetScaler Console and a VPX instance.
-
IP address - You can select an IPv4 or IPv6 address or both to manage the NetScaler VPX instance. A VPX instance can have only one management IP (also called NetScaler IP). You cannot remove the NetScaler IP address.For the selected option, assign a netmask, default gateway, and next hop to the NetScaler Console for the IP address.
-
-
XVA File - Select the XVA file from which you want to provision a VPX instance. Use one of the following options to select the XVA file.
-
Local - Select the XVA file from your local machine.
-
Appliance - Select the XVA file from an NetScaler Console file browser.
-
-
Admin Profile - This profile provides access to provision VPX instances. With this profile, NetScaler Console retrieves the configuration data from an instance. If you have to add a profile, click Add.
-
Agent - Select the agent with which you want to associate the instances
-
Site - Select the site where you want the instance to be added.
Step 2 - Allocate licenses
In the License Allocation section, specify the VPX license. You can use Standard, Advanced, and Premium licenses.
-
Allocation mode - You can choose Fixed or Burstable modes for the bandwidth pool.If you choose Burstable mode, you can use extra bandwidth when the fixed bandwidth is reached.
-
Throughput - Assign the total throughput (in Mbps) to an instance.
Note
Buy a separate license (SDX 2-Instance Add-On Pack for Secure Web Gateway) for Citrix Secure Web Gateway™ (SWG) instances on SDX appliances. This instance pack is different from the SDX platform license or SDX instance pack.
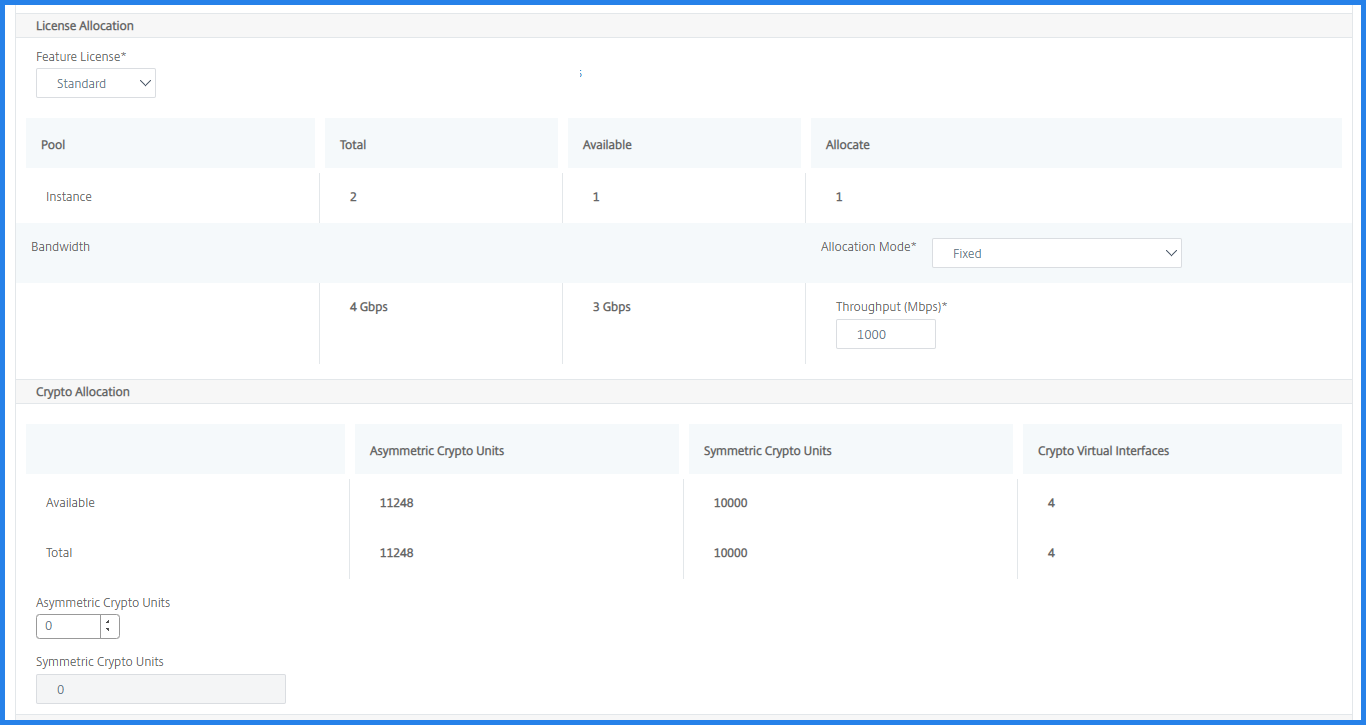
From the SDX 12.0 57.19 version, the interface to manage crypto capacity has changed. For more information, see Manage crypto capacity.
Step 3 - Allocate resources
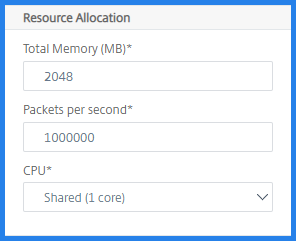
In the Resource Allocation section, allocate resources to a VPX instance to maintain traffic.
-
Total Memory (MB) - Assign total memory to an instance. The minimum value is
2048MB. -
Packets per second - Specify the number of packets to transmit per second.
-
CPU - Specify number of CPU cores to an instance. You can use shared or dedicated CPU cores.When you select a shared core to an instance, the other instances can use the shared core at the time of resource shortage.Restart instances on which CPU cores are reassigned to avoid any performance degradation.If you are using the SDX 25000xx platform, you can assign a maximum of 16 cores to an instance. Also, if you are using the SDX 2500xxx platform, you can assign a maximum of 11 cores to an instance.NoteFor an instance, the maximum throughput that you configure is 180 Gbps.
See the table in Provision NetScaler instances that lists the supported VPX, single bundle image version, and the number of cores you can assign to an instance.
Step 4 - Add instance administration
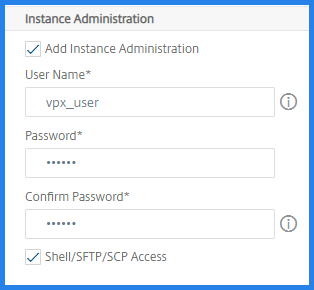
You can create an admin user for the VPX instance. To do so, select Add Instance Administration in the Instance Administration section.
Specify the following details:
-
User name: The user name for the NetScaler instance administrator. This user has superuser access but does not have access to networking commands to configure VLANs and interfaces.
-
Password: Specify the password for the user name.
-
Shell/Sftp/Scp Access: The access allowed to the NetScaler instance administrator. This option is selected by default.
Step 5 - Specify network settings
Select the required network settings to an instance:
-
Allow L2 Mode under network settings - You can allow L2 mode on the NetScaler instance. Select Allow L2 Mode under Networking Settings. Before you log on to the instance and enable L2 mode. For more information, see Allowing L2 Mode on a NetScaler instance.NoteIf you disable L2 mode for an instance, you must log on to the instance and disable L2 mode from that instance. Otherwise, it might cause all the other NetScaler modes to be disabled after you restart the instance.
-
0/1 - In VLAN tag, specify a VLAN ID for the management interface.
-
0/2 - In VLAN tag, specify a VLAN ID for the management interface.
By default interface 0/1 and 0/2 are selected.
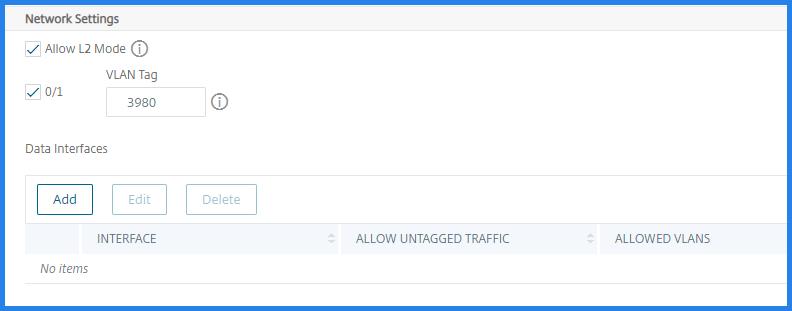
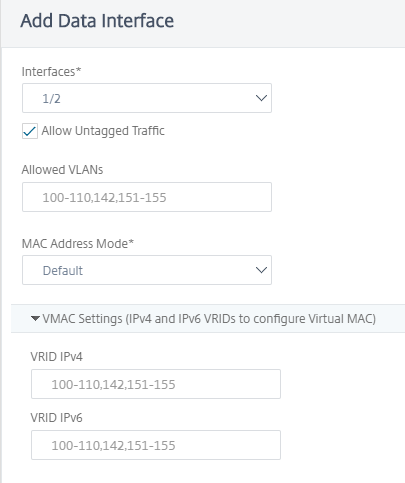
In Data Interfaces, click Add to add data interfaces and specify the following:
-
Interfaces - Select the interface from the list.NoteThe interface IDs of interfaces that you add to an instance do not necessarily correspond to the physical interface numbering on the SDX appliance.For example, the first interface that you associate with instance-1 is SDX interface 1/4, it appears as interface 1/1 when you view the interface settings in that instance. This interface indicates it is the first interface that you associated with instance-1.
-
Allowed VLANs - Specify a list of VLAN IDs that can be associated with a NetScaler instance.
-
MAC Address Mode - Assign a MAC address to an instance. Select from one of the following options:
-
Default - Citrix Workspace assigns a MAC address.
-
Custom - Choose this mode to specify a MAC address that overrides the generated MAC address.
-
Generated - Generate a MAC address by using the base MAC address set earlier. For information about setting a base MAC address, see Assigning a MAC Address to an Interface.
-
-
VMAC Settings (IPv4 and IPv6 VRIDs to configure Virtual MAC)
-
VRID IPV4 - The IPv4 VRID that identifies the VMAC. Possible values: 1–255. For more information, see Configuring VMACs on an Interface.
-
VRID IPV6 - The IPv6 VRID that identifies the VMAC. Possible values: 1–255. For more information, see Configuring VMACs on an Interface.
-
Click Add.
Step 6 - Specify Management VLAN settings
The Management Service and the management address (NSIP) of the VPX instance are in the same subnetwork, and communication is over a management interface.
If the Management Service and the instance are in different subnetworks, specify a VLAN ID while you provision a VPX instance. Therefore, the instance is reachable over the network when it active.
If your deployment requires the NSIP is accessible only through the selected interface while provisioning the VPX instance, select NSVLAN. And, the NSIP becomes inaccessible through other interfaces.
-
HA heartbeats are sent only on the interfaces that are part of the NSVLAN.
-
You can configure an NSVLAN only from the VPX XVA build
9.3-53.4and later.
Important
-
You cannot change this setting after you provision the VPX instance.
-
The
clear config fullcommand on the VPX instance deletes the VLAN configuration if NSVLAN is not selected.
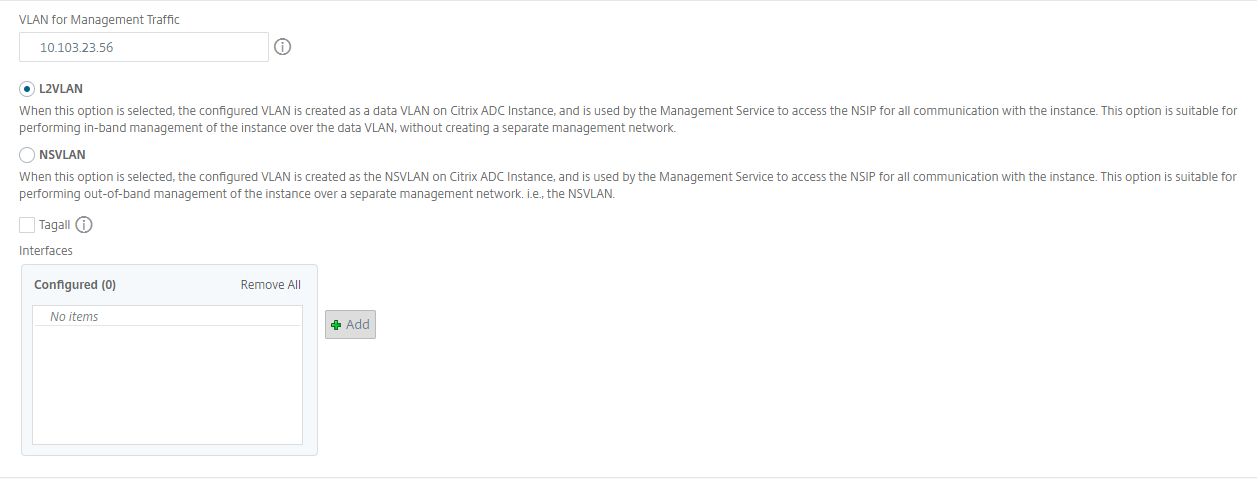
Click Done to provision a VPX instance.
View the provisioned VPX instance
To view the newly provisioned instance, do the following:
-
Navigate to Infrastructure > Instances > NetScaler.
-
In the VPX tab, search an instance by the Host IP address property and specify SDX instance IP to it.
