
Configuring a CloudBridge Connector tunnel between a NetScaler appliance and virtual private gateway on AWS
To connect a datacenter to Amazon Web Services (AWS), you can configure a CloudBridge Connector tunnel between a NetScaler appliance in the datacenter and a virtual private gateway on AWS. The NetScaler appliance and the virtual private gateway form the endpoints of the CloudBridge Connector tunnel and are called peers.
Note:
You can also set up a CloudBridge Connector tunnel between a NetScaler appliance in a datacenter and a NetScaler VPX instance (instead of a virtual private gateway) on AWS. For more information, see Configuring CloudBridge Connector between Datacenter and AWS Cloud.
Virtual private gateways on AWS support the following IPSec settings for a CloudBridge Connector tunnel. Therefore, you must specify the same IPSec settings when you configure the NetScaler appliance for the CloudBridge Connector tunnel.
| IPSec Properties | Setting |
|---|---|
| IPSec mode | Tunnel mode |
| IKE version | Version 1 |
| IKE Authentication method | Pre-Shared Key |
| Encryption algorithm | AES |
| Hash algorithm | HMAC SHA1 |
Related information
Example of CloudBridge® Connector tunnel configuration and data flow
As an illustration of the traffic flow in a CloudBridge Connector tunnel, consider an example in which a CloudBridge Connector tunnel is set up between NetScaler appliance NS\_Appliance-1 in a datacenter and virtual private gateway gateway AWS-Virtual-Private-Gateway-1 on AWS cloud.
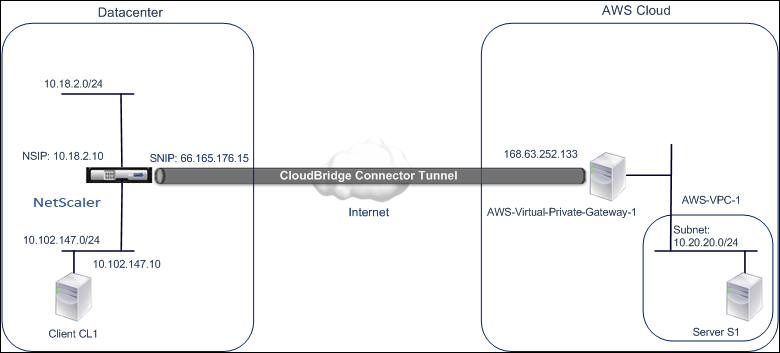
NS_Appliance-1 also functions as an L3 router, which enables a private network in the datacenter to reach a private network in the AWS cloud through the CloudBridge Connector tunnel. As a router, NS_Appliance-1 enables communication between client CL1 in the datacenter and server S1 in the AWS cloud through the CloudBridge Connector tunnel. Client CL1 and server S1 are on different private networks.
On NS_Appliance-1, the CloudBridge Connector tunnel configuration includes an IPSec profile entity named NS_AWS_IPSec_Profile, a CloudBridge Connector tunnel entity named NS_AWS_Tunnel, and a policy based routing (PBR) entity named NS_AWS_Pbr.
The IPSec profile entity NS_AWS_IPSec_Profile specifies the IPSec protocol parameters, such as IKE version, encryption algorithm, and hash algorithm, to be used by the IPSec protocol in the CloudBridge Connector tunnel. NS_AWS_IPSec_Profile is bound to IP tunnel entity NS_AWS_Tunnel.
CloudBridge Connector tunnel entity NS_AWS_Tunnel specifies the local IP address (a public IP—SNIP—address configured on the NetScaler appliance), the remote IP address (the IP address of the AWS-Virtual-Private-Gateway-1), and the protocol (IPSec) used to set up the CloudBridge Connector tunnel. NS_AWS_Tunnel is bound to policy based routing (PBR) entity NS_AWS_Pbr.
The PBR entity NS_AWS_Pbr specifies a set of conditions and a CloudBridge Connector tunnel entity (NS_AWS_Tunnel). The source IP address range and the destination IP address range are the conditions for NS_AWS_Pbr. The source IP address range and the destination IP address range are specified as a subnet in the datacenter and a subnet in the AWS cloud, respectively. Any request packet originating from a client in the subnet in the datacenter and destined to a server in the subnet on the AWS cloud matches the conditions in NS_AWS_Pbr. This packet is then considered for CloudBridge Connector processing and is sent across the CloudBridge Connector tunnel (NS_AWS_Tunnel) bound to the PBR entity.
The following table lists the settings used in this example.
| IP address of the CloudBridge Connector tunnel end point (NS_Appliance-1) in the datacenter side | 66.165.176.15 | |
|---|---|---|
| IP address of the CloudBridge Connector tunnel end point (AWS-Virtual-Private-Gateway-1) in the AWS | 168.63.252.133 | |
| Datacenter Subnet, the traffic of which is to traverse the CloudBridge Connector tunnel | 10.102.147.0/24 | |
| AWS Subnet, the traffic of which is to traverse the CloudBridge Connector tunnel | 10.20.20.0/24 |
Settings on Amazon AWS
| Customer Gateway | AWS-Customer-Gateway-1 | Routing = Static, IP Address = Internet-routable CloudBridge Connector tunnel endpoint IP address on the NetScaler side = 66.165.176.15 |
|---|---|---|
| Virtual Private Gateway | AWS-Virtual-Private-Gateway-1 | Associated VPC = AWS-VPC-1 |
| VPN Connection | AWS-VPN-Connection-1 | Customer Gateway = AWS-Customer-Gateway-1, Virtual Private Gateway= Virtual-Private-Gateway-1, Routing Options: Type = Static, Static IP Prefixes = Subnets on the NetScaler side = 10.102.147.0/24 |
Settings on NetScaler appliance NS_Appliance-1 in Datacenter-1:
| Appliance | Settings | |
|---|---|---|
| SNIP1(for reference purposes only) | 66.165.176.15 | |
| IPSec profile | NS_AWS_IPSec_Profile | IKE version = v1, Encryption algorithm = AES, Hash algorithm = HMAC SHA1 |
| CloudBridge Connector tunnel | NS_AWS_Tunnel | Remote IP = 168.63.252.133, Local IP= 66.165.176.15, Tunnel protocol = IPSec, IPSec profile= NS_AWS_IPSec_Profile |
| Policy based route | NS_AWS_Pbr | Source IP range = Subnet in the datacenter =10.102.147.0-10.102.147.255, Destination IP range =Subnet in AWS =10.20.20.0-10.20.20.255, IP Tunnel = NS_AWS_Tunnel |
Points to consider for a CloudBridge Connector tunnel configuration
Before configuring a CloudBridge Connector tunnel between a NetScaler appliance and AWS gateway, consider the following points:
-
AWS supports the following IPSec settings for a CloudBridge Connector tunnel. Therefore, you must specify the same IPSec settings when you configure the NetScaler appliance for the CloudBridge Connector tunnel.
-
IKE version = v1
-
Encryption algorithm = AES
-
Hash algorithm = HMAC SHA1
-
-
You must configure the firewall at the NetScaler end to allow the following.
-
Any UDP packets for port 500
-
Any UDP packets for port 4500
-
Any ESP (IP protocol number 50) packets
-
-
You must configure Amazon AWS before specifying the tunnel configuration on the NetScaler, because the public IP address of the AWS end (gateway) of the tunnel and the PSK are automatically generated when you set up the tunnel configuration in AWS. You need this information for specifying the tunnel configuration on the NetScaler appliance.
-
AWS gateway supports static routes and the BGP protocol for route updates. The NetScaler appliance does not support the BGP protocol in a CloudBridge Connector tunnel to AWS gateway. Therefore, appropriate static routes must be used on both sides of the CloudBridge Connector tunnel for proper routing of traffic through the tunnel.
Configuring Amazon AWS for the CloudBridge Connector tunnel
To create a CloudBridge Connector tunnel configuration on Amazon AWS, use the Amazon AWS Management Console, which is a web based graphical interface for creating and managing resources on Amazon AWS.
Before you begin the CloudBridge Connector tunnel configuration on AWS cloud, make sure that:
-
You have a user account for Amazon AWS cloud.
-
You have a virtual private cloud whose networks you want to connect to the networks at the NetScaler side through the CloudBridge Connector tunnel.
-
You are familiar with the Amazon AWS Management Console.
Note:
The procedures for configuring Amazon AWS for a CloudBridge Connector tunnel might change over time, depending on the Amazon AWS release cycle. Citrix recommends you refer Amazon AWS documentation for the latest procedures.
To configure a CloudBridge connector tunnel between a NetScaler and AWS gateway perform the following tasks on the AWS Management Console:
-
Create a Customer Gateway. A customer gateway is an AWS entity that represents a CloudBridge Connector tunnel endpoint. For a CloudBridge Connector tunnel between a NetScaler appliance and AWS gateway, the customer gateway represents the NetScaler appliance on AWS. The customer gateway specifies a name, the type of routing (static or BGP) used in the tunnel, and the CloudBridge Connector tunnel endpoint IP address on the NetScaler side. The IP address can be an Internet-routable NetScaler owned subnet IP (SNIP) address or, if the NetScaler appliance is behind a NAT device, an Internet-routable NAT IP address that represents the SNIP address.
-
Create a Virtual Private Gateway and attach it to a VPC. A virtual private gateway is a CloudBridge Connector tunnel endpoint at the AWS side. When you create a virtual private gateway, you assigned it a name or allow AWS to assign the name. You then associate the virtual private gateway with a VPC. This association enables the subnets of the VPC to connect to the subnets at the NetScaler side through the CloudBridge Connector tunnel.
-
Create a VPN Connection. A VPN connection specifies a customer gateway and a virtual private gateway between which a CloudBridge Connector tunnel is to be created. It also specifies an IP prefix for the networks at the NetScaler side. Only IP prefixes that are known to the virtual private gateway (through static route entry) can receive traffic from the VPC through the tunnel. Also, the virtual private gateway does not route any traffic not destined to the specified IP prefixes through the tunnel. After configuring a VPN connection, you might have to wait few minutes for it to be created.
-
Configure Routing Options. For the VPC’s network to reach the networks at the NetScaler side through the CloudBridge Connector tunnel, you must configure the VPC’s routing table to include routes for the networks at the NetScaler side and point those routes to the virtual private gateway. You can include routes in a VPC’s routing table in one of the following ways:
-
Enable Route Propagation. You can enable route propagation for your routing table, so that routes are automatically propagated to the table. The static IP prefixes that you specify for VPN configuration are propagated to the routing table after you've created the VPN connection.
-
Enter Static Routes Manually. If you do not enable route propagation, you must manually enter the static routes for the networks at the NetScaler side.
-
-
Download Configuration. After the CloudBridge Connector tunnel (VPN connection) configuration is created on AWS, download the configuration file of the VPN connection to your local system. You might need the information in the configuration file for configuring the CloudBridge Connector tunnel on the NetScaler appliance.
To create a customer gateway
-
Open the Amazon VPC console at
<https://console.aws.amazon.com/vpc/>. -
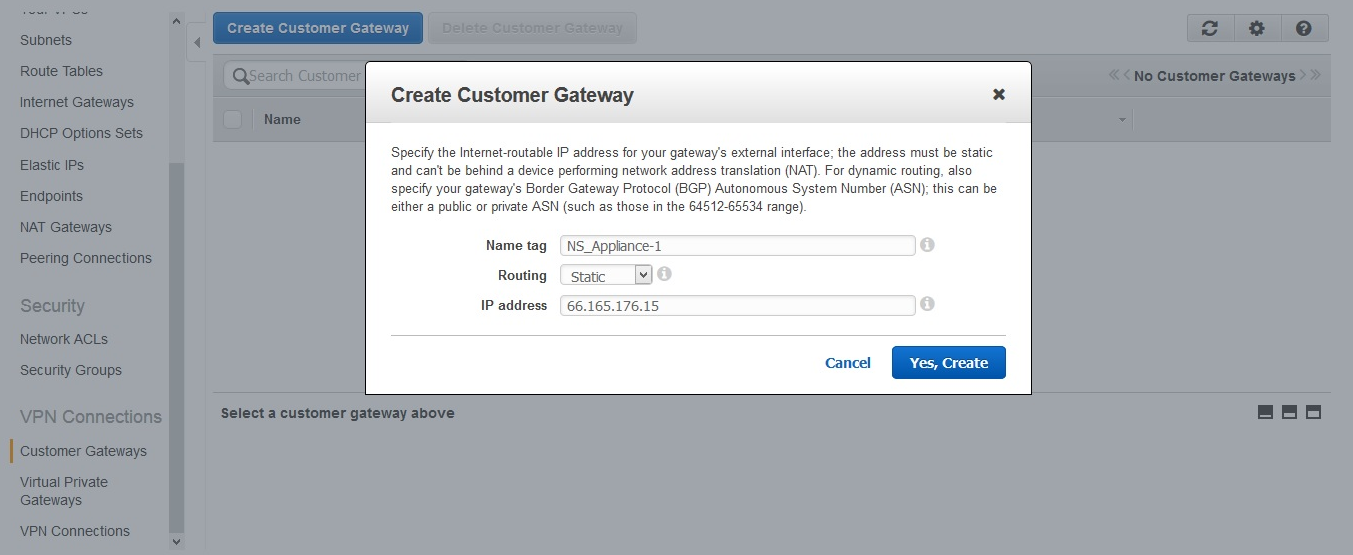
Navigate to VPN Connections > Customer Gateways and click on Create Customer Gateway.
-
In the Create Customer Gateway dialog box, set the following parameters and then click Yes, Create:
-
Name tag. A name for the customer gateway.
-
Routing list. Type of routing between NetScaler appliance and AWS virtual private gateway for advertising routes to each other through the CloudBridge Connector tunnel. Select Static Routing from the Routing list. Note: The NetScaler appliance does not support the BGP protocol in a CloudBridge Connector tunnel to AWS gateway. Therefore, appropriate static routes must be used on both sides of the CloudBridge Connector tunnel for proper routing of traffic through the tunnel.
-
IP Address. Internet-routable CloudBridge Connector tunnel endpoint IP address on the NetScaler side. The IP address can be an Internet-routable NetScaler owned subnet IP (SNIP) address or, if the NetScaler appliance is behind a NAT device, an Internet-routable NAT IP address that represents the SNIP address.
-
To create a virtual private gateway and attach it to a VPC
-
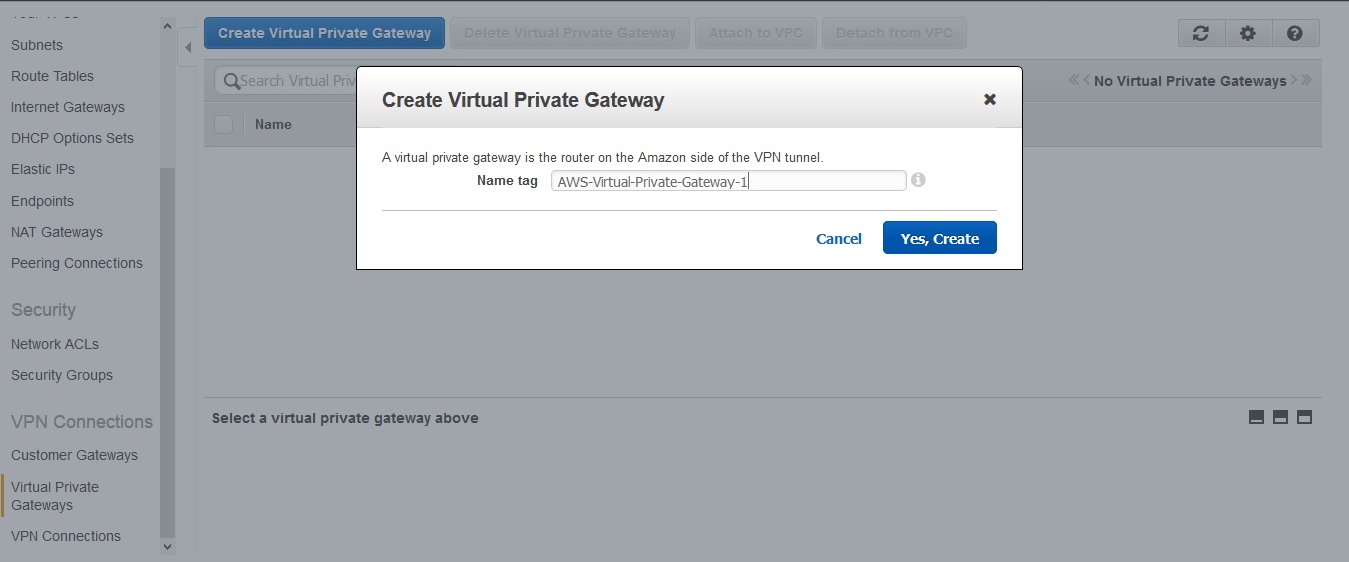
Navigate to VPN Connections > Virtual Private Gateways, and then click Create Virtual Private Gateway.
-
Enter a name for the virtual private gateway, and then click Yes, Create.
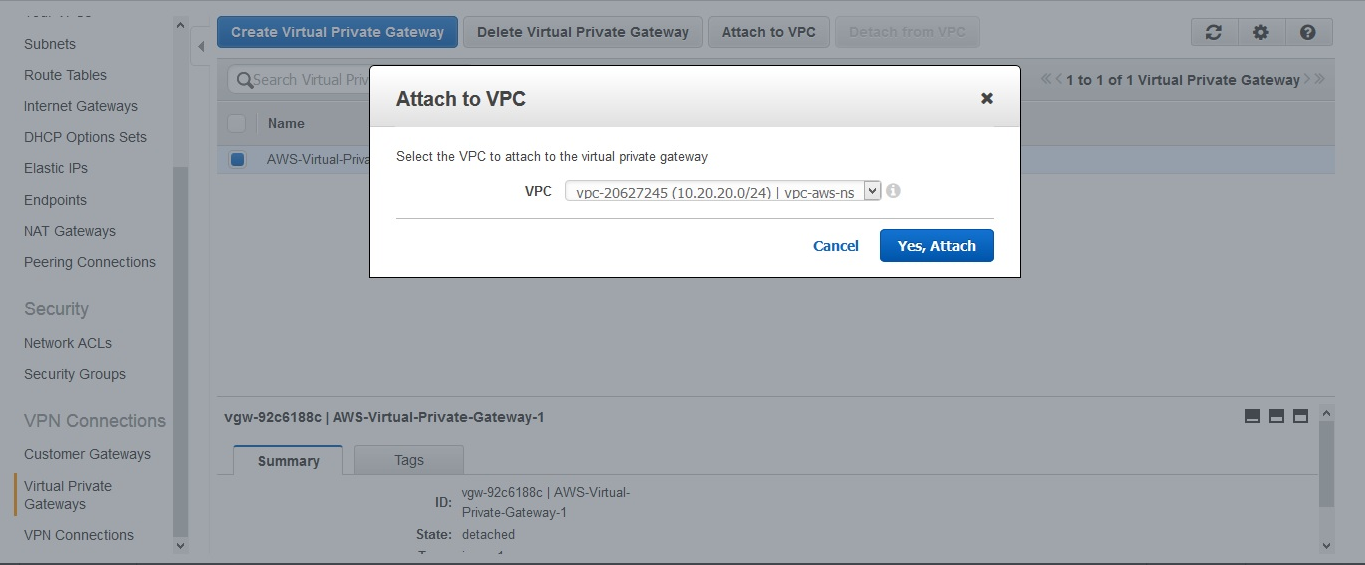
 3. Select the virtual private gateway that you created, and then click Attach to VPC. 4. In the Attach to VPC dialog box, select your VPC from the list, and then choose Yes, Attach.
To create a VPN connection:
-
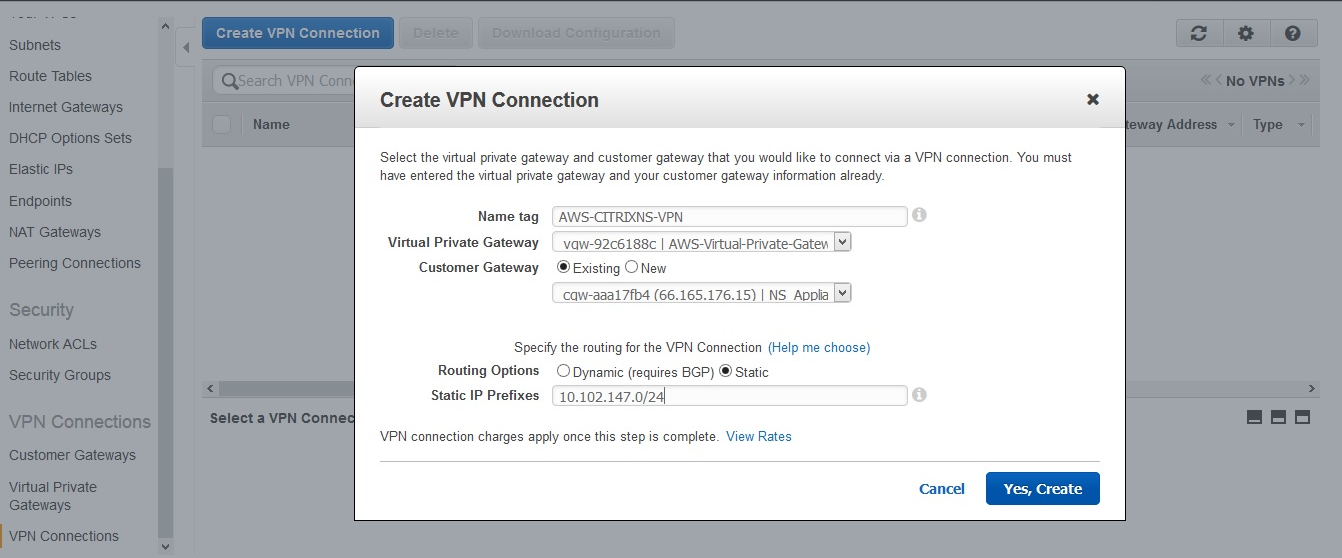
Navigate to VPN Connections > VPN Connections and then click Create VPN Connection.
-
In the Create VPN Connection dialog box set the following parameters and then choose Yes, Create:
-
Name tag. A name for the VPN connection.
-
Virtual Private Gateway. Select the virtual private gateway that you created earlier.
-
Customer Gateway. Select Existing. Then, from the drop down list, select the customer gateway that you created earlier.
-
Routing Options. Type of routing between the virtual private gateway and customer gateway (NetScaler appliance). Select Static. In the Static IP Prefixes field, specify the IP prefixes for the subnet on the NetScaler side, separated by commas.
-
To enable route propagation:
-
Navigate to Route Tables and select the routing table that's associated with the subnet whose traffic is to traverse the CloudBridge Connector tunnel.
Note
By default, this is the main routing table for the VPC.
-
On the Route Propagation tab in the details pane, choose Edit, select the virtual private gateway, and then choose Save.
To manually enter static routes:
-
Navigate to Route Tables and select your routing table.
-
On the Routes tab, click Edit.
-
In the Destination field, enter the static route used by your CloudBridge Connector tunnel (VPN connection).
-
Select the virtual private gateway ID from the Target list, and then click Save.
To download the configuration file:
-
Navigate to VPN Connection, select a VPN connection, and then click Download Configuration.
-
In the Download Configuration dialog box, set the following parameters, and then click Yes, Download.
-
Vendor. Select Generic.
-
Platform. Select Generic.
-
Software. Select Vendor Agnostic.
-
Configuring the NetScaler appliance for the CloudBridge Connector tunnel
To configure a CloudBridge Connector tunnel between a NetScaler appliance and a virtual private gateway on AWS cloud, perform the following tasks on the NetScaler appliance. You can use either the NetScaler command line or the GUI.
-
Create an IPSec profile. An IPSec profile entity specifies the IPSec protocol parameters, such as IKE version, encryption algorithm, hash algorithm and PSK to be used by the IPSec protocol in the CloudBridge Connector tunnel.
-
Create an IP tunnel that uses IPSec protocol and associate the IPSec profile with it. An IP tunnel specifies the local IP address (a SNIP address configured on the NetScaler appliance), remote IP address (the public IP address of the virtual private gateway in AWS), protocol (IPSec) used to set up the CloudBridge Connector tunnel, and an IPSec profile entity. The created IP tunnel entity is also called the CloudBridge Connector tunnel entity.
-
Create a PBR rule and associate it with the IP tunnel. A PBR entity specifies a set of rules and an IP tunnel (CloudBridge Connector tunnel) entity. The source IP address range and the destination IP address range are the conditions for the PBR entity. Set the source IP address range to specify the NetScaler-side subnet whose traffic is to traverse the tunnel, and set the destination IP address range to specify the AWS VPC subnet whose traffic is to traverse the CloudBridge Connector tunnel. Any request packet that originates from a client in the subnet on the NetScaler side and is destined to a server in the AWS cloud subnet, and matches the source and destination IP range of the PBR entity, is sent across the CloudBridge Connector tunnel associated with the PBR entity.
To create an IPSEC profile by using the NetScaler command line
At the Command prompt, type:
-
add ipsec profile <name> -psk <string> -**ikeVersion** v1 -
show ipsec profile** <name>
To create an IPSEC tunnel and bind the IPSEC profile to it by using the NetScaler command line
At the Command prompt, type:
-
add ipTunnel <name> <remote> <remoteSubnetMask> <local> -protocol IPSEC –ipsecProfileName <string> -
show ipTunnel <name>
To create a PBR rule and bind the IPSEC tunnel to it by using the NetScaler command line
At the Command prompt, type:
-
add pbr <pbrName> ALLOW –srcIP <subnet-range> -destIP** <subnet-range> -*ipTunnel <tunnelName> -
apply pbrs -
show pbr <pbrName>
The following commands create all settings of NetScaler appliance NS_Appliance-1 used in "Example of CloudBridge Connector Configuration and Data Flow."
    > add ipsec profile NS_AWS_IPSec_Profile -psk  DkiMgMdcbqvYREEuIvxsbKkW0Foyabcd -ikeVersion v1 –lifetime 31536000
     Done
     > add iptunnel NS_AWS_Tunnel 168.63.252.133 255.255.255.255 66.165.176.15 –protocol IPSEC –ipsecProfileName NS_AWS_IPSec_Profile

     Done
     > add pbr NS_AWS_Pbr -srcIP 10.102.147.0-10.102.147.255 –destIP 10.20.0.0-10.20.255.255 –ipTunnel NS_AWS_Tunnel
     Done

     > apply pbrs

     Done
To create an IPSEC profile by using the GUI
-
Navigate to System > CloudBridge Connector > IPSec Profile.
-
In the details pane, click Add.
-
In the Add IPSec Profile dialog box, set the following parameters:
-
Name
-
Encryption Algorithm
-
Hash Algorithm
-
IKE Protocol Version (select V1)
-
-
Select the Pre-shared Key Authentication method and set the Pre-Shared Key Exists parameter.
-
Click Create, and then click Close.
To create an IP tunnel and bind the IPSEC profile to it by using the GUI
-
Navigate to System > CloudBridge Connector > IP Tunnels.
-
On the IPv4 Tunnels tab, click Add.
-
In the Add IP Tunnel dialog box, set the following parameters:
-
Name
-
Remote IP
-
Remote Mask
-
Local IP Type (In the Local IP Type drop down list, select Subnet IP).
-
Local IP (All the configured IPs of the selected IP type are in the Local IP drop down list. Select the desired IP from the list.)
-
Protocol
-
IPSec Profile
-
-
Click Create, and then click Close.
To create a PBR rule and bind the IPSEC tunnel to it by using the GUI
-
Navigate to System > Network > PBR.
-
On the PBR tab, click Add.
-
In the Create PBR dialog box, set the following parameters:
-
Name
-
Action
-
Next Hop Type (Select IP Tunnel)
-
IP Tunnel Name
-
Source IP Low
-
Source IP High
-
Destination IP Low
-
Destination IP High
-
-
Click Create, and then click Close.
The corresponding new CloudBridge Connector tunnel configuration on the NetScaler appliance appears in the GUI.
The current status of the CloudBridge connector tunnel is shown in the Configured CloudBridge Connector pane. A green dot indicates that the tunnel is up. A red dot indicates that the tunnel is down.
Monitoring the CloudBridge Connector tunnel
You can monitor the performance of CloudBridge Connector tunnels on a NetScaler appliance by using CloudBridge Connector tunnel statistical counters. For more information about displaying CloudBridge Connector tunnel statistics on a NetScaler appliance, see Monitoring CloudBridge Connector Tunnels.