
Multiple-Firewall Environment
In a multiple-firewall environment, the NetScaler appliance is placed between two sets of firewalls, the external set connecting to the public Internet, and the internal set connecting to the internal private network. The external set typically handles the egress traffic. These firewalls mainly implement access control lists to allow or deny access to external resources. The internal set typically handles the ingress traffic. These firewalls implement security to safeguard the intranet from malicious attacks apart from load-balancing the ingress traffic. The multiple-firewall environment allows you to load-balance traffic coming from another firewall. By default, the traffic coming from a firewall is not load balanced on the other firewall across a NetScaler appliance. Having firewall load balancing enabled on both the sides of NetScaler improves the traffic flow in both the egress and ingress direction and ensures faster processing of the traffic.
The following figure shows a multiple-firewall load balancing environment
Figure 1. Firewall Load Balancing (multiple-firewall)
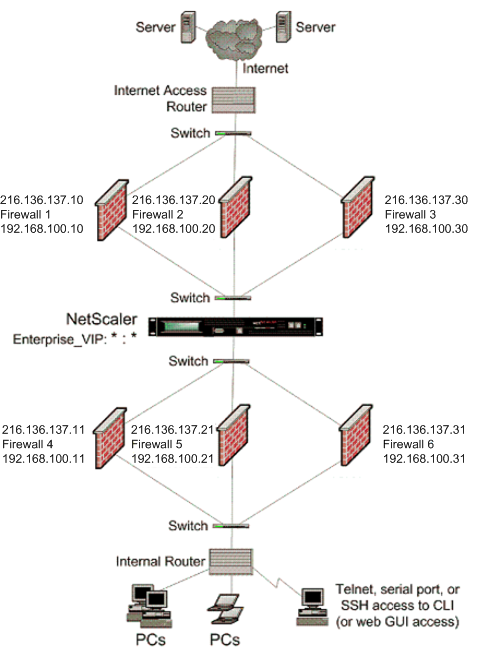
With a configuration like the one shown in Figure 1, you can configure the NetScaler to load balance the traffic through the an internal firewall even if it is load balanced by an external firewall. For example, with this feature configured, the traffic coming from the external firewalls (firewalls 1, 2, and 3) is load balanced on the internal firewalls (firewalls 4, 5, and 6) and vice versa.
Firewall load balancing is supported only for MAC mode LB virtual server.
The service type ANY configures the NetScaler to accept all traffic.
To avail benefits related to HTTP and TCP, configure the service and virtual server with type HTTP or TCP. For FTP to work, configure the service with type FTP.
Related information
Configuring the NetScaler in a Multiple-Firewall Environment
To configure a NetScaler appliance in a multiple-firewall environment, you have to enable the load balancing feature, configure a virtual server to load balance the egress traffic across the external firewalls, configure a virtual server to load balance the ingress traffic across the internal firewalls, and enable firewall load balancing on the NetScaler appliance. To configure a virtual server to load balance traffic across a firewall in the multiple-firewall environment, you need to:
-
Configure a wildcard service for each firewall
-
Configure a monitor for each wildcard service
-
Configure a wildcard virtual server to load balance the traffic sent to the firewalls
-
Configure the virtual server in MAC rewrite mode
-
Bind firewall services to the wildcard virtual server
Enabling the load balancing feature
To configure and implement load balancing entities such as services and virtual servers, you need to enable the load balancing feature on the NetScaler device.
To enable load balancing by using the CLI:
At the command prompt, type the following command to enable load balancing and verify the configuration:
enable ns feature <featureName>
 show ns feature
Example:
enable ns feature LoadBalancing
 Done
 show ns feature
 Feature Acronym Status
 ------- ------- ------
 1) Web Logging WL OFF
 2) Surge Protection SP ON
 3) Load Balancing LB ON
 .
 .
 .
 24) NetScaler Push push OFF
 Done
To enable load balancing by using the GUI:
-
In the navigation pane, expand System, and then click Settings.
-
In the Settings pane, under Modes and Features, click Change basic features.
-
In the Configure Basic Features dialog box, select the Load Balancing check box, and then click Ok.
Configuring a wildcard service for each firewall
To accept traffic from all the protocols, you need to configure wildcard service for each firewall by specifying support for all the protocols and ports.
To configure a wildcard service for each firewall by using the CLI:
At the command prompt, type the following command to configure support for all the protocols and ports:
add service <name>@ <serverName> <serviceType> <port_number>
Example:
add service fw-svc1 10.102.29.5 ANY *
To configure a wildcard service for each firewall by using the GUI:
-
Navigate to Traffic Management > Load Balancing > Services.
-
In the details pane, click Add.
-
In the Create Services dialog box, specify values for the following parameters as shown:
-
Service Name—name
-
Server—serverName
-* A required parameter -
-
In Protocol, select Any and in Port, select *.
-
Click Create, and then click Close. The service you created appears in the Services pane.
Configuring a monitor for each service
A PING monitor is bound by default to the service. You will need to configure a transparent monitor to monitor hosts on the trusted side through individual firewalls. You can then bind the transparent monitor to services. The default PING monitor monitors the connectivity only between the NetScaler appliance and the upstream device. The transparent monitor monitors all the devices existing in the path from the appliance to the device that owns the destination IP address specified in the monitor. If a transparent monitor is not configured and the status of the firewall is UP but one of the next hop devices from that firewall is down, the appliance includes the firewall while performing load balancing and forwards the packet to the firewall. However, the packet is not delivered to the final destination because one of the next hop devices is down. By binding a transparent monitor, if any of the devices (including the firewall) are down, the service is marked as DOWN and the firewall is not included when the appliance performs firewall load balancing.
Binding a transparent monitor will override the PING monitor. To configure a PING monitor in addition to a transparent monitor, after you create and bind a transparent monitor, you need to bind a PING monitor to the service.
To configure a transparent monitor by using the CLI:
At the command prompt, type the following commands to configure a transparent monitor and verify the configuration:
add lb monitor <monitorName> <type> [-destIP <ip_addr|ipv6_addr|*>] [-transparent (YES | NO )]
 bind lb monitor <monitorName> <serviceName>
Example:
add monitor monitor-HTTP-1 HTTP -destip 10.10.10.11 -transparent YES
 bind monitor monitor-HTTP-1 fw-svc1
The NetScaler appliance learns the server L2 parameters from the monitor that is bound to the service. For UDP-ECV monitors, configure a receive string to enable the appliance to learn the L2 parameters of the server. If the receive string is not configured and the server does not respond, then the appliance does not learn the L2 parameters but the service is set to UP. The traffic for this service is blackholed.
To configure a receive string by using the CLI:
At the command prompt, type the following command:
add lb monitor <monitorName> <type> [-destIP <ip_addr|ipv6_addr|*>] [-transparent (YES | NO )] [-send <string>] [-recv <string>]
Example:
add lb monitor monitor-udp-1 udp-ecv -destip 10.10.10.11 -transparent YES –send "test message" –recv "site_is_up"
To create and bind a transparent monitor by using the GUI:
-
Navigate to Traffic Management > Load Balancing > Monitors.
-
In the details pane, click Add.
-
In the Create Monitor dialog box, specify values for the following parameters as shown:
-
Name*
-
Type*—type
-
Destination IP
-
Transparent
-* A required parameter -
-
Click Create, and then click Close. In the Monitors pane, select the monitor that you just configured and verify that the settings displayed at the bottom of the screen are correct.
Configuring a virtual server to load balance the traffic sent to the firewalls
To load balance any kind of traffic, you need to configure a wildcard virtual server specifying the protocol and port as any value.
To configure a virtual server to load balance the traffic sent to the firewalls by using the CLI:
At the command prompt, type the following command:
add lb vserver <name>@ <serviceType> <IPAddress> <port_number>
Example:
add lb vserver Vserver-LB-1 ANY * *
To configure a virtual server to load balance the traffic sent to the firewalls by using the GUI:
-
Navigate to Traffic Management > Load Balancing > Virtual Servers.
-
In the details pane, click Add.
-
In Protocol, select Any, and in IP Address and Port, select *.
-
Click Create, and then click Close. The virtual server you created appears in the Load Balancing Virtual Servers pane.
Configuring the virtual server to MAC rewrite mode
To configure the virtual server to use MAC address for forwarding the incoming traffic, you need to enable the MAC rewrite mode.
To configure the virtual server in MAC rewrite mode by using the CLI:
At the command prompt, type the following command:
set lb vserver <name>@ -m <RedirectionMode>
Example:
set lb vserver Vserver-LB-1 -m MAC
To configure the virtual server in MAC rewrite mode by using the GUI:
-
Navigate to Traffic Management > Load Balancing > Virtual Servers.
-
In the details pane, select the virtual server for which you want to configure the redirection mode (for example, Vserver-LB1), and then click Open.
-
On the Advanced tab, under the Redirection Mode mode, click Open.
-
Click Ok.
Binding firewall services to the virtual server
To access a service on NetScaler appliance, you need to bind it to a wildcard virtual server.
To bind firewall services to the virtual server by using the CLI:
At the command prompt, type the following command:
bind lb vserver <name>@ <serviceName>
Example:
bind lb vserver Vserver-LB-1 Service-HTTP-1
To bind firewall services to the virtual server by using the GUI:
-
Navigate to Traffic Management > Load Balancing > Virtual Servers.
-
In the details pane, select the virtual server for which you want to configure the redirection mode (for example, Vserver-LB1), and then click Open.
-
In the Configure Virtual Server (Load Balancing) dialog box, on the Services tab, select the Active check box next to the service that you want to bind to the virtual server(for example, Service-HTTP-1 ).
-
Click Ok.
Configuring the multiple-firewall load balancing on the NetScaler appliance
To load balance traffic on both the sides of a NetScaler using firewall load balancing, you need to enable mulitpl-firewall load balancing by using the vServerSpecificMac parameter.
To configure multiple-firewall load balancing by using the CLI:
At the command prompt, type the following command:
set lb parameter -vServerSpecificMac <status>
Example:
set lb parameter -vServerSpecificMac ENABLED
To configure multiple-firewall load balancing by using the GUI:
-
Navigate to Traffic Management > Load Balancing > Virtual Servers.
-
In the details pane, select the virtual server for which you want to configure the redirection mode (for example, Configure Load Balancing parameters).
-
In the Set Load Balancing Parameters dialog box, select the Virtual Server Specific MAC check box.
-
Click Ok.
Saving and Verifying the Configuration
When you've finished the configuration tasks, be sure to save the configuration. You should also check to make sure that the settings are correct.
To save and verify the configuration by using the CLI:
At the command prompt, type the following commands to configure a transparent monitor and verify the configuration:
-
save ns config
-
show vserver
Example:
save config
 show lb vserver FWLBVIP2
         FWLBVIP2 (*:*) - ANY    Type: ADDRESS
         State: UP
         Last state change was at Mon Jun 14 07:22:54 2010
         Time since last state change: 0 days, 00:00:32.760
         Effective State: UP
         Client Idle Timeout: 120 sec
         Down state flush: ENABLED
         Disable Primary Vserver On Down : DISABLED
         No. of Bound Services :  2 (Total)       2 (Active)
         Configured Method: LEASTCONNECTION
         Current Method: Round Robin, Reason: A new service is bound
         Mode: MAC
         Persistence: NONE
         Connection Failover: DISABLED

 1) fw-int-svc1 (10.102.29.5: *) - ANY State: UP Weight: 1
 2) fw-int-svc2 (10.102.29.9: *) - ANY State: UP Weight: 1
  Done
 show service fw-int-svc1
         fw-int-svc1 (10.102.29.5:*) - ANY
         State: DOWN
         Last state change was at Thu Jul  8 14:44:51 2010
         Time since last state change: 0 days, 00:01:50.240
         Server Name: 10.102.29.5
         Server ID : 0   Monitor Threshold : 0
         Max Conn: 0     Max Req: 0      Max Bandwidth: 0 kbits
         Use Source IP: NO
         Client Keepalive(CKA): NO
         Access Down Service: NO
         TCP Buffering(TCPB): NO
         HTTP Compression(CMP): NO
         Idle timeout: Client: 120 sec   Server: 120 sec
         Client IP: DISABLED
         Cacheable: NO
         SC: OFF
         SP: OFF
         Down state flush: ENABLED

 1)      Monitor Name: monitor-HTTP-1
                 State: DOWN     Weight: 1
                 Probes: 9       Failed [Total: 9 Current: 9]
                 Last response: Failure - Time out during TCP connection establishment stage
                 Response Time: 2000.0 millisec
 2)      Monitor Name: ping
                 State: UP       Weight: 1
                 Probes: 3       Failed [Total: 0 Current: 0]
                 Last response: Success - ICMP echo reply received.
                 Response Time: 1.275 millisec
  Done
To save and verify the configuration by using the GUI:
-
In the details pane, click Save.
-
In the Save Config dialog box, click Yes.
-
Navigate to Traffic Management > Load Balancing > Virtual Servers.
-
In the details pane, select the virtual server that you created in step 5 and verify that the settings displayed in the Details pane are correct.
-
Navigate to Traffic Management > Load Balancing > Services.
-
In the details pane, select the service that you created in step 5 and verify that the settings displayed in the Details pane are correct.
Monitoring a Firewall Load Balancing Setup in a Multiple-Firewall Environment
After the configuration is up and running, you should view the statistics for each service and virtual server to check for possible problems.
Viewing the Statistics of a Virtual Server
To evaluate the performance of virtual servers or to troubleshoot problems, you can display details of the virtual servers configured on the NetScaler appliance. You can display a summary of statistics for all the virtual servers, or you can specify the name of a virtual server to display the statistics only for that virtual server. You can display the following details:
-
Name
-
IP address
-
Port
-
Protocol
-
State of the virtual server
-
Rate of requests received
-
Rate of hits
To display virtual server statistics by using the command line interface
To display a summary of the statistics for all the virtual servers currently configured on the NetScaler appliance, or for a single virtual server, at the command prompt, type:
stat lb vserver [-detail] [<name>]
Example:
>stat lb vserver -detail
 Virtual Server(s) Summary
                       vsvrIP  port     Protocol        State    Req/s   Hits/s
 One                        *    80         HTTP           UP      5/s      0/s
 Two                        *     0          TCP         DOWN      0/s      0/s
 Three                      *  2598          TCP         DOWN      0/s      0/s
 dnsVirtualNS    10.102.29.90    53          DNS         DOWN      0/s      0/s
 BRVSERV            10.10.1.1    80         HTTP         DOWN      0/s      0/s
 LBVIP           10.102.29.66    80         HTTP           UP      0/s      0/s
  Done
To display virtual server statistics by using the GUI:
-
Navigate to Traffic Management > Load Balancing > Virtual Servers > Statistics.
-
If you want to display the statistics for only one virtual server, in the details pane, select the virtual server, and click Statistics.
Viewing the Statistics of a Service
You can view the rate of requests, responses, request bytes, response bytes, current client connections, requests in surge queue, current server connections, and so forth using the service statistics.
To view the statistics of a service by using the CLI:
At the command prompt, type:
stat service <name>
Example:
stat service Service-HTTP-1
To view the statistics of a service by using the GUI:
-
Navigate to Traffic Management > Load Balancing > Services > Statistics.
-
If you want to display the statistics for only one service, select the service, and click Statistics.