
Virtual MAC Based Traffic Domains
You can associate a traffic domain with a virtual MAC address instead of with VLANs. NetScaler then sends the traffic domain’s virtual MAC address in all responses to ARP queries for network entities in that domain. As a result, NetScaler segregates subsequent incoming traffic for different traffic domains based on the destination MAC address, because the destination MAC address is the virtual MAC address of a traffic domain. After creating entities on a traffic domain, you can easily manage and monitor them by performing traffic domain level operations.
Consider an example in which two traffic domains, with IDs 1 and 2, are configured on NetScaler appliance NS1. The NetScaler creates a virtual MAC address virtual MAC1 and associates it with traffic domain 1. Similarly, the NetScaler created another virtual MAC address virtual MAC2 and associates with traffic domain 2.
In traffic domain 1, the load balancing virtual server LBVS-TD1 is configured to load balance traffic across servers S1 and S2. On the NetScaler appliance, servers S1 and S2 are represented by services SVC1-TD1 and SVC2-TD1, respectively. A subnet IP address (SNIP) SNIP1 is configured for enabling the NetScaler to communicate with S1 and S2. Because virtual MAC1 is associated with traffic domain 1, the appliance sends virtual MAC1 as the MAC address in all ARP announcements and ARP responses for LBVS-TD1 and SNIP1.
Similarly in traffic domain 2, the load balancing virtual server LBVS-TD2 is configured to load balance traffic across S3 and S4. On the NetScaler appliance, servers S3 and S4 are represented by services SVC3-TD2 and SVC4-TD2, respectively. A SNIP address SNIP2 is configured for enabling the NetScaler to communicate with S3 and S4. Because virtual MAC2 is associated with traffic domain 2, the appliance sends virtual MAC2 as the MAC address in all ARP announcements and ARP responses for LBVS-TD2 and SNIP2.
NetScaler segregates subsequent incoming traffic for traffic domains 1 or 2 based on the destination MAC address, if the destination MAC address is virtual MAC1 or virtual MAC2. 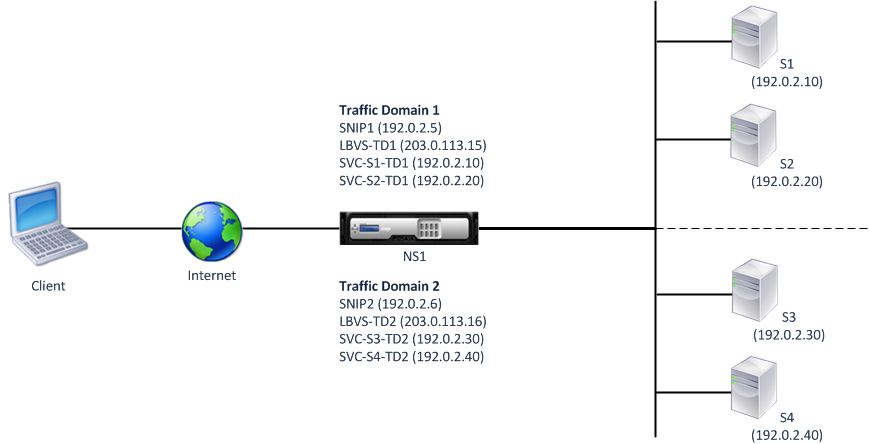
The following table lists the settings used in the example: Virtual MAC based traffic domain example settings.
Related information
Before you Begin
Consider the following points before you configure a virtual MAC based traffic domain:
-
Virtual MAC based traffic domains are the easiest way to achieve network traffic segregation.
-
Because virtual MAC-based traffic domains segregate network traffic based on virtual MAC addresses and not VLANS, you cannot create duplicate IP addresses on different virtual MAC based traffic domains on a NetScaler.
-
Virtual MAC based traffic domains do not work when the NetScaler is deployed only in L2 Mode.
-
Both VLAN and virtual MAC based traffic domains can coexist on a NetScaler. virtual MAC based traffic domains actually run on all VLANs that are not bound to any VLAN-based traffic domain.
Configuration Steps
Configuring a virtual MAC based traffic domain on a NetScaler appliance consists of the following tasks:
-
Create a traffic domain entity and enable the virtual MAC option. Create a traffic domain entity uniquely identified by an ID, which is an integer value, and then enable the virtual MAC option. After creating the traffic domain entity, the NetScaler creates a virtual MAC address and then associates it to the traffic domain entity.
-
Create feature entities on the traffic domain. Create the required feature entities in the traffic domain by specifying the traffic domain identifier (td) when configuring these feature entities. NetScaler owned network entities created in a virtual MAC based traffic domain are associated with the virtual MAC address, which is associated with the traffic domain. The NetScaler then sends the traffic domain’s virtual MAC address in ARP announcements and ARP responses for these network entities.
CLI procedures
To create a virtual MAC based traffic domain by using the CLI:
At the command prompt, type:
add ns trafficDomain \<td> [-vmac ( ENABLED | DISABLED )]
 show ns trafficdomain \<td>
To configure a SNIP address by using the CLI:
At the command prompt, type:
add ns ip \<IPAddress> \<netmask> -type SNIP -td \<id>
 show ns ip \<IPAddress> -td \<id>
To create a service by using the CLI:
At the command prompt, type:
add service \<name> \<IP> \<serviceType> \<port> -td \<id>
 show service \<name> -td \<id>
To create a load balancing virtual server and bind services to it by using the CLI:
At the command prompt, type:
add lb vserver \<name> \<serviceType> \<IPAddress> \<port> -td \<id>
 bind lb vserver \<name> \<serviceName>
 show lb vserver \<name> -td \<id>
Example:
> add ns trafficDomain 1 -vmac ENABLED
  Done
 > add ns trafficDomain 2 -vmac ENABLED
  Done

 > add ns ip 192.0.2.5 255.255.255.0 -type SNIP -td 1
  Done
 > add service  SVC-S1-TD1  192.0.2.10 HTTP 80 -td 1
  Done
 > add service  SVC-S2-TD1  192.0.2.20 HTTP 80 -td 1
  Done
 > add lb vserver  LBVS-TD1 HTTP   203.0.113.15 80 -td 1
  Done
 > bind lb vserver  LBVS-TD1 SVC-S1-TD1
  Done
 > bind lb vserver  LBVS-TD1 SVC-S2-TD1
  Done

 > add ns ip 192.0.2.6 255.255.255.0 -type SNIP -td 2
  Done
 > add service  SVC-S3-TD2  192.0.2.30 HTTP 80 -td 2
  Done
 > add service  SVC-S4-TD2  192.0.2.40 HTTP 80 -td 2
  Done
 > add lb vserver  LBVS-TD2 HTTP 203.0.113.16 80 -td 2
  Done
 > bind lb vserver  LBVS-TD2 SVC-S3-TD2
  Done
 > bind lb vserver  LBVS-TD2 SVC-S4-TD2
  Done
GUI procedures
To create a virtual MAC based traffic domain by using the GUI:
-
Navigate to System > Network > Interfaces.
-
In the details pane, click Add.
-
On the Create Traffic Domain page, set the following parameters:
-
Traffic Domain ID*
-
Enable Mac
-
-
Click Create.
To configure a SNIP address by using the GUI:
-
Navigate to System > Network > IPs > IPv4.
-
Navigate to Network > IPs > IPv4.
-
In the details pane, click Add.
-
In the Create IP page, set the following parameters. For a description of a parameter, hover the mouse cursor over the corresponding field.
-
IP Address
-
Netmask
-
IP Type
-
Traffic Domain ID
-
-
Click Create.
To create a service by using the GUI:
-
Navigate to Traffic Management > Load Balancing > Services.
-
In the details pane, click Add.
-
In the Basic Settings Page, set the following parameters. For a description of a parameter, hover the mouse cursor over the corresponding field.
-
Service Name
-
Server
-
Protocol
-
Port
-
Traffic Domain ID
-
-
Click Continue, and click Done.
-
Repeat step 2 through step 4 to create another service.
-
Click Close.
To create a load balancing virtual server and bind services to it by using the GUI:
-
Navigate to Traffic Management > Load Balancing > Virtual Servers.
-
In the Load Balancing Virtual Servers pane, click Add.
-
In the Create Virtual Servers (Load Balancing) dialog box, set the following parameters. For a description of a parameter, hover the mouse cursor over the corresponding field.
-
Name
-
IP Address
-
Protocol
-
Port
-
Traffic Domain ID
-
-
Click Continue, on the Service Pane, click >.
-
On the Service page, click Insert, and then select the checkbox for the services that you want to bind to the virtual server.
-
Click Continue, and click Done.
-
Repeat step 2 through step 5 to create another virtual server.