
Secure load balanced traffic by using SSL
The NetScaler SSL offload feature transparently improves the performance of websites that conduct SSL transactions. By offloading CPU-intensive SSL encryption and decryption tasks from the local web server to the appliance, SSL offloading ensures secure delivery of web applications without the performance penalty incurred when the server processes the SSL data. Once the SSL traffic is decrypted, it can be processed by all standard services. The SSL protocol works seamlessly with various types of HTTP and TCP data and provides a secure channel for transactions using such data.
To configure SSL, you must first enable it. Then, you configure HTTP or TCP services and an SSL virtual server on the appliance, and bind the services to the virtual server. You must also add a certificate-key pair and bind it to the SSL virtual server. If you use Outlook Web Access servers, you must create an action to enable SSL support and a policy to apply the action. An SSL virtual server intercepts incoming encrypted traffic and decrypts it by using a negotiated algorithm. The SSL virtual server then forwards the decrypted data to the other entities on the appliance for appropriate processing.
For detailed information about SSL offloading, see SSL offload and acceleration.
Related information
SSL configuration task sequence
To configure SSL, you must first enable it. Then, you must create an SSL virtual server and HTTP or TCP services on the NetScaler appliance. Finally, you must bind a valid SSL certificate and the configured services to the SSL virtual server.
An SSL virtual server intercepts incoming encrypted traffic and decrypts it using a negotiated algorithm. The SSL virtual server then forwards the decrypted data to the other entities on the NetScaler appliance for appropriate processing.
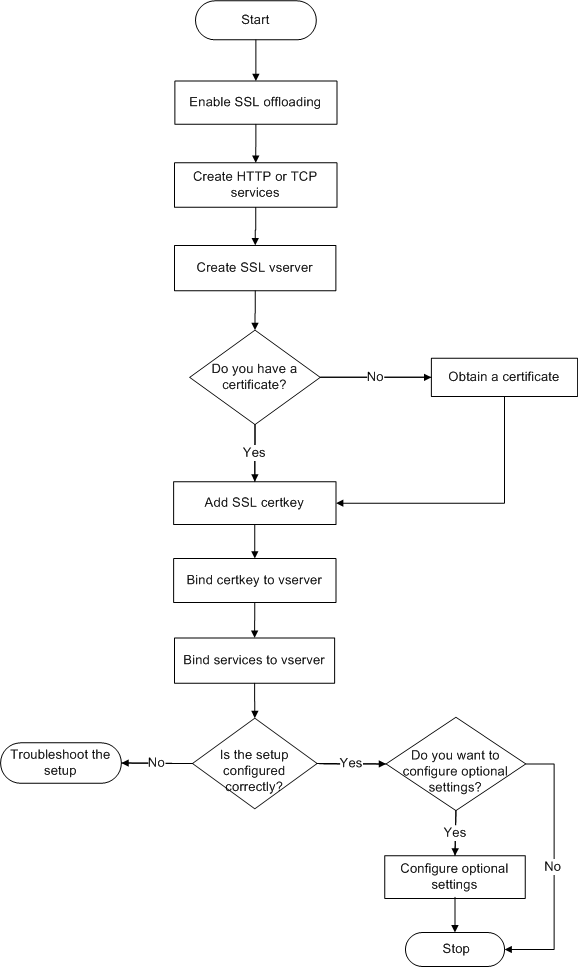
The following flow chart shows the sequence of tasks for configuring a basic SSL offload setup.
Figure 1. Sequence of Tasks to Configure SSL Offloading
Enable SSL offload
First enable the SSL feature. You can configure SSL-based entities on the appliance without enabling the SSL feature, but they will not work until you enable SSL.
Enable SSL by using the CLI
At the command prompt, type the following commands to enable SSL Offload and verify the configuration:
-  enable ns feature SSL
 -  show ns feature
Example:
> enable ns feature ssl

 Done


 > show ns feature


 Feature Acronym Status


 ------- ------- ------


 1) Web Logging WL ON


 2) SurgeProtection SP OFF


 3) Load Balancing LB ON . . .


  9) SSL Offloading SSL ON


 10) Global Server Load Balancing GSLB ON . .


 Done >
Enable SSL by using the GUI
Follow these steps:
-
In the navigation pane, expand System, and then click Settings.
-
In the details pane, under Modes and Features, click Change basic features.
-
Select the SSL Offloading check box, and then click OK.
-
In the Enable/Disable Feature(s)? message box, click Yes.
Create HTTP services
A service on the appliance represents an application on a server. Once configured, services are in the disabled state until the appliance can reach the server on the network and monitor its status. This topic covers the steps to create an HTTP service.
Note: For TCP traffic, perform the following procedures, but create TCP services instead of HTTP services.
Add an HTTP service by using the CLI
At the command prompt, type the following commands to add an HTTP service and verify the configuration:
-  add service <name> (<IP> | <serverName>) <serviceType> <port>
 -  show service <name>
Example:
> add service SVC_HTTP1 10.102.29.18 HTTP 80


  Done


 > show service SVC_HTTP1


         SVC_HTTP1 (10.102.29.18:80) - HTTP


         State: UP


         Last state change was at Wed Jul 15 06:13:05 2009


         Time since last state change: 0 days, 00:00:15.350


         Server Name: 10.102.29.18


         Server ID : 0   Monitor Threshold : 0


         Max Conn: 0     Max Req: 0      Max Bandwidth: 0 kbits


         Use Source IP: NO


         Client Keepalive(CKA): NO


         Access Down Service: NO


         TCP Buffering(TCPB): NO


         HTTP Compression(CMP): YES


         Idle timeout: Client: 180 sec   Server: 360 sec


         Client IP: DISABLED


         Cacheable: NO


         SC: OFF


         SP: OFF


         Down state flush: ENABLED


 1)      Monitor Name: tcp-default


                 State: UP       Weight: 1


                 Probes: 4       Failed [Total: 0 Current: 0]


                 Last response: Success - TCP syn+ack received.


                 Response Time: N/A


  Done
Add an HTTP service by using the GUI
Follow these steps:
-
Navigate to Traffic Management > SSL Offload > Services.
-
In the details pane, click Add.
-
In the Create Service dialog box, type the name of the service, IP address, and port (for example, SVC_HTTP1, 10.102.29.18, and 80).
-
In the Protocol list, select the type of the service (for example, HTTP).
-
Click Create, and then click Close. The HTTP service you configured appears in the Services page.
-
Verify that the parameters you configured are correctly configured by selecting the service and viewing the Details section at the bottom of the pane.
Add an SSL based virtual server
In a basic SSL offloading setup, the SSL virtual server intercepts encrypted traffic, decrypts it, and sends the clear text messages to the services that are bound to the virtual server. Offloading CPU-intensive SSL processing to the appliance allows the back-end servers to process a greater number of requests.
Add an SSL-based virtual server by using the CLI
At the command prompt, type the following commands to create an SSL-based virtual server and verify the configuration:
-  add lb vserver <name> <serviceType> [<IPAddress> <port>]
 -  show lb vserver <name>
Caution: To ensure secure connections, you must bind a valid SSL certificate to the SSL-based virtual server before you enable it.
Example:
> add lb vserver vserver-SSL-1 SSL 10.102.29.50 443
   Done


   > show lb vserver vserver-SSL-1


   vserver-SSL-1 (10.102.29.50:443) - SSL Type: ADDRESS


   State: DOWN[Certkey not bound] Last state change was at Tue Jun 16 06:33:08 2009 (+176 ms)


   Time since last state change: 0 days, 00:03:44.120


   Effective State: DOWN Client Idle Timeout: 180 sec


   Down state flush: ENABLED


   Disable Primary Vserver On Down : DISABLED


   No. of Bound Services : 0 (Total) 0 (Active)


   Configured Method: LEASTCONNECTION Mode: IP


   Persistence: NONE


   Vserver IP and Port insertion: OFF


   Push: DISABLED Push VServer: Push Multi Clients: NO Push Label Rule: Done
Add an SSL-based virtual server by using the GUI
Follow these steps:
-
Navigate to Traffic Management > SSL Offload > Virtual Servers.
-
In the details pane, click Add.
-
In the Create Virtual Server (SSL Offload) dialog box, type the name of the virtual server, IP address, and port.
-
In the Protocol list, select the type of the virtual server, for example, SSL.
-
Click Create, and then click Close.
-
Verify that the parameters you configured are correctly configured by selecting the virtual server and viewing the Details section at the bottom of the pane. The virtual server is marked as DOWN because a certificate-key pair and services have not been bound to it.
Caution: To ensure secure connections, you must bind a valid SSL certificate to the SSL-based virtual server before you enable it.
Bind services to the SSL virtual server
After decrypting the incoming data, the SSL virtual server forwards the data to the services that you have bound to the virtual server.
Data transfer between the appliance and the servers can be encrypted or in clear text. If the data transfer between the appliance and the servers is encrypted, the entire transaction is secure from end to end. For more information about configuring the system for end-to-end security, see SSL offload and acceleration.
Bind a service to a virtual server by using the CLI
At the command prompt, type the following commands to bind a service to the SSL virtual server and verify the configuration:
-  bind lb vserver <name> <serviceName>
 -  show lb vserver <name>
Example:
> bind lb vserver vserver-SSL-1 SVC_HTTP1


   Done


   > show lb vserver vserver-SSL-1 vserver-SSL-1 (10.102.29.50:443) - SSL Type:


   ADDRESS State: DOWN[Certkey not bound]


   Last state change was at Tue Jun 16 06:33:08 2009 (+174 ms)


   Time since last state change: 0 days, 00:31:53.70


   Effective State: DOWN Client Idle


   Timeout: 180 sec


   Down state flush: ENABLED Disable Primary Vserver On Down :


   DISABLED No. of Bound Services : 1 (Total) 0 (Active)


   Configured Method: LEASTCONNECTION Mode: IP Persistence: NONE Vserver IP and


   Port insertion: OFF Push: DISABLED Push VServer: Push Multi Clients: NO Push Label Rule:


   1) SVC_HTTP1 (10.102.29.18: 80) - HTTP


   State: DOWN Weight: 1


   Done
Bind a service to a virtual server by using the GUI
-
Navigate to Traffic Management > SSL Offload > Virtual Servers.
-
In the details pane, select a virtual server, and then click Open.
-
On the Services tab, in the Active column, select the check boxes next to the services that you want to bind to the selected virtual server.
-
Click OK.
-
Verify that the Number of Bound Services counter in the Details section at the bottom of the pane is incremented by the number of services that you bound to the virtual server.
Add a certificate-key pair
An SSL certificate is an integral element of the SSL Key-Exchange and encryption/decryption process. The certificate is used during an SSL handshake to establish the identity of the SSL server. You can use a valid, existing SSL certificate that you have on the NetScaler appliance, or you can create your own SSL certificate. The appliance supports RSA certificates of up to 4096 bits.
ECDSA certificates with only the following curves are supported:
-
prime256v1 (P_256 on the ADC)
-
secp384r1 (P_384 on the ADC)
-
secp521r1 (P_521 on the ADC; supported on VPX only)
-
secp224r1 (P_224 on the ADC; supported on VPX only)
Note: Citrix® recommends that you use a valid SSL certificate that has been issued by a trusted certificate authority. Invalid certificates and self-created certificates are not compatible with all SSL clients.
Before a certificate can be used for SSL processing, you must pair it with its corresponding key. The certificate key pair is then bound to the virtual server and used for SSL processing.
Add a certificate key pair by using the CLI
Note: For information about creating an ECDSA certificate-key pair, see Create an ECDSA certificate-key pair.
At the command prompt, type the following commands to create a certificate key pair and verify the configuration:
-  add ssl certKey <certkeyName> -cert <string> [-key <string>]
 -  show sslcertkey <name>
Example:
> add ssl certKey CertKey-SSL-1 -cert ns-root.cert -key ns-root.key

  Done


 > show sslcertkey CertKey-SSL-1


    Name: CertKey-SSL-1 Status: Valid,


    Days to expiration:4811 Version: 3


    Serial Number: 00 Signature Algorithm: md5WithRSAEncryption Issuer: C=US,ST=California,L=San


    Jose,O=Citrix ANG,OU=NS Internal,CN=de fault


    Validity Not Before: Oct 6 06:52:07 2006 GMT Not After : Aug 17 21:26:47 2022 GMT


    Subject: C=US,ST=California,L=San Jose,O=Citrix ANG,OU=NS Internal,CN=d efault Public Key


    Algorithm: rsaEncryption Public Key


    size: 1024


  Done
Add a certificate key pair by using the GUI
Follow these steps:
-
Navigate to Traffic Management > SSL > Certificates.
-
In the details pane, click Add.
-
In the Install Certificate dialog box, in the Certificate-Key Pair Name text box, type a name for the certificate key pair you want to add, for example, Certkey-SSL-1.
-
Under Details, in Certificate File Name, click Browse (Appliance) to locate the certificate. Both the certificate and the key are stored in the /nsconfig/ssl/ folder on the appliance. To use a certificate present on the local system, select Local.
-
Select the certificate you want to use, and then click Select.
-
In Private Key File Name, click Browse (Appliance) to locate the private key file. To use a private key present on the local system, select Local.
-
Select the key you want to use and click Select. To encrypt the key used in the certificate key pair, type the password to be used for encryption in the Password text box.
-
Click Install.
-
Double-click the certificate key pair and, in the Certificate Details window, verify that the parameters have been configured correctly and saved.
Bind an SSL certificate key pair to the virtual server
After you pairing an SSL certificate with its corresponding key, bind the certificate-key pair to the SSL virtual server so that it can be used for SSL processing. Secure sessions require establishing a connection between the client computer and an SSL-based virtual server on the appliance. SSL processing is then carried out on the incoming traffic at the virtual server. Therefore, before enabling the SSL virtual server on the appliance, you need to bind a valid SSL certificate to the SSL virtual server.
Bind an SSL certificate key pair to a virtual server by using the CLI
At the command prompt, type the following commands to bind an SSL certificate key pair to a virtual server and verify the configuration:
-  bind ssl vserver <vServerName> -certkeyName <string>
 -  show ssl vserver <name>
Example:
> bind ssl vserver Vserver-SSL-1 -certkeyName CertKey-SSL-1

 Done


 > show ssl vserver Vserver-SSL-1


      Advanced SSL configuration for VServer Vserver-SSL-1:


      DH: DISABLED


      Ephemeral RSA: ENABLED Refresh Count: 0


      Session Reuse: ENABLED Timeout: 120 seconds


      Cipher Redirect: ENABLED


      SSLv2 Redirect: ENABLED


      ClearText Port: 0


      Client Auth: DISABLED


      SSL Redirect: DISABLED


      Non FIPS Ciphers: DISABLED


      SSLv2: DISABLED SSLv3: ENABLED TLSv1: ENABLED


 1) CertKey Name: CertKey-SSL-1 Server Certificate


 1) Cipher Name: DEFAULT


    Description: Predefined Cipher Alias


 Done
Bind an SSL certificate key pair to a virtual server by using the GUI
Follow these steps:
-
Navigate to Traffic Management > SSL Offload > Virtual Servers.
-
Select the virtual server to which you want to bind the certificate key pair, for example, Vserver-SSL-1, and click Open.
-
In the Configure Virtual Server (SSL Offload) dialog box, on the SSL Settings tab, under Available, select the certificate key pair that you want to bind to the virtual server. Then click Add.
-
Click OK.
-
Verify that the certificate key pair that you selected appears in the Configured area.
Configure support for Outlook web access
If you use Outlook Web Access (OWA) servers on your NetScaler appliance, you must configure the appliance to insert a special header field, FRONT-END-HTTPS: ON, in HTTP requests directed to the OWA servers, so that the servers generate URL links as
https:// instead of http://.
Note: You can enable OWA support for HTTP-based SSL virtual servers and services only. You cannot apply it for TCP-based SSL virtual servers and services.
To configure OWA support, do the following:
-
Create an SSL action to enable OWA support.
-
Create an SSL policy.
-
Bind the policy to the SSL virtual server.
Create an SSL action to enable OWA support
Before you can enable Outlook Web Access (OWA) support, you must create an SSL action. SSL actions are bound to SSL policies and triggered when incoming data matches the rule specified by the policy.
Create an SSL action to enable OWA support by using the CLI
At the command prompt, type the following commands to create an SSL action to enable OWA support and verify the configuration:
-  add ssl action <name> -OWASupport ENABLED
 -  show SSL action <name>
Example:
    > add ssl action Action-SSL-OWA -OWASupport enabled


     Done


     > show SSL action Action-SSL-OWA


     Name: Action-SSL-OWA


     Data Insertion Action: OWA


     Support: ENABLED


     Done
Create an SSL action to enable OWA support by using the GUI
Follow these steps:
-
Navigate to Traffic Management > SSL > Policies.
-
In the details pane, on the Actions tab, click Add.
-
In the Create SSL Action dialog box, in the Name text box, type Action-SSL-OWA.
-
Under Outlook Web Access, select Enabled.
-
Click Create, and then click Close.
-
Verify that Action-SSL-OWA appears in the SSL Actions page.
Create SSL policies
SSL policies are created by using the policy infrastructure. Each SSL policy has an SSL action bound to it, and the action is carried out when incoming traffic matches the rule that has been configured in the policy.
Create an SSL policy by using the CLI
At the command prompt, type the following commands to configure an SSL policy and verify the configuration:
-  add ssl policy <name> -rule <expression> -reqAction <string>
 -  show ssl policy <name>
Example:
> add ssl policy-SSL-1 -rule ns_true -reqaction Action-SSL-OWA

 Done

 > show ssl policy-SSL-1

 Name: Policy-SSL-1 Rule: ns_true

 Action: Action-SSL-OWA Hits: 0

 Policy is bound to following entities

 1) PRIORITY : 0

 Done
Create an SSL policy by using the GUI
Follow these steps:
-
Navigate to Traffic Management > SSL > Policies.
-
In the details pane, click Add.
-
In the Create SSL Policy dialog box, in the Name text box, type the name of the SSL Policy (for example, Policy-SSL-1).
-
In Request Action, select the configured SSL action that you want to associate with this policy (for example, Action-SSL-OWA). The ns_true general expression applies the policy to all successful SSL handshake traffic. However, to filter specific responses, you can create policies with a higher level of detail. For more information about configuring granular policy expressions, see SSL actions and policies.
-
In Named Expressions, choose the built-in general expression ns_true and click Add Expression. The expression ns_true now appears in the Expression text box.
-
Click Create, and then click Close.
-
Verify that the policy is correctly configured by selecting the policy and viewing the Details section at the bottom of the pane.
Bind the SSL policy to the SSL virtual server
After you configure an SSL policy for Outlook Web Access, bind the policy to a virtual server that will intercept incoming Outlook traffic. If the incoming data matches any of the rules configured in the SSL policy, the policy is triggered and the action associated with it is carried out.
Bind an SSL policy to an SSL virtual server by using the CLI
At the command prompt, type the following commands to bind an SSL policy to an SSL virtual server and verify the configuration:
-  bind ssl vserver <vServerName> -policyName <string>
 -  show ssl vserver <name>
Example:
> bind ssl vserver Vserver-SSL-1 -policyName Policy-SSL-1

  Done

 > show ssl vserver Vserver-SSL-1

 Advanced SSL configuration for VServer Vserver-SSL-1:

 DH: DISABLED

 Ephemeral RSA: ENABLED

 Refresh Count: 0

 Session Reuse: ENABLED

 Timeout: 120 seconds

 Cipher Redirect: ENABLED

 SSLv2 Redirect: ENABLED

 ClearText Port: 0

 Client Auth: DISABLED

 SSL Redirect: DISABLED

 Non FIPS Ciphers: DISABLED

 SSLv2: DISABLED SSLv3: ENABLED TLSv1: ENABLED

 1) CertKey Name: CertKey-SSL-1 Server Certificate

 1) Policy Name: Policy-SSL-1 Priority: 0

 1) Cipher Name: DEFAULT Description: Predefined Cipher Alias

 Done
Bind an SSL policy to an SSL virtual server by using the GUI
Follow these steps:
-
Navigate to Traffic Management > SSL Offload > Virtual Servers.
-
In the details pane, select the virtual server (for example, Vserver-SSL-1), and then click Open.
-
In the Configure Virtual Server (SSL Offload) dialog box, click Insert Policy, and then select the policy that you want to bind to the SSL virtual server. Optionally, you can double-click the Priority field and type a new priority level.
-
Click OK.