
Accelerate load balanced traffic by using compression
Compression is a popular means of optimizing bandwidth usage, and most web browsers support compressed data. If you enable the compression feature, the NetScaler appliance intercepts requests from clients and determines whether the client can accept compressed content. After receiving the HTTP response from the server, the appliance examines the content to determine whether it is compressible. If the content is compressible, the appliance compresses it, modifies the response header to indicate the type of compression performed, and forwards the compressed content to the client.
NetScaler compression is a policy-based feature. A policy filters requests and responses to identify responses to be compressed, and specifies the type of compression to apply to each response. The appliance provides several built-in policies to compress common MIME types such as text/html, text/plain, text/xml, text/css, text/rtf, application/msword, application/vnd.ms-excel, and application/vnd.ms-powerpoint. You can also create custom policies. The appliance does not compress compressed MIME types such as application/octet-stream, binary, bytes, and compressed image formats such as GIF and JPEG.
To configure compression, you must enable it globally and on each service that will provide responses that you want compressed. If you have configured virtual servers for load balancing or content switching, you should bind the polices to the virtual servers. Otherwise, the policies apply to all traffic that passes through the appliance.
Related information
Compression configuration task sequence
The following flow chart shows the sequence of tasks for configuring basic compression in a load balancing setup.
Figure 1. Sequence of Tasks to Configure Compression
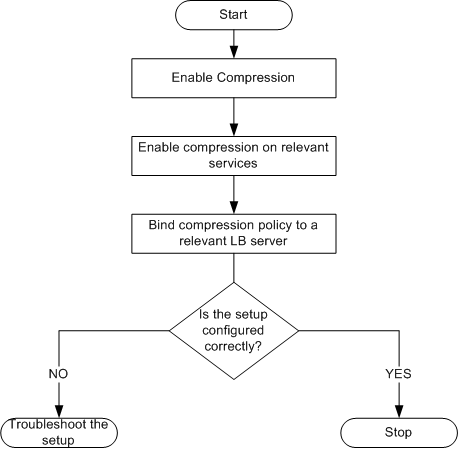
Note: The steps in the above figure assume that load balancing has already been configured.
Enable compression
By default, compression is not enabled. You must enable the compression feature to allow compression of HTTP responses that are sent to the client.
To enable compression by using the CLI
At the command prompt, type the following commands to enable compression and verify the configuration:
-
enable ns feature CMP
-
show ns feature
    > enable ns feature CMP


     Done


     > show ns feature


            Feature                        Acronym              Status


            -------                        -------              ------


     1)     Web Logging                    WL                   ON


     2)     Surge Protection               SP                   OFF


     .


     7) Compression Control CMP ON

        .


     Done
To enable compression by using the GUI
-
In the navigation pane, expand System, and then click Settings.
-
In the details pane, under Modes and Features, click Change basic features.
-
In the Configure Basic Features dialog box, select the Compression check box, and then click OK.
-
In the Enable/Disable Feature(s)? dialog box, click Yes.
Configure services to compress data
In addition to enabling compression globally, you must enable it on each service that will deliver files to be compressed.
To enable compression on a service by using the CLI
At the command prompt, type the following commands to enable compression on a service and verify the configuration:
-
set service \<name\> -CMP YES
-
show service \<name\>
 > show service SVC_HTTP1


 SVC_HTTP1 (10.102.29.18:80) - HTTP


 State: UP


 Last state change was at Tue Jun 16 06:19:14 2009 (+737 ms)


 Time since last state change: 0 days, 03:03:37.200


 Server Name: 10.102.29.18


 Server ID : 0   Monitor Threshold : 0


 Max Conn: 0     Max Req: 0      Max Bandwidth: 0 kbits


 Use Source IP: NO


 Client Keepalive(CKA): NO


 Access Down Service: NO


 TCP Buffering(TCPB): NO


 HTTP Compression(CMP): YES


 Idle timeout: Client: 180 sec   Server: 360 sec


 Client IP: DISABLED


 Cacheable: NO


 SC: OFF


 SP: OFF


 Down state flush: ENABLED

 1)      Monitor Name: tcp-default


 State: DOWN     Weight: 1


 Probes: 1095    Failed [Total: 1095 Current: 1095]


 Last response: Failure - TCP syn sent, reset received.


 Response Time: N/A


 Done
To enable compression on a service by using the GUI
-
Navigate to Traffic Management > Load Balancing > Services.
-
In the details pane, select the service for which you want to configure compression (for example, service-HTTP-1), and then click Open.
-
On the Advanced tab, under Settings, select the Compression check box, and then click OK.
-
Verify that, when the service is selected, HTTP Compression(CMP): ON appears in the Details section at the bottom of the pane.
Bind a compression policy to a virtual server
If you bind a policy to a virtual server, the policy is evaluated only by the services associated with that virtual server. You can bind compression policies to a virtual server either from the Configure Virtual Server (Load Balancing) dialog box or from the Compression Policy Manager dialog box. This topic includes instructions to bind compression policies to a load balancing virtual server by using the Configure Virtual Server (Load Balancing) dialog box.
To bind or unbind a compression policy to a virtual server by using the command line
At the command prompt, type the following commands to bind or unbind a compression policy to a load balancing virtual server and verify the configuration:
bind lb vserver <name> -policyName <string>
 Done

 unbind lb vserver <name> -policyName <string>
 Done

 show lb vserver <name>
Example:
 > bind lb vserver lbvip -policyName ns_cmp_msapp
 Done
 > show lb vserver lbvip

 lbvip (8.7.6.6:80)-HTTPType:ADDRESS
 State:UP
 Last state change was at Thu May2805:37:212009(+685ms)
 Time since last state change:19days,04:26:50.470
 EffectiveState:UP
 Client Idle Timeout:180sec
 Down state flush:ENABLED
 Disable Primary Vserver On Down:DISABLED
 Port Rewrite:DISABLED
 No.of Bound Services:1(Total)1(Active)
 Configured Method:LEASTCONNECTION
 Current Method:RoundRobin,Reason:Boundservice'sstatechangedtoUP
 Mode:IP
 Persistence:NONE
 Vserver IP and Port insertion:OFF
 Push:DISABLEDPushVServer:
 Push Multi Clients:NO
 Push Label Rule: None

 BoundServiceGroups:
 1)GroupName:Service-Group-1

 1)Service-Group-1(10.102.29.252:80)-HTTPState:UPWeight:1

 1)Policy:ns_cmp_msappPriority:0

 Done
To bind or unbind a compression policy to a load balancing virtual server by using the GUI
-
Navigate to Traffic Management > Load Balancing > Virtual Servers.
-
In the details pane, select the virtual server to which you want to bind or unbind a compression policy (for example, Vserver-LB-1), and then click Open.
-
In the Configure Virtual Server (Load Balancing) dialog box, on the Policies tab, click Compression.
-
Do one of the following:
-
To bind a compression policy, click Insert Policy, and then select the policy you want to bind to the virtual server.
-
To unbind a compression policy, click the name of the policy you want to unbind from the virtual server, and then click Unbind Policy.
-
-
Click OK.