
Call Home
Appliances might sometimes fail to perform well because of software or hardware issues. In such cases, NetScaler needs to collect data and perform issue resolution before a potential impact can occur at the customer site. By enabling Call Home on your NetScaler appliance, you can automate the error notification process. Not only you avoid calling NetScaler support, raising a service request, and uploading system data before the support team can troubleshoot the issue, but support can identify and address an issue before it occurs. Call Home periodically monitors the appliance and automatically uploads data to the Citrix technical support server. In addition, the incoming Call Home data provide insights about NetScaler usage. Multiple teams within Citrix can use this data to better design, support, and implement NetScaler.
By default, Call Home is enabled on all platforms and all flavors of NetScaler (MPX, VPX, SDX). By having this feature enabled, you allow Citrix to collect NetScaler deployment and telemetry data for better implementation, and support service.
Note
You can also see the Call Home FAQ page for information pertaining to Call Home.
Related information
Benefits
Call Home provides the following benefits.
-
Monitor hardware and software error conditions. For more information, see Monitor critical error conditions section.
-
Notify critical events that impact your network.
-
Send performance data and system usage details to Citrix® to:
-
Analyze and improve product quality.
-
Provide real-time troubleshooting information for proactive issue identification, and faster issue resolution.
-
Platform support
Call Home feature is supported on all NetScaler platforms and all appliance models (MPX, VPX, and SDX).
-
NetScaler MPX: All MPX models.
-
NetScaler VPX: All VPX models, including VPX appliances that obtain their license from external or central licensing pools.
-
NetScaler SDX: Monitors the disk drive and assigned SSL chips for any errors or failures. The VPX instances, however, do not have access to the Power Supply Unit (PSU) and therefore their status is not monitored. In an SDX platform, you can configure Call Home either directly on an individual instance or through the SVM.
Prerequisites
To use Call Home, the NetScaler appliance must have the following:
-
Internet connection. Call Home requires an internet connection for the NetScaler to connect to the NetScaler support server for uploading a data archive. NetScaler uses the NSIP for communicating with
callhome.citrix.com. -
URL. Call Home works by exchanging traffic with
callhome.citrix.comover SSL/TLS protocol using port 443 for bi-directional traffic.
How Call Home works
The following figure shows a basic workflow of Call Home in a NetScaler appliance deployed at a customer site.
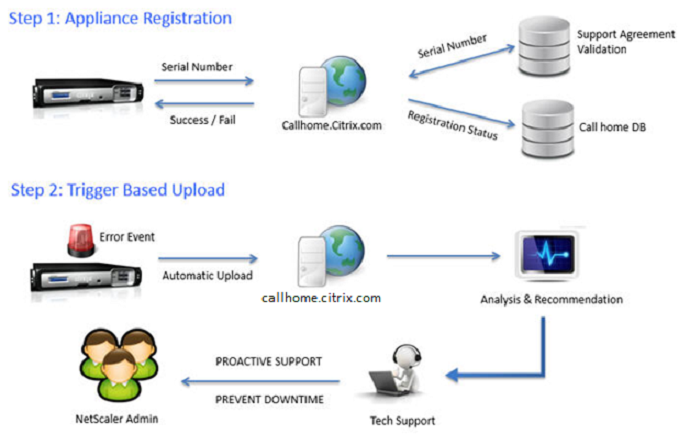
The following are the workflow of a Call Home:
1. Set up Internet Connectivity. For Call Home to upload system data, your appliance must have an internet connectivity. If it does not, you can configure a proxy server configuration to provide internet connectivity. For more information, see Configuring Call Home section.
2. Enable Call Home. When upgrading your appliance to the latest software through either NetScaler command interface or GUI, Call Home is enabled by default and the system delays the registration process by 24 hours. During this period, you can choose to manually disable the feature, but Citrix recommends you to have it enabled.
Note
If you are upgrading your appliance from an older version that explicitly has Call Home disabled, the system still enables the feature by default and displays a notification message on your first login.
In addition, if you are doing any configuration changes for an internet connectivity, you must disable and enable Call Home. It enables Call Home to register with the Citrix Insight Services (CIS) server without any failure errors.
3. Register the NetScaler appliance on the NetScaler support Server. When Call Home registers the appliance with the NetScaler support server, the server checks the database for the validity of the appliance serial number. If the serial number is valid, the server registers the appliance for Call Home service and sends a successful registration response. Otherwise, the server sends back a registration failure message. The basic system information is sent as a separate message. The data includes memory and CPU usage details along with the throughput numbers. The data is sent periodically as part of the heartbeat message every 7 days, by default. However, a value of less than 5 days is not recommended, because frequent uploads are not useful.
4. Monitor critical error conditions. Once registered, Call Home starts monitoring the appliance. The following table lists the conditions Call Home can monitor on the appliance.
| Critical Error Condition | Description | Call Home Monitoring Interval | Corresponding SNMP Alarm Name |
|---|---|---|---|
| Compact flash drive errors | The compact flash drive on the appliance encountered read or write failures. | 24 hours | COMPACT-FLASH-ERRORS |
| Hard disk drive errors | The hard drives on the appliance encountered read or write failures. | 24 hours | HARD-DISK-DRIVE-ERRORS |
| Power supply unit failure | One of the power supply units on the NetScaler appliance has failed. | 7 seconds | POWER-SUPPLY-FAILURE |
| SSL card failure | One of the SSL cards on the NetScaler appliance has failed. | 7 seconds | SSL-CARD-FAILED |
| Warm restart | The appliance has warm restarted due to a failure of a system process. | After every restart of the NetScaler appliance. | WARM-RESTART-EVENT |
| Memory anomaly error | Memory utilization progressively increases above its normal limit and exceeds the threshold. | 1 day | No SNMP alarm |
| Rate limit packet drop | The throughput limits or packets-per-second (pps) limits is reached. | 7 seconds | PF-RL-PPS-PKTS-DROPPED, PF-RL-RATE-PKTS-DROPPED |
5. Upload Call Home data. If any one of the previous critical conditions is identified on the appliance, the Call Home feature automatically notifies the NetScaler® support. The support archives are uploaded to the NetScaler support server. Also, you can configure the CALLHOME-UPLOAD-EVENT SNMP alarm to generate an SNMP alert whenever Call Home upload happens. The SNMP alert notifies the local administrator about the critical event.
Note
Call Home creates the Call Home tar file and uploads it to the Citrix tech support server for only the first occurrence of a particular error condition since the last reboot. If you want the appliance to send alerts each time a particular error condition occurs, configure the corresponding SNMP alarm for the error condition.
6. Create Service Request. Call Home automatically creates a service request for all the critical hardware related events. The events are classified as; power supply failure, SSL card failure, hard disk drive errors, and compact flash errors. For other errors, after you review the System Logs, you can contact the NetScaler support team to raise a service request for investigation.
Configuring Call Home
To configure Call Home, verify the internet connectivity on the appliance and ensure that a DNS nameserver is configured. If there is no internet connection, configure a proxy server or service. Then, enable Call Home on the appliance and verify the registration status of the appliance with the NetScaler support server. Once registered, Call Home can monitor and upload data. In addition, you can configure SNMP alarms to notify the administrator at the customer site.
To configure Call Home, you can use either the NetScaler command interface or the GUI to do the following tasks:
-
Enable Call Home.
-
Configure Call Home for optional proxy server parameters.
-
Verify Call Home Registration Status.
-
View errors and timestamp details.
-
Configure SNMP Alarms.
To configure Call Home by using the NetScaler command interface
The NetScaler command interface enables you to do the following:
Enabling Call Home
At the command prompt, type:
enable ns feature callhome
Configuring Call Home for optional proxy server parameters
Call Home enables you to configure the optional proxy server for internet connectivity. You can either configure a proxy server with IP address and port or configure a proxy authentication service with one-way or two-way authentication.
To configure optional proxy server with IP address and port
At the command prompt, type:
set callhome –proxyMode ( YES | NO ) [-IPAddress <ip_addr|ipv6_addr|*>] [-port <port |*>]
set callhome –proxyMode YES –IPAddress 10.102.167.33 –port 80
Note
Call Home uses the proxy server only when you set the proxy-mode parameter to YES. If you set it to NO, the proxy functionality does not work, even if the IP address and port are configured. The port number must be for an HTTP service, not for an HTTPS service.
To configure optional proxy authentication service
This mode provides two types of security authentication: one-way and two-way. To set up either type, you must configure an SSL service. For more information, see Configuring an SSL Service topic.
In one-way authentication, only the NetScaler appliance authenticates the proxy server. In two-way authentication, the NetScaler appliance authenticates the proxy server and the proxy server, in turn, authenticates the appliance.
To configure proxy authentication service
At the command prompt, type:
set callhome –proxyMode ( YES | NO ) [-proxyAuthService <string>]
set callhome –proxyMode YES –proxyAuthService callhome_proxy
To configure one-way proxy server authentication
Do the following tasks to configure one-way proxy server authentication.
-
Create an SSL service.
-
Bind a CA certificate to the service.
-
Bind an HTTPS Monitor to the service.
-
Configure Call Home to use the SSL service.
To configure two-way proxy server authentication
Do the following tasks to configure two-way proxy server authentication.
-
Create an SSL service
-
Bind a CA certificate to the service.
-
Bind a Client Certificate.
-
Bind an HTTPS Monitor to the service.
-
Configure Call Home to use the SSL service.
Verifying Call Home Registration status
At the command prompt, type:
show callhome

     show callhome

      Registration with Citrix upload server SUCCESSFUL

      Mode: Default

      Contact email address: exampleadmin@example.com

      Heartbeat Custom Interval (days): 7

      Proxy Mode: Yes

         Proxy IP Address:10.102.29.200

         Proxy Authentication Service:

         Proxy Port: 80

     Trigger event                  State   First occurrence                Latest occurrence

      -------------                  -----   ----------------                -----------------

      1) Warm boot                   Enabled N/A                             ..

      2) Compact flash errors        Enabled ..                              ..

      3) Hard disk drive errors      Enabled ..                              ..

      4) SSL card failure            N/A     N/A                             N/A

      5) Power supply unit failure   N/A     N/A                             N/A

      6) Rate limit packet drops     Enabled ..                              ..

      7) Memory anomaly              Enabled ..                              ..

      Done
Note
If the Call Home fails to register with CIS, the appliance displays an error message.
Enabling SNMP Alarms
The NetScaler appliance provides a set of error condition entities called SNMP alarms. When an error condition in an SNMP alarm is met, the appliance generates SNMP trap messages that are sent to the configured trap listeners. For example, when the SSL-CARD-FAILED alarm is enabled, a trap message is generated and sent to the trap listener. The trap message is sent whenever there is an SSL card failure on the appliance. For more information, see SNMP.
At the command prompt, type:
enable snmp alarm <trapName>
show snmp alarm <trapName>
To configure Call Home by using GUI
To verify if the Call Home feature is enabled by default in the GUI
-
Navigate to Configuration > System > Settings.
-
In the details pane, click Configure Advanced features link.
-
In the Configure Advanced Features page, Call Home option must display as enabled.
To enable Call Home by using GUI
-
Navigate to Configuration > System > Settings.
-
In the details pane, click Configure Advanced features link and select Callhome option.
To configure Call Home for optional proxy mode authentication by using GUI
-
You can use any of the two ways to access the Call Home page:
-
Navigate to System > System Information.
-
Navigate to System > Diagnostics.
-
In the details pane, under Technical Support Tools, select Call Home.
-
-
-
On the Configure Call Home page, set the following parameters.
-
Mode. Call Home mode of operation. Possible types: Default, Citrix Service Provider™ (CSP) deployment.NoteThis option is not user configurable. The mode is automatically determined and set based on the type of NetScaler deployment.
-
Email address. Email address of the contact administrator at the customer site.
-
CallHome Heartbeats Interval (days). Monitoring interval (in days) between Call Home heartbeats. Minimum value=1 and Maximum value=30.
-
Enable Call Home. Enable or disable the Call Home feature to view the status of appliance registration on the NetScaler support server.
-
Proxy Mode. If you do not have an internet connectivity, enable proxy mode and set the optional proxy parameters.
-
Proxy Server. If you set the proxy mode by using a proxy server, specify the server IP address.
-
Proxy Service. If you set the proxy mode by using a proxy service, specify the service name.
-
IP Address. IP address of the proxy server.
-
Port. Port number of the proxy server.
-
Proxy Authentication SSL Service. The name of the proxy service that provides proxy-mode authentication.
-
-
-
Click OK and Done.
To configure SSL service for proxy server authentication by using GUI
For information about configuring the SSL service by using the GUI, see Configuring an SSL Service topic.
To verify Call Home registration status by using the GUI
-
You can use any of the two ways to access the Call Home page:
-
Navigate to System > System Information.
-
Navigate to System > Diagnostics.
-
In the details pane, under Technical Support Tools, select Call Home.
-
-
-
In the Configure Call Home page, the Registration with Citrix upload server field shows the registration status.
To configure an SNMP alarm
-
Navigate to System > SNMP > Alarms.
-
In the details pane, select an alarm and configure its parameters.
-
Click OK and Close.
Citrix Service Provider (CSP) deployment support
In a Citrix Service Provider (CSP) environment where NetScaler services are deployed on VPX instances, Call Home can monitor and track the license-specific information and securely send the information to Citrix Insight Services (CIS). CIS in turn sends the information to the License Usage Insights (LUI) portal for accounting purposes and for CSP customers to review their license usage. Currently, CSP environments support NetScaler services on VPX instances only, not on MPX or SDX appliances. The VPX instances can be deployed in either standalone or high availability mode.