
Use case 1: SMPP load balancing
Millions of short messages are exchanged daily between individuals and value-added service providers, such as banks, advertisers, and directory services, by using the short message peer to peer (SMPP) protocol. Often, message delivery is delayed because servers are overloaded and traffic is not optimally distributed among the servers. The NetScaler supports SMPP load balancing and provides optimal distribution of messages across your servers, preventing poor performance and outages.
The NetScaler performs load balancing on the server side when messages are received from clients and on the client side when messages are received from servers.
Load balancing of SMPP messages by the NetScaler provides the following benefits:
-
Better load distribution on servers, which translates to faster response time to end users
-
Server health monitoring and better failover capabilities
-
Quick and easy addition of new servers (message centers) without changing the client configuration
-
High availability
Related information
Introduction to SMPP
SMPP is an application layer protocol for the transfer of short messages between External Short Message Entities (ESME), Routing Entities (RE) and Message Centers (MC) over long-lived TCP connections. It is used for sending short message service (SMS) messages between friends, contacts, and third parties such as banks (mobile banking), advertisers (mobile commerce), and directory services. Messages from an ESME (non-mobile entity) arrive at the MC, which distributes them to short message entities (SMEs) such as mobile phones. SMPP is also used by SMEs to send short messages to third parties (for example, for purchase of products, bill payment, and funds transfer). These messages arrive at the MC and are forwarded to the destination MC or ESME.
The following diagram shows the different SMPP entities: ESMEs, REs, and MCs, in a mobile network.
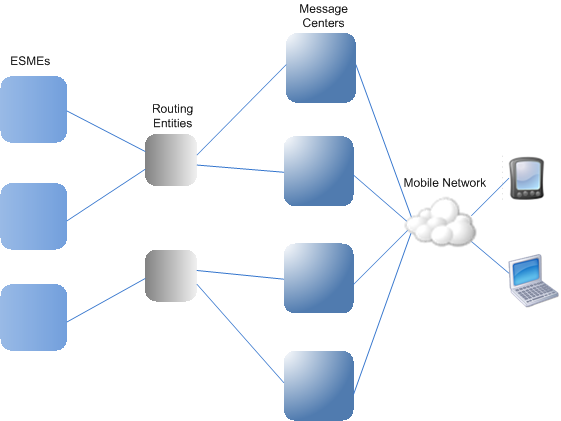
Architecture Overview of the Different SMPP Entities in a Mobile Network
Note: The terms client and ESME are used interchangeably throughout the document.
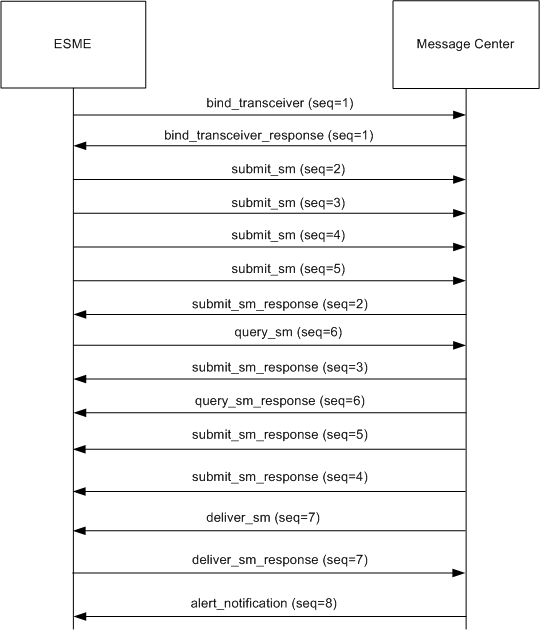
An ESME (client) opens a connection to the MC in one of the three modes: as a transmitter, a receiver, or a transceiver. As a transmitter, it can only submit messages for delivery. As a receiver, it can only receive messages. As a transceiver, the ESME can both submit and receives messages. The ESME sends the MC one of the three messages (also known as PDUs): bind_transmitter, bind_receiver, or bind_transceiver. The MC responds with a bind_transmitter_resp, bind_receiver_resp, or bind_transceiver_resp, as appropriate for the request.
After the connection is established, the ESME can, depending on the mode in which it is bound to the MC, send a submit_sm or data_sm message, receive a deliver_sm or data_sm message, or send and receive any of these types of messages. The ESME can also send ancillary messages, such as query_sm, replace_sm, and cancel_sm, to query the status of an earlier message delivery, replace an earlier message with a new message, or cancel an undelivered message.
If a message is not delivered because an ESME is not available or a mobile subscriber is not online, the message is queued. Later, when the MC detects that the mobile subscriber is now reachable, it sends an alert_notification PDU to the ESME over a receiver or transceiver session, requesting delivery of any queued messages.
Each request PDU has a unique sequence number. The response PDU has the same sequence number as the original request. Because message exchange over SMPP can be in asynchronous mode, an ESME or an MC can send multiple requests at a time. The sequence number plays a crucial role in returning the response in the same SMPP session. In other words, the sequence number makes request and response matching possible.
The following diagram shows how the traffic flow uses the various PDUs when the ESME binds as a transceiver.
Limitation:
The NetScaler appliance does not support out bound operations. That is, a message center cannot initiate an SMPP session with an ESME through the NetScaler appliance.
How SMPP Load Balancing Works on the NetScaler
An ESME (client) sends a bind message to open a connection to the NetScaler. The ADC authenticates each ESME and, if successful, responds with an appropriate message. The NetScaler establishes a connection with each message center and load balances all the messages among these message centers. When the ADC receives a message from a client, it reuses an open connection to the message center or sends a bind request to a message center if an open connection is not available.
The ADC can load balance messages originating from the clients and from the servers. It can monitor the health of the message centers and handle concatenated messages. It also provides content switching support for the message centers.
Messages Originating from the ESMEs
Each ESME must be added as a user on the NetScaler for authentication. The client establishes a TCP connection with an SMPP virtual server configured on the ADC by sending a bind request. The ADC authenticates the client and, if successful, parses the bind message. The ADC then sends the request to the message center selected by the configured load balancing method. If a connection to the message center is not available for reuse, the ADC opens a TCP connection with the message center by sending a new bind request to the message center.
Before forwarding the response (submit_sm_resp or data_sm_resp) from the message center to the client, the ADC adds a custom server ID to the message ID to identify the message center for ancillary operations, such as query, replace, or cancel requests for a message, by the client. Requests from other clients are load balanced in the same way.
In the original bind request, a client specifies the address range that it can serve. This range is used for forwarding deliver_sm or data_sm messages from the message centers to the clients.
Messages Originating from a Message Center
ESMEs that can handle a specific address range are grouped into a cluster. All the nodes in a cluster provide the same credentials. Within a cluster, only the round robin method is used for load balancing. To deliver mobile originated (MO) messages, the message center sends a deliver_sm message to the NetScaler. If a cluster that can serve the destination address range (for example, numbers starting with 998) is bound to the ADC, it selects that cluster, and then load balances the message among the ESME nodes in that cluster.
If an ESME that can serve deliver_sm messages for the address range is not bound to the ADC, and message queuing is enabled, the message is queued until such a client binds to the ADC in a receiver or transceiver mode. You can specify the size of the queue.
The following diagram illustrates the internal flow of PDUs between ESMEs, NetScaler, and the message centers. For simplicity, only two ESMEs and two message centers are shown.
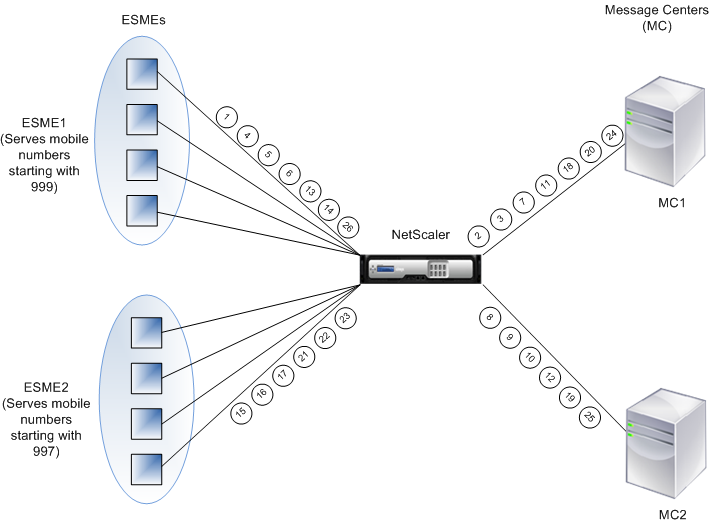
Flow of messages (PDUs):
-
ESME1 sends bind request to NetScaler®
-
NetScaler sends bind request to MC1
-
MC1 sends bind response to NetScaler
-
NetScaler sends bind response to ESME1
-
ESME1 sends submit_sm(1) to NetScaler
-
ESME1 sends submit_sm(2) to NetScaler
-
NetScaler forwards submit_sm(1) to MC1
-
NetScaler sends bind request to MC2
-
MC2 sends bind response to NetScaler
-
NetScaler forwards submit_sm(2) to MC2
-
MC1 sends submit_sm_resp(1) to NetScaler
-
MC2 sends submit_sm_resp(2) to NetScaler
-
NetScaler forwards submit_sm_resp(1) to ESME1
-
NetScaler forwards submit_sm_resp(2) to ESME1
-
ESME2 sends bind request to NetScaler
-
NetScaler sends bind response to ESME2
-
ESME2 sends submit_sm(3) to NetScaler
-
NetScaler forwards submit_sm(3) to MC1
-
MC2 sends deliver_sm to NetScaler (ESME2 serves the address range specified in the message)
-
MC1 sends submit_sm_resp(3) to NetScaler
-
NetScaler forwards submit_sm_resp(3) to ESME2
-
NetScaler forwards deliver_sm to ESME2
-
ESME2 sends deliver_sm_resp to NetScaler
-
MC1 sends alert_notification to NetScaler (ESME1 serves the address range specified in the message)
-
NetScaler forwards deliver_sm_resp to MC2
-
NetScaler forwards the alert_notification to ESME1
Health Monitoring of Message Centers
By default, a TCP_default monitor is bound to an SMPP service, but you can bind a custom monitor of type SMPP. The custom monitor opens a TCP connection to the message center and sends an enquire_link packet. Depending on the success or failure of the probe, the service is marked UP or DOWN.
Content Switching on Message Centers
Message centers can accept multiple connections (or bind requests) from ESMEs. You can configure the NetScaler to content switch these requests based on the SMPP bind parameters. Following are some common expressions for configuring methods to select a message center:
-
Based on the address range: In the following sample expression, the ADC selects a specific message center if the address range starts at 988.
Example:
SMPP.BINDINFO.ADDRESS_RANGE.CONTAINS("\^988")
-
Based the ESME ID: In the following sample expression, the ADC selects a specific message center if the ESME ID equals ESME1.
Example:
SMPP.BINDINFO.SYSTEM_ID.EQ("ESME1")
-
Based on the ESME type: In the following sample expression, the ADC selects a specific message center if the ESME type is VMS. VMS stands for voice mail system.
Example:
SMPP.BINDINFO.SYSTEM_TYPE.EQ("VMS")
-
Based on the type of number (TON) of the ESME: In the following sample expression, the ADC selects a specific message center if TON equals 1 (1 stands for an international number.)
Example:
SMPP.BINDINFO.ADDR_TON.EQ(1)
-
Based on the number plan indicator (NPI) of the ESME: In the following sample expression, the ADC selects a specific message center if NPI equals 0 (0 stands for an unknown connection.)
Example:
SMPP.BINDINFO.ADDR_NPI.EQ(0)
-
Based on the bind type: In the following sample expression, the ADC selects a specific message center if the bind type is TRANSCEIVER. (A transceiver can send and receive messages.)
Example:
SMPP.BINDINFO.TYPE.EQ(TRANSCEIVER)
Concatenated Message Handling
An SMS can hold a maximum of 140 bytes. Longer messages must be broken down into smaller parts. If the destination mobile is capable, the messages are combined and delivered as one long SMS. The NetScaler forwards the fragments of a message to the same message center. Each message contains a reference number, a sequence number, and the total number of fragments. The reference number is the same for each fragment of a long message. The sequence number specifies that position of the particular fragment in the complete message. After all the fragments are received, the ESME combines the fragments into one long message and delivers the message to the mobile subscriber.
If a client disconnects from an active connection, the connection to the message center is not closed. It is reused for requests from other clients.
Limitation
Message IDs, from the message center, longer than 59 bytes are not supported. If the message ID length returned by the message center is more than 59 bytes, ancillary operations fail and the NetScaler responds with an error message.
Configuring SMPP Load Balancing on the NetScaler
Perform the following tasks to configure SMPP load balancing on the ADC:
-
Add an SMPP user. The ADC authenticates the user before it accepts a bind request from the user. The user is typically an ESME.
-
Add a load balancing virtual server, specifying the protocol as SMPP.
-
Add a service, specifying the protocol as SMPP, and a custom server ID that is unique for each server. Bind the service to the load balancing virtual server created earlier.
-
Optionally, create a service group and add services to the service group.
-
Optionally, add a monitor of type SMPP-ECV and bind it to the service. A TCP-default monitor is bound by default.
-
Set the SMPP parameters, such as client mode and message queue.
To configure SMPP load balancing by using the command line
At the command prompt, type:
add smpp user <username> -password <password>
 add service <name> <IP> SMPP <port> –customserverID <customserverID>
 add lb vserver <name> <IP> SMPP <port>
 bind lb vserver <name> <service name>
 set smpp param
Example
add smpp user smppclient1 -password c03ebb540695b6110eb31172f32245a1 -encrypted -encryptmethod ENCMTHD_2
 add smpp user smppclient2 -password c03ebb540695b6110eb31172f32245a1 -encrypted -encryptmethod ENCMTHD_2
 add service smmpsvc 10.102.84.140 SMPP 2775 -gslb NONE -maxClient 0 -maxReq 0 -cip DISABLED -usip NO -useproxyport YES -sp ON -cltTimeout 180 -svrTimeout 360 -CustomServerID ab -CKA NO -TCPB NO -CMP NO
 add service smmpsvc2 10.102.81.175 SMPP 2775 -gslb NONE -maxClient 0 -maxReq 0 -cip DISABLED -usip NO -useproxyport YES -sp ON -cltTimeout 180 -svrTimeout 360 -CustomServerID xy -CKA NO -TCPB NO -CMP NO
 add lb vserver smppvs SMPP 10.102.239.179 2775 -persistenceType NONE -cltTimeout 180
 bind lb vserver smppvs smmpsvc2
 bind lb vserver smppvs smmpsvc
 set smpp param -addrrange "d*"
To configure SMPP load balancing by using the configuration utility
-
Navigate to System > User Administration > SMPP Users, and add an SMPP user.
-
Navigate to Traffic Management > Load Balancing > Configure SMPP Parameters, and set the parameters as required by your deployment.
-
Navigate to Traffic Management > Load Balancing > Virtual Servers, and add a virtual server of type SMPP.
-
Click in the Service section, add a service of type SMPP, and specify a Server ID.