
Configure on-prem agents for multisite deployment
In the earlier versions of NetScaler Console, NetScaler instances deployed in remote data centers can be managed and monitored from NetScaler Console running in a primary data center. NetScaler instances sent data directly to the primary NetScaler Console that resulted in consumption of WAN bandwidth. Also, processing of analytics data utilizes CPU and memory resources of the primary NetScaler Console.
You can have data centers located across the globe. Agents play a vital role in the following scenarios:
-
To install agents in remote data centers so that there is reduction in WAN bandwidth consumption.
-
To limit the number of instances directly sending traffic to primary NetScaler Console for data processing.
Note
-
Installing agents for instances in remote data center is recommended but not mandatory. If necessary, users can directly add NetScaler instances to primary NetScaler Console.
-
If you have installed agents for one or more remote data centers, then the communication between the agents and the primary site is through floating IP address. For more information, see port.
-
You can install agents and apply pooled licenses to the instances at one or more remote data centers. In this scenario, the communication between the primary site and one or more remote data centers is through the floating IP address.
-
NetScaler Console on-premises agent doesn't support pooled licensing.
From NetScaler Console 12.1 or later, instances can be configured with agents to communicate with the primary NetScaler Console located in a different data center.
Agents work as an intermediary between the primary NetScaler Console and the discovered instances across different data centers. Following are the benefits of installing agents:
-
The instances are configured to agents so that the unprocessed data is sent directly to agents instead of primary NetScaler Console. Agents do the first level of data processing and send the processed data in compressed format to the primary NetScaler Console for storage.
-
Agents and instances are co-located in the same data center so that the data processing is faster.
-
Clustering the agents provides redistribution of NetScaler instances on agent failover. When one agent in a site fails, traffic from NetScaler instances is switched to another available agent in the same site.NoteThe number of agents to be installed per site depends on the traffic being processed.
Related information
Architecture
The following figure shows NetScaler instances in two data centers and NetScaler Console high availability deployment using multisite agent-based architecture.
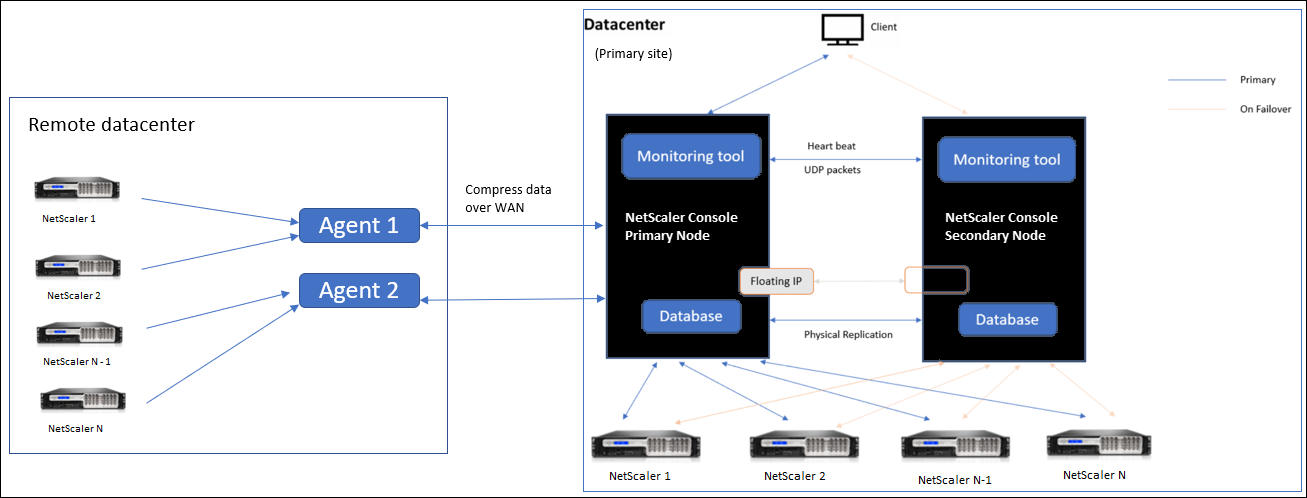
The primary site has the NetScaler Console nodes deployed in a high availability configuration. The NetScaler instances in the primary site are directly registered with the NetScaler Console.
In the secondary site, agents are deployed and registered with the NetScaler Console server in the primary site. These agents work in a cluster to handle continuous flow of traffic in case an agent failover occurs. The NetScaler instances in the secondary site are registered with the primary NetScaler Console server through agents located within that site. The instances send data directly to agents instead of primary NetScaler Console. The agents process the data received from the instances and send it to the primary NetScaler Console in a compressed format. Agents communicate with the NetScaler Console server over a secure channel and the data sent over the channel is compressed for bandwidth efficiency.
Enable basic authentication
Basic authentication must be temporarily enabled to:
-
Complete the initial registration of agents and disaster recovery nodes.
-
Initiate the License Activation System (LAS) checkout from the NetScaler GUI.
Note:
Basic authentication is required only for the initial registration.
Configure basic authentication
-
Navigate to Settings > Administration > System Configurations > System, Time Zone, Allowed URLs and Agent Settings.
-
Click Basic Settings.
-
Select Enable Allow Basic Authentication.
-
Click OK.
Get started
-
Install the agent in a data center
-
Register the agent
-
Attach the agent to a site
-
-
Add NetScaler instances
-
Add new instance
-
Update an existing instance
-
Install the agent in a data center
You can install and configure the agent, to enable communication between the primary NetScaler Console and the managed NetScaler instances in another data center.
You can install an agent on the following hypervisors in your enterprise data center:
-
Citrix Hypervisor™
-
VMware ESXi
-
Microsoft Hyper-V
-
Linux KVM Server
Note
On-prem agents for multisite deployment are supported only with NetScaler Console high availability deployment.
Before you begin installing the agent, ensure you have the required virtual computing resources that the hypervisor must provide for each agent.
| Component | Requirement |
|---|---|
| RAM | 32 GB |
| Virtual CPU | 8 CPUs |
| Storage space | 30 GB |
| Virtual Network Interfaces | 1 |
| Throughput | 1 Gbps |
Ports
For communication purposes, the following ports must be open between the agent and NetScaler Console on-prem server.
| Type | Port | Details | Direction of communication |
|---|---|---|---|
| TCP | 8443, 7443, 443 | For outbound and inbound communication between agent and the NetScaler Console on-prem server. | NetScaler agent to NetScaler Console |
The following ports must be open between the agent and NetScaler Instances.
| Type | Port | Details | Direction of communication |
|---|---|---|---|
| TCP | 80 | For NITRO communication between agent and NetScaler instance. | NetScaler Console to NetScaler and NetScaler to NetScaler Console |
| TCP | 22 | For SSH communication between agent and NetScaler instance. For synchronization between NetScaler Console servers deployed in high availability mode. | NetScaler Console to NetScaler and NetScaler agent to NetScaler |
| UDP | 4739 | For AppFlow communication between agent and NetScaler instance. | NetScaler to NetScaler Console |
| ICMP | No reserved port | To detect network reachability between NetScaler Console and NetScaler instances, or the secondary NetScaler Console server deployed in high availability mode. | |
| UDP | 161, 162 | To receive SNMP events from NetScaler instance to agent. | Port 161 - NetScaler Console to NetScaler |
| Port 162 - NetScaler to NetScaler Console | |||
| UDP | 514 | To receive syslog messages from NetScaler instance to agent. | NetScaler to NetScaler Console |
| TCP | 5557 | For Logstream communication between agent and NetScaler instances. | NetScaler to NetScaler Console |
Register the agent
-
Use the agent image file downloaded from the NetScaler site and import it in to your hypervisor. The naming pattern of the agent image file is as follows, MASAGENT-\<HYPERVISOR\>-\<Version.no\>. For example: MASAGENT-XEN-13.0-xy.xva
-
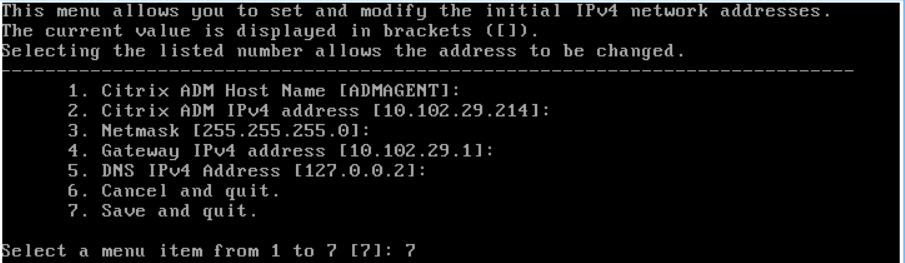
From the Console tab, configure NetScaler Console with the initial network configurations.
-
Enter the NetScaler Console host name, IPv4 address, and gateway IPv4 address. Select option 7 to save and quit the configuration.
-
After the registration is successful, the console prompts to log on. Use nsrecover/nsroot as the credentials.
-
To register the agent, enter /mps/register\_agent\_onprem.py. The NetScaler agent registration credentials are displayed as shown in the following image.
-
Enter the NetScaler Console floating IP address and the user credentials.
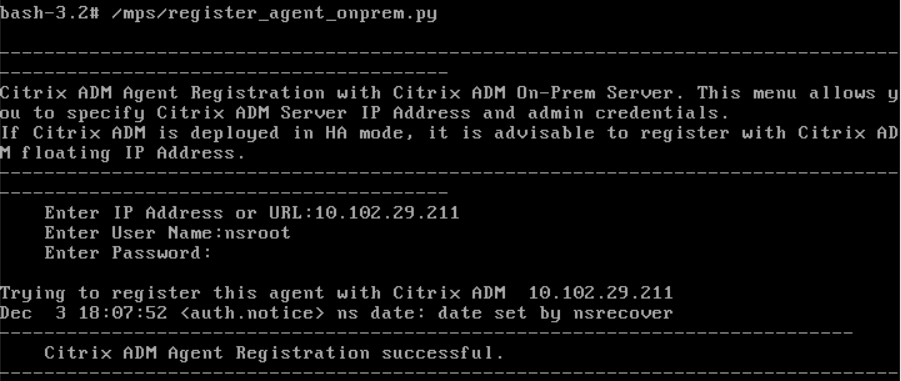
After the registration is successful, the agent restarts to complete the installation process.
After the agent restarts, access the NetScaler Console GUI, from the main menu go to the Infrastructure > Instances > Agents page to verify the status of the agent. The newly added agent is displayed in Up state.
Note
The NetScaler Console displays the version of the agent and also checks if the agent is on the latest version. The download icon signifies that the agent is not on the latest version and needs to be upgraded. We recommend you upgrade the agent version to the NetScaler Console version.
Attach an agent to a site
-
Select the agent and click Attach Site.
-
In the Attach site page, select a site from the list, or create a site using the plus (+) button.
-
Click Save.Note
-
By default, all newly registered agents are added to the default data center.
-
It is important to associate the agent with the correct site. In the event of an agent failure, the NetScaler instances assigned to it are automatically switched to other functioning agents in the same site.
-
Agent actions
You can apply various actions to an agent under Infrastructure > Agents > Select Actions.
Under Select Action, you can use the following features:
Install a new certificate: if you need a different agent certificate to meet your security requirement, you can add one.
Change the default password: to ensure security of your infrastructure, change the default password of an agent.
Generate a technical support file: generate a technical support file for a selected NetScaler agent. You can download this file and send it to Citrix technical support for investigation and troubleshooting.
Add NetScaler instances
Instances are NetScaler appliances or virtual appliances that you want to discover, manage, and monitor from NetScaler Console through agents. You can add the following NetScaler appliances and virtual appliances to NetScaler Console or agents:
-
NetScaler MPX
-
NetScaler VPX
-
NetScaler SDX
-
NetScaler CPX
-
NetScaler Gateway
-
Citrix SSL Forward Proxy
For more information, see Add instances to NetScaler Console.
Attach an existing instance to the agent
If an instance is already added to the primary NetScaler Console, you can attach it to an agent by editing an agent.
-
Navigate to Infrastructure > Instances and select the instance type. For example, NetScaler.
-
Click Edit to edit an existing instance.
-
Click to select the agent.
-
From the Agent page, select the agent with which you want to associate the instance and then click OK.NoteEnsure to select the Site with which you want to associate the instance.
Access the GUI of an instance to validate events
After the instances are added and agent is configured, access the GUI of an instance to check if the trap destination is configured.
In NetScaler Console, navigate to Infrastructure > Instances. Under Instances, select the type of instance you want to access (for example, NetScaler VPX), and then click the IP address of a specific instance.
The GUI of the selected instance is displayed in a pop-up window.
By default, the agent is configured as the trap destination on the instance. To confirm, log on to the GUI of the instance and check the trap destinations.
Important
Adding an agent for NetScaler instances in remote data centers is recommended but not mandatory.
In case you want to add the instance directly to the primary MAS, do not select an agent while adding instances.
NetScaler agent failover
The agent failover can occur in a site that has two or more registered agents. When an agent becomes inactive (DOWN state) in the site, the NetScaler Console redistributes the NetScaler instances of the inactive agent with other active agents.
Important
-
Ensure the Agent Failover feature is enabled on your account. To enable this feature, see Enable or disable NetScaler Console features.
-
If an agent is running a script, ensure that script is present on all the agents in the site. Therefore, the changed agent can run the script after agent failover.
To attach a site to an agent in the NetScaler Console GUI, see Attach an agent to a site.
To achieve an agent failover, select NetScaler agents one by one and attach to the same site.
For example, two agents 10.106.1xx.2x and 10.106.1xx.3x are attached and operational in the Bangalore site. If one agent becomes inactive, NetScaler Console detects it and displays the state as down.
When a NetScaler agent becomes inactive (Down state) in a site, NetScaler Console waits for five minutes for the agent to become active (Up state). If the agent remains inactive, NetScaler Console automatically redistributes the instances among available agents in the same site.
NetScaler Console triggers instance redistribution every 30 minutes to balance the load among active agents in the site.
Configure agent unreachable threshold and notification
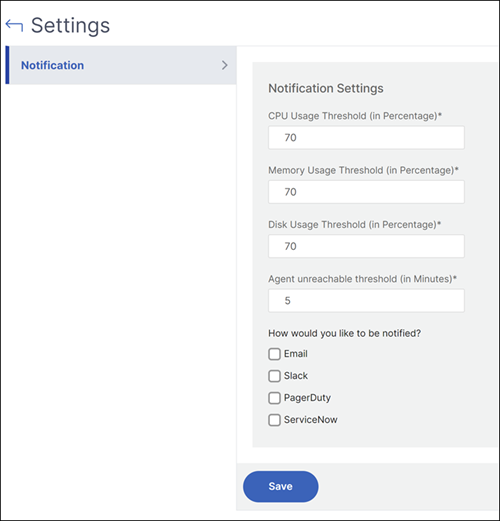
If an agent is down or not reachable for a certain duration, you can get notification on the agent status through email, slack, PagerDuty, and ServiceNow. In Infrastructure > Instances > Agents, click Settings, specify the duration between 5 minutes and 60 minutes, and select the notification method that you want to get notified.
Secure communication between NetScaler® Console agents and NetScaler Console
A secure communication between NetScaler Console agents and NetScaler Console is available for versions 14.1-34.x or later. You can enable this secure communication by verifying the Console server SSL certificate. Previously, communication between NetScaler Console agents and the NetScaler Console on-prem server was not verifying the Console server SSL certificate, leading to potential security vulnerabilities.
To enable this secure communication:
-
Ensure that the Netscaler Console has SSL certificates configured.
-
Login to the NetScaler Console agent.
-
Place the CA root certificate at /mpsconfig/console_onprem_cacert. This is used to validate the server certificate. The name of the CA root certificate must be cacert.pem.
-
Configure the secure communication by running the following command. Configure_secure_communication_with_server.py
-
This prompts for FQDN(Fully Qualified Domain Name) or IP address of the Netscaler Console server.
-
Enter the FQDN or IP address to finish executing the script.

-
The script verifies the server certificate presented by an FQDN or IP address, using the provided CA root certificate. Secure communication is enabled if the certificate validation passes.
-
This script can be invoked either before or after the agent is registered with the NetScaler Console.
NOTE:
This is applicable for VM based agents only.