
Pre-configuration tasks in NetScaler Console and OpenStack
This section assists you to perform the pre-configuration tasks before you configure NetScaler Console and OpenStack.
Related information
Installing NetScaler Console
Install NetScaler Console on a supported hypervisor. For more information on how to download and install NetScaler Console, see Deploying NetScaler Console.
Installing the NetScaler driver software and registering NetScaler Console on OpenStack
Download the NetScaler bundle for OpenStack from the NetScaler Console Downloads page.
To install NetScaler driver on OpenStack platform using NetScaler Console GUI:
-
In NetScaler Console, click Downloads. The Downloads page in NetScaler Console provides you links to download NetScaler bundle for OpenStack software required for Newton, Ocata, and Pike OpenStack versions.
-
Download the latest NetScaler bundle tar file to a temporary directory (for example, /tmp) in OpenStack Controller. This bundle includes the LBaaS V2 driver and Heat plug-in for all OpenStack releases.

-
Run the following command to extract the files from the NetScaler driver tar file:
tar -xvzf <name_of_tar_file> -
If you have an OpenStack \<Release Name\> setup, at the prompt, type the following command:
cd <Release Name>Example:cd Newton -
Run the following command to install the driver and specify the NetScaler Console IP address, the NetScaler driver password that you configured when you registered OpenStack with NetScaler Console, and the protocol:
./install.sh --ip=<NetScaler_MAS_IP> --password=<password> --protocol=<protocol> --neutron-lbaas-path <neutron-lbaas-directory-path>Example for single node OpenStack setup:./install.sh --ip=10.102.29.90 --password=xxxx --protocol=HTTP --neutron-lbaas-path=/opt/stack/neutron-lbaasExample for multinode OpenStack setup:./install.sh --ip=10.102.29.90 --password=xxxx --protocol=HTTP --neutron-lbaas-path=/usr/lib/python2.7/site-packagesNoteProviding the path of theneutron-lbaasdirectory of the system is optional. Providing the path might assist the script to find the drivers.After NetScaler Console is registered successfully on OpenStack, you can log on to NetScaler Console using your OpenStack user credentials also.After NetScaler Console is registered successfully on OpenStack, restart the OpenStack Neutron services.
Registering OpenStack with NetScaler Console
To register OpenStack with NetScaler Console using NetScaler Console GUI:
-
In NetScaler Console, navigate to Orchestration \> Cloud Orchestration \> OpenStack.
-
Click Configure OpenStack Settings.
-
In Configure OpenStack Settings page, you can set the parameters to configure OpenStack in NetScaler Console. You have two options here - Default and Customized.For Newton and Ocata releases of OpenStack, you can use either default or customized deployment type. But for Pike release, you must use customized deployment type to register OpenStack with NetScaler Console.
-
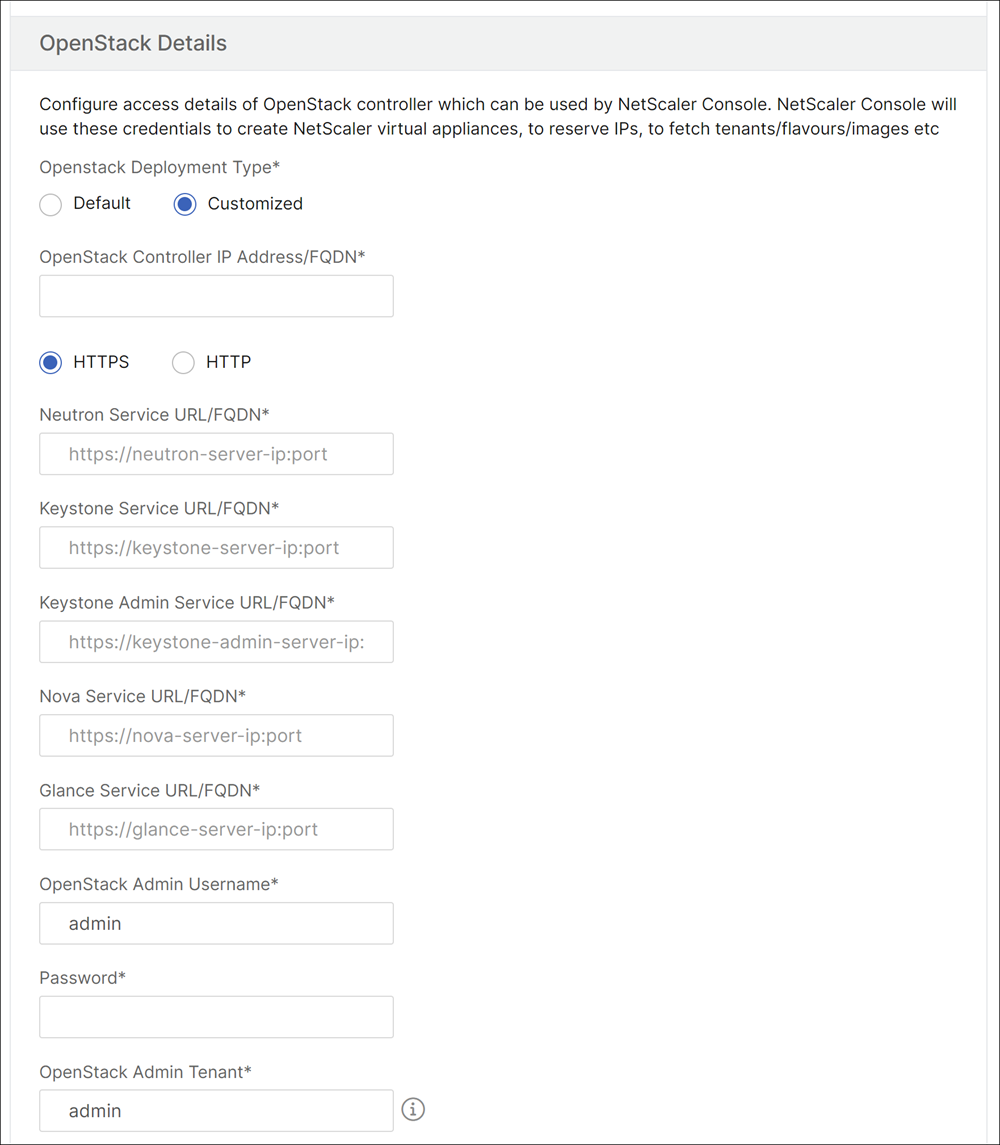
Default Deployment TypeSelect Default, if the OpenStack services are running on default ports. For example, the default portal for Neutron services is 9696, the default portal for Keystone services is 5000.
-
OpenStack Controller IP Address - IP address of the OpenStack controller (both the KeyStone service and the Neutron service should be reachable on this IP address). For example, enter the IP address 10.102.205.23.
-
OpenStack Admin user name - administrative user name of the OpenStack controller. For example, enter admin1.
-
Password - password of the administrative user of the OpenStack controller.
-
OpenStack Admin Tenant - the name of the administrative tenant on OpenStack. For example, enter admin.
-
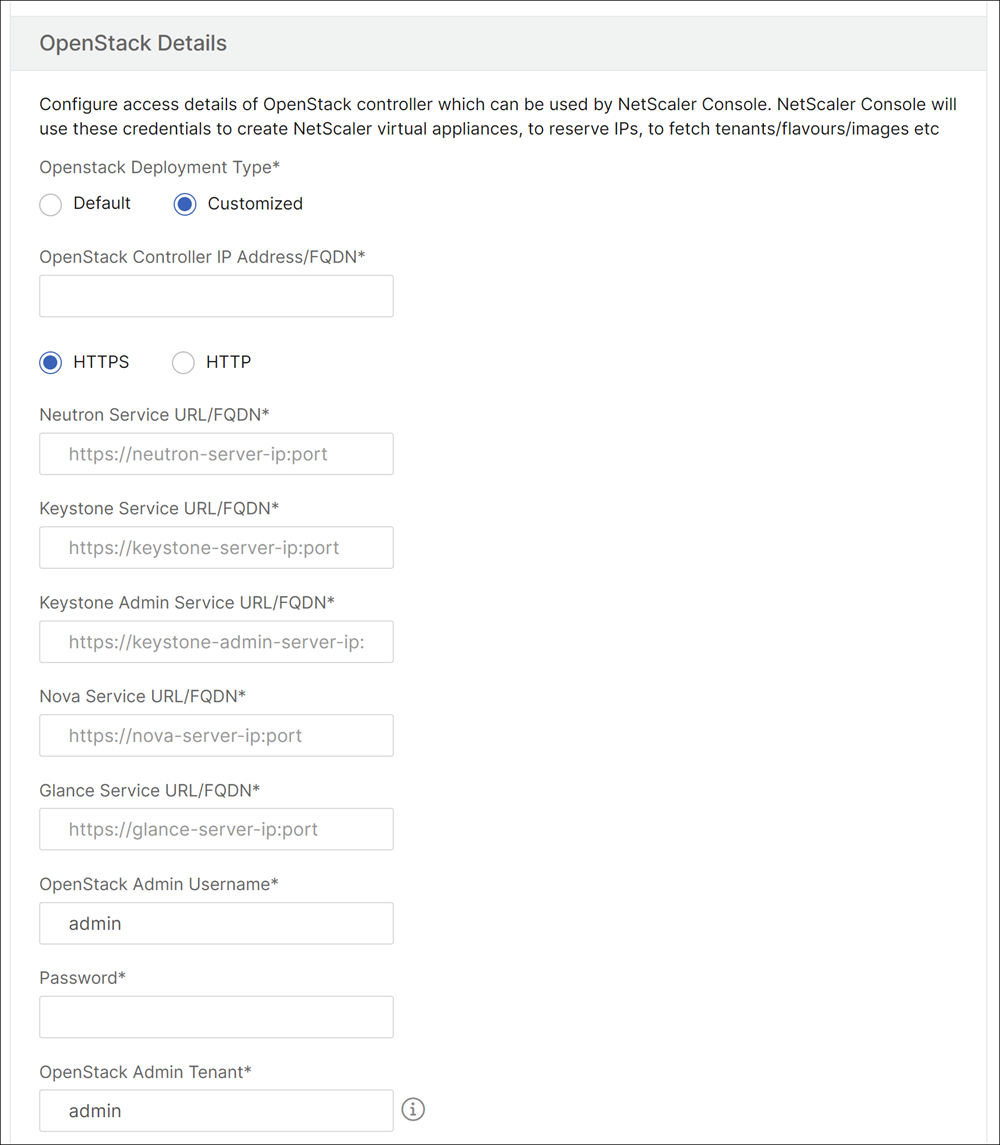
Customized Deployment TypeSelect deployment type as Customized if the OpenStack services are running on ports different from the default ports. If these services are running on different ports, specify them here. Registering OpenStack Newton and Ocata releases with NetScaler Console is different from registering OpenStack Pike release.Newton and Ocata Release of OpenStack:
-
Specify the port numbers for the various OpenStack services if you are registering Newton release of OpenStack.
-
Specify the OpenStack Admin user name, password, and OpenStack Admin Tenant user name as you had specified earlier in the Default settings.
Pike Release of OpenStack:If you are registering the Pike release of OpenStack enter the details of the OpenStack services as shown in the following image. You must also specify the OpenStack Admin user name, password, and OpenStack Admin Tenant user name as in Default settings.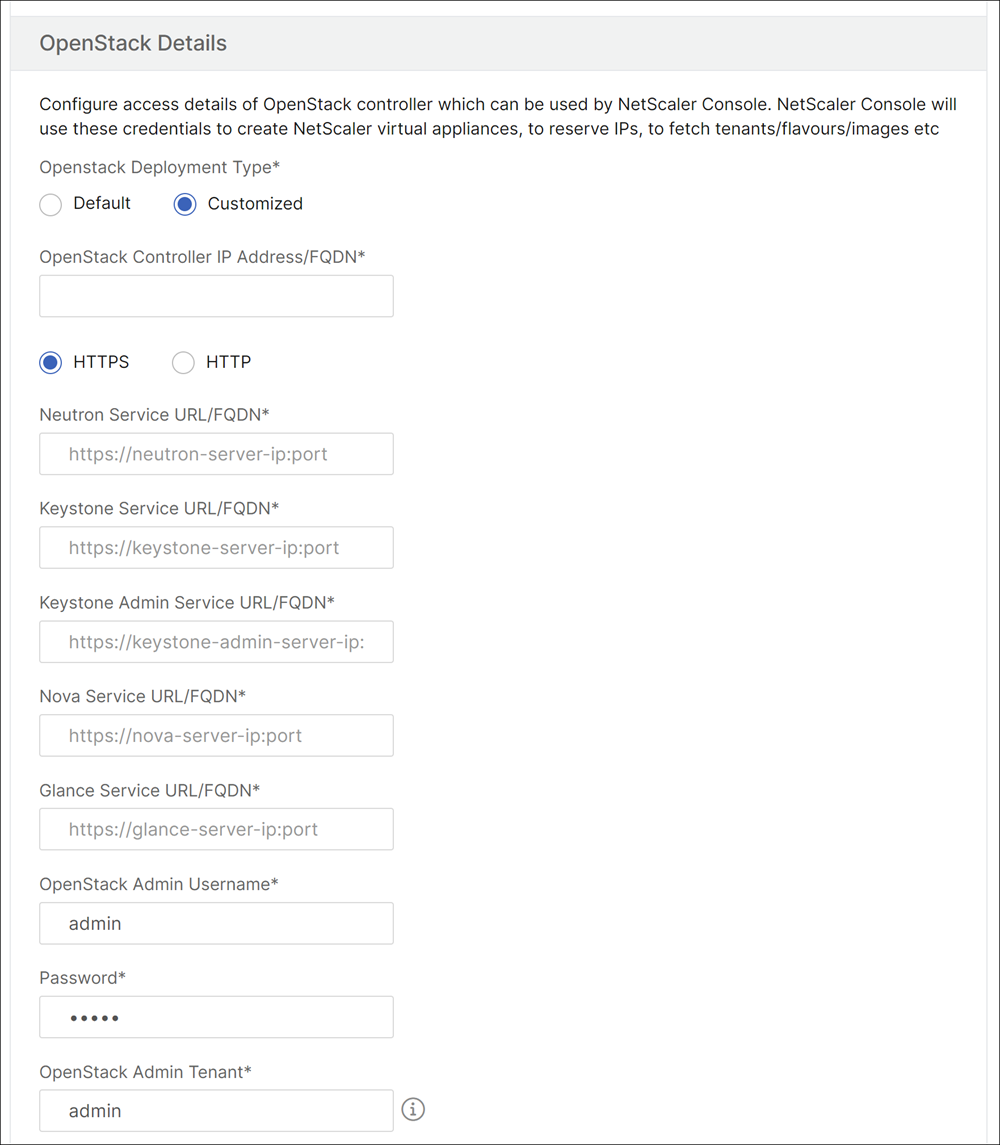
-
-
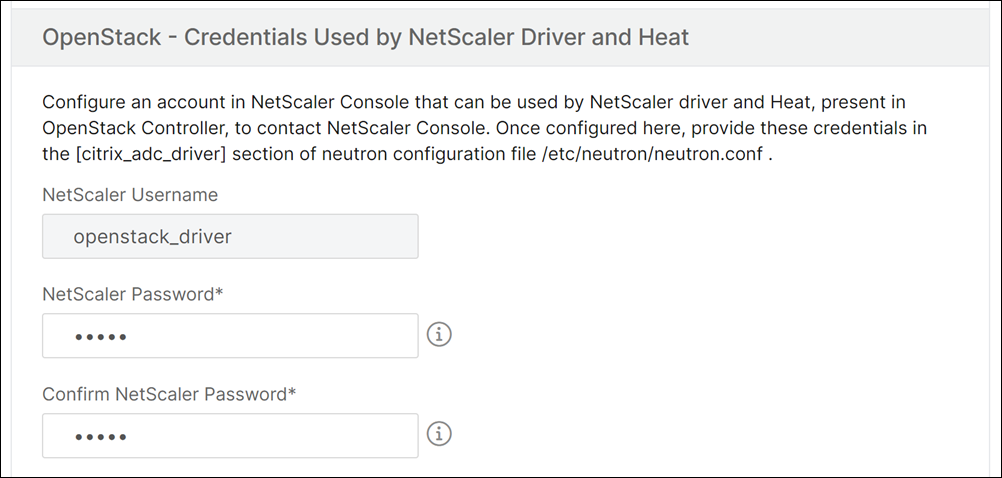
In OpenStack Neutron LBaaS - Credentials Used by NetScaler Driver section, set the NetScaler Driver Password for the OpenStack NetScaler driver user account. NetScaler Console authenticates the calls from the OpenStack NetScaler driver by using these credentials. You must specify the same password when you run the NetScaler driver installation script in the OpenStack controller.
-
Click OK.
Creating a tenant on OpenStack
Create a project or a tenant on OpenStack, add users to the project or tenant, and assign roles to all of the users. KeyStone, the Identity service in OpenStack provides authentication services for each OpenStack service. The authentication service uses a combination of domains, projects (tenants), users, and roles.
For more information on how to create a project, and to perform other tasks in OpenStack, see the OpenStack documentation at
<http://docs.openstack.org/>.
Adding OpenStack tenants
-
In NetScaler Console, navigate to Orchestration \> Cloud Orchestration \> OpenStack \> OpenStack Tenants, and then click Add.
-
In Add OpenStack Tenants page, click +Add, and then select the OpenStack tenant.
-
Click OK.
Based on whether you are using pre-provisioned instance or auto-provisioning the instance when you are integrating the OpenStack, follow one of these two tasks:
-
Pre-provision the NetScaler Devices
-
Auto-provision the NetScaler VPX devices on OpenStack
Provisioning NetScaler devices
Based on whether you are using pre-provisioned instance or auto-provisioning the instance when you are integrating the OpenStack, follow one of these two tasks:
-
Pre-provision the NetScaler Devices
-
Auto-provision the NetScaler VPX devices on OpenStack
Pre-provisioning NetScaler devices
Install the NetScaler device on any of the hypervisor platforms such as Citrix Hypervisor, KVM, or ESX, and add the instance to NetScaler Console. NetScaler Console then manages this device that load balances the traffic in the servers.
To add an existing NetScaler VPX instance in NetScaler Console:
-
In NetScaler Console, navigate to Infrastructure \> Instances \> NetScaler VPX, and then click Add.
-
On the Add NetScaler VPX page, specify the IP address of the NetScaler VPX instance and select an instance profile from the Profile Name list. The instance profile contains the credentials used to logon to the NetScaler VPX. You can also create a new instance profile by clicking the + icon. Click OK.
Autoprovisioning NetScaler devices
Download the required NetScaler instance image from the NetScaler download page, and upload it on Glance, the OpenStack Imaging service. Having an image available on Glance allows you to configure a NetScaler instance on-demand when assigning the instance to the tenant.
To auto-provision the NetScaler VPX devices on OpenStack:
-
In NetScaler Console, navigate to Orchestration \> Cloud Orchestration \> OpenStack.
-
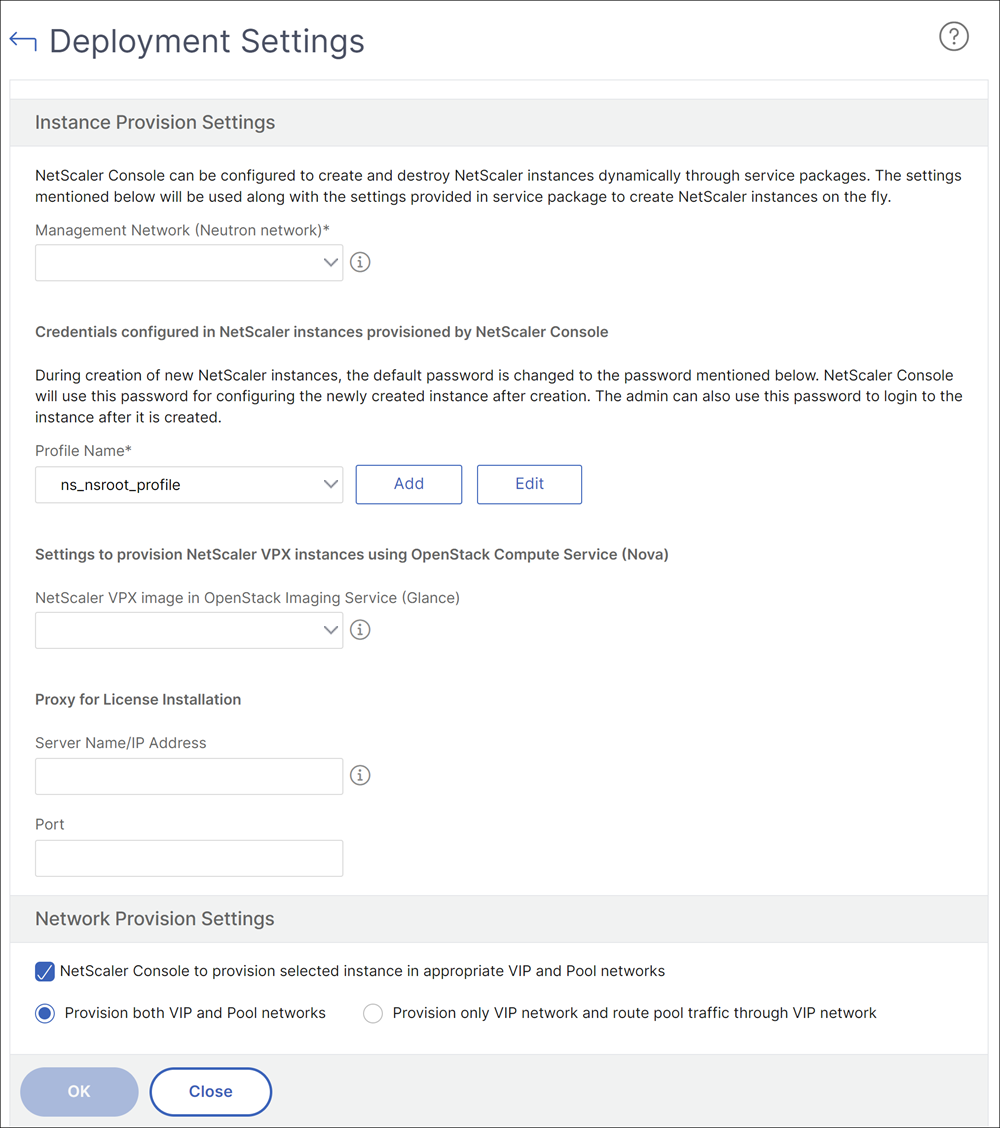
Click Deployment Settings.
-
Set the following parameters:
-
Management Network - select the management network on OpenStack, to which the auto-provisioned NetScaler VPX is connected.
-
Profile Name - select the profile from the drop-down list. The NetScaler Console uses the password contained in this profile to configure new auto-provisioned NetScaler VPX instances.
-
Licenses - provide the NetScaler Console license access codes used to license new auto-provisioned NetScaler instances. NetScaler Console provisions NetScaler instances on OpenStack compute in management network, then triggers license installation on them using the specified license code. The NetScaler instance then downloads the license files from Citrix website using the license access code specified here.
-
NetScaler VPX Image in Glance - select the NetScaler VPX image available in the OpenStack Glance that is used to create a NetScaler VPX instance.
-
Proxy Settings - provide details of NetScaler proxy server for installing licenses. This may be required when NetScaler does not have direct access to the Internet through the management network.
-
-
Click OK.
Creating a service package in NetScaler Console
To create service packages for a tenant in NetScaler Console:
-
In NetScaler Console, navigate to Orchestration \> Cloud Orchestration \> OpenStack \> Service Packages, and then click Add.
-
On the Service Package page specify the following parameters:
-
Name - name for the service package. For example, enter SVC-PKG-GOLD.
-
NetScaler Instance Allocation - the type of instance allocation defined in the service package based which NetScaler instance resources are allocated to a tenant. Select Dedicated. For more information on policies, see Service Package Isolation Policies.
-
NetScaler Instance Provisioning - select Existing Instance to allocate an existing NetScaler instance to a tenant. If you want to create NetScaler instances during the configuration itself, select Create Instance OnDemand.
-
NetScaler Instance Type - select NetScaler VPX.
NoteSelect NetScaler VPX to allocate pre-provisioned NetScaler instances hosted on SDX platform. -
-
Click Continue to associate a tenant with a service package.NoteEnable Provision pair of NetScaler instances for high availability, if you are deploying the NetScaler instances in high availability mode.
-
In Assign Instances section, click Add, and then select the NetScaler instance that you want to assign to the tenant, and click Continue.
-
In Assign OpenStack Tenants/Placement Policies section, under OpenStack Tenants, click Add, and select the tenant.
-
Click Continue, and then click Done.
Note
If the policy is not found, the fallback mechanism is revived, and the NetScaler Console assigns NetScaler instances based on tenants. If the tenant is not part of any service package, the NetScaler Console displays an error message that says: "Tenant \<admin\> is not part of any Service Package and there is no default Service Package."
Creating placement policies (optional)
Isolation Policies are not tenant-based only. You can create flexible placement policies, where the policies are not only based on tenant name or id, but on other custom attributes also.
To create placement policies for a tenant in NetScaler Console:
-
In NetScaler Console, navigate to Orchestration \> Cloud Orchestration \> OpenStack \> Placement Policy, and then click Add.
-
On the Add Placement Policy page, set the following parameters:
-
Name - type a name for the placement policy
-
Sample Expressions - select a sample expression from the list. These examples are helpful to construct the placement policy.
-
Expression - a Boolean expression is populated in this field based on the sample expression that you have selected in the earlier field. Edit the field names as required.
-
-
Click OK.
Enabling traffic from NetScaler instances to back-end servers through client network
By default, in the OpenStack orchestration workflow, NetScaler instances are dynamically bound to the load balancer or client networks and member or server networks.
In certain deployments servers are also reachable through client networks and can be routed through the client gateway. In such cases, the NetScaler instances need not be bound to server networks, but they need to be bound only to client networks.
Perform the following setting to configure traffic through client gateway.
Navigate to Orchestration > Cloud Orchestration > OpenStack > Deployment Settings, and then select the Provision only VIP network and route pool traffic through VIP network option.
NetScaler Console then configures the NetScaler instance to client networks by adding a SNIP in that network, and will further add a default route to the client network gateway. This enables the instance to reach the servers through the client gateway.
Auto-provisioning NetScaler VPX devices deployed on NetScaler SDX platform
Add the NetScaler SDX platform in NetScaler Console, so that NetScaler Console provisions the instances on this platform on-demand.
To auto-provison NetScaler instances deployed on NetScaler SDX platform:
-
In NetScaler Console GUI, navigate to Infrastructure > Instances \> NetScaler SDX, and click Add to add a NetScaler SDX platform.
-
Navigate to Orchestration \> Cloud Orchestration \> OpenStack \> Deployment Settings.
-
In Management Network section, select the management network on OpenStack to which the auto-provisioned NetScaler SDX is connected.
-
In Profile Name, select the profile from the drop-down list. The NetScaler Console uses the password contained in this profile to configure new auto-provisioned NetScaler VPX instances.
-
Click OK.
-
-
To provision the NetScaler SDX platform in OpenStack, navigate to Orchestration \> Cloud Orchestration \> OpenStack\> Service Package.
-
Click Add to create a new service package.
-
Enter the name of the service package.
-
In NetScaler Instance Allocation field, select Dedicated.
-
In NetScaler Instance Provisioning field, select Create Instance OnDemand, and in Auto Provision Platform field, select NetScaler SDX.
-
By default, only NetScaler VPX instances are provisioned on NetScaler SDX platform.
-
Click Continue.
-
In Auto Provision Settings section, set the Resources properties.
-
Throughput field. Enter 1000 Mbps.
-
NetScaler Version field. From the list, select the right version of the NetScaler VPX image present on the NetScaler SDX platform.
-
-
In NetScaler SDX Platforms section, click Add to add the SDX platform to the service package.
-
Click Continue.
-
In Configure OpenStack Tenants section, click Add to add the tenants. You can also add new tenants by clicking New.
-
Click Done.
-
-
LBaaS V2 API implementations are performed through Neutron LBaaS commands. Connect to any Neutron client and run the configuration tasks. For more information on how to run configuration commands, see Configuring LBaaS V2 using Command Line.