
Migrate NetScaler Console on-prem to Citrix Cloud
You can migrate NetScaler ADM 13.0 64.35 or a later version to Citrix Cloud. If your NetScaler ADM has 12.1 or an earlier version, you must first upgrade to 13.0 64.35 or a later version and then migrate to Citrix Cloud. For more information, see the Upgrade section.
Note:
NetScaler® ADM service is now renamed to NetScaler Console service. Our product UI and documentation are currently undergoing updates to reflect these changes. During this time, you may come across the older and newer names being referenced interchangeably. We thank you for your understanding during this transition.
NetScaler Console service through Citrix Cloud™ enables you to get:
-
Faster releases, approximately every two weeks with latest feature updates.
-
Machine-learning based analytics for application security and bot, performance, and usage.
-
Various other features that are currently supported only in NetScaler Console service, such as peak and lean period analytics, machine-learning based analytics for application security and bot, application CPU analytics, and many more.
For a successful migration, you must:
-
Ensure to have internet connection in NetScaler Console on-prem for Citrix Cloud accessibility
-
Configure the NetScaler agent
-
Get the client and secret CSV file from Citrix Cloud
-
Validate the NetScaler Console licensing
-
Migrate using a script
After you migrate from NetScaler Console on-prem to NetScaler Console service, if you want to again continue with NetScaler Console on-prem, you can use the rollback script. For more information, see Roll back to NetScaler Console on-prem.
Related information
Configure the NetScaler agent
To enable communications between NetScaler instances and NetScaler Console service, you must configure an agent. NetScaler agents are, by default, automatically upgraded to latest build. You can also select a specific time for the agent upgrade. For more information, see Configuring agent upgrade settings.
-
If your existing NetScaler Console on-prem (standalone or HA pair) has no agents configured, you must configure at least one agent for NetScaler Console service.
-
If your existing NetScaler Console on-prem (standalone or HA pair) has configured with on-premises agents for multisite deployments, you must configure the same number of agents for NetScaler Console service.
For more information on configuring an agent, see the Getting Started section.
Get the client and secret CSV file from Citrix Cloud
After you configure the agent, get the client and secret CSV file from the Citrix Cloud page:
-
Log on to citrix.cloud.com
-
Click the Home icon and select Identity and Access Management
-
From the API Access tab, enter a secure client name and click Create Client.
-
ID and Secret is generated. Click Download and save the CSV file in the NetScaler Console on-prem.For example, save the CSV file to the /var directory.
Validate the NetScaler Console service licenses
You must obtain licenses for NetScaler service.
-
The VIP licenses in NetScaler Console service must be more than or equal to the on-premises VIP licenses.NoteIf VIP licenses are lesser, then virtual servers are selected randomly and the VIP-level configuration for NetScaler Console service fails.
-
If you use NetScaler Console on-prem deployment as a license server, reallocate your licenses to NetScaler Console service before migration. For more information, see How to reallocate a license file.
-
If you are using the pooled licenses in NetScaler Console on-prem, you must obtain the pooled licenses for NetScaler Console service and then allocate licenses to the NetScaler instances. For more information, see Configure Pooled Licensing. The following supported NetScaler versions enable you to modify the license allocation from NetScaler Console:
-
NetScaler SDX: 13.0 74.11 or later versions.
-
NetScaler VPX and MPX: 13.0 47.24 or later versions, 12.1 58.14 or later versions, and 11.1 65.10 or later versions.
-
Migrate using a script
-
Using the NetScaler Console 82.x build, you can select the feature and then migrate.
-
For NetScaler Console 76.x or later builds, the migration scripts (
servicemigrationtool.pyandconfig_collect_onprem.py) are available as part of the build, available atcd /mps/scripts. -
For NetScaler Console earlier than 76.x builds, you must download the migration scripts and copy the scripts in NetScaler Console on-prem.NoteEnsure that the NetScaler Console on-prem has internet connectivity during migration.
-
Using an SSH client, log on to the NetScaler Console on-prem.NoteFor a NetScaler Console HA pair, log on to the primary node.
-
Type shell and press Enter to switch to bash mode.
-
Copy the client ID and secret CSV file. For example, copy the file to the /var directory.After you copy the CSV file, you can validate if the CSV file is present.
 NoteFor a NetScaler Console HA pair, copy the CSV file in the primary node.
 -
For NetScaler Console on-prem 13.0 82.xx version, run the following commands to complete the migration:
-
cd /mps/scripts -
python servicemigrationtool.py <path of ClientID/Secret File in on-premises NetScaler Console VM>
For example,python servicemigrationtool.py /var/secureclient.csvAfter you run the migration script, the tool displays the following options: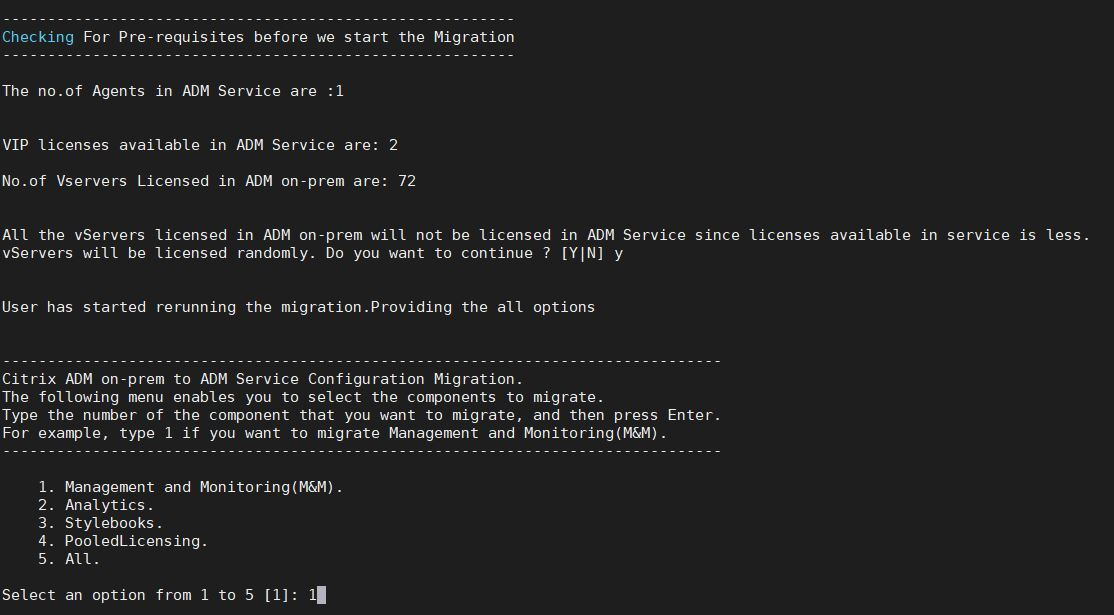 Based on the choice you provide, only that feature gets migrated to NetScaler Console service.In the example, option 1 is selected. The tool completes the Management and Monitoring (M&M) migration and displays the following message:
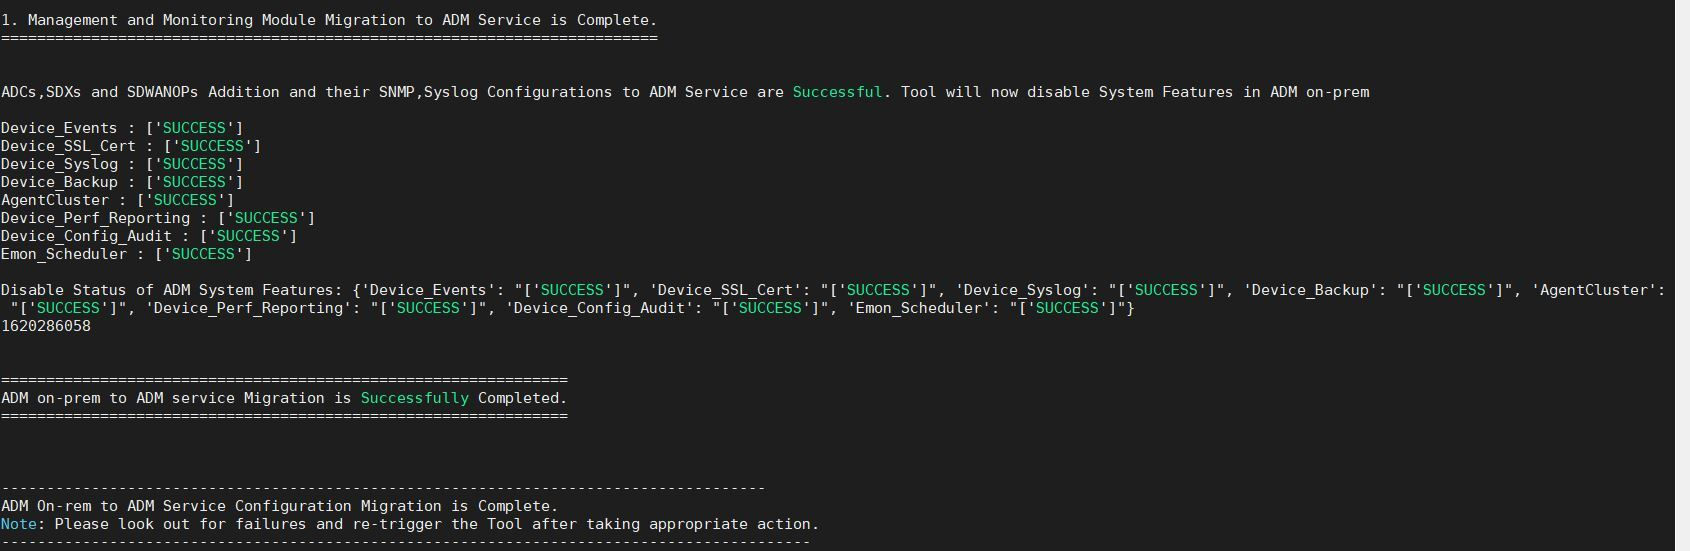 The Management and Monitoring (M&M) feature includes:
-
NetScaler Instances, tags, instance groups, profiles, custom apps, config jobs, SNMP, syslog configurations.
-
Sites, IP blocks, network reporting, analytics thresholds, notification settings, data pruning settings.
-
Config audit templates, polling intervals, event rules and settings.
-
RBAC groups, roles, and policies
The Analytics feature includes:-
Appflow configuration per vserver from NetScaler instances.
-
Appflow® configuration per SDWAN device.
Note:-
The Management and Monitoring (M&M) feature is automatically migrated, even if you select any other feature (2, 3, or 4).
-
You can specify only one feature at a time.
-
After you complete migrating any feature, if you want to migrate any other feature later, the feature that is already migrated is not shown in the list. For example, if you complete migrating the Analytics feature first, the next time you run the migration script, you can see only the StyleBooks, Pooled Licensing, and All options.
-
When you migrate pooled licensing, it migrates all types including vservers.
-
-
For NetScaler Console on-prem 13.0 76.xx version, run the following commands to complete the migration:
-
cd /mps/scripts -
python servicemigrationtool.py <path of ClientID/Secret File in on-premises NetScaler Console VM>
For example,python servicemigrationtool.py /var/secureclient.csv -
-
For NetScaler Console on-prem earlier than 13.0 76.xx version:
-
Download the migration script from the following location:
https://download.citrixnetworkapi.net/root/download/v1/public/software?product=admonprem&build=migrationtool&model=servicemigrationtool_27.tgzThe downloaded file comprises two bundle scripts,servicemigrationtool_27.pyandconfig_collect_onprem_27.py. -
Save the two scripts in NetScaler Console on-prem. For example, save in the /var directory
-
Run the following commands to migrate:
-
cd /var -
servicemigrationtool_27.py <path of ClientID/Secret File in NetScaler Console on-prem VM>For example,python servicemigrationtool_27.py /var/secureclient.csv
-
-
After you run the script, it checks the prerequisites and then proceeds with the migration. The script first checks for the license availability. The following message is displayed only if you have lesser NetScaler Console service license than the on-premises license.
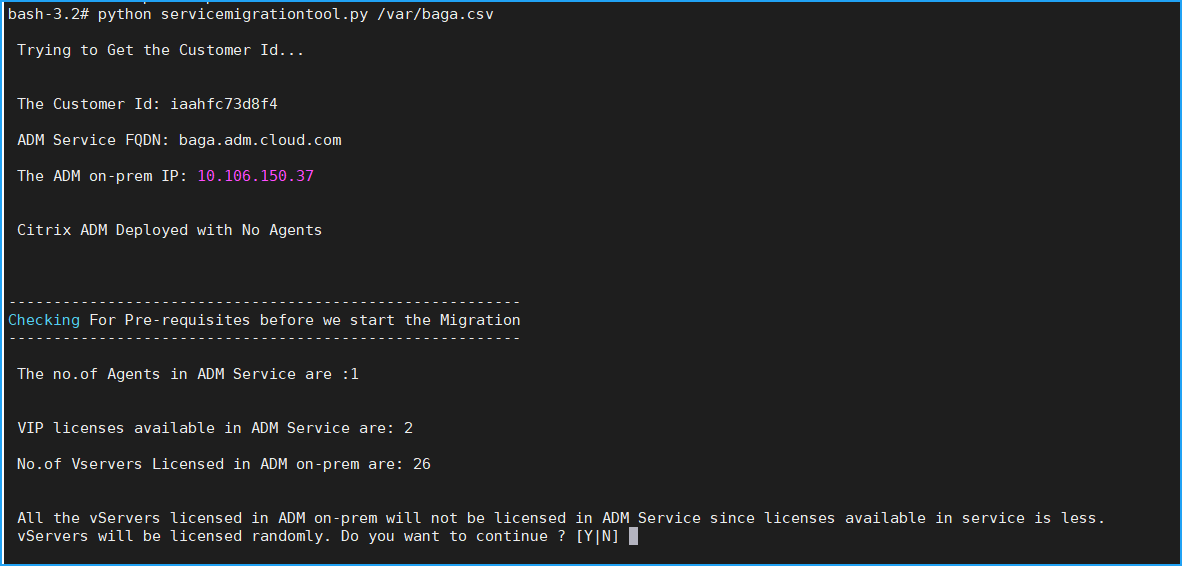
If you select Y, the migration continues by licensing the VIP randomly. If you select N, the script stops the migration.
If you have the unsupported NetScaler instance version for the pooled license server, the following message is displayed:
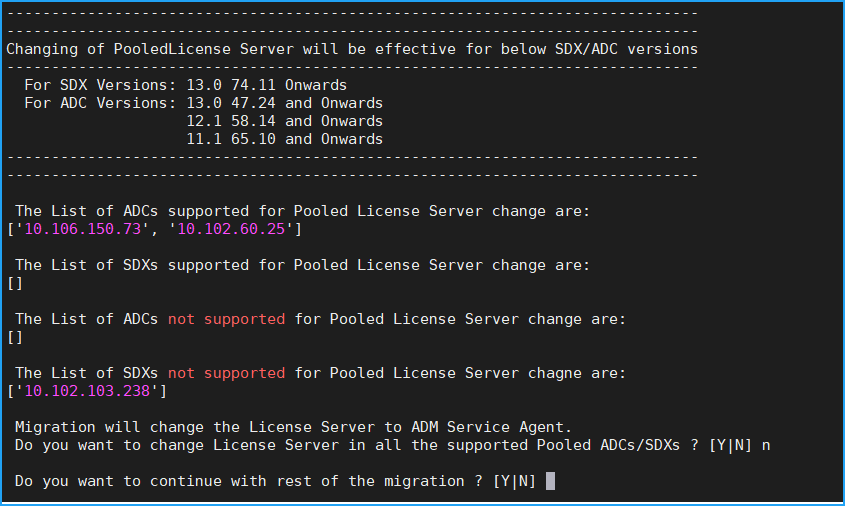
If you select Y, the migration process continues by changing the license server. If you select N, the script prompts if you want to proceed with rest of the migration. The script stops the migration if you select N.
Depending upon the on-premises configuration, the approximate time for the migration to complete is between a few minutes and a few hours. After the migration is complete, you see the following message:

The migration is successful once all the NetScaler instances and their respective configurations are successfully moved to NetScaler Console service. After successful migration, the on-premises NetScaler Console stops processing the following instance events:
-
SSL certificates
-
Syslog messages
-
Backup
-
Agent cluster
-
Performance reporting
-
Configuration audit
-
Emonscheduler
Roll back to NetScaler Console on-prem
If you want to roll back to NetScaler Console on-prem, ensure that the prerequisites are met.
Prerequisites
If your NetScaler Console on-prem (before migrating to NetScaler Console service) is:
-
Used as a pooled license server, ensure you have the required pooled licenses in the NetScaler Console on-prem.
-
Configured with NetScaler agents, ensure the agents are available in “UP” status.
Use the rollback script
Note
After rollback, the same configurations (before migration) in Analytics, SNMP, pooled licensing are again available in NetScaler Console on-prem. If you have made any changes to these configurations after migration, these changes are not reflected in NetScaler Console on-prem.
-
For NetScaler Console 82.xx or later builds, the rollback script is available as part of the build and accessible at
/mps/scripts. -
For NetScaler Console earlier than 79.xx builds, you can either upgrade to 82.x build and use the rollback script or you can download the rollback script and copy the script in NetScaler Console on-prem.
-
Using an SSH client, log on to the NetScaler Console on-prem.
-
Type shell and press Enter to switch to bash mode.
-
For NetScaler Console 13.0 82.xx build, run the following commands to complete the rollback:
-
cd /mps/scripts
-
python rollback_to_onprem.py
<path of ClientID/Secret File in NetScaler Console on-prem VM>For example,python rollback_to_onprem.py /var/ secureclient.csv.csvThe tool initiates the rollback operation and a prompt asks if you want to proceed. Type Y to proceed. You can see the following message after the rollback gets completed.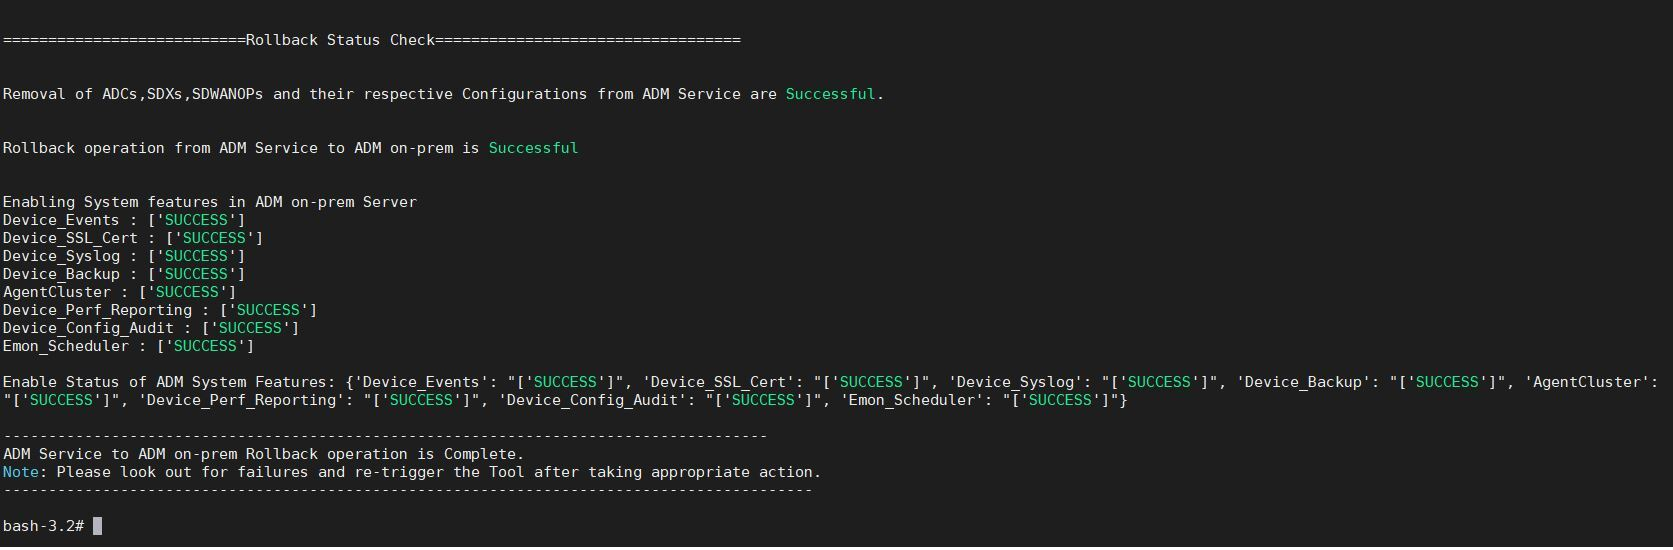
-
-
For NetScaler Console earlier than 82.xx build:
-
Download the rollback script from the following location:
https://download.citrixnetworkapi.net/root/download/v1/public/software?product=admonprem&build=migrationtool&model=servicemigrationtool_27.tgz -
For NetScaler Console 79.xx and 76.xx builds, save the script in
/mps/scriptsand run the following commands to roll back:-
cd /mps/scripts -
python rollback_to_onprem.py < path of client/secret csv file in NetScaler Console on-prem>For example,python rollback_to_onprem.py /var/ secureclient.csv
-
-
For NetScaler Console earlier than 76.xx builds, save the script in NetScaler Console on-prem. For example, save it in the
/varlocation and run the following commands to roll back:-
cd /var -
python rollback_to_onprem_27.py < path of client/secret csv file in NetScaler Console on-prem>For example,python rollback_to_onprem_27.py /var/secureclient.csv
The tool initiates the rollback operation and a prompt asks if you want to proceed. Type Y to proceed. -
-