
Unified Security dashboard
The Unified Security dashboard is a single-pane dashboard where you can configure protections, enable analytics, and deploy the protections on your application. In this dashboard, you can choose from various template options and complete the entire configuration process in a single workflow. To get started, navigate to Security > Security Dashboard and then click Manage Application. In the Manage Application page, you can view details of your secured and unsecured applications.
Note:
-
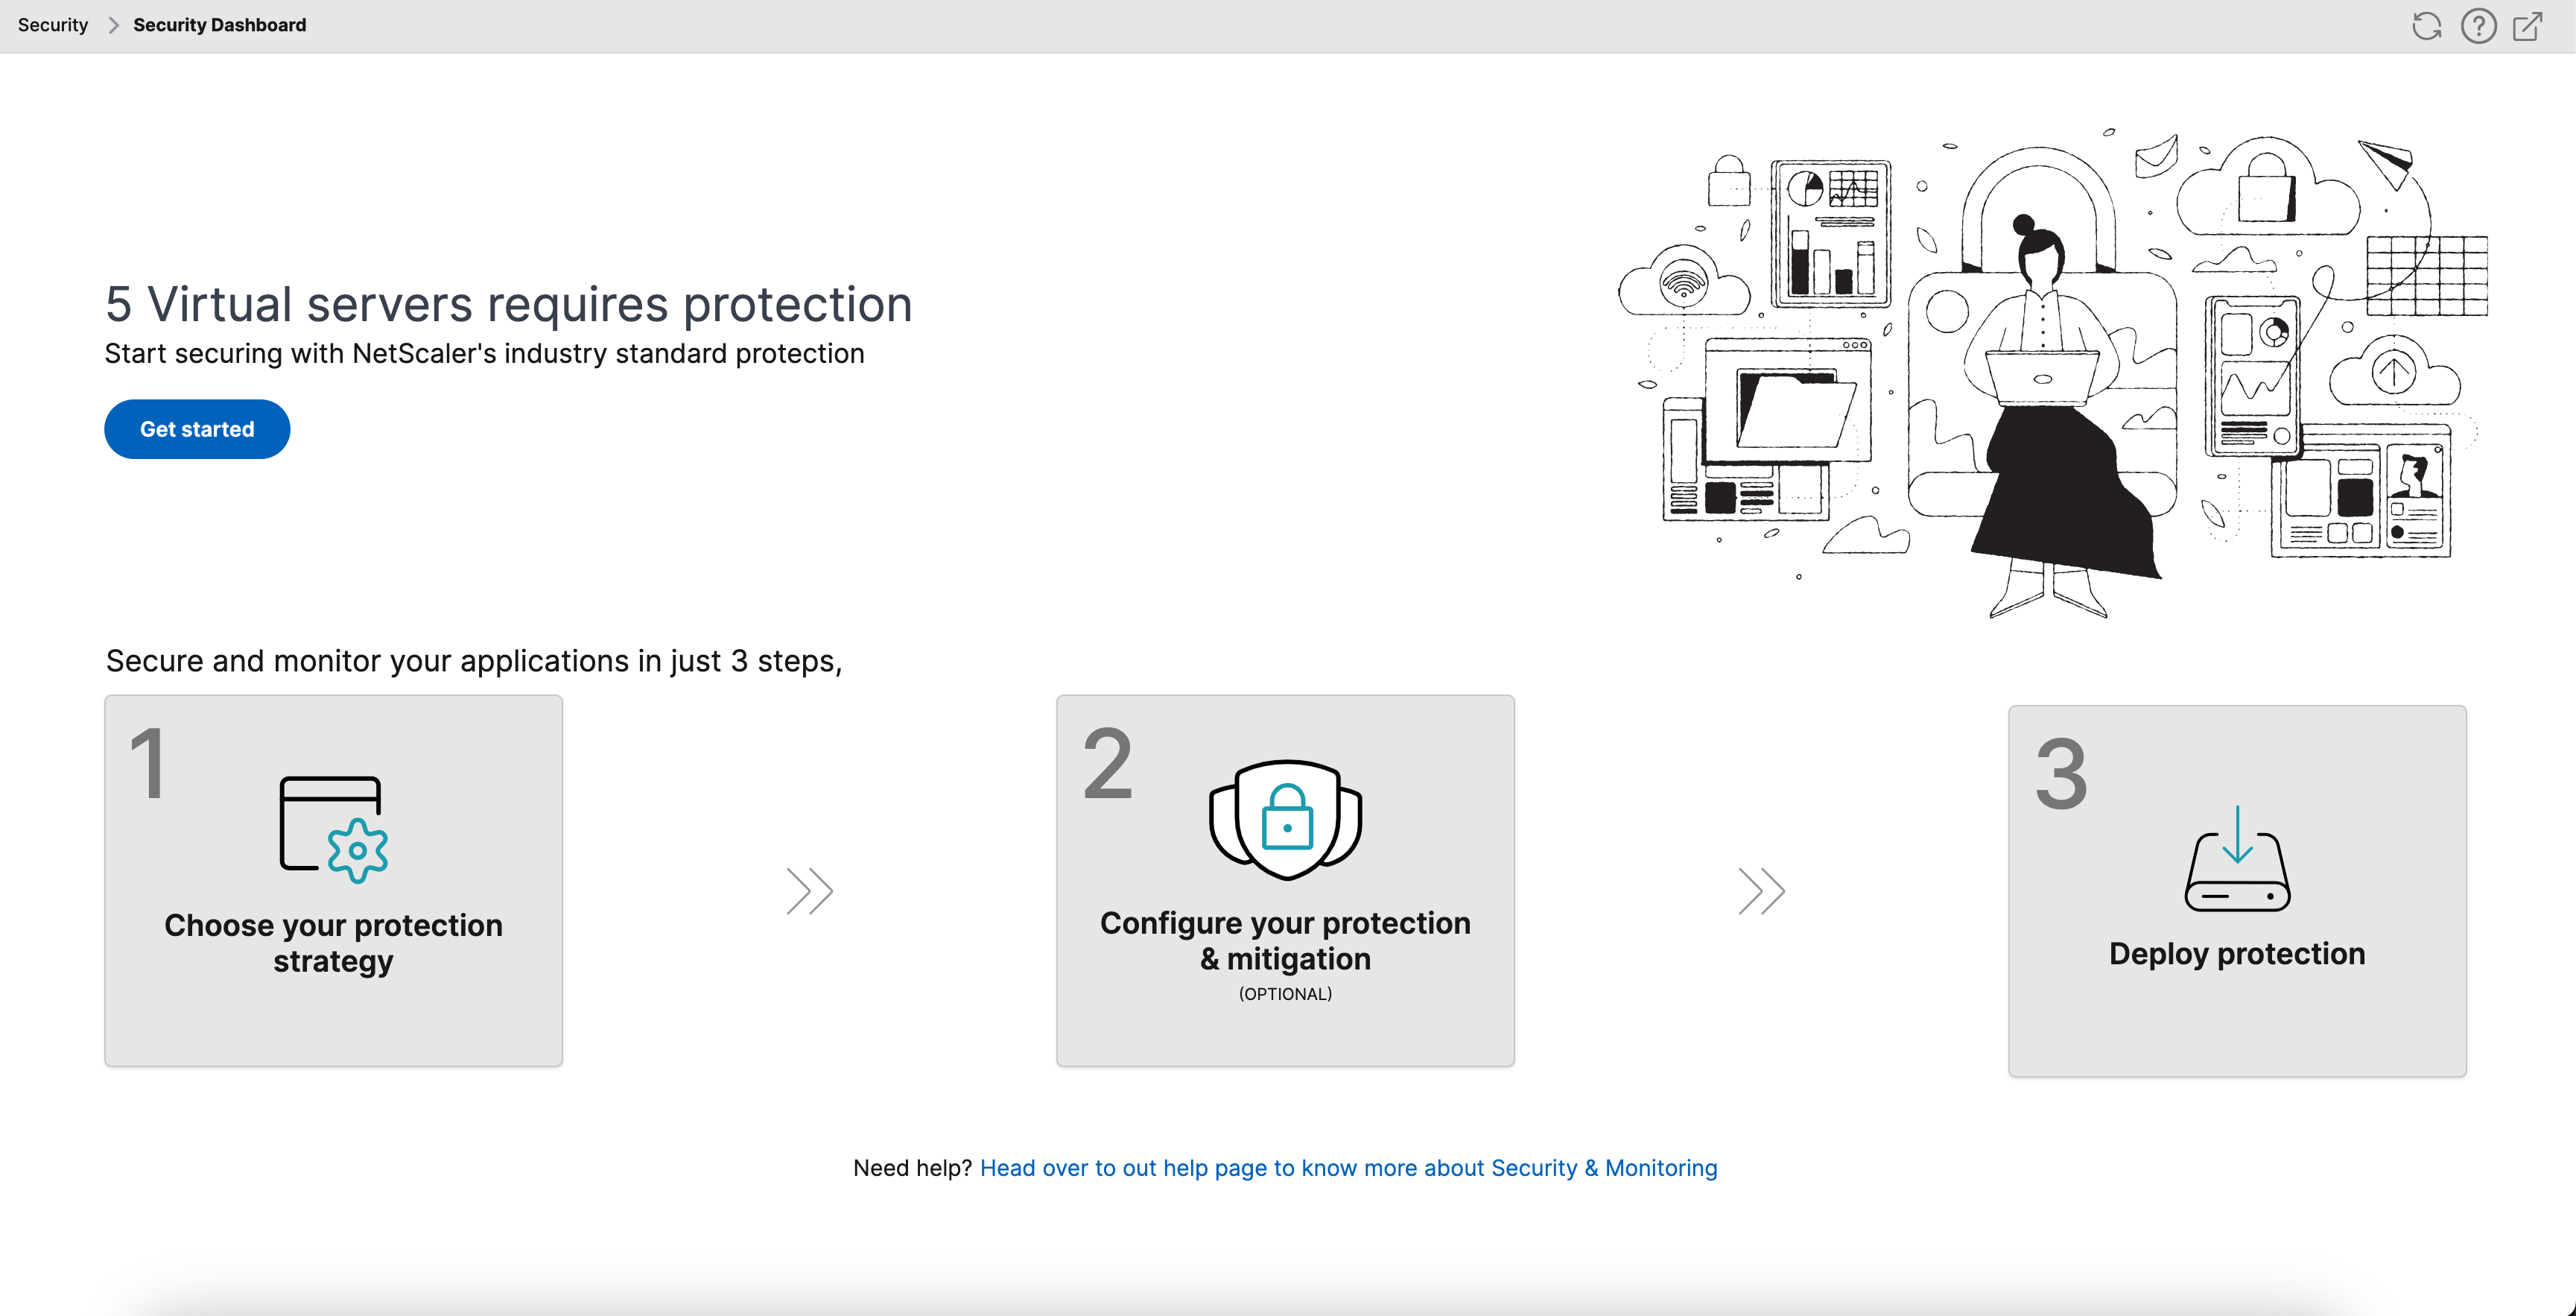
If you are a new user or if you have not configured any protections either through StyleBooks or directly on NetScaler® instances, the following page appears after you click Security > Security Dashboard.
-
You can view the total number of virtual servers that require protection. Click Get Started to view details in Unsecured Applications.
-
The eligible virtual server types for configuring protections are load balancing and content switching.
Related information
Secured applications
You can view details after you configure protections using the unified security dashboard. For more information, see Configure protections for unsecured applications.
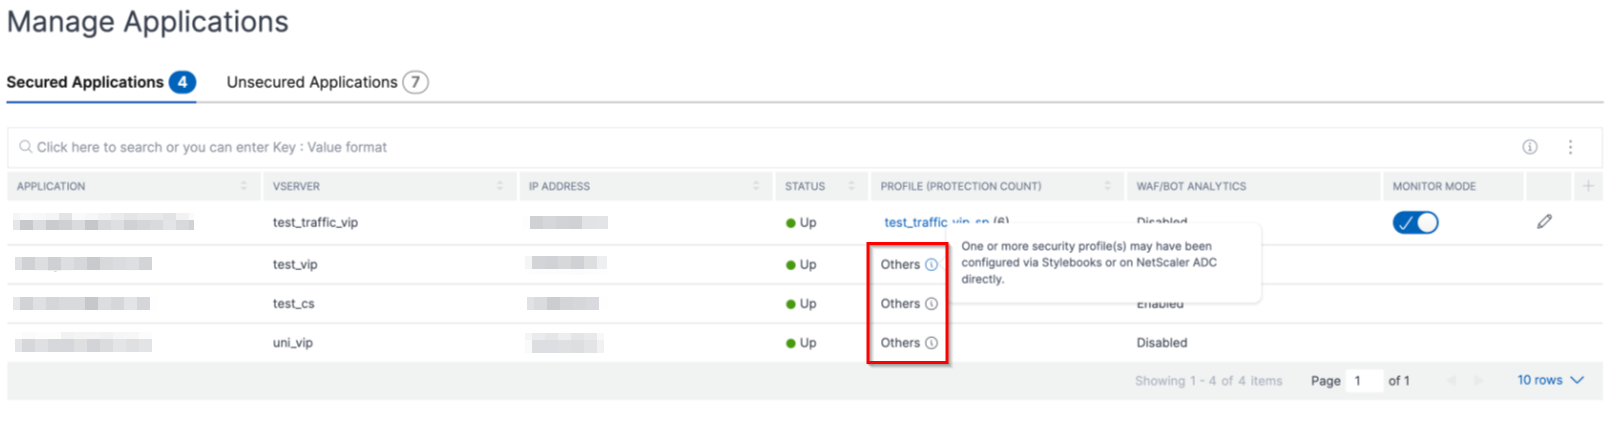
If you have already configured protections directly on the NetScaler instances or through StyleBooks, you can view the applications in the Secured Applications tab marked as Others under Profile.
Configure protections for unsecured applications
Note:
The maximum supported configuration entities (rules) in Block list is 32.
In the Unsecured Applications tab, select an application, and click Secure Application.
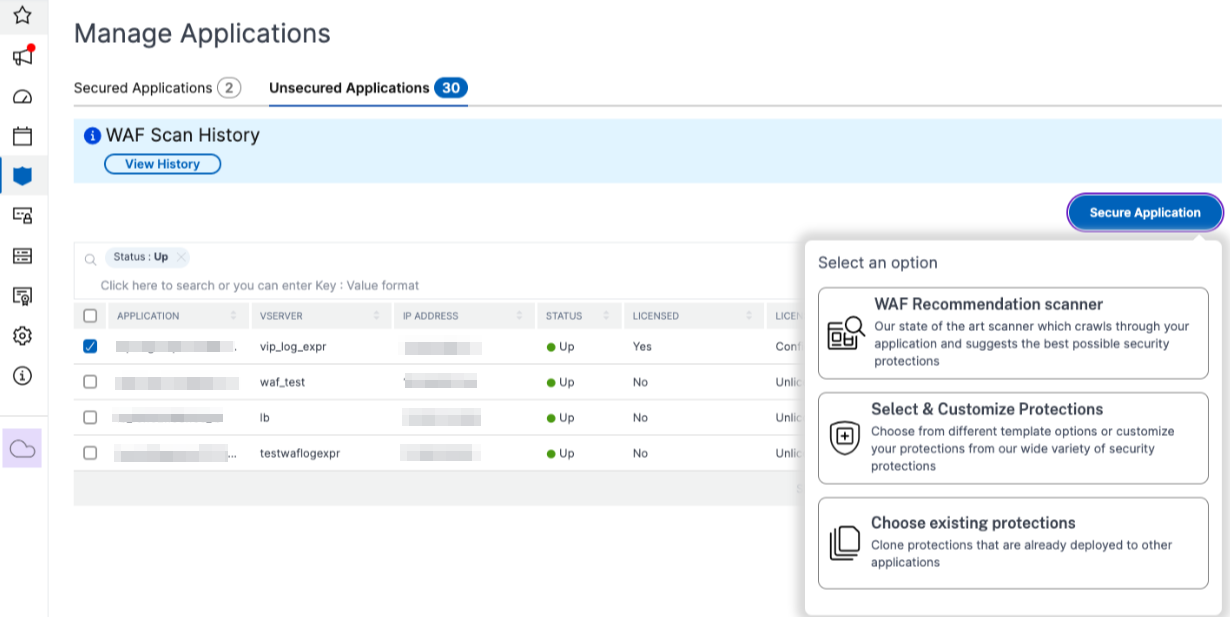
You can select either of the following options to protect your application:
-
WAF Recommendation scanner - This option enables you to run a scan on your application. Based on certain parameters of the scan, the result suggests you the protections for your application. You might consider applying those recommendations.
-
Select & Customize Protections - This option enables you to choose from different template options or customize your protections and deploy.
-
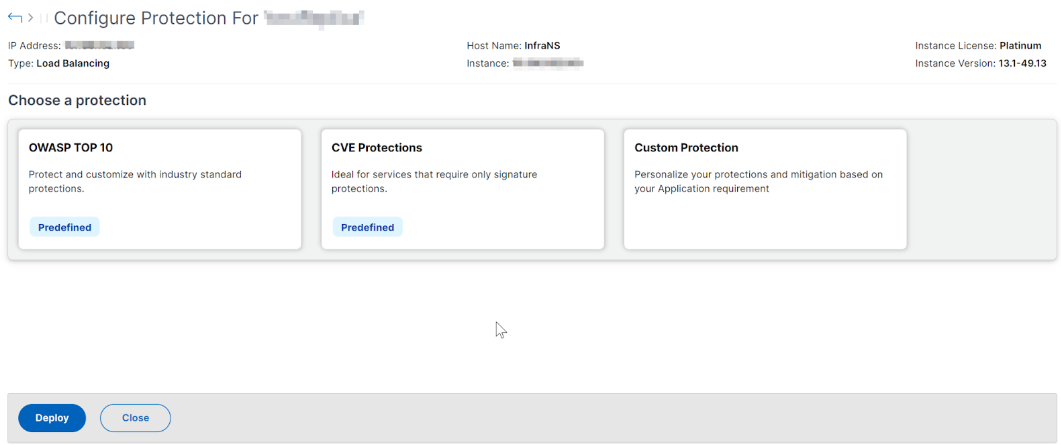
OWASP Top 10 - A predefined template that has the industry-standard protections against the OWASP top-10 security risks. For more information, see
https://owasp.org/www-project-top-ten/. -
CVE Protections - You can create the signature set from the list of pre-configured signature rules classified under known vulnerability categories. You can select signatures to configure log or block action when a signature pattern matches the incoming traffic. The log message contains the vulnerability details.
-
Custom Protections - Select the protections and deploy them based on your requirements.
-
-
Choose existing protections - This option clones the protections that are deployed in an existing application. If you want to deploy those same protections to another application, you can select this option and deploy it to another application as it is. You can also select this option as a template, modify the protections, and then deploy.
WAF recommendation scanner
Note:
-
You can run only one scan at a time for an application. To start a new scan for the same application or a different application, you must wait until the previous scan gets completed.
-
You can click View History to view the history and status of the past scans. You can also click View Report and then apply recommendations later.
Prerequisites:
-
The NetScaler instance must be 13.0 41.28 or later (for security checks) and 13.0 or later (for signatures).
-
Must have the premium license.
-
Must be the load balancing virtual server.
To get started with WAF recommendation scan, you must provide the following information:
-
Under Scan Parameters:
-
Domain Name – Specify a valid accessible IP address or the publicly reachable domain name that is associated with the application. For example:
www.example.com. -
HTTP/HTTPS Protocol – Select the protocol of the application.
-
Traffic Timeout – The wait time (in seconds) for a single request during the scan. The value must be greater than 0.
-
URL to start scan from – The home page of the application to initiate the scan. For example,
https://www.example.com/home. The URL must be a valid IPv4 address. If the IP addresses are private, then you must ensure that the private IP address is accessible from the NetScaler Console on-prem management IP. -
Login URL – The URL to which the login data is sent for authentication. In HTML, this URL is commonly known as the action URL.
-
Authentication Method – Select the supported authentication method (form based or header based) for your application.
-
Form-based authentication requires submitting a form to the login URL with the login credentials. These credentials must be in the form of form fields and their values. The application then shares the session cookie that is used to maintain sessions during the scan.
-
Header-based authentication requires the Authentication header and its value in the headers section. The Authentication header must have a valid value and is used to maintain sessions during the scan. The form-fields should be left empty for Header-based.
-
-
Request Method – Select the HTTP method used when submitting form data to the login URL. The allowed request method is POST, GET, and PUT.
-
Form Fields – Specify the form data to be submitted to the login URL. Form Fields are required only if you select the form-based authentication. You must specify in the key-value pairs, where Field Name is the Key and Field Value is the Value. Ensure that all form fields needed for login to work are added correctly, including passwords. The values are encrypted before storing it in the database. You can click Add to add multiple form fields. For example, Field Name – user name and Field Value – admin.
-
Logout URL – Specify the URL that terminates the session after accessing. For example:
https://www.example.com/customer/logout.
-
-
Under Scan Configurations:
-
Vulnerabilities to check – Select the vulnerabilities for the scanner to detect them. Currently, this is done for SQL Injection and Cross-site scripting violations. By default, all the violations are selected. After selecting the vulnerabilities, it simulates these attacks on the application to report the potential vulnerability. It is recommended to enable this detection that is not in the production environment. All other vulnerabilities are also reported, without simulating these attacks on the application.
-
Response size limit – The maximum limit on the response size. Any responses beyond the mentioned value are not scanned. The recommended limit is 10 MB (1000000 bytes).
-
Requests Concurrency – The total requests sent to the web application in parallel.
-
-
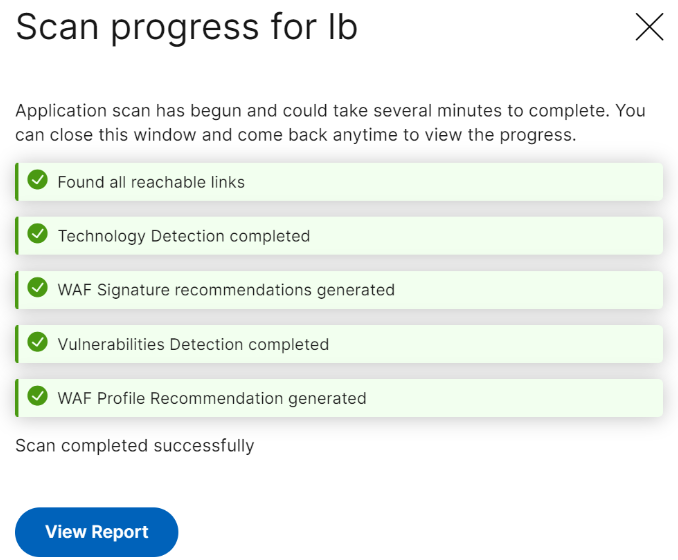
The WAF scan settings configuration is complete. You can click Start Scan to begin the scanning process and wait for the progress to complete. After the scan is complete, click View Report.
-
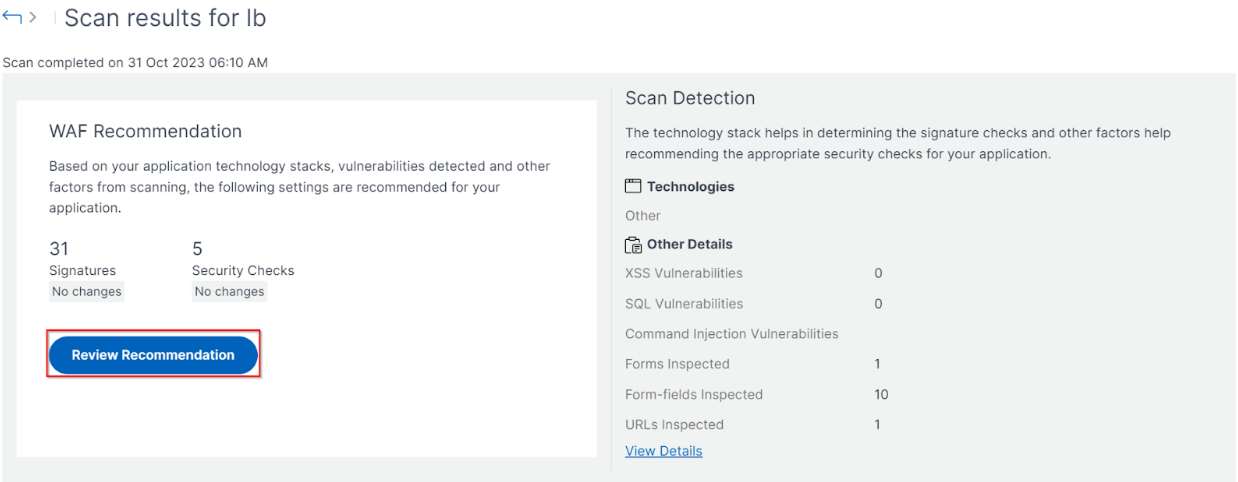
In the scan results page, click Review Recommendation.
-
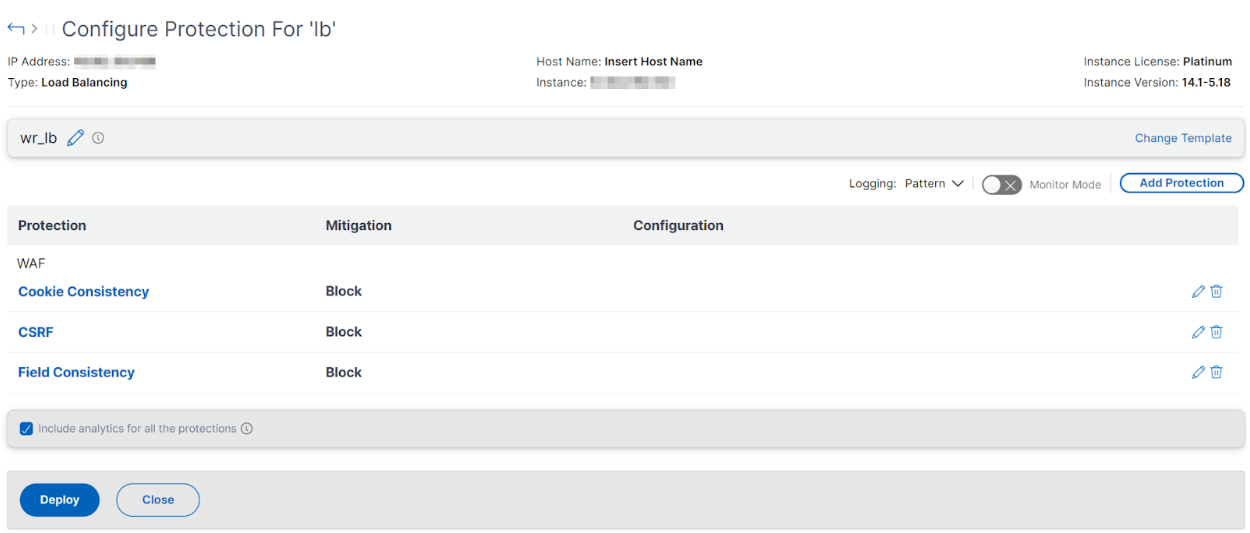
Review the protections or edit/add any other protections, and click Deploy.
 When you apply security checks successfully:
-
The configuration is applied on the NetScaler instance through StyleBooks, depending upon the version.
-
For NetScaler 13.0,
unified-appsec-protection-130StyleBook is used. -
For NetScaler 13.1,
unified-appsec-protection-131StyleBook is used. -
For NetScaler 14.1,
unified-appsec-protection-141StyleBook is used.
-
-
The
Appfwprofile is created on your NetScaler and bound to the application using thepolicylabel. -
The signatures are bound to the appfw profile, if the recommended signatures are already applied.
Note
Security checks are supported in NetScaler 13.0 41.28 or later version.
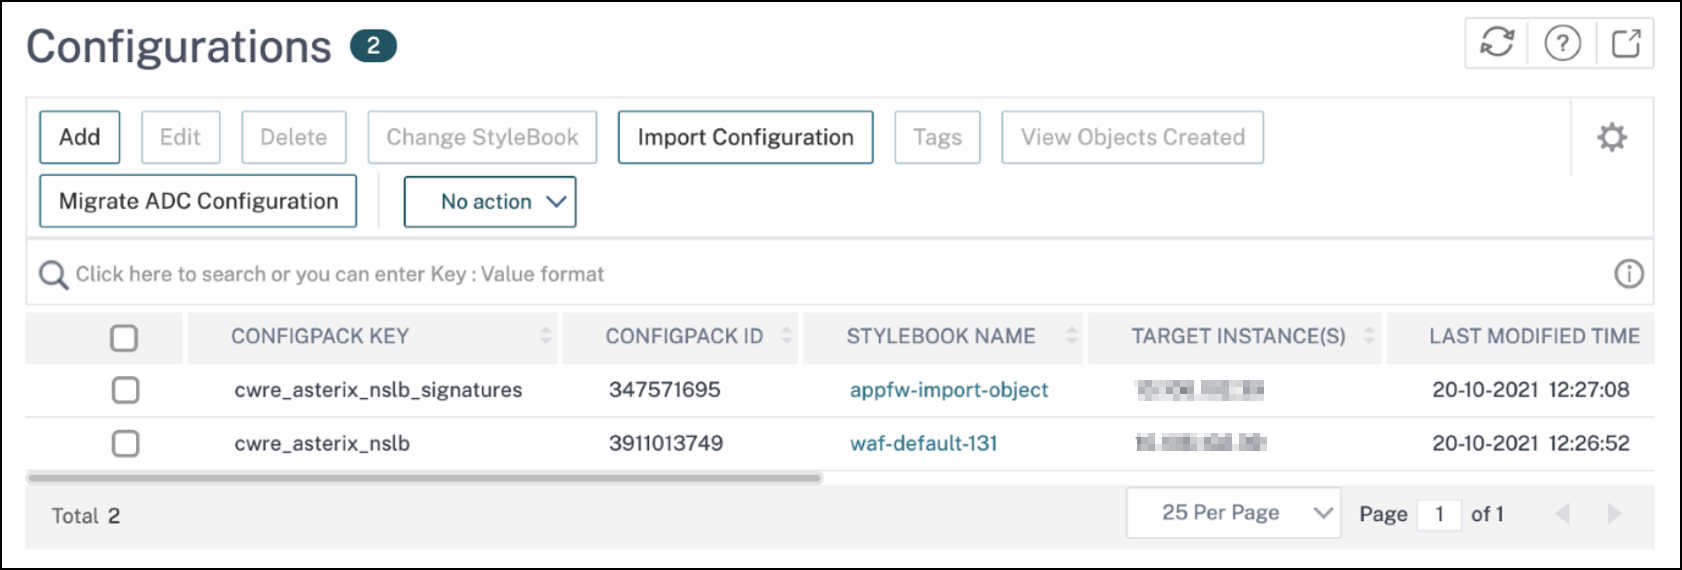
You can verify the WAF profiles and signatures are applied through the default StyleBooks by navigating to Applications > Configuration > Config Packs.
Export the WAF scanner report
To export the WAF scanner report, follow these steps:
-
Navigate to Security > Dashboard > Manage Applications.
-
In the Unsecured Applications tab, click View History.
-
On the Scan History page, select the desired scan and click View Report.
-
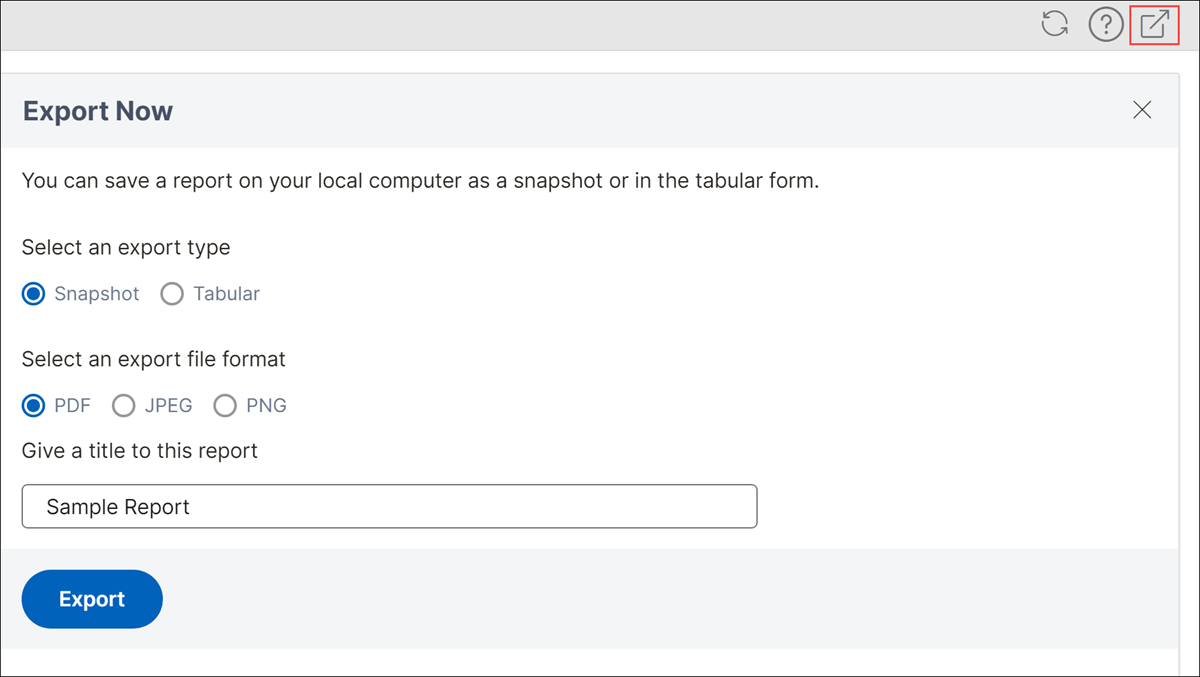
On the Scan Results page, click the Export icon.
-
On the Exports Now page, choose the export type.
For Snapshot export type:
-
Select an export file format: PDF, JPG, or PNG
-
Enter a title for the report.
-
Click Export.
For Tabular export type:
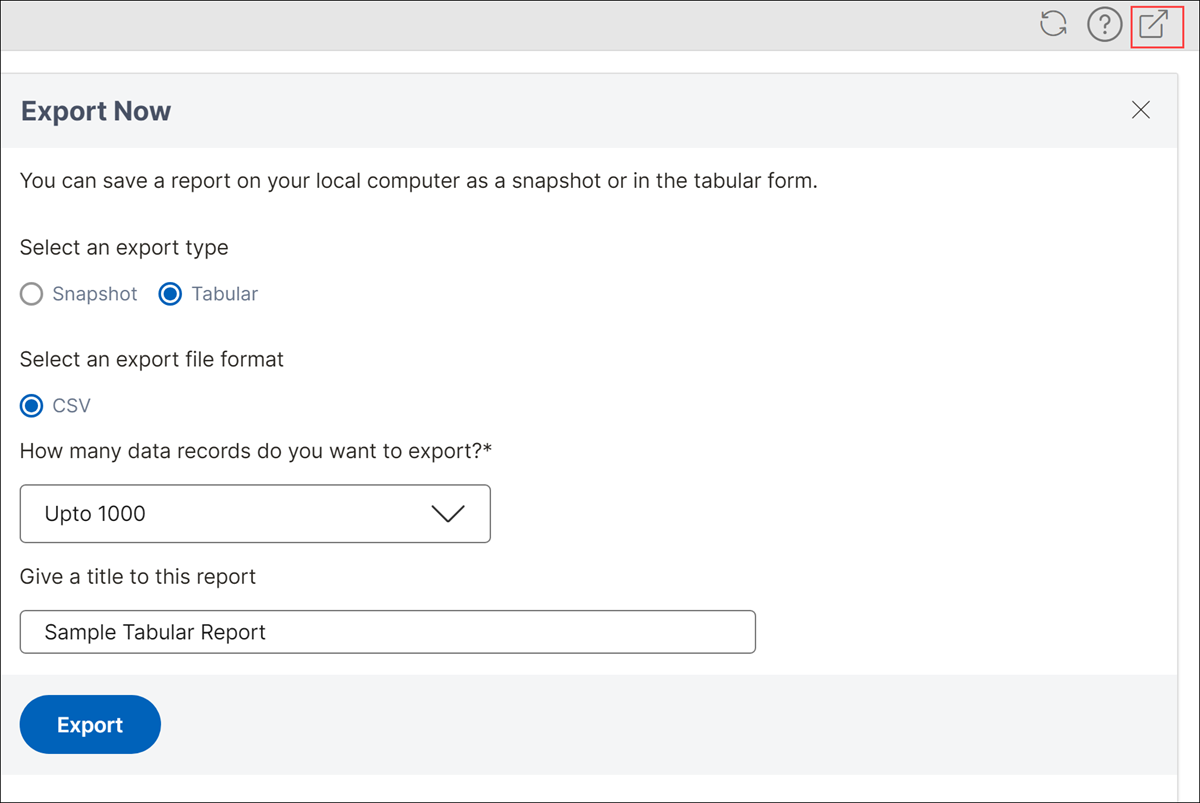
Starting from release 14.1 build 25.x, you can export the WAF scanner report in a tabular format.
-
Select the CSV file format.
-
Select the number of data records to export from the list.
-
Enter a title for the report.
-
Click Export.
Select and customize protections
OWASP Top 10
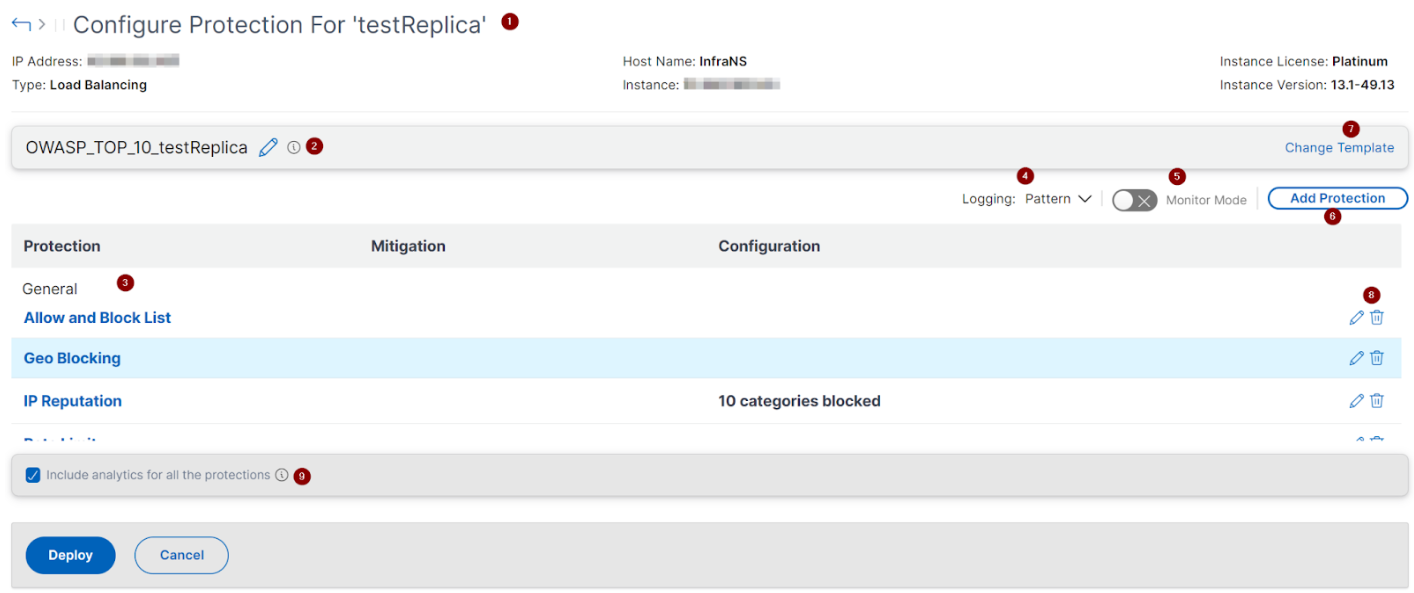
1 - Provides information about the application such as IP address, virtual server type, license type, from which instance the application is configured, and so on.
2 - Displays the selected template. You can rename it based on your choice.
3 - Displays the protections. Some protections require additional information.
4 - Displays the verbose log type. You can select the following options:
-
Pattern. Logs only violation pattern.
-
Pattern payload. Logs violation pattern and 150 bytes of extra JSON payload.
-
Pattern, payload, header. Logs violation pattern, 150 bytes of extra JSON payload and HTTP header information.
5 - Allows you to enable the Monitor Mode. If you enable Monitor Mode, the traffic is only logged and mitigations are not activated.
6 - Enables you to add more protections. Click Add Protections and review them to add.
7 - Allows you to choose a new template by using the Change Template option.
8 - Enables you to edit or delete the protection.
9 - Enables analytics for the protections that you select. This option is selected by default. You can view analytics for the configured protections at Security > Security Violations.
After you configure the protections, click Deploy.
CVE protections
To deploy the CVE protections, click Create CVE Protection. In the Create Signature Set page, select the signatures from the list to configure the log or block action, and then click Save.
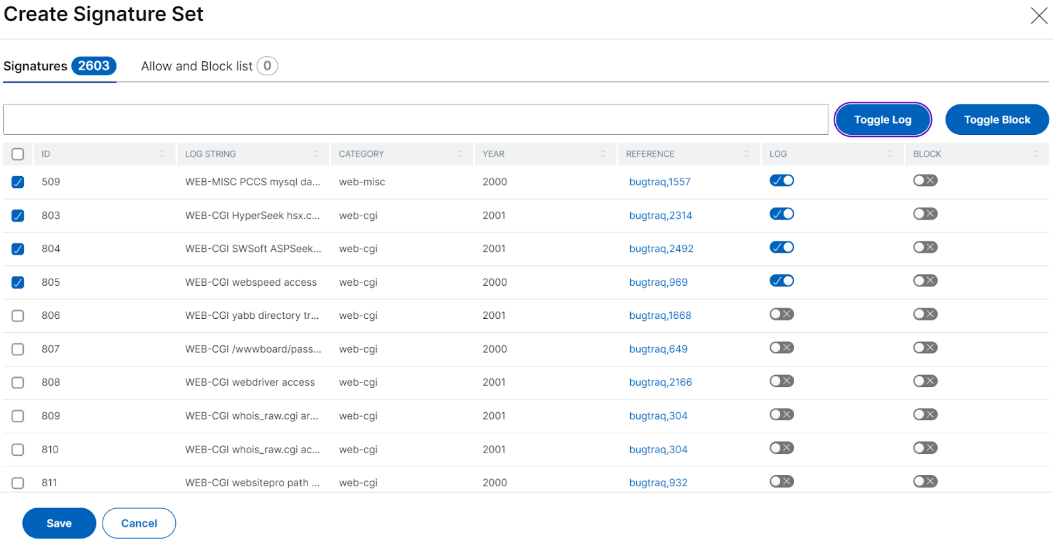
After you click Save, you can view the signatures added to the configuration page.
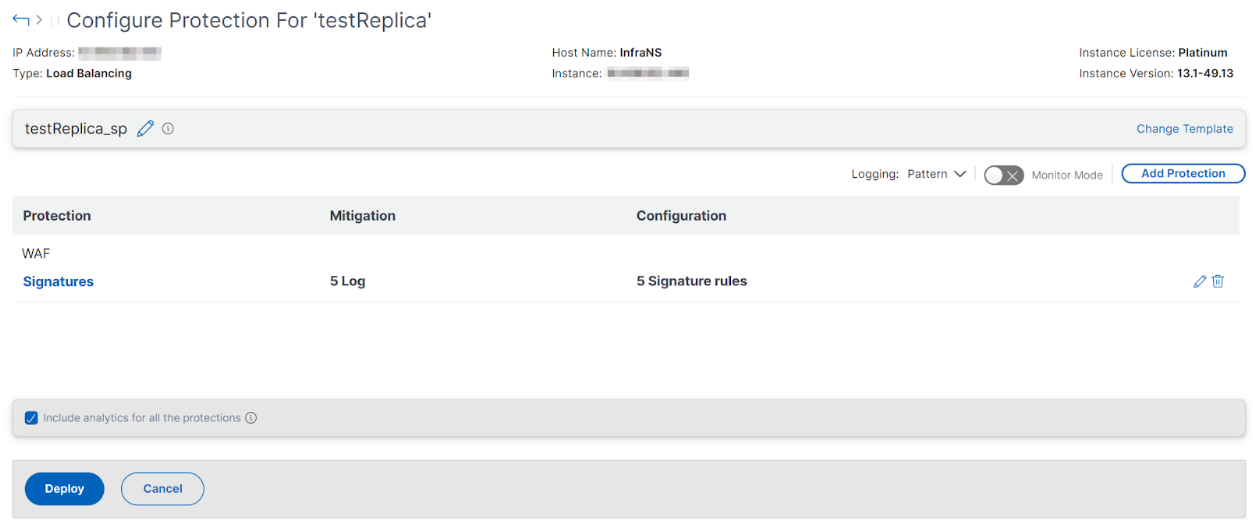
You can also click Add Protection to add more protections to the application. After you configure all protections, click Deploy.
Custom Protection
To deploy with protections based on your requirement, click Create new protection. In the Add Protections page, select the protections that you want to deploy and click Save.
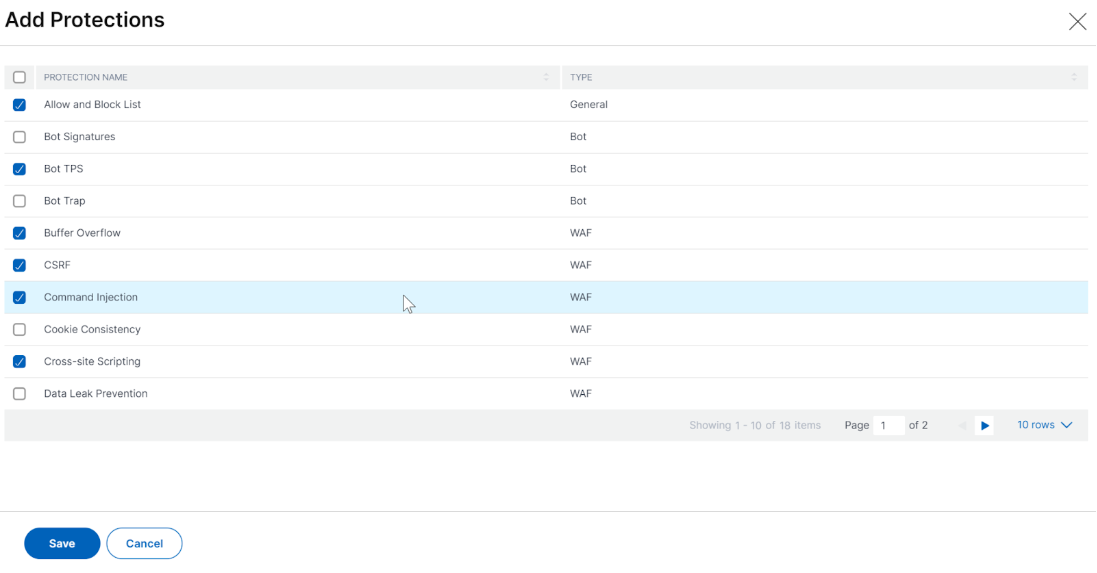
After you click Save, review the selected protections in the configuration page, and then click Deploy.
Choose existing protections
To deploy existing protections from one application to another, select an existing protection from the list.
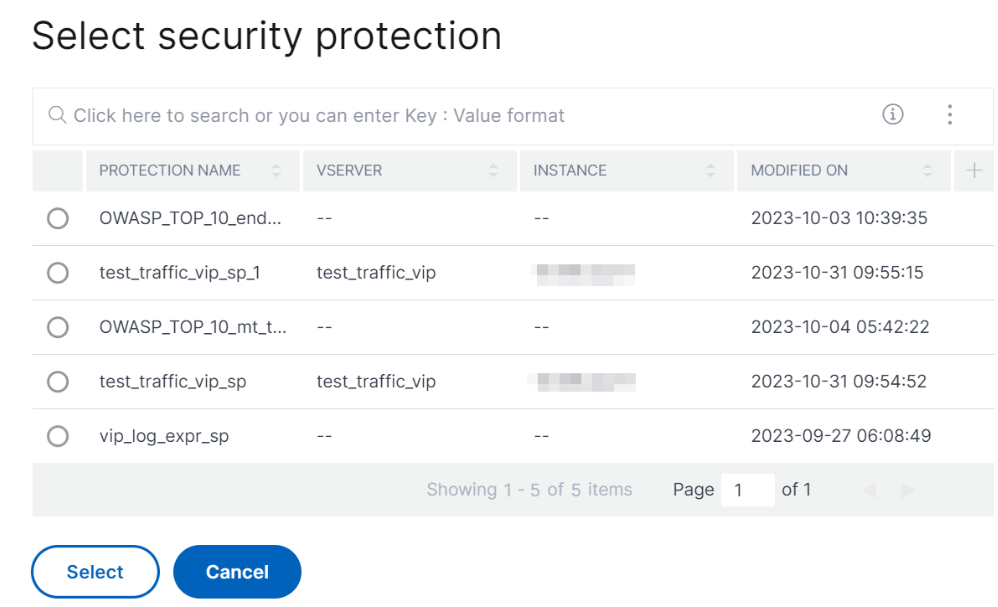
After you select a protection, the existing protections are cloned and displayed in the configuration page. You can modify based on your requirement and then click Deploy.