
Configure analytics on virtual servers
The prerequisite to enable analytics is that the virtual servers must be licensed. If you use a flexed license, all the existing virtual servers and the subsequent virtual servers are automatically licensed. You can proceed to configure analytics.
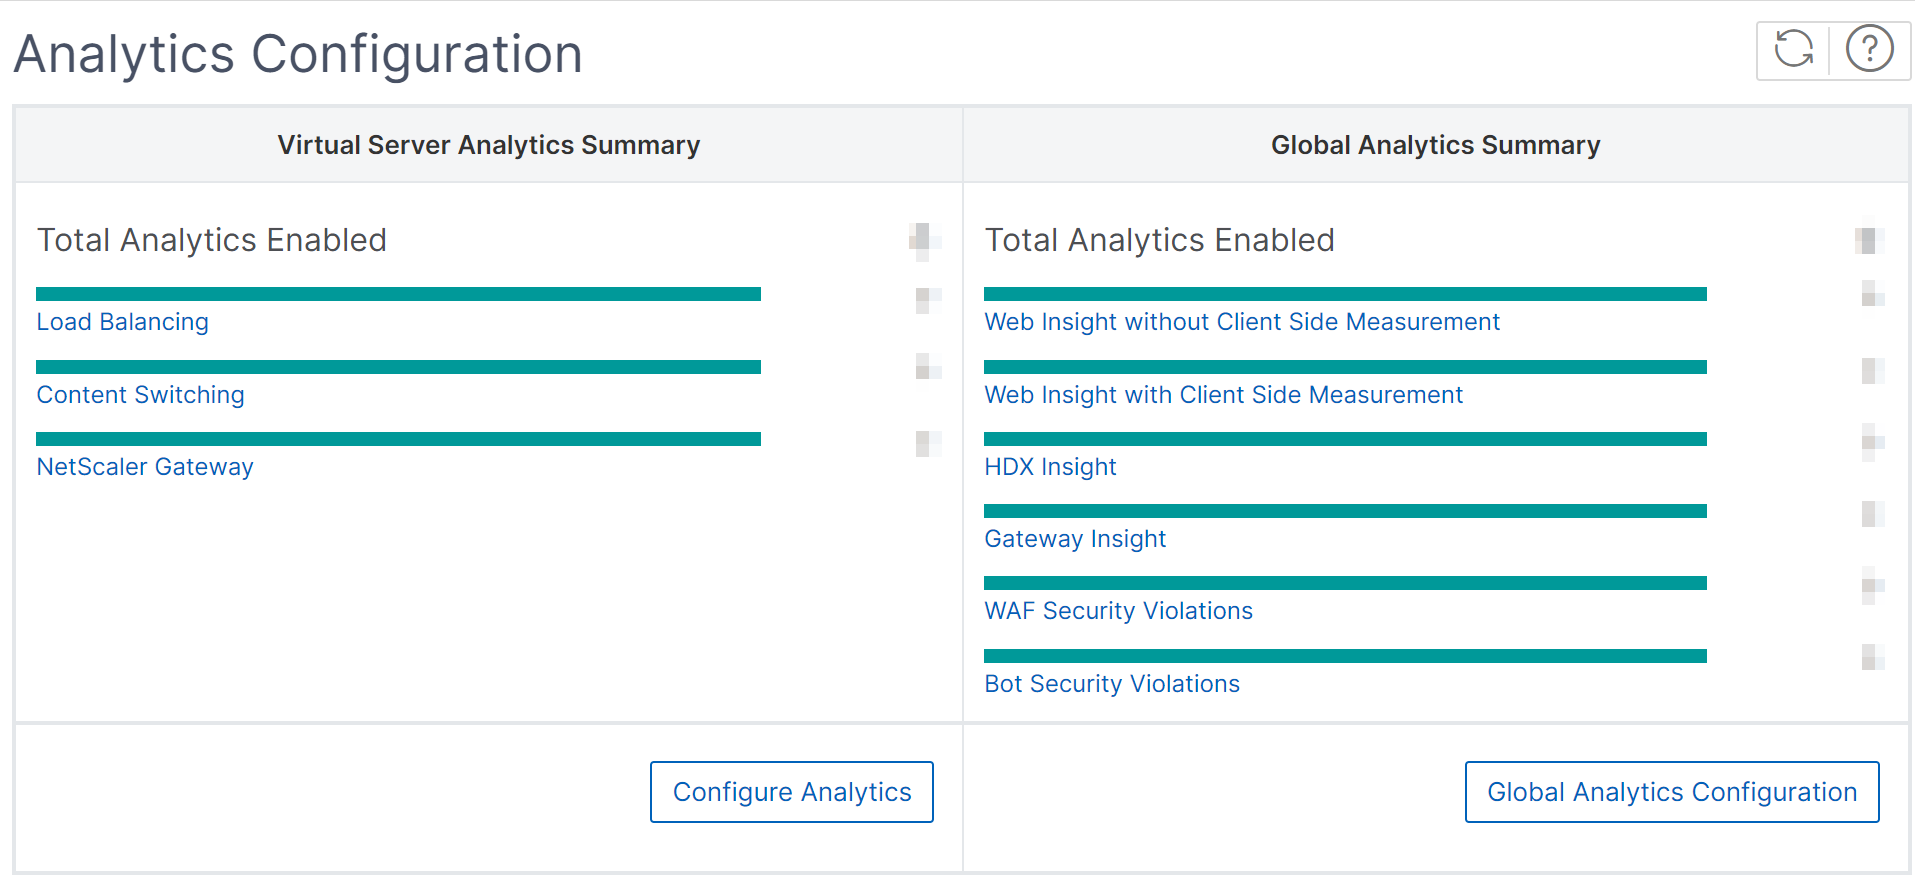
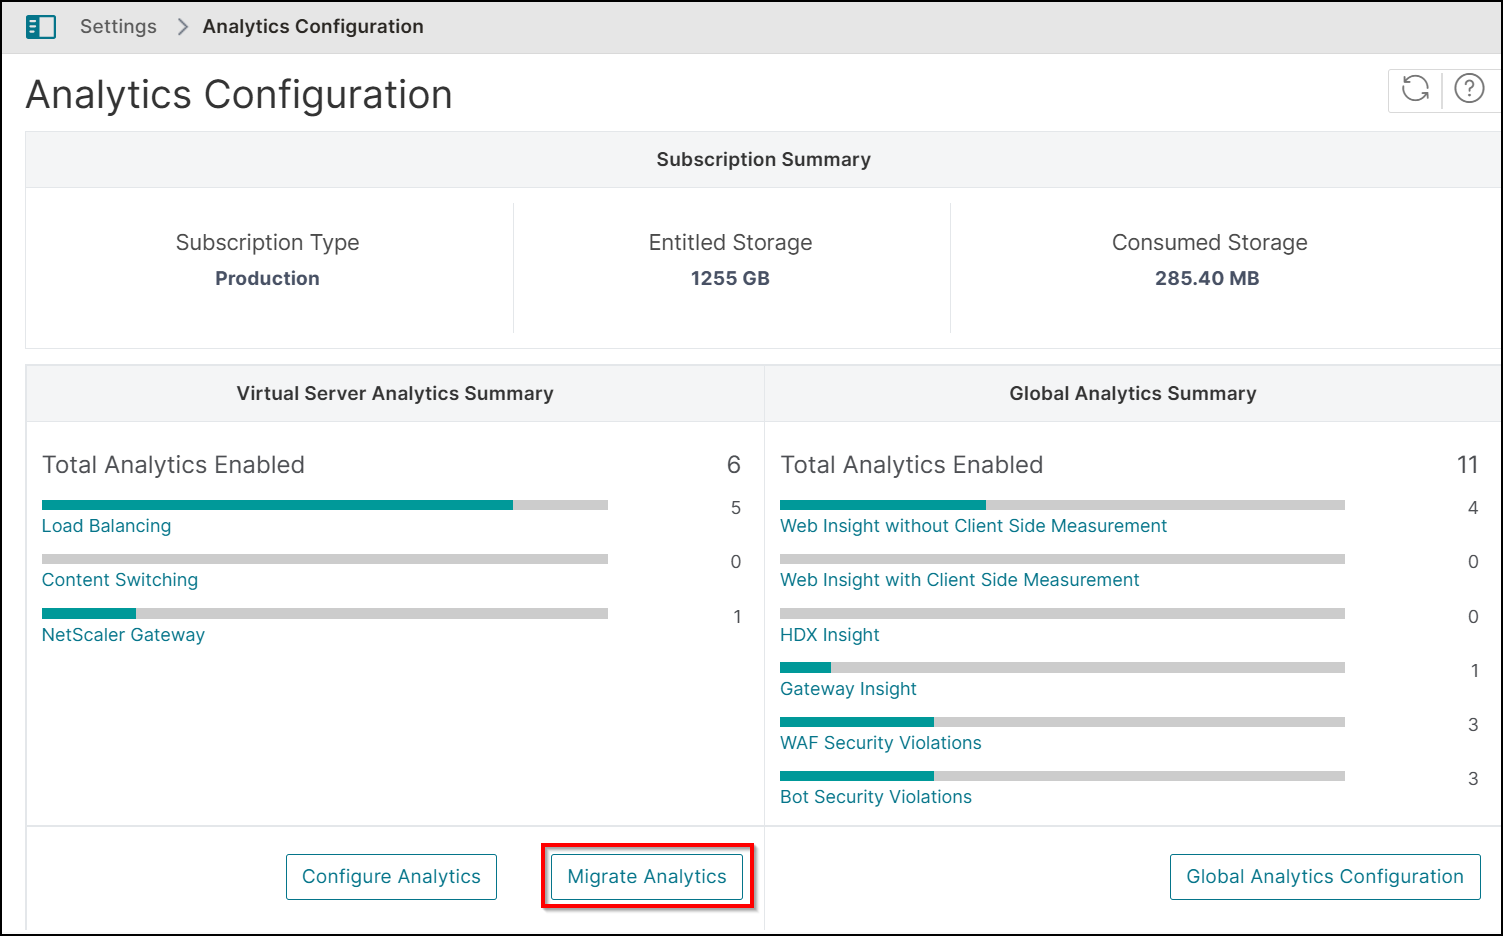
You can configure analytics in two ways. Navigate to Settings > Analytics Configuration to view:
-
Virtual Server Analytics Summary - Enables you to configure analytics on the existing virtual servers.
-
Global Analytics Summary - Enables you to configure analytics on both existing and subsequent virtual servers.
Related information
Configure analytics on the existing virtual servers
Note:
Ensure that the virtual servers you want to enable analytics are in UP status.
-
Under Virtual Server Analytics Summary, click Configure Analytics.The All Virtual Servers page is displayed. You can:
-
Enable analytics
-
Edit analytics
-
Disable analytics
Note:The supported virtual servers to enable analytics are Load Balancing, Content Switching, and NetScaler Gateway. -
-
Select the virtual servers and then click Enable Analytics.
 NoteAlternatively, you can enable analytics for an instance:
-
Navigate to Infrastructure > Instances > NetScaler and then select the instance type. For example, VPX.
-
Select the instance and from the Select Action list, select Configure Analytics
-
On the Configure Analytics on Virtual Servers page, select the Virtual Server and click Enable Analytics.
-
-
On the Enable Analytics window:
-
Select the insight types.
-
Select Logstream as Transport Mode.Note:For NetScaler 12.0 or earlier, IPFIX is the default option for Transport Mode. For NetScaler 12.0 or later, you can either select Logstream or IPFIX as Transport Mode.For more information about IPFIX and Logstream, see Logstream overview.
-
Under Instance level options:
-
Enable HTTP X-Forwarded-For - Select this option to identify the IP address for the connection between client and application, through HTTP proxy or load balancer.
-
Custom Header - Define a custom header such as X-Real-IP, X-Client-IP, or any other custom header to fetch the actual client IP address instead of the proxy IP address. Ensure that the managed NetScaler instance is 14.1–38.24 or later build.
-
NetScaler Gateway - Select this option to view analytics for NetScaler Gateway.
-
-
The Expression is true by default.
-
Click OK.Note:
-
For admin partitions, only Web Insight is supported.
-
For virtual servers such as Cache Redirection, Authentication, and GSLB, you cannot enable analytics. An error message is displayed.
-
-
After you click OK, NetScaler Console processes to enable analytics on the selected virtual servers.
Note
NetScaler Console uses NetScaler SNIP for Logstream and NSIP for IPFIX. If there is a firewall enabled between NetScaler agent and NetScaler instance, ensure you open the following port to enable NetScaler Console to collect AppFlow traffic:
| Transport Mode | Source IP | Type | Port |
|---|---|---|---|
| IPFIX | NSIP | UDP | 4739 |
| Logstream | SNIP | TCP | 5557 |
Edit analytics
To edit analytics on the virtual servers:
-
Select the virtual servers.Note:Alternatively, you can also edit analytics for an instance:
-
Navigate to Infrastructure > Instances > NetScaler and then select the instance type. For example, VPX.
-
Select the instance and click Edit Analytics.
-
-
Click Edit Analytics
-
Edit the parameters that you want to apply on the Edit Analytics Configuration window.
-
Click OK.
Disable analytics
To disable analytics on the selected virtual servers:
-
Select the virtual servers.
-
Click Disable Analytics.
NetScaler Console disables the analytics on the selected virtual servers.
The following table describes the features of NetScaler Console that supports IPFIX and Logstream as the transport mode:
| Feature | IPFIX | Logstream |
|---|---|---|
| Web Insight | • | • |
| WAF Security Violations | • | • |
| Gateway Insight | • | • |
| HDX Insight | • | • |
| SSL Insight | Not supported | • |
| CR Insight | • | • |
| IP Reputation | • | • |
| AppFirewall | • | • |
| Client Side Measurement | • | • |
| Syslog/Auditlog | • | • |
Configure global analytics
You can enable global analytics by either creating a custom policy or a global policy.
Notes:
-
You can create only up to 10 policies. The policies can be a combination of nine custom policies and one global policy, or 10 custom policies.
-
If you have both (custom and global) policies, the insights that are selected in both policies are applied on the virtual servers. If you want to remove any insights, you must remove them manually.
Custom policy
Using a custom policy, you can control instances or virtual servers that only require specific insights. You might have hundreds of virtual servers configured through various NetScaler instances managed in your NetScaler Console. In some scenarios, you might want to apply selective insights (for example, Bot Security Violations and WAF Security Violations) only to some of the virtual servers or instances. For such scenarios, you can configure a custom policy, select specific analytics features, and apply it to the relevant instances and virtual servers.
To configure a custom policy:
-
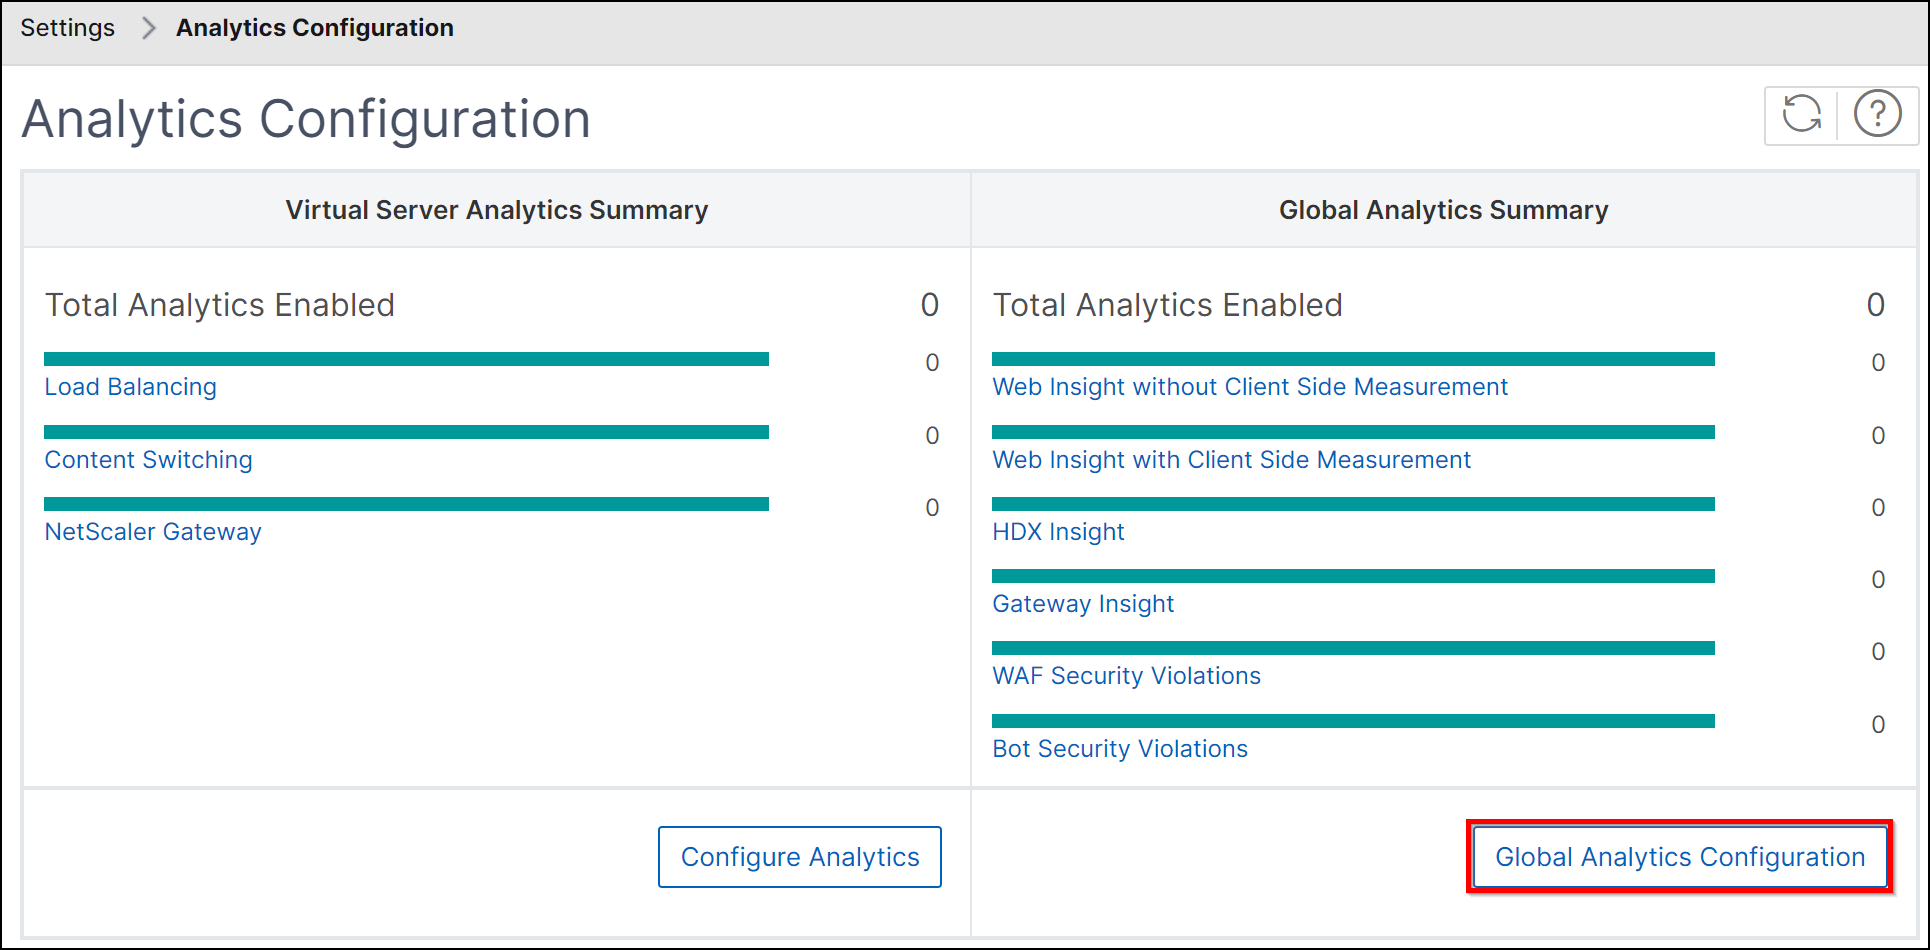
Under Global Analytics Summary, click Global Analytics Configuration.
-
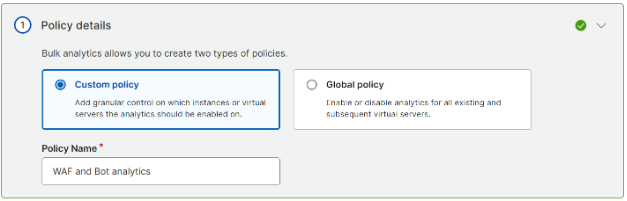
Under Policy details, select Custom policy and specify a policy name of your choice.Note:You cannot edit the policy name later.
-
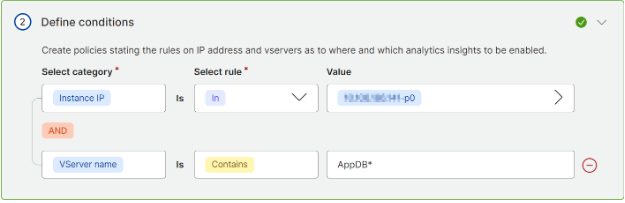
Under Define Conditions, create conditions by selecting the set of instance IPs or specific instances or virtual server name or both.
-
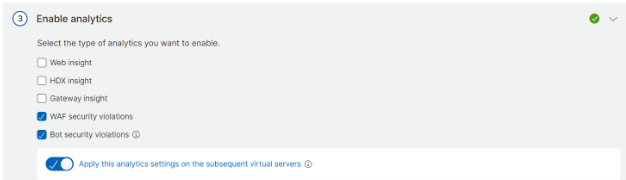
Under Enable analytics, select the analytics feature type.Note:If you enable Apply this analytics settings on the subsequent virtual servers, analytics will be applied to the subsequent virtual servers based on the defined analytics features.
-
Click Save.Points to note:
-
If you modify the policy by removing an existing insight and adding another insight, the updated policy is applied with the new insight. If you want to remove any insight, you must manually delete the already configured insights.Consider that you have created a custom policy with HDX insight and Web Insight. If you update the policy to remove HDX Insight and add Bot Security Violations, the virtual servers/instances are updated with HDX Insight, Web Insight, and Bot Security Violations. If you want to remove HDX Insight, you must manually remove using the edit analytics option.
-
The same logic is also applicable if you delete an existing policy and create another policy by adding the same instances or virtual servers.
-
Global policy
Using the global policy, you can enable analytics on both discovered and subsequent virtual servers. To create a global policy:
-
Under Global Analytics Summary, click Global Analytics Configuration.
-
Under Policy details, select Global policy.
-
Under Enable analytics, select the analytics feature type.Note:If you enable Apply this analytics settings on the subsequent virtual servers, analytics will be applied to the subsequent virtual servers based on the defined category.
-
Click Save.
After configuration, the analytics is enabled on both discovered and subsequent virtual servers.
Points to note
-
Consider that you have configured the Global policy for the first time by selecting Web Insight, HDX™ Insight, and Gateway Insight. If you again change the analytics settings later and deselect Gateway Insight, the changes do not impact the virtual servers that are already enabled with analytics. You must manually remove the Gateway Insight on the virtual servers.
-
Consider that you have 10 virtual servers and two of them are already enabled with analytics using the Configure Analytics option. In this scenario, when you configure the Global policy, the analytics are applied only on the remaining eight virtual servers.
-
Consider that you have 10 virtual servers and you have manually disabled analytics for two virtual servers. In this scenario, when you configure the Global policy, the analytics are applied only on the remaining eight virtual servers and it skips the virtual servers that are manually disabled with analytics.
Migrate analytics
Starting from 14.1-43.x build, when you enable analytics on virtual servers, the analytics are applied through profile-based configuration. Earlier, analytics was configured through an AppFlow policy. The profile-based configuration has the following benefits:
-
Improved performance and flexibility
-
Easier configuration and management
Note:
Enhancements related to analytics configurations are supported only through profile-based configuration. We recommend that you migrate all your existing virtual servers that are enabled for analytics to profile-based configuration.
-
Navigate to Settings > Analytics Configuration and then select Migrate Analytics.
-
In the Migrate Analytics page, you can view instances that have one or more virtual servers configured through AppFlow® policy.
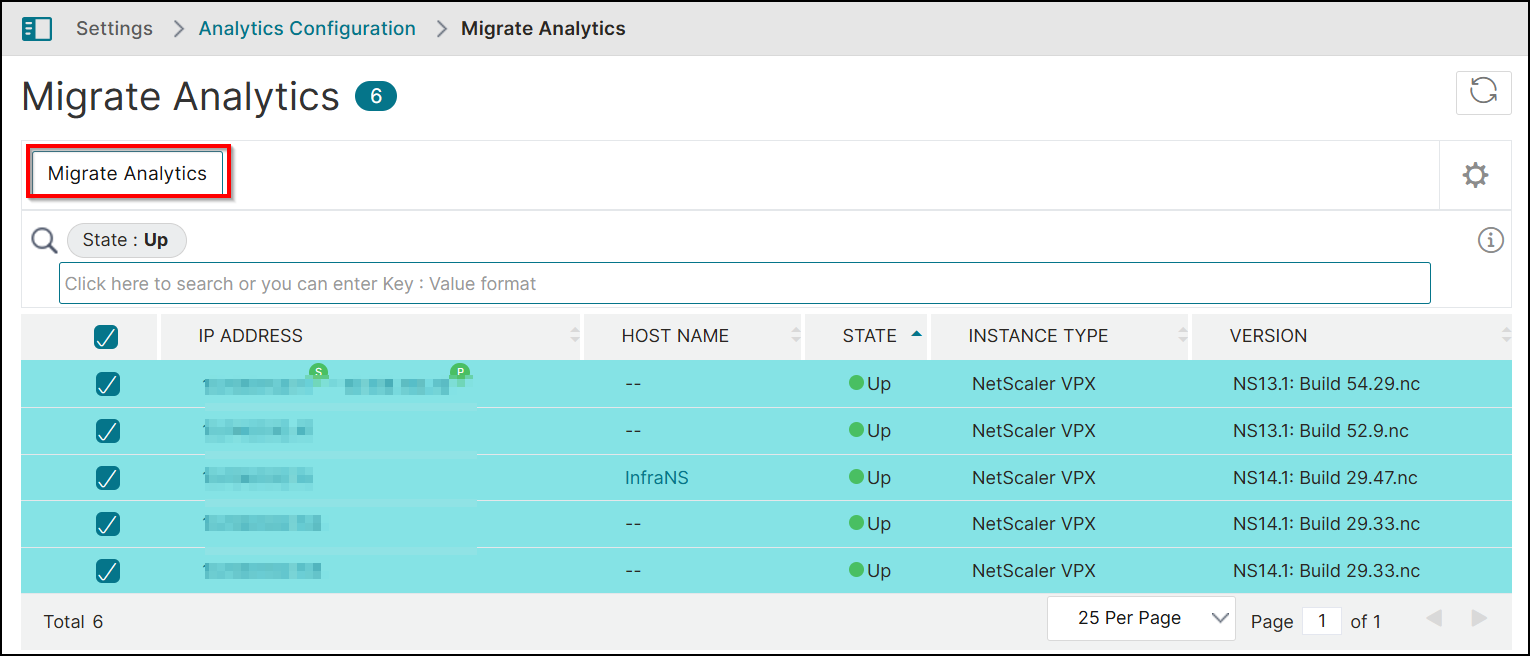 A confirmation window appears. Click Yes to complete the migration.