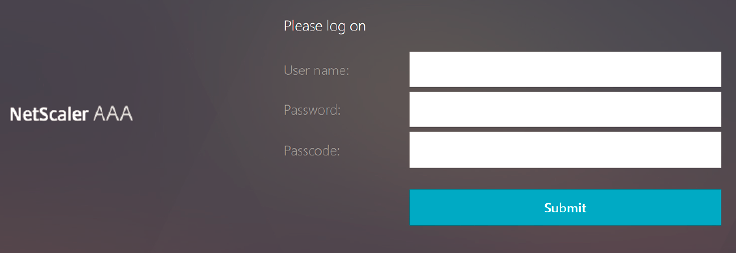
認証のためのネイティブOTPサポート
NetScalerは、サードパーティのサーバーを使用しなくてもワンタイムパスワード(OTP)をサポートします。ワンタイムパスワードは、生成される番号またはパスコードがランダムであるため、セキュリティで保護されたサーバーを認証するための非常に安全なオプションです。以前は、乱数を生成する特定のデバイスを持つRSAなどの専門企業が、OTPを提供していました。
この機能は、資本コストと運用経費の削減に加えて、構成全体をNetScalerアプライアンスに保持することで管理者の制御を強化します。
注意事項:
-
サードパーティサーバーは不要になったため、NetScaler管理者はユーザーデバイスを管理および検証するためのインターフェイスを構成する必要があります。
-
ネイティブ OTP ソリューションは SAML ログアウト機能をサポートしていません。
OTPソリューションを使用するには、ユーザーをNetScaler仮想サーバーに登録する必要があります。登録は一意のデバイスごとに一度だけ必要で、特定の環境に制限することができます。登録ユーザーの設定と検証は、追加の認証ポリシーの設定と似ています。
Related information
ネイティブOTPサポートの利点
-
Active Directory に加えて、認証サーバー上に追加のインフラストラクチャを用意する必要がなくなるため、運用コストが削減されます。
-
構成をNetScalerアプライアンスのみに統合するため、管理者はきめ細かく制御できます。
-
クライアントが期待する数値を生成するために、クライアントが追加の認証サーバーに依存する必要がなくなります。
ネイティブ OTP ワークフロー
ネイティブ OTP ソリューションは 2 つのプロセスであり、ワークフローは次のように分類されます。
-
デバイス登録
-
エンドユーザログイン
重要:
サードパーティのソリューションを使用している場合や、NetScalerアプライアンス以外のデバイスを管理している場合は、登録プロセスをスキップできます。追加する最後の文字列は、NetScalerが指定した形式である必要があります。
次の図は、OTP を受信する新しいデバイスを登録するためのデバイス登録フローを示しています。
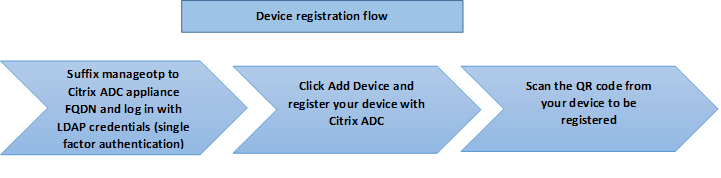
注:
デバイスの登録は、さまざまな要素を使用して行うことができます。デバイス登録プロセスを説明するために、1 つの要素(前の図で指定)を例として使用します。詳細については、「 デバイス登録に推奨されるネイティブ OTP 構成」を参照してください。
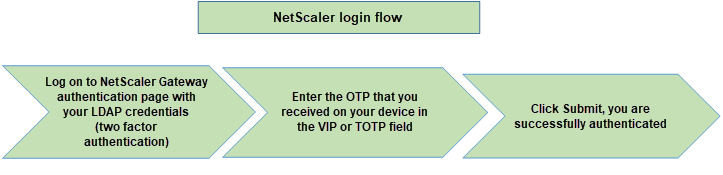
次の図は、登録済みデバイスを介した OTP の検証を示しています。
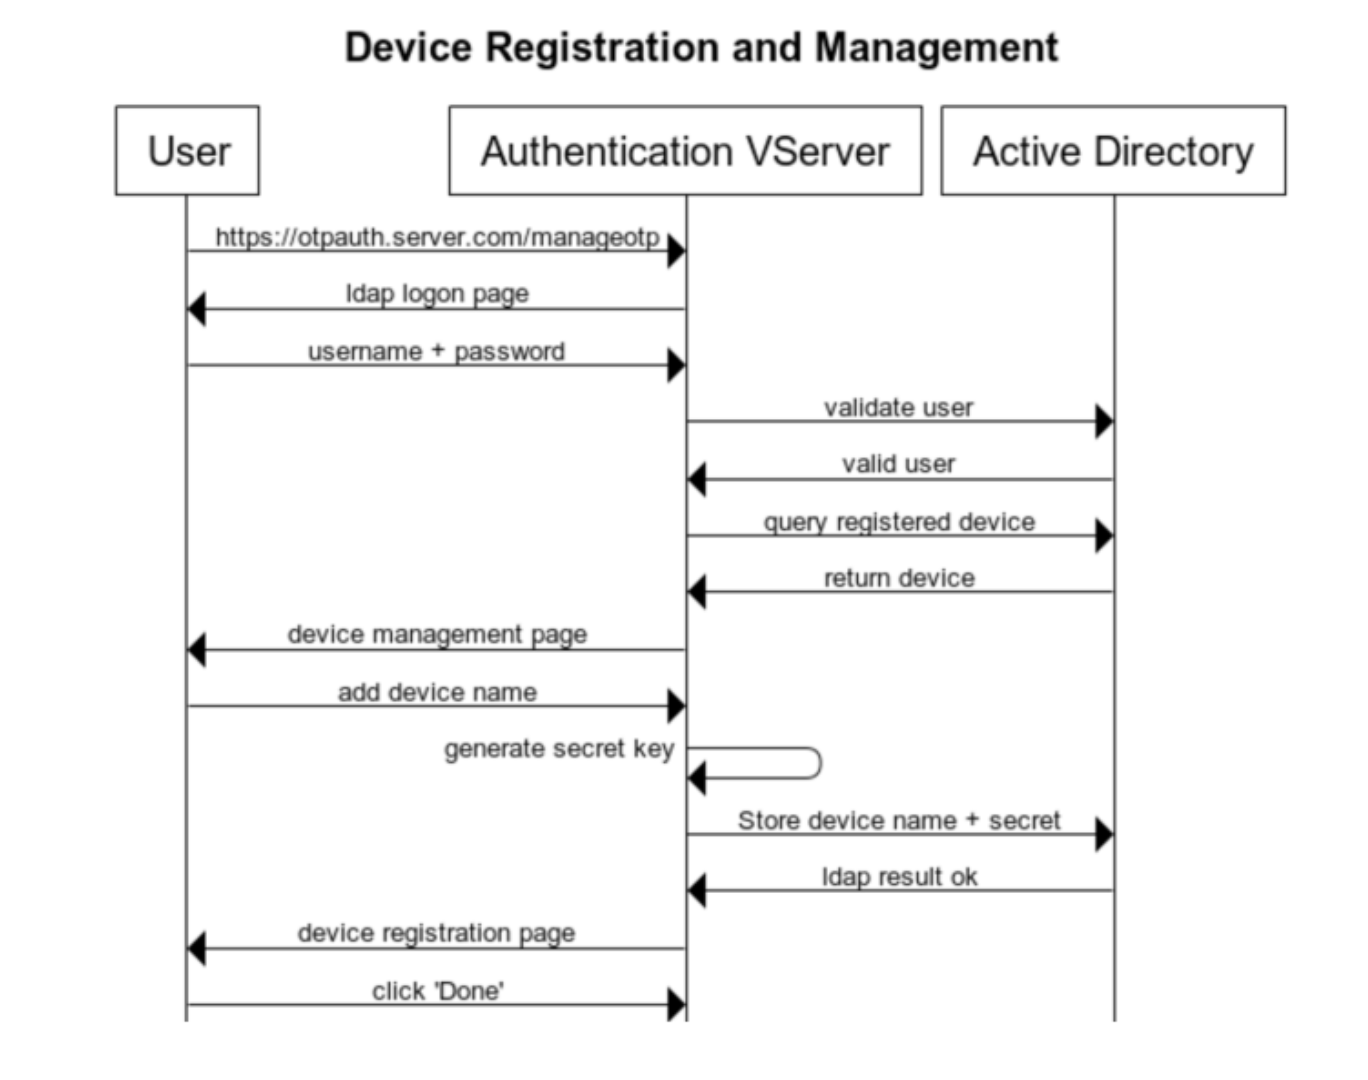
次の図は、デバイスの登録と管理フローを示しています。
次の図は、ネイティブ OTP 機能のエンドユーザフローを示しています。
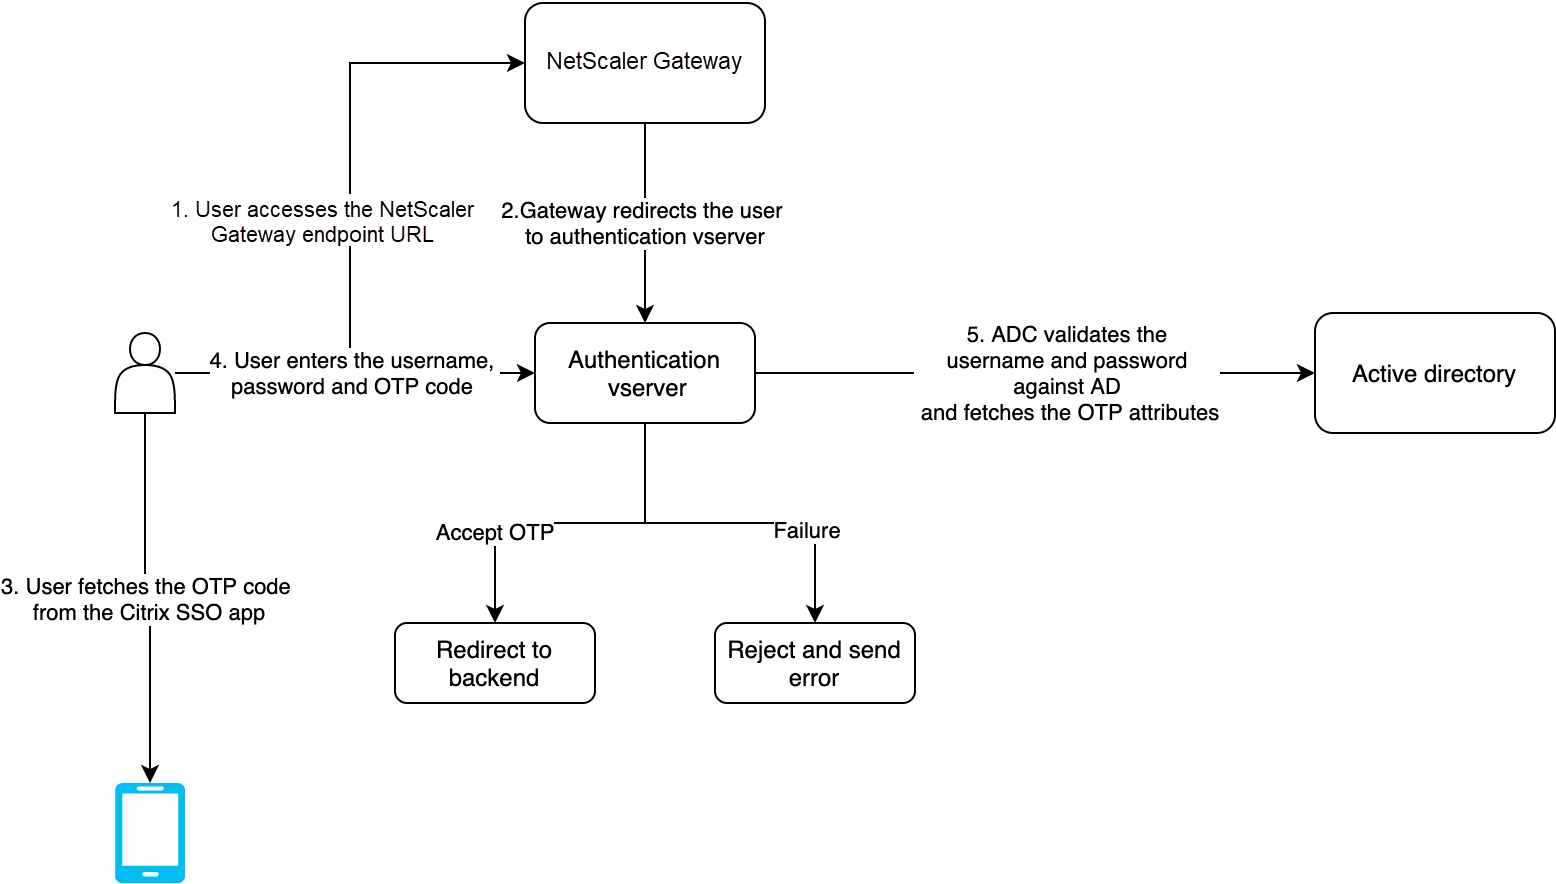
前提条件
ネイティブ OTP 機能を使用するには、次の前提条件が満たされていることを確認してください。
-
NetScaler機能リリースバージョンは12.0ビルド51.24以降です。
-
AdvancedエディションまたはPremiumエディションのライセンスがNetScaler Gatewayにインストールされています。
-
NetScalerは管理IPで構成されており、管理コンソールにはブラウザとコマンドラインの両方を使用してアクセスできます。
-
NetScalerは、ユーザーを認証するための認証、承認、監査仮想サーバーで構成されています。詳細については、「 認証仮想サーバー」を参照してください。
-
NetScalerアプライアンスはUnified Gateway で構成され、認証、承認、監査プロファイルがGateway仮想サーバーに割り当てられます。
-
ネイティブ OTP ソリューションは、nFactor 認証フローに制限されています。ソリューションを構成するには、高度なポリシーが必要です。詳細については、「 nFactor 認証の設定」を参照してください。
また、Active Directory については、次の点を確認してください:
-
属性の最小長は 256 文字です。
-
属性タイプは、ユーザパラメータなどの 'DirectoryString' である必要があります。これらの属性は文字列値を保持できます。
-
デバイス名が英語以外の文字である場合、属性文字列タイプは Unicode である必要があります。
-
NetScaler LDAP管理者は、選択したAD属性への書き込みアクセス権を持っている必要があります。
-
NetScalerアプライアンスとクライアントマシンは、共通のネットワークタイムサーバーと同期する必要があります。
GUI を使用したネイティブ OTP の設定
ネイティブ OTP 登録は、単要素認証だけではありません。次のセクションでは、シングルファクタ認証とセカンドファクタ認証の設定について説明します。
第 1 ファクタのログインスキーマの作成
-
下にスクロールして SingleAuthManageOTP.xml を選択し、「 選択」をクリックします。
-
[Create] をクリックします。
-
名前: lpol_single_auth_manage_otp_by_urlプロファイル: リストから lschema_single_auth_manage_otp を選択します。規則:
HTTP.REQ.COOKIE.VALUE("NSC_TASS").EQ("manageotp")
認証、承認、および監査仮想サーバーの構成
-
「 ログインスキーマなし」を選択します。
-
[認証PolicyLabelの作成] 画面で次のように入力し、[続行] をクリックします。名前: manage_otp_flow_labelログインスキーマ: Lschema_Int
-
Create a policy for a normal LDAP server. -
名前:auth_pol_ldap_native_otp
-
Create the first LDAP action with authentication enabled to be used for single factor. -
「 認証 LDAP サーバーの作成 」ページで、「 サーバー IP 」ラジオボタンを選択し、「 認証」の横にあるチェックボックスをオフにし、次の値を入力して「 テスト接続」を選択します。次に、設定例を示します。名前:ldap_native_otpIPアドレス:192.8.xx.xxベース DN: DC = トレーニング、DC = ラボパスワード:
xxxxxCreate a policy for OTP . -
名前: auth_pol_ldap_otp_action
-
Create the second LDAP action to set OTP authenticator with OTP secret configuration and authentication unchecked. -
「 認証 LDAP サーバーの作成 」ページで、「 サーバー IP 」ラジオボタンを選択し、「 認証」の横にあるチェックボックスをオフにし、次の値を入力して「 テスト接続」を選択します。次に、設定例を示します。名前: ldap_otp_actionIPアドレス:192.8.xx.xxベース DN: DC = トレーニング、DC = ラボパスワード:
xxxxx -
次の属性を入力します。属性 1 = メール属性 2 = objectGUID 属性 3 = immutableID
-
[OK] をクリックします。
-
Create OTP for OTP verification. -
名前:auth_pol_ldap_otp_verify
-
Create the third LDAP action to verify OTP. -
「 認証 LDAP サーバーの作成 」ページで、「 サーバー IP 」ラジオボタンを選択し、「 認証」の横にあるチェックボックスをオフにし、次の値を入力して「 テスト接続」を選択します。次に、設定例を示します。名前:ldap_verify_otpIPアドレス:192.168.xx.xxベース DN: DC = トレーニング、DC = ラボパスワード:
xxxxx -
次の属性を入力します。属性 1 = メール属性 2 = objectGUID 属性 3 = immutableID
-
[OK] をクリックします。
通常の LDAP サーバー用の高度な認証ポリシーがまだ設定されていない可能性があります。 を LDAP に変更します。 通常の LDAP サーバーを選択します。これは、認証が有効になっているサーバーです。 式に true を入力します。これは、クラシック構文の代わりに高度なポリシーを使用します。 「 作成」をクリックします。
注:
認証仮想サーバーは、RfWebUI ポータルテーマにバインドする必要があります。サーバー証明書をサーバーにバインドします。サーバー IP '1.2.3.5' には、後で使用できるように otpauth.server.com という対応する FQDN が必要です。
第 2 要素 OTP のログインスキーマの作成
-
[Add Binding] をクリックします。
-
「 認証ログインスキーマポリシーの作成 」ページで、ポリシーの名前を入力し、「 追加」をクリックします。
-
「 認証ログインスキーマの作成 」ページで、ログインスキーマの名前を入力し、 noschemaの横にある鉛筆アイコンをクリックします。
-
[Create] をクリックします。
-
[Bind] をクリックします。
シングルサインオンのトラフィックポリシー
-
NetScaler Gateway > ポリシー > トラフィックに移動します。
-
トラフィックプロファイルの名前を入力します。
-
AAA.USER.ATTRIBUTE(1) -
http.req.method.eq(post)||http.req.method.eq(get) && false -
[Create] をクリックします。
-
トラフィックポリシーを VPN 仮想サーバーにバインドします。
-
**NetScaler Gateway仮想サーバーを選択して認証プロファイルを構成し、[OK]**をクリックします。
-
「 ポリシー 」セクションで、「+」アイコンをクリックします。
-
ポリシータイプを「 トラフィック 」として選択し、「 続行」をクリックします。
-
[完了] をクリックします。
OTP を管理するためのコンテンツスイッチングポリシーを構成する
CLI を使用したネイティブ OTP の設定
OTP デバイス管理ページを設定するには、次の情報が必要です。
-
認証仮想サーバーに割り当てられた IP
-
割り当てられた IP に対応する FQDN
-
認証仮想サーバーのサーバー証明書
注:
ネイティブ OTP は Web ベースのソリューションのみです。
OTP デバイスの登録および管理ページを設定するには
認証仮想サーバーの作成
```
 add authentication vserver authvs SSL 1.2.3.5 443
 bind authentication vserver authvs -portaltheme RFWebUI
 bind ssl vserver authvs -certkeyname otpauthcert
 ```
注:
認証仮想サーバーは RfWebUI ポータルテーマにバインドする必要があります。サーバー証明書をサーバーにバインドします。サーバー IP '1.2.3.5' には、後で使用できるように otpauth.server.com という対応する FQDN が必要です。
LDAP ログオンアクションを作成するには
add authentication ldapAction <LDAP ACTION NAME> -serverIP <SERVER IP> - serverPort <SERVER PORT> -ldapBase <BASE> -ldapBindDn <AD USER> -ldapBindDnPassword <PASSWO> -ldapLoginName <USER FORMAT>
例:
add authentication ldapAction ldap_logon_action -serverIP 1.2.3.4 -serverPort 636 -ldapBase "OU=Users,DC=server,DC=com" -ldapBindDn administrator@ctxnsdev.com -ldapBindDnPassword PASSWORD -ldapLoginName userprincipalname
LDAP ログオンの認証ポリシーを追加するには
add authentication Policy auth_pol_ldap_logon -rule true -action ldap_logon_action
Loginschemaを使用して UI を表示するには
ログオン時にユーザー名フィールドとパスワードフィールドをユーザーに表示する
add authentication loginSchema lschema_single_auth_manage_otp -authenticationSchema "/nsconfig/loginschema/LoginSchema/SingleAuthManageOTP.xml"
デバイスの登録と管理ページを表示する
デバイスの登録と管理画面を表示するには、URL とホスト名の2つの方法をお勧めします。
注:
現在、デバイス登録とデバイス管理はブラウザを使用してのみ実行できます。
-
URL を使うURL に '/manageotp' が含まれている場合
-
add authentication loginSchemaPolicy lpol_single_auth_manage_otp_by_url -rule "http.req.cookie.value("NSC_TASS").contains("manageotp")" -action lschema_single_auth_manage_otp -
bind authentication vserver authvs -policy lpol_single_auth_manage_otp_by_url -priority 10 -gotoPriorityExpression END
-
-
ホスト名を使うホスト名が「alt.server.com」の場合
-
add authentication loginSchemaPolicy lpol_single_auth_manage_otp_by_host -rule "http.req.header("host").eq("alt.server.com")" -action lschema_single_auth_manage_otp -
bind authentication vserver authvs -policy lpol_single_auth_manage_otp_by_host -priority 20 -gotoPriorityExpression END
-
CLI を使用してユーザログインページを設定するには
OTP パスコード検証アクションを作成するには
add authentication ldapAction <LDAP ACTION NAME> -serverIP <SERVER IP> -serverPort <SERVER PORT> -ldapBase <BASE> -ldapBindDn <AD USER> -ldapBindDnPassword <PASSWORD> -ldapLoginName <USER FORMAT> -authentication DISABLED -OTPSecret <LDAP ATTRIBUTE>`
例:
add authentication ldapAction ldap_otp_action -serverIP 1.2.3.4 -serverPort 636 -ldapBase "OU=Users,DC=server,DC=com" -ldapBindDn administrator@ctxnsdev.com -ldapBindDnPassword PASSWORD -ldapLoginName userprincipalname -authentication DISABLED -OTPSecret userParameters
重要:
LDAPログオンとOTPアクションの違いは、認証を無効にして新しいパラメータ
OTPSecretを導入する必要があることです。AD 属性値は使用しないでください。
OTP パスコード検証の認証ポリシーを追加するには
add authentication Policy auth_pol_otp_validation -rule true -action ldap_otp_action
LoginSchema を介して 2 要素認証を提示するには
2 要素認証用の UI を追加します。
add authentication loginSchema lscheme_dual_factor -authenticationSchema "/nsconfig/loginschema/LoginSchema/DualAuth.xml"
 add authentication loginSchemaPolicy lpol_dual_factor -rule true -action lscheme_dual_factor
ポリシーラベルを介してパスコード検証係数を作成するには
次の要素の管理OTPフローポリシーラベルを作成します(最初の要素はLDAPログオンです)
add authentication loginSchema lschema_noschema -authenticationSchema noschema
 add authentication policylabel manage_otp_flow_label -loginSchema lschema_noschema
OTPポリシーをポリシー・ラベルにバインドするには
bind authentication policylabel manage_otp_flow_label -policyName auth_pol_otp_validation -priority 10 -gotoPriorityExpression NEXT
UI フローをバインドするには
LDAPログオンに続いて、認証仮想サーバーを使用したOTP検証をバインドします。
bind authentication vserver authvs -policy auth_pol_ldap_logon -priority 10 -nextFactor  manage_otp_flow_label -gotoPriorityExpression NEXT
 bind authentication vserver authvs -policy lpol_dual_factor -priority 30 -gotoPriorityExpression END
シングルサインオン用のトラフィックポリシーを作成して VPN 仮想サーバーにバインドするには
add vpn trafficAction vpn_html_pol http -userExpression aaa.user.attribute(1) -passwdExpression aaa.user.attribute(2)

 add vpn trafficpolicy tf1 'http.req.method.eq(post)||http.req.method.eq(get) && false' vpn_html_pol

 bind vpn vserver vpn1 -policy tf1 -priority 10
デバイスをNetScalerに登録する
-
ブラウザで、/manageotpというサフィックスが付いたNetScaler FQDN(最初に公開されているIP)に移動します。たとえば、
<https://otpauth.server.com/manageotp>。ユーザーの資格情報を使用してログインします。 -

-
デバイス名を入力して Goを押します。画面にバーコードが表示されます。
-
デバイスのカメラを QR コードの上に置きます。オプションでコードを入力できます。
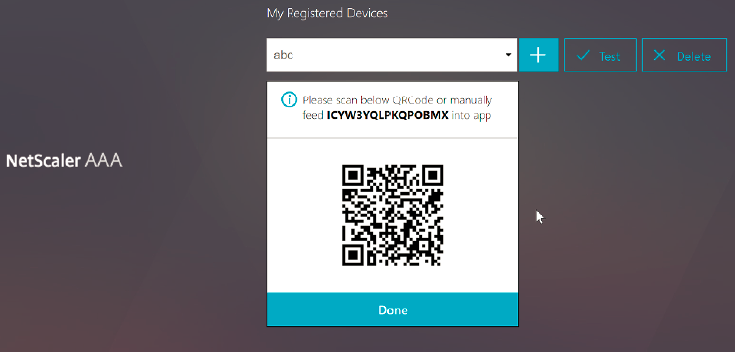 注:表示された QR コードは 3 分間有効です。
 -
スキャンが成功すると、ログインに使用できる 6 桁の時刻依存コードが表示されます。

-
ページの右上隅にあるドロップダウンメニューを使用して、必ずログアウトしてください。
OTPを使用してNetScalerにログインします
-
最初に公開する URL に移動し、Google Authenticator の OTP を入力してログオンします。
-
NetScalerのスプラッシュページを認証します。