
Citrix StoreFront™ StyleBooks
StoreFront is an enterprise app store that aggregates applications and desktops from Citrix Virtual Apps and Desktops sites into a single store for users. StoreFront authenticates users to sites hosting resources and manages application stores and desktops that users access. It hosts your enterprise application store, which allows you give users self-service access to app and desktops you make available to them.
This StyleBook defines the NetScaler configurations for StoreFront servers. With this StyleBook, you can configure StoreFront servers to the desired NetScaler instances. You can choose encrypted communication by selecting SSL and providing the SSL files and key files from your local system.
Related information
Create configuration for Citrix StoreFront applications
-
In the NetScaler® ADM GUI, navigate to Applications > StyleBooks.
-
In the search bar, use the Name properties and search
Citrix StoreFront. -
On the Citrix StoreFront StyleBook, click Create Configuration.
-
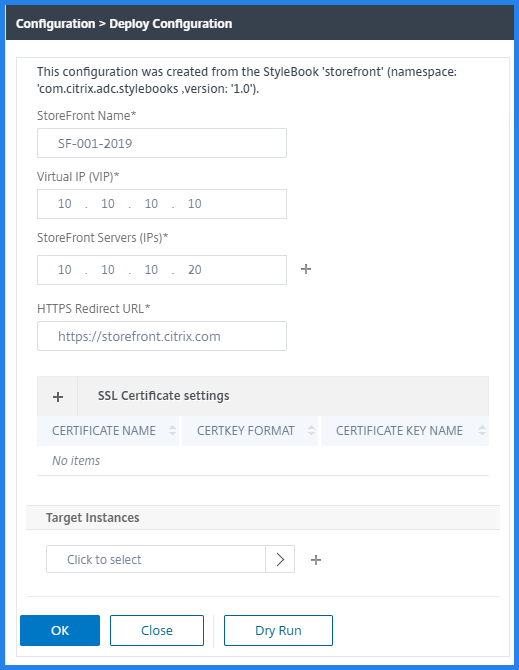
Specify the following details:
-
StoreFront Name: Specify the StoreFront name. The StoreFront ConfigPack is created with the same StoreFront name.
-
Virtual IP (VIP): Specify the virtual IP address at which the NetScaler instance receives the client requests.
-
StoreFront Servers: Specify the IP addresses of the StoreFront servers that you want to configure with a NetScaler instance.
-
HTTPS Redirect URL: Specify the HTTPS url to which the HTTPS requests are redirected.
-
-
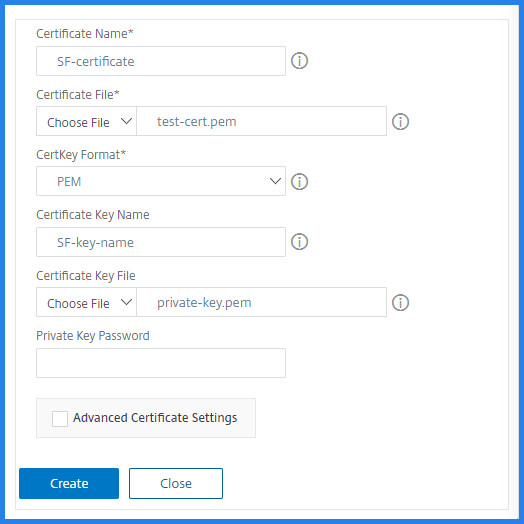
In SSL Certificates Settings section, enter the names of the SSL certificate and the certificate key.
-
Select the respective files from your local storage folder. You can also type in the private key password to specify the encrypted private keys in PEM format.
-
You can also enable Advanced Certificate Settings check box. Here you can enter details such as certificate expiry notification period, enable, or disable the certificate expiry monitor.
-
Optional, select SSL CA Certificate for the authentication virtual IP check box if the SSL certificate requires a CA public certificate to be installed on NetScaler. Make sure you choose Is a CA Certificate in the Advanced Certificate Settings section.
-
Click Create.
-
Click Target Instances and select the NetScaler instances on which you want to configure the StoreFront servers.
-
Click Create to create the configuration and deploy the configuration on the selected NetScaler instances.