
Configure high availability deployment
High Availability (HA) refers to a system that is always available to a user without any interruption to the services. High availability setup is crucial during system downtime, network or application failures, and is a key requirement to any enterprise. A high availability deployment of two NetScaler® ADM nodes in active-passive mode with same configurations provides uninterrupted operations.
Related information
Deployment scenario
Note
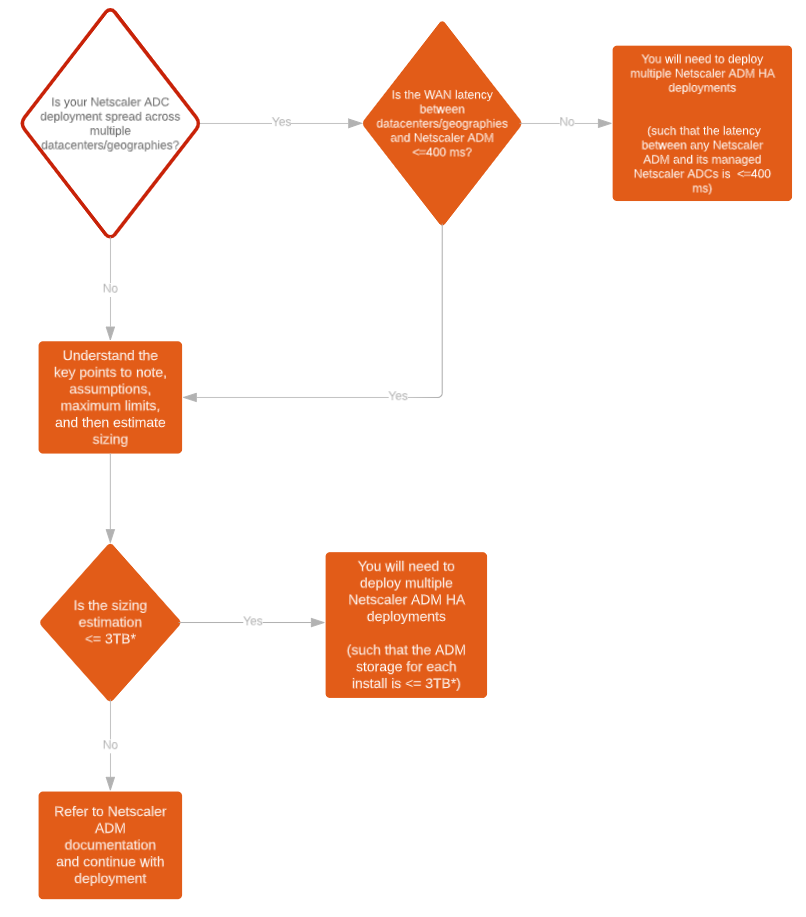
The validated maximum storage limit for a single NetScaler ADM HA deployment is 3 TB. For more information, see the deployment guide.
Important
To access NetScaler ADM 12.1 build 48.18 or later versions using HTTPS:
If you have configured a NetScaler instance to load balance NetScaler ADM in a high availability mode, first remove the NetScaler instance. Then, configure a floating IP address to access NetScaler ADM in high availability mode.
The following are the benefits of high availability deployment in NetScaler ADM:
-
An improved mechanism to monitor heartbeats between the primary and secondary node.
-
Provides physical streaming replication of database instead of a logical bi-directional replication.
-
Ability to configure the floating IP address on the primary node to eliminate the need of separate NetScaler load balancer.
-
Provides easy access to the NetScaler ADM user interface using the floating IP address.
-
NetScaler ADM user interface is provided only on the primary node. By using the primary node, you can eliminate the risk of accessing and making changes to the secondary node.
-
Configuring the floating IP address handles the failover situation and reconfiguring the instances is not required.
-
Provides built in ability to detect and handle split-brain situation.
The following table describes the terms used in high availability deployment.
| Terms | Description |
|---|---|
| Primary node | First node registered in the high availability deployment. |
| Secondary node | Second node registered in the high availability deployment. |
| Heartbeat | A mechanism used to exchange messages between primary and secondary node in the high availability setup. The messages determine status and health of the application on each individual node. |
| Floating IP address | A floating IP is an IP address that can be instantly moved from one node to another in the same subnet. Internally it is set up as an alias on the network interface of the primary node. If there is a failover, the floating IP address is seamlessly moved from the old primary to the new one. It is useful in high availability setup because it allows clients to communicate with the high availability nodes using a single IP address. |
Note
For more information on port and protocol details, see Ports.
Components of high availability architecture
The following figure displays the architecture of two NetScaler ADM nodes deployed in high availability mode.
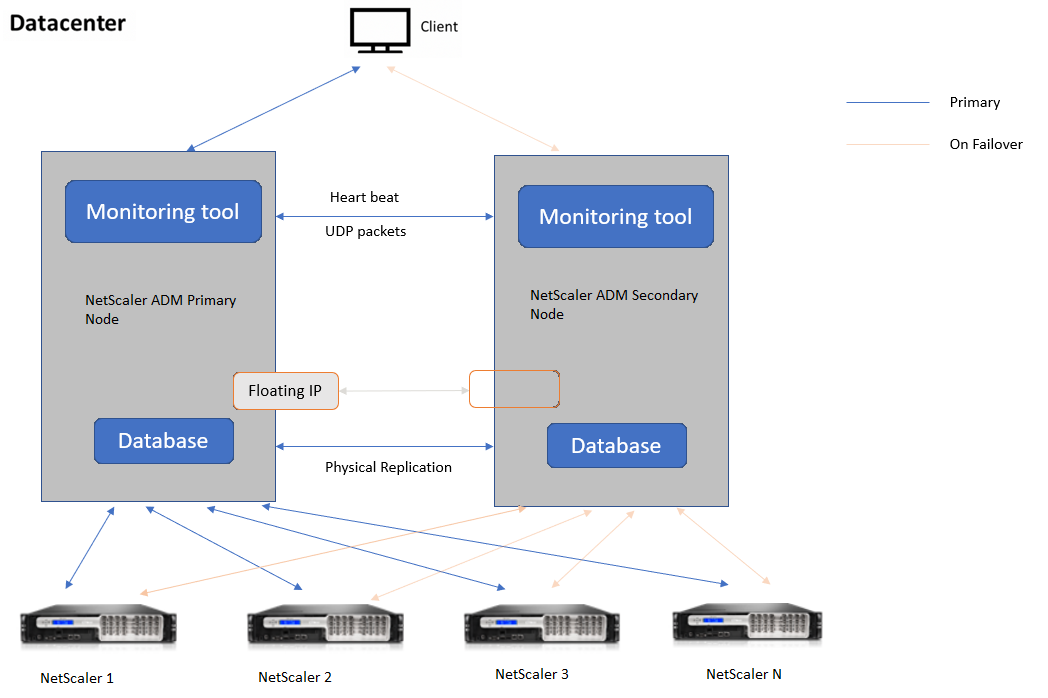
In high availability deployment, one NetScaler ADM node is configured as the primary node (MAS 1) and the other as the secondary node (MAS 2). If the primary node goes down due to any reason, the secondary node takes over as the new primary node.
Monitoring tool
Monitoring tool is an internal process used to monitor, alert, and handle failover situations. The tool is active and running on each node in high availability. It is responsible for starting subsystems, initiating database on both the nodes, deciding on the primary, or secondary node if there is a failover, and so on.
Primary node
The primary node accepts connections and manages the instances. All processes such as AppFlow®, SNMP, LogStream, syslog, and so on is managed by the primary node. The NetScaler ADM user interface access is available on primary node. The floating IP address is configured on the primary node.
Secondary node
The secondary node listens to the heartbeat messages sent from the primary node. Database on the secondary node is in read-replica mode only. None of the processes are active in the secondary node and the NetScaler ADM user interface is not accessible on the secondary node.
Physical streaming replication
The primary and secondary nodes synchronize through heartbeat mechanism. With the physical streaming replication of database, the secondary node starts in read-replica mode. The secondary node listens to the heartbeat messages received from the primary node. If the secondary node does not receive any heartbeats for a time period of 180 seconds, the primary node is considered to be down. Then, the secondary node takes over as the primary node.
Heartbeat messages
Heartbeat messages are User Datagram Packets (UDP) that are sent and received between primary and secondary node. It monitors all subsystems of NetScaler ADM and database to exchange information about the node state, health, processes, and so on. The information is shared between the high availability nodes every second. Notifications are sent as alerts to the administrator if there is a failover or break up of high availability states.
Floating IP address
The floating IP address is associated with the primary node in the high availability setup. It is an alias given to the primary node IP address, that the client can use to connect to NetScaler ADM in the primary node. Since the floating IP address is configured on the primary node, the instance reconfiguration is not required in case of failover. The instances reconnect to the same IP address to reach the new primary.
Key points to note
-
In a high availability setup, both the NetScaler ADM nodes are deployed in active-passive mode. They must be on the same subnets using the same software version and build, and have same configurations.
-
Floating IP address:
-
Floating IP address is configured on the primary node.
-
Instances need not be reconfigured if there is a failover.
-
You can access a high availability node from the user interface, either by using the primary node IP or floating IP address.NoteCitrix recommends that you use the floating IP address to access the user interface.
-
-
Database:
-
In a high availability setup, all configuration files are synchronized automatically from the primary node to the secondary node at an interval of one minute.
-
Database synchronization happens instantly by physical replication of database.
-
Database on secondary node is in read-replica mode.
-
-
NetScaler ADM upgrade:
-
Internal processes implicitly upgrade NetScaler ADM from the earlier versions.NoteAfter the upgrade is successful, you must configure the floating IP address.
-
-
UDP default port 5005 is available on both the nodes for heartbeats to be sent and for messages to be received.
-
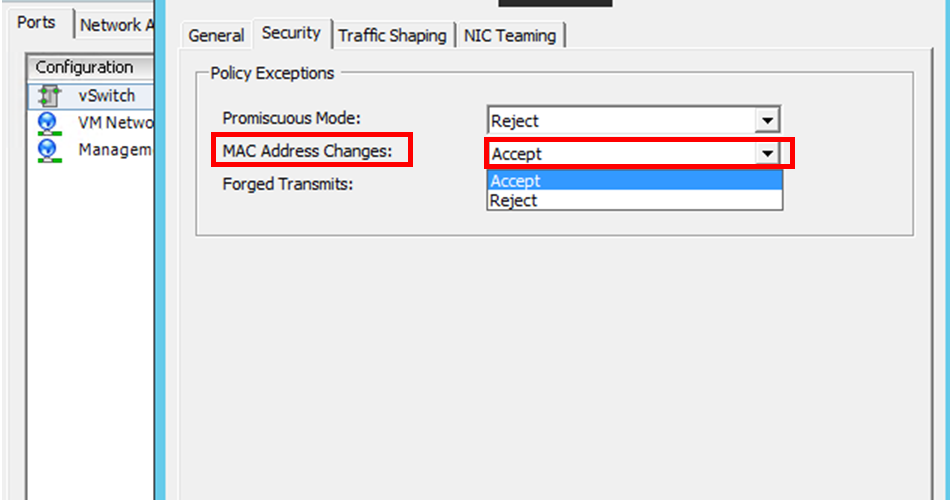
MAC addressThe setting for the "MAC Address Changes" option in a hypervisor affects the traffic that a virtual machine receives. Allow MAC address changes to be enabled on the virtual switch so that the floating IP address moves seamlessly to the new primary node after failover. For example, when deploying NetScaler ADM on a high availability on VMware ESXi, ensure you accept changes to MAC address. ESXi now allows requests to change the active MAC address to other than the initial MAC address.NoteFor NetScaler ADM deployed on ESXI version 6.7, you can set the MAC Address Changes option to Reject also. After failover, the traffic flows to new primary node seamlessly irrespective of the MAC Address Changes setting. Therefore, accept changes to MAC address is not mandatory.If the NetScaler ADM is deployed on the ESXI version lower than 6.7, ensure the MAC Address Changes option is set to Accept only.
Prerequisites
Before you set up high availability for NetScaler ADM nodes, note the following prerequisites:
-
The NetScaler ADM high availability deployment is supported from NetScaler ADM version 12.0 build 51.24.
-
Download the NetScaler Application Delivery Management image file (.xva) from the NetScaler site:
<https://www.citrix.com/downloads/>
Citrix recommends that you set CPU priority (in virtual machine properties) at the highest level to improve scheduling behavior and network latency.
The following table lists the minimum requirements for the virtual computing resources:
| Component | Requirement |
|---|---|
| RAM | 32 GB |
| Virtual CPU | 8 CPUs |
| Storage Space | Citrix recommends using solid-state drive (SSD) technology for NetScaler ADM deployments. The default value is 120 GB. Actual storage requirement depends on NetScaler ADM sizing estimation. If your NetScaler ADM storage requirement exceeds 120 GB, you have to attach an additional disk. Note You can add only one additional disk. Citrix recommends you to estimate storage and attach additional disk at the time of initial deployment. For more information, see How to Attach an Additional Disk to NetScaler ADM. |
| Virtual network interfaces | 1 |
| Throughput | 1 Gbps or 100 Mbps |
| Hypervisor | Versions |
| Citrix Hypervisor | 6.2 and 6.5 |
| VMware ESXi | 5.5 and 6.0 |
| Microsoft Hyper-V | 2012 R2 |
| Linux KVM | Ubuntu and Fedora |
To set up NetScaler ADM in high availability mode
-
Register and deploy the first server (primary node).
-
Register and deploy the second server (secondary node).
-
Deploy the primary and secondary node for high availability setup.
Register and deploy the first server (primary node)
To register the first node:
-
Use the .xva image file downloaded from the NetScaler site and import it in to your hypervisor.NoteIt might take a few minutes for the .xva image file to import and get started. You can see the status on the bottom of the screen.

-
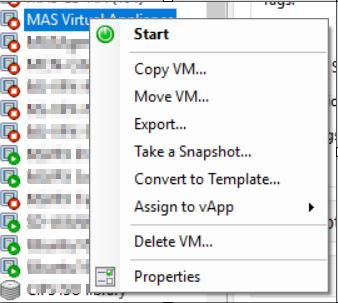
After the import is successful, right-click and click Start.
-
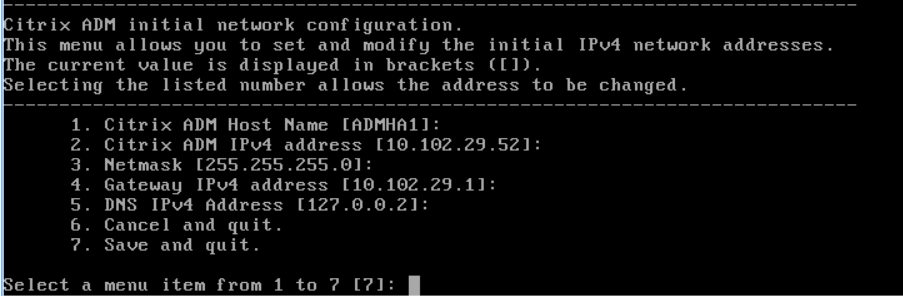
From the Console tab, configure NetScaler ADM with the initial network configurations.
-
After the initial network configuration is complete, the system prompts for login. Log on using following credentials – nsrecover/nsroot.NoteAfter you log on, if you want to update the initial network configuration, type
networkconfig, update the configuration, and save the configuration. -
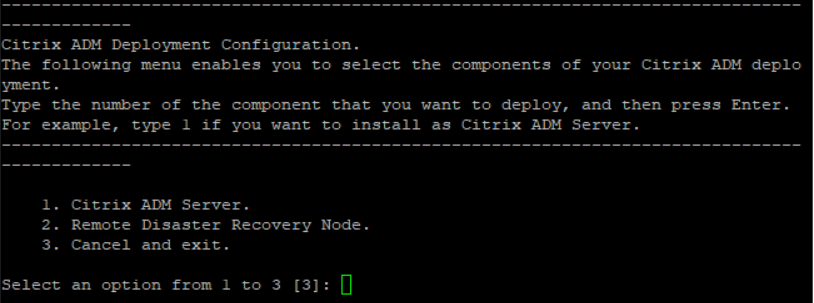
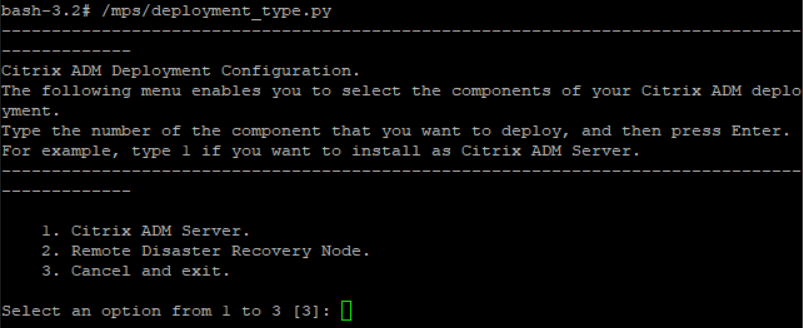
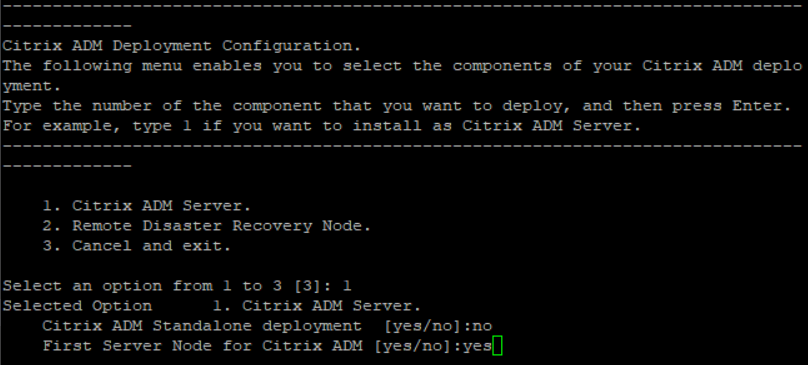
To deploy the primary node, enter /mps/deployment_type.py. The NetScaler ADM deployment configuration menu is displayed.
-
Select 1 to register NetScaler ADM server as primary node.
-
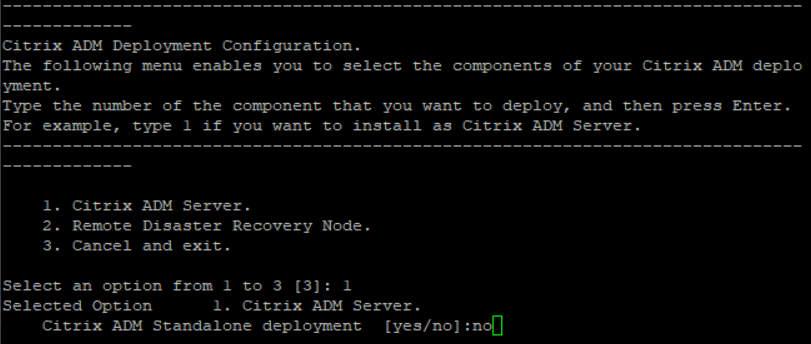
The console prompts you to select the NetScaler ADM standalone deployment. Enter No to confirm the deployment as high availability.
-
The console prompts you to select the First Server Node. Enter Yes to confirm the node as the first node.
-
The console prompts you to restart the system. Enter Yes to restart.
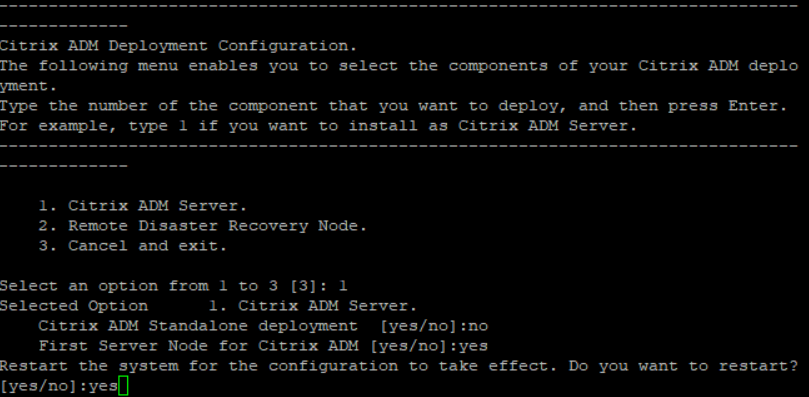 The system restarts and is displayed as the primary node in the NetScaler ADM user interface.
Register and deploy the second server (secondary node)
-
Use the .xva image file downloaded from the NetScaler site and import it in to your hypervisor.
-
From the Console tab, configure NetScaler ADM with the initial network configurations as displayed in the following image.
-
After the initial network configuration is completed, the system prompts for login. Log on using following credentials – nsrecover/nsroot.NoteAfter you log on, if you want to update the initial network configuration, type
networkconfig, update the configuration, and save the configuration. -
To deploy the secondary node, enter /mps/deployment_type.py. The NetScaler ADM deployment configuration menu is displayed.
-
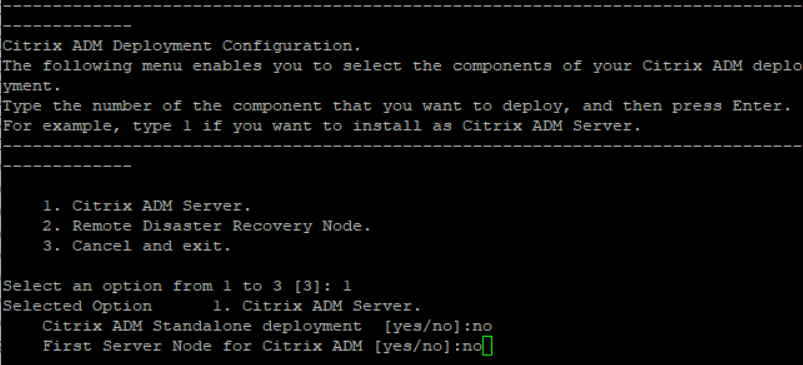
Select 1 to register NetScaler ADM server as secondary node.
-
The console prompts you to select the NetScaler ADM as standalone deployment. Enter No to confirm the deployment as high availability.
-
The console prompts you to select the first server node. Enter No to confirm the node as the second server.
-
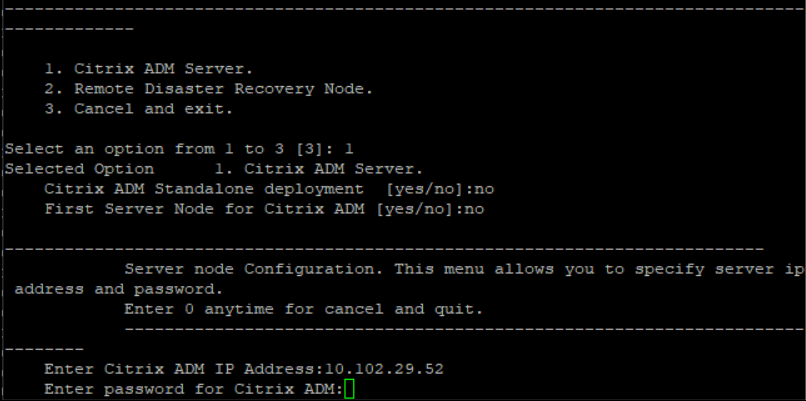
The console prompts you to enter the IP address and password of the primary node.
-
The console prompts you to enter the floating IP address.
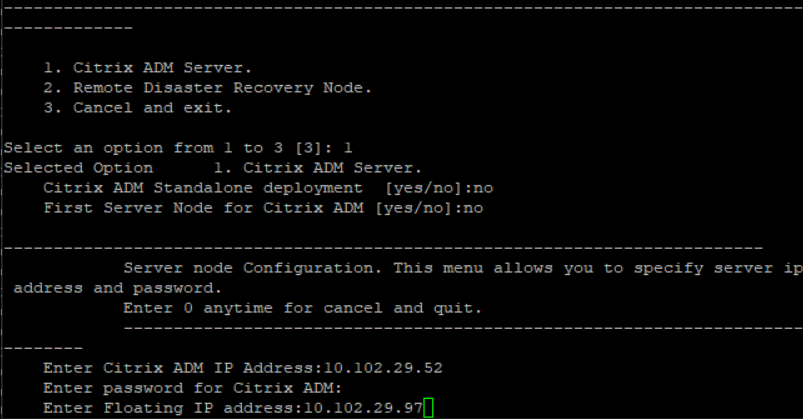
-
The console prompts you to restart the system. Enter Yes to restart.Note
-
Floating IP address is mandatory for high availability deployment of nodes.
-
The system will show error messages if there are any issues in the configuration.
-
The system reboots and takes a few minutes for the configurations to take effect.
-
Deploy the primary and secondary node as a high availability pair
After the registration both primary and secondary nodes are displayed on the NetScaler ADM user interface. Deploy these nodes into a high availability pair.
Note
-
Before deploying the nodes into a high availability pair, ensure that the secondary node is completed with a reboot, after the initial network configuration.
-
After the high availability deployment is complete, use the floating IP address to access the NetScaler ADM user interface.
To deploy nodes as a high availability pair:
-
Open a web browser and enter the IP address of the first NetScaler ADM server node.
-
In the user Name and password fields, enter the administrator credentials.
-
Click Get Started in the home page.
-
Select the deployment type as Two Servers deployed in High Availability Mode, and click Next.
-
On the Deployment page, click Deploy.
-
A confirmation message is displayed. Click Yes.The NetScaler ADM restarts and takes approximately 10 minutes for the configuration to take effect.NoteYou can now start using the Floating IP address.
-
Log on to NetScaler ADM using administrator credentials, click Get Started in the home page, and optionally, complete the following:
-
Add NetScaler instances
-
Configure Customer IdentityNoteYou can also click Skip to complete it later and click Finish.
-
-
Navigate to Settings > Deployment to validate the deployment.For more information, see the Frequently Asked Questions.
Disable high availability
You can disable high availability on a NetScaler ADM high availability pair and convert the nodes to standalone NetScaler ADM servers.
Note
Disable high availability from the primary node.
To disable the high availability:
-
In a web browser, enter the IP address of the NetScaler ADM server primary node.
-
In the User Name and Password fields, enter the administrator credentials.
-
On the System tab, navigate to Deployment and click Break HA.A dialogue box is displayed. Click Yes to break the high availability deployment.
Redeploy high availability
After you disable the high availability to a standalone deployment, you can redeploy it to high availability mode again. Redeploying high availability is similar to the first time deployment of high availability. For more details see Deploy the primary and secondary node as a high availability pair.
Note:
After disabling NetScaler Console high availability, use only one console node as the standalone license server. The second node must be reprovisioned.
High availability failover scenarios
A failover occurs if one of the following conditions is encountered:
-
Node failure: Primary node goes down, no heartbeat is detected from primary node for 180 seconds.
-
Application health failure: Primary node is up and running but one of the NetScaler ADM processes is down.
View Database Synchronization Log messages
In the NetScaler ADM HA pair, the configuration files are synchronized automatically from the primary node to the secondary node and the physical streaming replication of database happens.
However, if there is a streaming replication error, the Sync Database button appears. You can click the Sync Database button to start the database synchronization process.
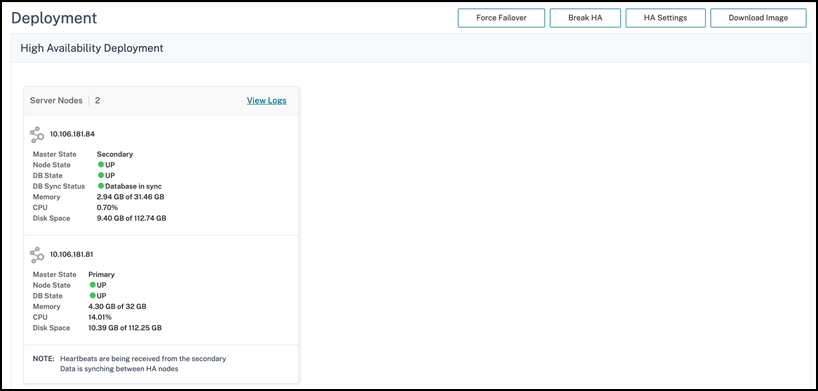
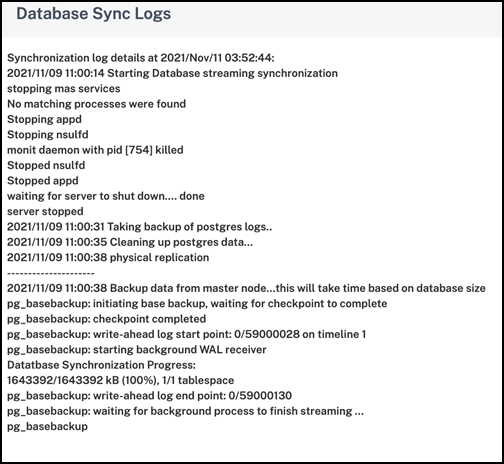
To view the progress of the database synchronization, click View Logs. The Database Sync Logs message appears and you can view the details of the synchronization progress real-time.
Split-brain scenario
When there is no communication between both the nodes due to downtime in network link, then:
-
Primary node continues to operate as primary
-
Secondary node takes over as primary because of the failure to receive heartbeats
-
Both the nodes would run their individual database instances
For example, in an enterprise two NetScaler ADM nodes have been deployed as primary and secondary. Due to a possible network link downtime, the communication between the two NetScaler ADM nodes breaks completely. Since there is no heartbeat exchange for over 180 seconds, both the nodes consider themselves to be the primary node. Both nodes act as active nodes and run their own instances of database.
From NetScaler ADM 12.1 or later release, this split-brain situation is handled gracefully after the network link and heartbeat is restored. High availability synchronization is restored automatically. The recovery time depends on the data and speed of the link between the nodes.
Note
During the split-brain condition, changes that occurred on the old primary node is reset with the new primary when it is rejoined in high availability. The changes that happened on new primary node during split-brain remains intact.