
NetScalerとのインラインデバイス統合
侵入防止システム(IPS)や次世代ファイアウォール(NGFW)などのセキュリティデバイスは、ネットワーク攻撃からサーバーを保護します。これらのデバイスはレイヤー2インラインモードで導入され、その主な機能はサーバーをネットワーク攻撃から保護し、ネットワーク上のセキュリティ脅威を報告することです。
脆弱な脅威を防ぎ、高度なセキュリティ保護を提供するために、NetScalerアプライアンスは1つ以上のインラインデバイスと統合されています。インラインデバイスは、IPS、NGFW など、どのセキュリティデバイスでもかまいません。
NetScalerアプライアンスとインラインデバイス統合を使用することでメリットが得られるユースケースのいくつかを以下に示します。
-
暗号化されたトラフィックを検査する。ほとんどのIPSおよびNGFWアプライアンスは暗号化されたトラフィックをバイパスするため、サーバーは攻撃に対して脆弱なままになります。NetScalerアプライアンスはトラフィックを復号化し、インラインデバイスに送信して検査することができます。これにより、お客様のネットワークセキュリティが強化されます。
-
インラインデバイスを TLS/SSL 処理からオフロードする。TLS/SSL 処理にはコストがかかるため、IPS または NGFW アプライアンスがトラフィックを復号化すると、システム CPU の使用率が高くなる可能性があります。暗号化されたトラフィックが急速に増加するにつれて、これらのシステムは暗号化されたトラフィックの復号化と検査に失敗します。NetScalerは、インラインデバイスをTLS/SSL処理からオフロードするのに役立ちます。その結果、インラインデバイスは大量のトラフィック検査をサポートすることになります。
-
インラインデバイスの負荷分散。NetScalerアプライアンスは、大量のトラフィックがある場合に複数のインラインデバイスの負荷分散を行います。
-
トラフィックのスマートな選択。アプライアンスに流れ込むすべてのパケットは、テキストファイルのダウンロードなど、内容が検査される場合があります。ユーザーは、NetScalerアプライアンスを構成して、検査対象として特定のトラフィック(.exeファイルなど)を選択し、そのトラフィックをインラインデバイスに送信してデータを処理できます。
Related information
NetScalerをインラインデバイスと統合する方法
次の図は、NetScalerがインラインセキュリティデバイスとどのように統合されるかを示しています。 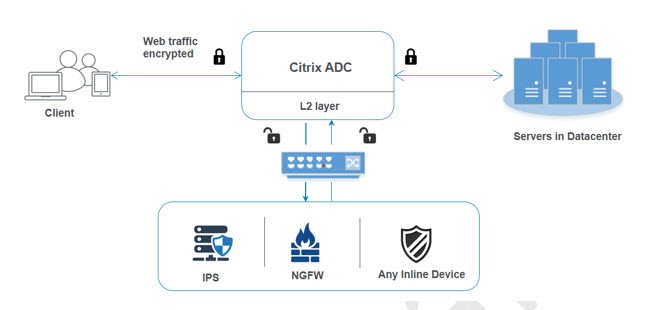
インラインデバイスをNetScalerアプライアンスと統合すると、コンポーネントは次のように相互作用します。
-
クライアントがNetScalerアプライアンスにリクエストを送信します。
-
アプライアンスは要求を受信し、ポリシー評価に基づいてインラインデバイスに送信します。 注:インラインデバイスが 2 つ以上ある場合、アプライアンスはデバイスの負荷分散を行い、トラフィックを送信します。 着信トラフィックが暗号化されたものである場合、アプライアンスはデータを復号化し、コンテンツを検査するためにプレーンテキストとしてインラインデバイスに送信します。
-
インラインデバイスは、データの脅威を検査し、データをドロップ、リセット、またはアプライアンスに戻すかどうかを決定します。
-
セキュリティ上の脅威がある場合、デバイスはデータを修正してアプライアンスに送信します。
-
NetScalerはデータを再暗号化し、リクエストをバックエンドサーバーに転送します。
-
バックエンドサーバーは、NetScalerアプライアンスに応答を送信します。
-
アプライアンスは再びデータを復号化し、検査のためにインラインデバイスに送信します。
-
アプライアンスはデータを再暗号化し、応答をクライアントに送信します
ソフトウェアライセンス
インラインデバイス統合を展開するには、NetScalerアプライアンスに次のいずれかのライセンスをプロビジョニングする必要があります。
-
ADC Premium
-
ADC Advanced
-
Telco Advanced
-
Telco プレミアム
-
SWG ライセンス
インラインデバイス統合の設定
NetScalerアプライアンスをインラインデバイスで構成するには、3つの方法があります。設定シナリオは次のとおりです。
1 つのインラインデバイスを使用する場合のシナリオ 1
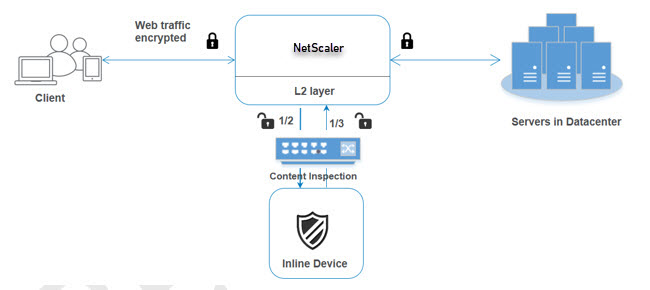
セキュリティデバイス(IPSまたはNGFW)をインラインモードで統合する場合は、まずコンテンツ検査機能を有効にし、NetScaler in MBF(MACベースの転送)をグローバルモードで有効にする必要があります。機能を有効にしたら、コンテンツ検査プロファイルを追加し、インラインデバイスで検査に基づいてトラフィックをリセット、ブロック、またはドロップするためのコンテンツ検査アクションを追加する必要があります。次に、アプライアンスにコンテンツ検査ポリシーを追加して、インラインデバイスに送信するトラフィックのサブセットを決定します。次に、サーバー上でレイヤー2接続が有効になっている負荷分散仮想サーバーを構成します。最後に、コンテンツ検査ポリシーを負荷分散仮想サーバーにバインドします。
MBF (MAC ベース転送) モードを有効にする
NetScalerアプライアンスをIPSやファイアウォールなどのインラインデバイスに統合する場合は、このモードを有効にする必要があります。MBF の詳細については、「MAC ベースの転送の設定」トピックを参照してください。
コマンドプロンプトで入力します:
enable ns mode mbf
コンテンツ検査を有効にする
NetScalerアプライアンスにコンテンツを復号化して検査用にインラインデバイスに送信する場合は、コンテンツ検査と負荷分散機能を有効にする必要があります。
enable ns feature contentInspection LoadBalancing
レイヤ 2 接続方法の追加
インラインデバイスから生成された応答を処理するために、アプライアンスはインラインデバイスとの通信のレイヤー2方式(L2ConnMethod)としてVLANチャネルを使用します。
コマンドプロンプトで入力します:
set l4param -l2ConnMethod <l2ConnMethod>
例
set l4param –l2ConnMethod VlanChannel
サービスのコンテンツ検査プロファイルの追加
NetScalerアプライアンスのインラインデバイス構成は、コンテンツ検査プロファイルと呼ばれるエンティティで指定できます。プロファイルには、インラインデバイスとの統合方法を説明する設定のコレクションがあります。
コマンドプロンプトで入力します:
add contentInspection profile <name> -type InlineInspection -egressInterface <interface_name> -ingressInterface <interface_name>[-egressVlan <positive_integer>] [-ingressVlan <positive_integer>]
例:
add contentInspection profile Inline_profile1 -type InlineInspection -ingressinterface “1/2” -egressInterface “1/3”
IPS-TCP モニターの追加
モニターを設定する場合は、ユーザー定義のモニターを追加します。 注:モニターを設定する場合は、カスタムモニターを使用する必要があります。モニターを追加するときは、transparent パラメーターを有効にする必要があります。
コマンドプロンプトで入力します:
add lb monitor <monitorName> <type> [-destIP <ip_addr|ipv6_addr>] [-destPort <port>] [-transparent ( YES | NO )]
例:
add lb monitor ips_tcp TCP -destIP 192.168.10.2 -destPort 80 -transparent YES
サービスを追加する
サービスを追加します。インラインデバイスを含め、どのデバイスも所有していないダミー IP アドレスを指定します。
use source IP address (USIP) を「はい」に設定します。useproxyportをNOに設定します。デフォルトでは、ヘルスモニタリングはオンになっており、サービスをヘルスモニターにバインドし、モニターの TRANSPARENT オプションもオンに設定します。コマンドプロンプトで入力します:
add service <Service_name> <IP> TCP * - contentinspectionProfileName <Name> -healthMonitor YES -usip ON –useproxyport OFF
例:
add service ips_service 192.168.10.2 TCP * -healthMonitor YES -usip YES -useproxyport NO -contentInspectionProfileName ipsprof
ヘルスモニターの追加
デフォルトでは、ヘルスモニターはオンになっており、必要に応じて無効にすることもできます。コマンドプロンプトで入力します:
add lb monitor <name> TCP -destIP <ip address> -destPort 80 -transparent <YES, NO>
例:
add lb monitor ips_tcp TCP -destIP 192.168.10.2 -destPort 80 -transparent YES
サービスをヘルスモニターにバインドする
ヘルスモニターを設定したら、サービスをヘルスモニターにバインドする必要があります。コマンドプロンプトで入力します:
bind service <name> -monitorName <name>
例:
bind service ips_svc -monitorName ips_tcp
サービスのコンテンツ検査アクションを追加
コンテンツ検査機能を有効にし、インラインプロファイルとサービスを追加したら、要求を処理するためのコンテンツ検査アクションを追加する必要があります。コンテンツ検査アクションに基づいて、インラインデバイスはデータを検査した後にドロップ、リセット、またはブロックアクションを行うことができます。
インラインサーバーまたはサービスが停止している場合は、
ifserverdown 次のアクションのいずれかを実行するようにアプライアンスのパラメータを設定できます。
CONTINUE:リモートサーバーがダウンしているときにユーザーがコンテンツ検査をバイパスしたい場合は、デフォルトで「CONTINUE」アクションを選択できます。 RESET (デフォルト): このアクションは、RST との接続を閉じることによってクライアントに応答します。 DROP: このアクションは、ユーザーに応答を送信せずにパケットをサイレントにドロップします。
コマンドプロンプトで入力します:
add contentInspection action <name> -type <type> (-serverName <string> [-ifserverdown <ifserverdown>] [-reqTimeout <positive_integer>] [-reqTimeoutAction <reqTimeoutAction>]
add ContentInspection action <action_name> -type InlineINSPECTION -serverName Service_name/Vserver_name>
例:
add ContentInspection action <Inline_action> -type InlineSPECTION –serverName Inline_service1
検査用のコンテンツ検査ポリシーを追加する
コンテンツ検査アクションを作成したら、コンテンツ検査ポリシーを追加して検査の要求を評価する必要があります。このポリシーは、1 つ以上の式で構成されるルールに基づいています。ポリシーは、ルールに基づいてインスペクション対象のトラフィックを評価し、選択します。
コマンドプロンプトで、次のように入力します:
add contentInspection policy <policy_name> –rule <Rule> -action <action_name>
例
add contentInspection policy Inline_pol1 –rule true –action Inline_action
HTTP/SSL タイプのコンテンツスイッチングまたは負荷分散仮想サーバーを追加する
Web トラフィックを受信するには、負荷分散仮想サーバーを追加する必要があります。また、仮想サーバ上で layer2 接続を有効にする必要があります。
コマンドプロンプトで入力します:
add lb vserver <name> <vserver name> -l2Conn ON
例:
add lb vserver HTTP_vserver HTTP 10.102.29.200 8080 –l2Conn ON
コンテンツ検査ポリシーを HTTP/SSL タイプのコンテンツスイッチング仮想サーバーまたは負荷分散仮想サーバーにバインドする
負荷分散仮想サーバーまたはHTTP/SSLタイプのコンテンツスイッチング仮想サーバーをコンテンツ検査ポリシーにバインドします。 コマンドプロンプトで、次のように入力します:
bind lb vserver <vserver name> -policyName < policy_name > -priority < priority > -type <REQUEST>
例:
bind lb vserver HTTP_vserver -policyName Inline_pol1 -priority 100 -type REQUEST
シナリオ 2: 専用インターフェイスを使用した複数のインラインデバイスの負荷分散
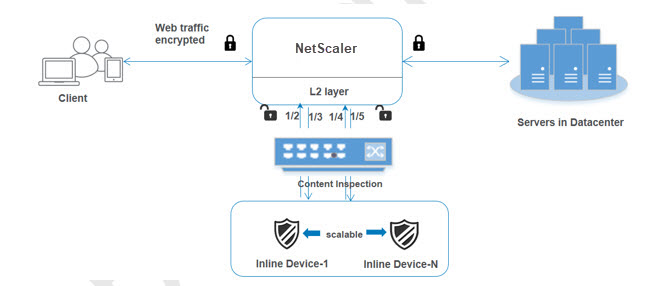
2 つ以上のインラインデバイスを使用している場合は、専用の VLAN 設定で異なるコンテンツ検査サービスを使用してデバイスのロードバランシングを行う必要があります。この場合、NetScalerアプライアンスは、専用のインターフェイスを介して各デバイスにトラフィックのサブセットを送信することに加えて、デバイスの負荷分散を行います。 基本的な設定手順については、シナリオ 1 を参照してください。
service1 のコンテンツ検査プロファイル 1 を追加
NetScalerアプライアンスのインライン構成は、コンテンツ検査プロファイルと呼ばれるエンティティで指定できます。プロファイルにはデバイス設定のコレクションがあります。コンテンツ検査プロファイル 1 はインラインサービス 1 用に作成され、通信は 1/2 および 1/3 専用インターフェイスを介して行われます。
コマンドプロンプトで入力します:
add contentInspection profile <name> -type InlineInspection -egressInterface <interface_name> -ingressInterface <interface_name>[-egressVlan <positive_integer>] [-ingressVlan <positive_integer>]
例:
add contentInspection profile Inline_profile1 -type InlineInspection -ingressinterface “1/2” -egressInterface “1/3”
service2 のコンテンツ検査プロファイル 2 を追加
コンテンツ検査プロファイル 2 が service2 に追加され、インラインデバイスは専用インターフェイスを介してアプライアンスと通信します。
1/4``1/5 コマンドプロンプトで入力します:
add contentInspection profile <name> -type InlineInspection -egressInterface <interface_name> -ingressInterface <interface_name>[-egressVlan <positive_integer>] [-ingressVlan <positive_integer>]
例:
add contentInspection profile Inline_profile2 -type InlineInspection -ingressinterface “1/4” -egressInterface “1/5”
インラインデバイス 1 にサービス 1 を追加
コンテンツ検査機能を有効にしてインラインプロファイルを追加したら、インラインデバイス 1 のインラインサービス 1 を負荷分散設定の一部として追加する必要があります。追加したサービスによって、インライン構成の詳細がすべて提供されます。
コマンドプロンプトで入力します:
add service <Service_name_1> <Pvt_IP1> TCP * -contentInspectionProfileName <Inline_Profile_1> -healthmonitor OFF –usip ON –useproxyport OFF
例:
add service Inline_service1 10.102.29.200 TCP 80 -contentInspectionProfileName Inline_profile1 -healthmonitor OFF -usip ON -useproxyport OFF
インラインデバイス 2 にサービス 2 を追加
コンテンツ検査機能を有効にしてインラインプロファイルを追加したら、インラインデバイス 2 にインラインサービス 2 を追加する必要があります。追加したサービスによって、インライン構成の詳細がすべて提供されます。
コマンドプロンプトで入力します:
add service <Service_name_1> <Pvt_IP1> TCP * -contentInspectionProfileName <Inline_Profile_2> -healthmonitor OFF –usip ON –useproxyport OFF
例:
add service Inline_service1 10.29.20.205 TCP 80 -contentInspectionProfileName Inline_profile2 -healthmonitor OFF -usip ON -useproxyport OFF
負荷分散仮想サーバの追加
インラインプロファイルとサービスを追加したら、サービスの負荷分散用の負荷分散仮想サーバを追加する必要があります。
コマンドプロンプトで入力します:
add lb vserver <vserver_name> TCP <Pvt_IP3> <port>
例:
add lb vserver lb-Inline_vserver TCP *
サービス 1 を負荷分散仮想サーバーにバインドします
負荷分散仮想サーバーを追加したら、負荷分散仮想サーバーを最初のサービスにバインドします。
コマンドプロンプトで入力します:
bind lb vserver <Vserver_name> <Service_name_1>
例:
bind lb vserver lb-Inline_vserver Inline_service1
サービス 2 を負荷分散仮想サーバーにバインドします
負荷分散仮想サーバーを追加したら、そのサーバーを 2 番目のサービスにバインドします。
コマンドプロンプトで入力します:
bind lb vserver <Vserver_name> <Service_name_1>
例:
bind lb vserver lb-Inline_vserver Inline_service2
サービスのコンテンツ検査アクションを追加
コンテンツ検査機能を有効にしたら、インラインリクエスト情報を処理するための「コンテンツ検査」アクションを追加する必要があります。選択したアクションに基づいて、インラインデバイスは特定のトラフィックのサブセットを検査した後、ドロップ、リセット、またはブロックします。
コマンドプロンプトで入力します:
add contentInspection action <name> -type <type> (-serverName <string> [-ifserverdown <ifserverdown>] [-reqTimeout <positive_integer>] [-reqTimeoutAction <reqTimeoutAction>]
add ContentInspection action < action_name > -type InlineINSPECTION -serverName Service_name/Vserver_name>
例:
add ContentInspection action Inline_action -type InlineINSPECTION –serverName lb-Inline_vserver
検査用のコンテンツ検査ポリシーを追加する
コンテンツ検査アクションを作成したら、サービス要求を評価するためのコンテンツ検査ポリシーを追加する必要があります。このポリシーは、1 つ以上の式で構成されるルールに基づいています。ルールは、リクエストがルールに一致する場合に関連するコンテンツ検査アクションに関連付けられます。
コマンドプロンプトで、次のように入力します:
add contentInspection policy <policy_name> –rule <Rule> -action <action_name>
例:
add contentInspection policy Inline_pol1 –rule true –action Inline_action
HTTP/SSL タイプのコンテンツスイッチングまたは負荷分散仮想サーバーを追加する
Web トラフィックを受け入れるために、コンテンツスイッチングまたは負荷分散仮想サーバーを追加します。また、仮想サーバ上で layer2 接続を有効にする必要があります。 ロードバランシングの詳細については、「 負荷分散の仕組み 」トピックを参照してください。
コマンドプロンプトで入力します:
add lb vserver <name> <vserver name> -l2Conn ON
例:
add lb vserver http_vserver HTTP 10.102.29.200 8080 –l2Conn ON
コンテンツ検査ポリシーを HTTP/SSL タイプの負荷分散仮想サーバーにバインドする
HTTP/SSL タイプのコンテンツスイッチング仮想サーバーまたは負荷分散仮想サーバーをコンテンツ検査ポリシーにバインドする必要があります。
コマンドプロンプトで、次のように入力します:
bind lb vserver <vserver name> -policyName < policy_name > -priority <> -type <L7InlineREQUEST | L4Inline-REQUEST>
例:
bind lb vserver http_vserver -policyName Inline_pol1 -priority 100 -type REQUEST
シナリオ 3: 共有インターフェイスを使用した複数のインラインデバイスの負荷分散
複数のインラインデバイスを使用していて、共有 VLAN インターフェイスで異なるサービスを使用するデバイスのロードバランシングを行う場合は、この設定を参照できます。共有 VLAN インターフェイスを使用するこの設定は、ユースケース 2 と似ています。基本的な設定については、シナリオ 2 を参照してください。
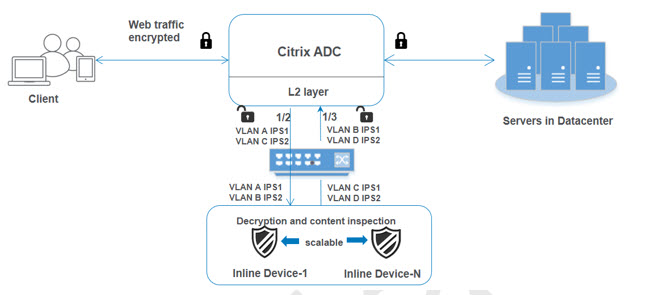
共有オプションを有効にして VLAN A をバインドする
コマンドプロンプトで、次のように入力します:
bind vlan <id> -ifnum <interface> -tagged
例:
bind vlan 100 –ifnum 1/2 tagged
共有オプションを有効にして VLAN B をバインド
コマンドプロンプトで、次のように入力します:
bind vlan <id> -ifnum <interface> -tagged
例:
bind vlan 200 –ifnum 1/3 tagged
共有オプションが有効な状態で VLAN C をバインド
コマンドプロンプトで、次のように入力します:
bind vlan <id> -ifnum <interface> -tagged
例:
bind vlan 300 –ifnum 1/2 tagged
共有オプションを有効にして VLAN D をバインド
コマンドプロンプトで、次のように入力します:
bind vlan <id> -ifnum <interface> -tagged
例:
bind vlan 400 –ifnum 1/3 tagged
service1 のコンテンツ検査プロファイル 1 を追加
NetScalerアプライアンスのインライン構成は、コンテンツ検査プロファイルと呼ばれるエンティティで指定できます。プロファイルにはデバイス設定のコレクションがあります。コンテンツ検査プロファイルはインラインサービス 1 用に作成され、通信は 1/2 と 1/3 の専用インターフェイスを介して行われます。
コマンドプロンプトで入力します:
add contentInspection profile <name> -type InlineInspection -egressInterface <interface_name> -ingressInterface <interface_name>[-egressVlan <positive_integer>] [-ingressVlan <positive_integer>]
例:
add contentInspection profile Inline_profile1 -type InlineInspection -ingressinterface “1/2” -egressInterface “1/3” –egressVlan 100 -ingressVlan 300
service2 のコンテンツ検査プロファイル 2 を追加
コンテンツ検査プロファイル 2 が service2 に追加され、インラインデバイスは専用インターフェイスを介してアプライアンスと通信します。
1/2``1/3
コマンドプロンプトで入力します:
add contentInspection profile <name> -type InlineInspection -egressInterface <interface_name> -ingressInterface <interface_name>[-egressVlan <positive_integer>] [-ingressVlan <positive_integer>]
例:
add contentInspection profile Inline_profile2 -type InlineInspection -ingressinterface “1/2” -egressInterface “1/3” –egressVlan 200 -ingressVlan 400
NetScaler GUIを使用してインラインサービス統合を構成する
-
NetScalerアプライアンスにログオンし、「 構成 」タブページに移動します。
-
「 モードの設定 」ページで、「 Mac ベースの転送」を選択します。
-
「 **OK」をクリックして「**閉じる」をクリックします。
-
「 拡張機能の設定 」ページで、「 コンテンツ検査」を選択します。
-
「 **OK」をクリックして「**閉じる」をクリックします。
-
「コンテンツ検査プロファイル」ページで、「追加」をクリックします。
-
「 コンテンツ検査プロファイルの作成 」ページで、次のパラメータを設定します。
-
プロファイル名。コンテンツ検査プロファイルの名前。
-
タイプ。プロファイルタイプをインライン検査として選択します。
-
出力インターフェイス。アプライアンスがNetScalerからインラインデバイスにトラフィックを送信するインターフェイス。
-
入力インターフェース。アプライアンスがインラインデバイスからNetScalerへのトラフィックを受信するインターフェイス。
-
出力VLAN。トラフィックがインラインデバイスに送信されるインターフェイス VLAN ID。
-
入力側の VLAN。アプライアンスがインラインからNetScalerへのトラフィックを受信するインターフェイスVLAN ID(構成されている場合)。
-
-
トラフィック管理 > 負荷分散 > サービスに移動し 、 追加をクリックします。
-
「 サービス 」ページで、次のパラメータを設定します。
-
サービス名。負荷分散サービスの名前。
-
IP アドレス。ダミー IP アドレスを使用してください。注:どのデバイスも IP アドレスを所有している必要はありません。
-
プロトコル。プロトコルタイプを TCP として選択します。
-
ポート。* を入力してください
-
ヘルスモニタリング。サービスを TCP タイプのモニターにバインドする場合にのみ、このオプションをオフにして有効にしてください。モニターをサービスにバインドする場合は、モニターの
TRANSPARENTオプションをオンにする必要があります。モニタの追加方法とサービスにバインドする方法については、手順 14 を参照してください。 -
[OK] をクリックします。
-
-
「 設定 」セクションで以下を編集し、「 **OK」**をクリックします。
-
プロキシポートを使用:オフにする
-
送信元 IP アドレスを使用:有効にする
-
-
「 プロファイル 」セクションに移動し、インラインコンテンツ検査プロファイルを追加して「 **OK」**をクリックします。
-
-
名前:モニターの名前
-
タイプ:TCP タイプを選択
-
送信先IP、ポート:送信先IPアドレスとポート。
-
透明:オンにする
注:インラインデバイスのステータスを監視するには、監視パケットがインラインデバイスを経由する必要があります。 -
-
**[作成]**をクリックします。
-
[完了] をクリックします。
-
サーバーの詳細を入力したら、「 OK」 をクリックし、もう一度「 **OK」**をクリックします。
-
負荷分散仮想サーバーのトラフィック設定セクションで 、レイヤー2パラメーターをオンにします。
-
「 ポリシー 」セクションに移動し、「+」アイコンをクリックしてコンテンツ検査ポリシーを設定します。
-
「ポリシーの選択」 ページで、「コンテンツ検査」を選択します。[続行] をクリックします。
-
「 ポリシーバインディング 」セクションで、「 追加 」をクリックしてコンテンツ検査ポリシーを追加します。
-
コンテンツ検査ポリシーの作成ページで 、インラインコンテンツ検査ポリシーの名前を入力します。
-
「 アクション 」フィールドで、「 追加 」をクリックしてインラインコンテンツ検査アクションを作成します。
-
「 CI アクションの作成 」ページで、次のパラメータを設定します。
-
Name:コンテンツ検査インラインポリシーの名前。
-
タイプ。タイプをインライン検査として選択します。
-
サーバー。サーバー/サービスをインラインデバイスとして選択します。
-
サーバーがダウンした場合。サーバがダウンした場合のオペレーションを選択します。
-
リクエストのタイムアウト。タイムアウト値を選択します。デフォルト値を使用できます。
-
タイムアウトアクションの要求。タイムアウトアクションを選択します。デフォルト値を使用できます。
-
-
**[作成]**をクリックします。
-
「 CI ポリシーの作成 」ページで、その他の詳細を入力します。
-
「 **OK」をクリックして「**閉じる」をクリックします。