
Converting a NetScaler MPX 24100 and 24150 appliance to a NetScaler SDX 24100 and 24150 appliance
You can convert a NetScaler MPX appliance to a NetScaler SDX appliance by upgrading the software through a new Solid State Drive (SSD). NetScaler supplies a field conversion kit to migrate a NetScaler MPX appliance to a NetScaler SDX appliance.
The conversion requires minimum of four SSDs.
Note
Citrix recommends that you configure the lights out management (LOM) Port of the NetScaler appliance before starting the conversion process. For more information on the LOM port of the NetScaler appliance, see Lights out Management Port of the NetScaler appliance.
To convert a NetScaler MPX appliance to a NetScaler SDX appliance, you must access the appliance through a console cable attached to a computer or terminal. Before connecting the console cable, configure the computer or terminal to support the following configuration:
-
VT100 terminal emulation
-
9600 baud
-
8 data bits
-
1 stop bit
-
Parity and flow control set to NONE
Connect one end of the console cable to the RS232 serial port on the appliance, and the other end to the computer or terminal.
Note
To use a cable with an RJ-45 converter, insert the optional converter into the console port and attach the cable to it.
Citrix® recommends you to connect a VGA monitor to the appliance to monitor the conversion process, because the LOM connection is lost during the conversion process.
With the cable attached, verify that the MPX appliance’s components are functioning correctly. You are then ready to begin the conversion. The conversion process modifies the BIOS, installs Citrix Hypervisor and a Management Service image, and copies the NetScaler VPX image to the Solid State Drive.
The conversion process also sets up a Redundant Array of Independent Disks (RAID) controller for local storage (SSD slot # 1 and SSD slot # 2) and NetScaler VPX storage (SSD slot # 3 and SSD slot # 4).
After the conversion process, modify the appliance’s configuration and apply a new license. You can then provision the VPX instances through the Management Service on what is now a NetScaler SDX appliance.
To verify proper operation of the MPX appliance's components
-
Access the console port and enter the administrator credentials.
-
Run the following command from the command line interface of the appliance to display the serial number:
show hardwareThe serial number might be helpful if you want to contact Citrix technical support. -
Run the following command to display the status of the active 10G interfaces: show interface
-
In the show interface command's output, verify that all the interfaces are enabled and the status of every interface is shown as UP/UP.NoteIf you do not have an SFP+ transceiver for every port, verify the interfaces in stages. After checking the first set of interfaces, unplug the SFP+ transceivers and plug them in to the next set of ports.
-
Run the following command for each of the interfaces that are not in the UP/UP state:
To upgrade the appliance
-
Power off the NetScaler appliance.
-
Locate two solid-state drives (SSDs) on the back of the appliance in slot #1 and slot #2, as shown in the following figure:
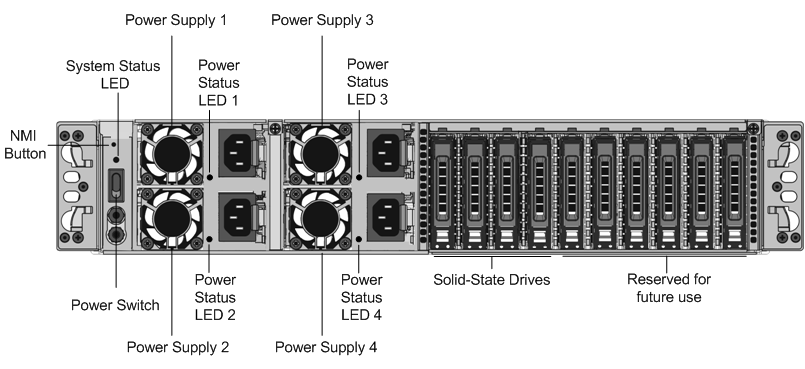
-
Verify that the replacement solid-state drives (SSDs) are the ones required for your NetScaler model. The conversion requires minimum of four SSDs. The NetScaler label is on the top of one of the solid-state drives, which is pre-populated with a new version of BIOS and a recent build of the required NetScaler SDX Management Service. This SSD must be installed in slot # 1.
-
Remove the SSDs by pushing the safety latch of the drive cover down while pulling the drive handle.
-
On the new NetScaler® certified SSD drive, open the drive handle completely to the left, and then insert the new drive into the slot #1 as far as possible.
-
To seat the drive, close the handle flush with the rear side of the appliance so that the drive locks securely into the slot.ImportantThe orientation of the SSD is important. When you insert the drive, make sure that the NetScaler product label is at the top.
-
Insert a second NetScaler certified SSD, which matches the capacity of the SSD in slot #1, in slot # 2. Insert more blank NetScaler certified SSDs in slots #3 and #4.ImportantMixing and matching of old and new SSDs is not supported. SSDs in slot #1 and slot # 2, which constitute the first RAID pair (local storage), must be of the same size and type. Similarly, SSDs in slot # 3 and slot #4, which constitute the second RAID pair (VPX storage), must be of the same size and type. Only use drives that are part of the provided conversion kit.
-
Disconnect all network cables from the data ports and the management ports.
-
Start the NetScaler appliance. For instructions, see “Switching on the Appliance” in Installing the Hardware. The conversion process can run for approximately 30 minutes, during which you must not power cycle the appliance. The entire conversion process might not be visible on the console and might appear to be unresponsive. The conversion process updates the BIOS, installs the Citrix Hypervisor and the Management Service. It also copies the NetScaler VPX image to the SSD for instance provisioning, and forms the Raid1 pair.NoteThe serial number of the appliance remains the same.
-
Keep the console cable attached during the conversion process. Allow the process to complete, at which point the netscaler-sdx login: prompt appears.
-
During the conversion process the LOM port connection might be lost as it resets the IP address to the default value of 192.168.1.3. The conversion status output is available on the VGA monitor.