Field replaceable units
NetScaler field replaceable units (FRUs) are components that can be removed from the appliance and replaced by the user or a technician at the user's site. The FRUs in a NetScaler SDX appliance can include DC or AC power supplies, solid-state drives (SSDs), and a direct-attach cable (DAC).
All NetScaler FRUs must be purchased from Citrix. Components not provided by NetScaler are not supported on NetScaler appliances. Contact your NetScaler sales representative to buy FRUs for your appliance.
Note
The figures in this section are illustrative. The actual product might vary depending on the model number.
This topic includes the following sections:
-
Power Supply
-
Solid-State Drive
-
Direct Attach Cable
Power supply
For appliances containing two power supplies, the second power supply acts as a backup. Some appliances can accommodate four power supplies, and require two power supplies for proper operation. The third and fourth power supplies act as backup. All power supplies must be of the same type (AC or DC).
The SDX appliance ships with a country-specific power cord and a plug.
For power-supply specifications, see the SDX hardware platforms topic, which describes the various platforms.
Note
If you suspect that a power-supply fan is not working, check the system health through the SDX GUI or lights out management. For more information, see System Health Monitoring and Lights out management port of the NetScaler SDX appliance.
On each power supply, a bicolor LED indicator shows the condition of the power supply. Green means that the appliance receives power. Red means that the power supply has detected an error. For more information about the LED power supply indicator, see "LCD Display and LED Status Indicators" in Common hardware components.
Electrical Safety Precautions for Power Supply Replacement
-
Ensure that the appliance has a direct physical connection to earth ground during normal use. When installing or repairing an appliance, always connect the ground circuit first and disconnect it last.
-
NetScaler SDX appliances do not contain user serviceable components, except as noted in the (FRU) section. Do not attempt to open the chassis.
-
Always unplug the power cord from the power source before removing the power supply.
-
Never touch a power supply when the power cord is plugged in. As long as the power cord is plugged in, line voltages are present in the power supply even if the power switch is turned off.
For the complete list of safety precautions, see Safety, cautions, warnings, and other information.
Replace an AC or a DC power supply
If the appliance has only one power supply, you have to shut down the appliance before replacing the power supply. If the appliance has two power supplies, you can replace one power supply without shutting down the appliance, provided the other power supply is working.
To install or replace an AC or a DC power supply on a NetScaler SDX appliance
-
Align the semicircular handle perpendicular to the power supply. Loosen the thumbscrew and press the lever toward the handle and pull out the existing power supply, as shown in the following figure.Figure 1. Remove an Existing AC Power Supply
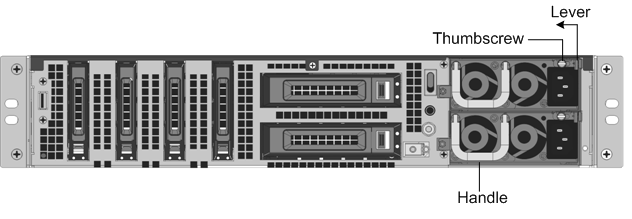 Figure 2. Remove an Existing DC Power Supply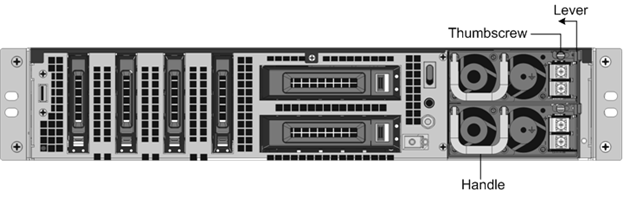
-
Carefully remove the new power supply from its box.
-
On the back of the appliance, align the power supply with the power supply slot.
-
Insert the power supply into the slot and press against the semicircular handle until you hear the power supply snap into place.Figure 3. Insert the Replacement AC Power Supply
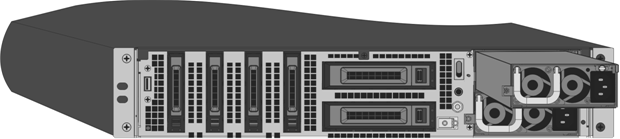 Figure 4. Insert the Replacement DC Power Supply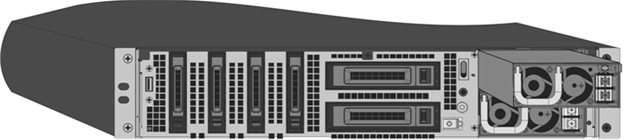
-
Connect the power supply to a power source. If connecting all power supplies, plug separate power cords into the power supplies and connect them to separate wall sockets.
Note
The NetScaler SDX appliance emits a high-pitched alert if the following conditions are met:
-
One power supply fails.
-
If you connect only one power cable to the appliance in which two power supplies are installed.
To silence the alarm, press the button labeled Alarm Disable on the back panel of the appliance. The Disable alarm button is functional only when the appliance has two power supplies.
Solid-State drives
In a NetScaler SDX appliance, the solid-state drives (SSD) store system bootup files and VDI of Management Service instances. Some support RAID and some do not.
SSDs with RAID support are hot swappable.
Note:
For more information about managing RAID allocation, see Managing RAID disk allocation on the SDX platform.
Direct attach cable
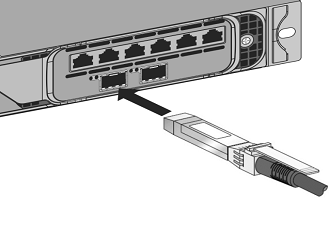
A direct attach cable (DAC) assembly is a high performance integrated duplex data link for bi-directional communication. The cable is compliant with the IPF MSA (SFF-8432) for mechanical form factor and SFP+ MSA for DACs. The cable, which can be up to 5 meters long, is data-rate agnostic. Supporting speeds more than 10 Gbps, it is a cost-effective alternative to optical links (SFP+ transceivers and fiber optic cables.) The transceiver with DAC is hot-swappable. You can insert and remove the transceiver with the attached cable without shutting down the appliance. The NetScaler appliance supports only the passive DAC.
Points to note:
-
DAC is supported only on 10G ports. Do not insert a DAC into a 1G port.
-
Do not attempt to unplug the integrated copper cable from the transceiver and insert a fiber cable into the transceiver.
Note
Autonegotiation is not supported on an interface to which a DAC is connected.
To replace a DAC
-
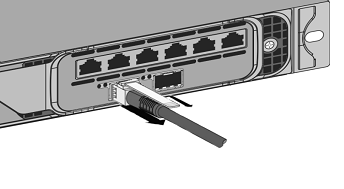
To remove the DAC, pull the tab on the top of the DAC, and then pull the DAC out of the port.Figure 9. Remove a DAC from the 10G port
-
To insert the DAC, slide it into the 10G port on the appliance. You hear a click when the DAC properly fits into the port.Figure 10. Insert a DAC into the 10G port