
Integrate NetScaler Gateway with StoreFront
This article describes how to create a NetScaler Gateway virtual server for remotely accessing StoreFront, for users who are using Citrix Workspace app or a web browser.
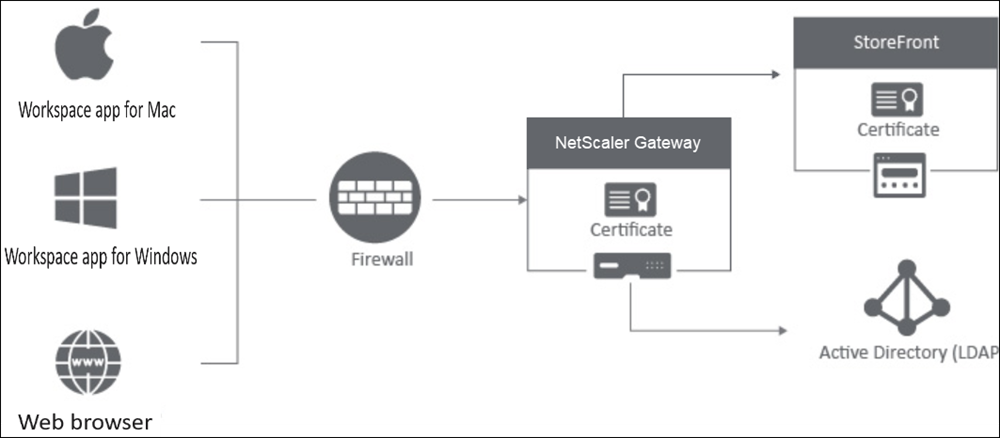
Users connect to NetScaler Gateway through a web browser or Citrix Workspace app. NetScaler Gateway authenticates users based on the configured policies. If the authentication is successful, then NetScaler Gateway enables the users to single sign-on to the store and proxies the StoreFront store to the user.
Important:
We recommend that you do not use the Citrix Virtual Apps and Desktops wizard to integrate NetScaler Gateway with StoreFront as it creates an invalid configuration by using the classic authentication policies (deprecated).
Configure NetScaler Gateway to use with StoreFront
To integrate NetScaler Gateway with StoreFront, complete the following steps:

1. Create a session policy for web browser-based access
-
Navigate to Configuration > NetScaler Gateway > Policies > Session.
-
In the Session Profiles tab, click Add.
-
Assign a name to the session profile.
-
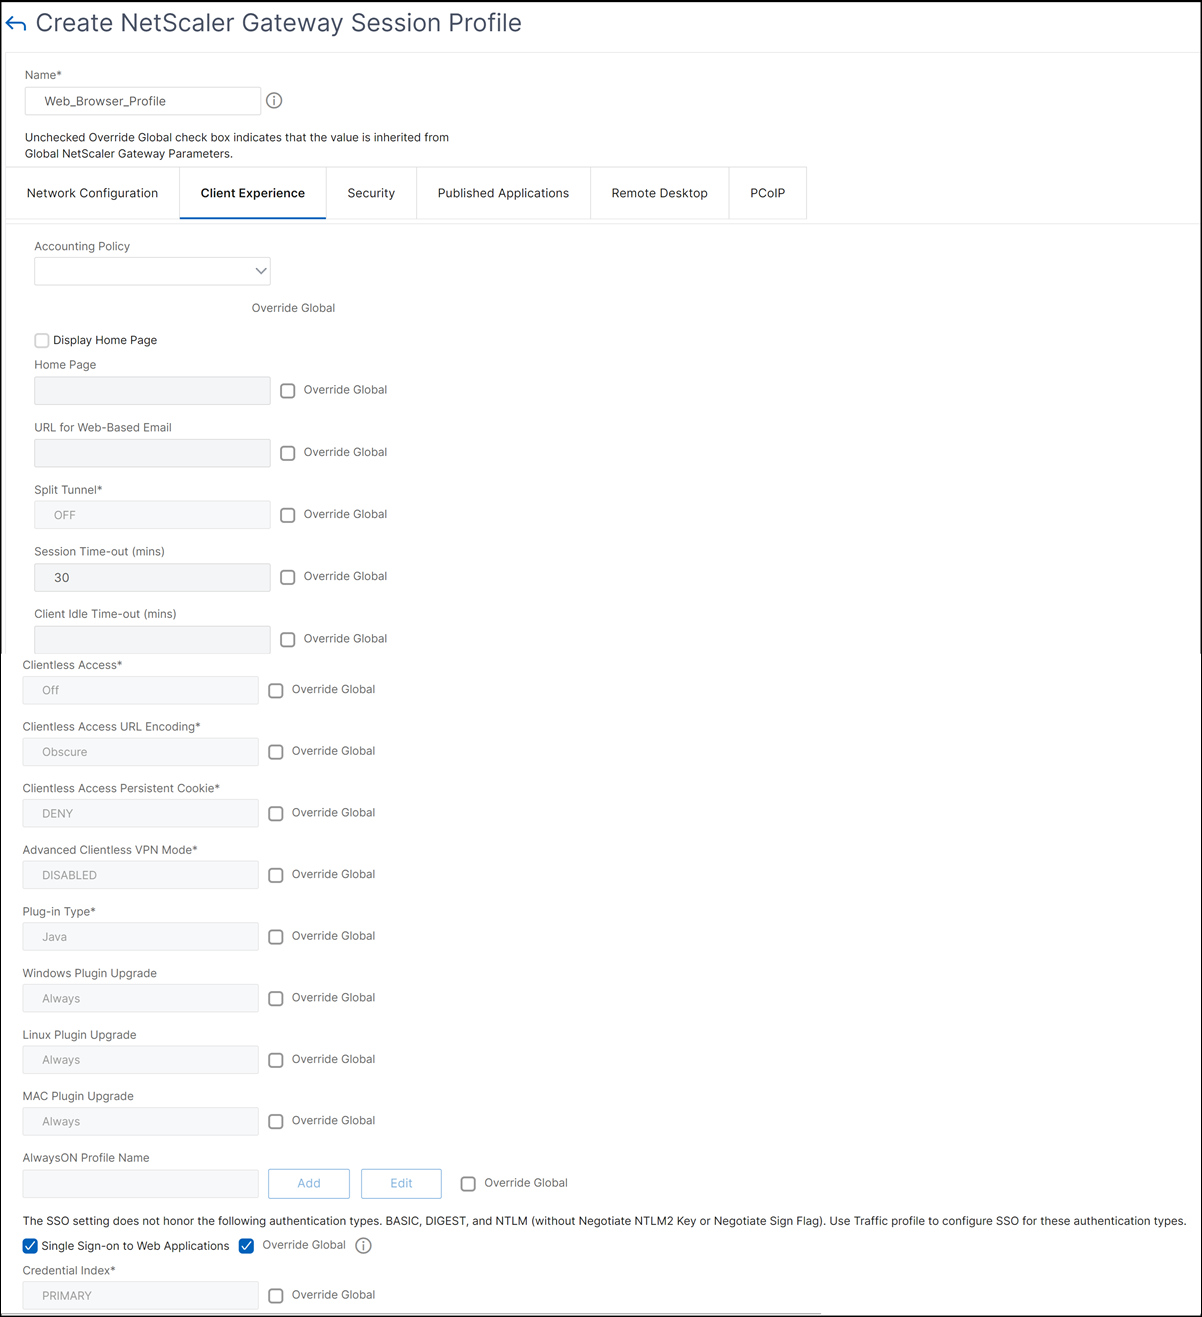
In the Client Experience tab, enable the following settings:
-
Session Time-out (mins): It is recommended that you select Override Global even if you intend to use the global session timeout settings. Failing to explicitly override this setting, even when using the default 30-minute timeout, can lead to authentication loops and force users to re-login.
-
Plug-in Type: The plug-in type is set to Java, by default. Although this setting is optional, it is recommended if users want to disable the full VPN.
-
Single Sign-on to Web Application: By selecting this option, when a user logs on to NetScaler Gateway, it forwards the credentials to the StoreFront website. This setting avoids users from having to enter their credentials twice. However, you must also enable the Pass-through from NetScaler Gateway authentication method on StoreFront. Disable this option if you require users to log on to NetScaler Gateway and the StoreFront store with different credentials.
-
-
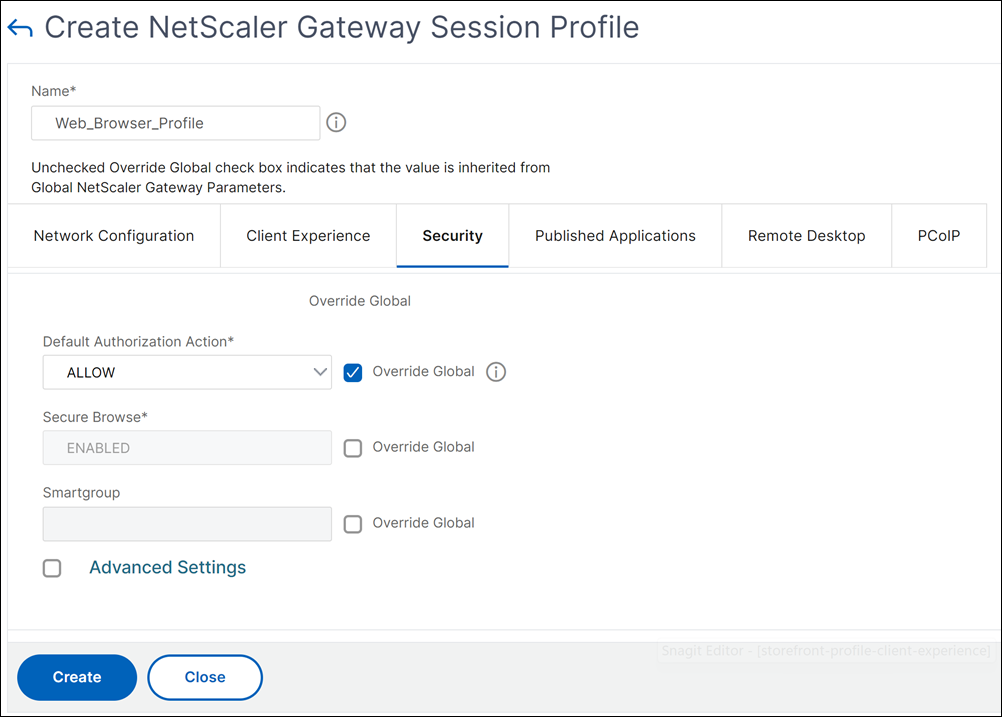
In the Security tab, enable Default Authorization Action and set it to ALLOW.
-
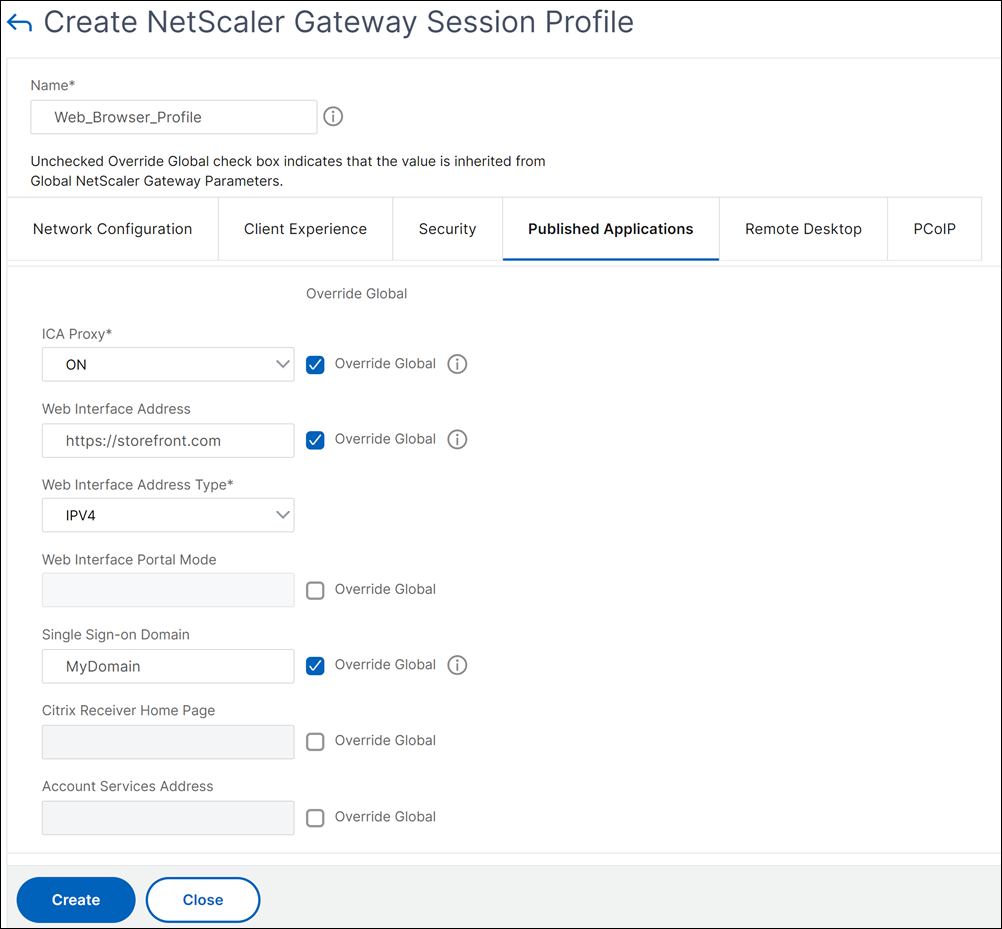
In the Published Applications tab, enable the following settings:
-
ICA® Proxy: Set to ON.
-
Web Interface Address: FQDN of the StoreFront™ server followed by the path to the store website.
-
Single Sign-on Domain: If you only use one domain, optionally enter the NetBIOS name for the domain.
-
-
Click Create.
-
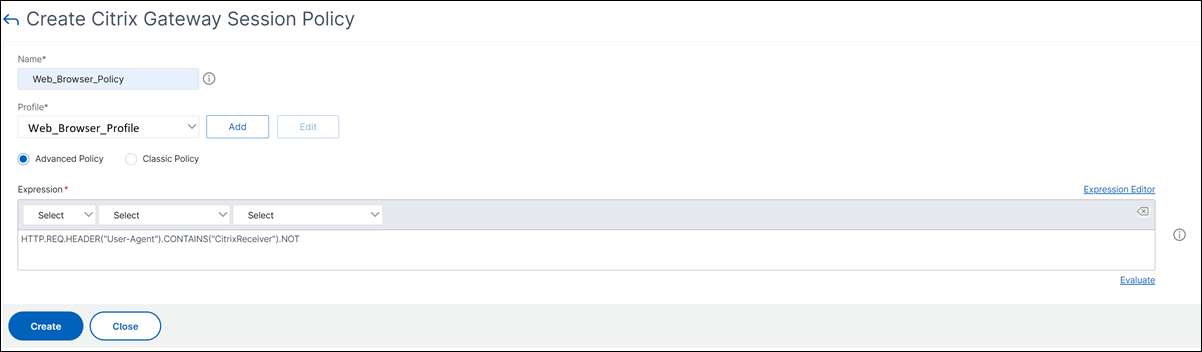
In the Session Policies tab, click Add. The session policy is required for NetScaler to differentiate between the web browser-based and Citrix Workspace app-based connections. This policy is applied to web browser-based connections.
-
In Name, assign a name to session policy.
-
In Profile, select the session profile that you created.
-
Click the Advanced Policy option and enter the following syntax under Expression:
HTTP.REQ.HEADER("User-Agent").CONTAINS("CitrixReceiver").NOT -
Click Create.
For more details about NetScaler Gateway session policies, see Session policies.
2. Create a session policy for Citrix Workspace™ app-based access
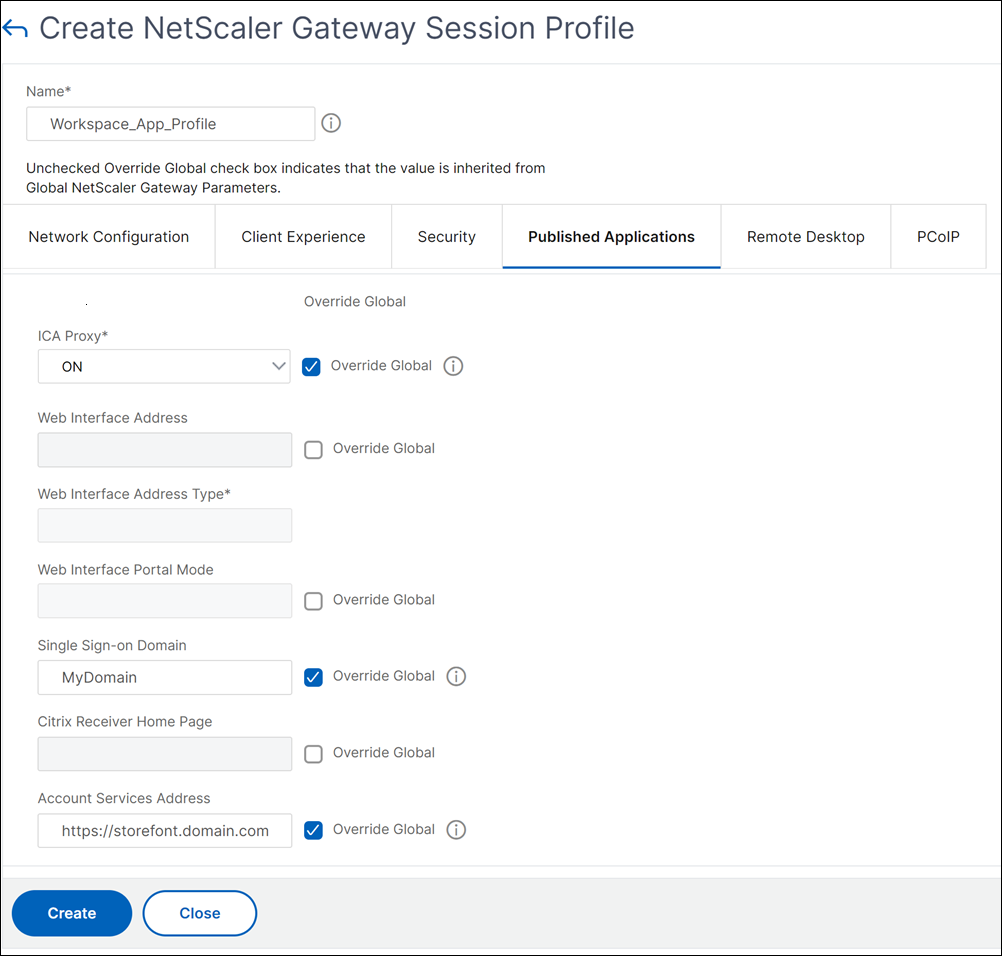
Repeat the preceding steps to create a session policy and session profile for Citrix Workspace app-based access. However, in the Published Applications tab, instead of configuring the web interface address, you must configure the Account service address setting. This step requires you to provide the FQDN of the StoreFront server. Citrix Workspace app uses this address to discover the stores that are available on the server.
3. Create an authentication profile
Create an authentication profile on NetScaler based on the type of authentication method that you need to configure.
Although this step is optional, we recommend it as a good practice to use NetScaler Gateway to authenticate identity of the users before granting access to StoreFront.
Refer to Authentication and Authorization for more details.
4. Create a NetScaler® Gateway virtual server
-
Navigate to NetScaler Gateway > Virtual Servers.
-
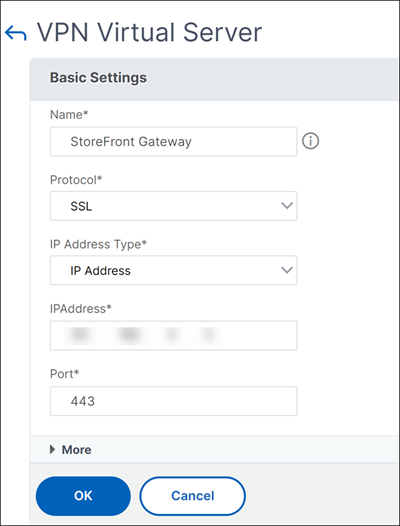
Click Add to add a NetScaler Gateway virtual server.
-
Assign a name and address to the virtual server.Note:If you choose not to use NetScaler Gateway to authenticate the users, click More and clear the Enable Authentication checkbox.
-
Under Certificate, click Server Certificate.
-
Upload a server certificate and click Bind.
-
Add the session policies:a. Under Policies, click +. b. From the Choose Policy drop-down list, select Session. From the Type drop-down list, select Request and then click Continue. c. Under Policy Binding, click Select Policy and select the web browser-based session policy and the Citrix Workspace app-based session policy that you previously created and click Bind to bind the session policies to the virtual server.
-
Under Published Applications, click STA Server. Specify at least one Security Ticket Authority (STA) URL. If you are using Citrix Virtual Apps and Desktops, enter the URLs of the Desktop Delivery Controllers. If you are using Citrix DaaS, enter the URLs of the Citrix Cloud Connectors.
-
Under Authentication Profile, select the authentication profile you created. This step is required because classic policies are no longer supported.
-
Click Done.
5. Add a NetScaler Gateway instance on StoreFront
For instructions on how to add a NetScaler Gateway instance on StoreFront, see Configure NetScaler Gateways.
References
For more details on StoreFront and NetScaler Gateway integration, refer to the following topics: