
Full VPN setup on NetScaler Gateway
This section describes how to configure full VPN setup on a NetScaler Gateway appliance. It contains networking considerations and the ideal approach for resolving issues from the networking perspective.
Prerequisites
-
Install an SSL certificate and bind it to the VPN virtual server.
-
NetScaler documentation - Binding the Certificate-Key Pair to the SSL-Based Virtual Server.
-
Create an authentication profile for NetScaler Gateway.
-
For additional information, refer to NetScaler documentation - Configuring External User Authentication.
-
For additional information, refer to Checklist - Use AD FS to implement and manage single sign-on.
-
-
Download VPN Client.
-
Create a session policy allowing full VPN connections.
When users connect with the Citrix Secure Access client, Secure Hub, or Citrix Workspace app, the client software establishes a secure tunnel over port 443 (or any configured port on NetScaler Gateway) and sends authentication information. Once the tunnel has been established, NetScaler Gateway sends configuration information to the Citrix Secure Access client, Citrix Secure Hub, or Citrix Workspace app describing the networks to be secured. That information also contains an IP address if you enable intranet IPs.
You configure user device connections by defining the resources users can access in the internal network. Configuring user device connections includes the following:
-
Split tunneling
-
IP addresses for users, including address pools (intranet IPs)
-
Connections through a proxy server
-
Defining the domains to which users are allowed access
-
Time-out settings
-
Single sign-on
-
User software that connects through NetScaler Gateway
-
Access for mobile devices
You configure most user device connections by using a profile that is part of a session policy. You can also define user device connection settings by using per-authentication, traffic, and authorization policies. They can also be configured using intranet applications.
Configure a full VPN setup on a NetScaler Gateway appliance
To configure a VPN setup on the NetScaler Gateway appliance, complete the following procedure:
-
Navigate to Traffic Management > DNS.
-
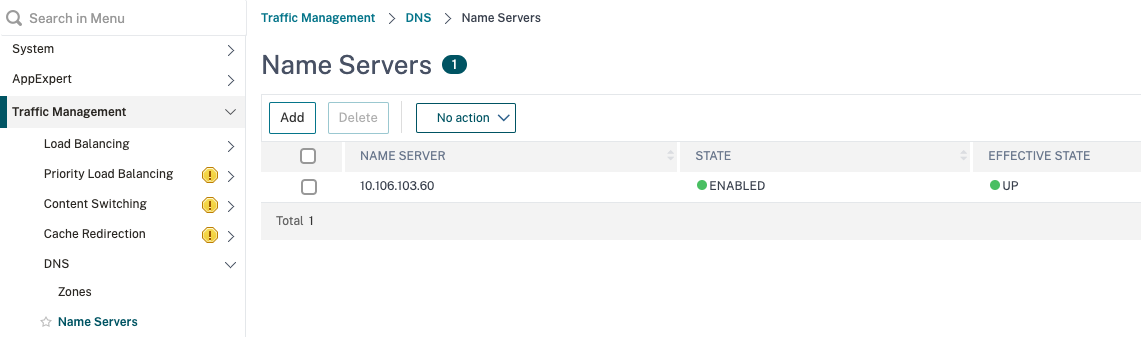
Select the Name Servers node, as shown in the following screenshot. Ensure that the DNS name server is listed. If it is not available, add a DNS Name Server.
-
Expand NetScaler Gateway > Policies.
-
Select the Session node.
-
In the NetScaler Gateway Session Policies and Profiles page, click the Profiles tab click Add. For each component you configure in the Configure NetScaler Gateway Session Profile dialog box, ensure that you select the Override Global option for the respective component.
-
Click the Client Experience tab.
-
Type the intranet portal URL in the Home Page field if you would like to present any URL when the user logs into the VPN. If the home page parameter is set to "nohomepage.html," the home page is not displayed. When the plug-in starts, a browser instance starts and gets killed automatically.
-
Ensure to select the desired setting from the Split Tunnel list.
-
Select OFF from the Clientless Access list if you want FullVPN.
-
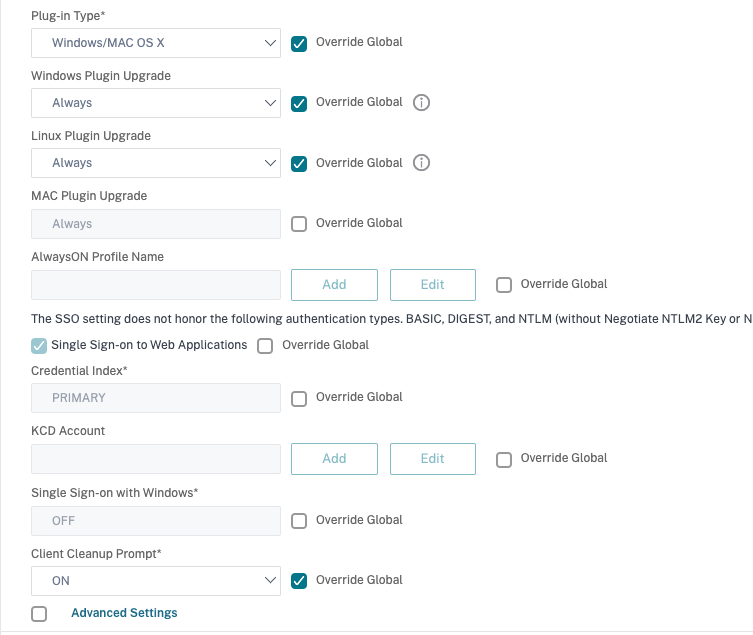
Ensure that Windows/Mac OS X is selected from the plug-in Type list.
-
Select the Single Sign-on to Web Applications option if desired.
-
Ensure that the Client Cleanup Prompt option is selected if necessary, as shown in the following screenshot:
-
Click the Security tab.
-
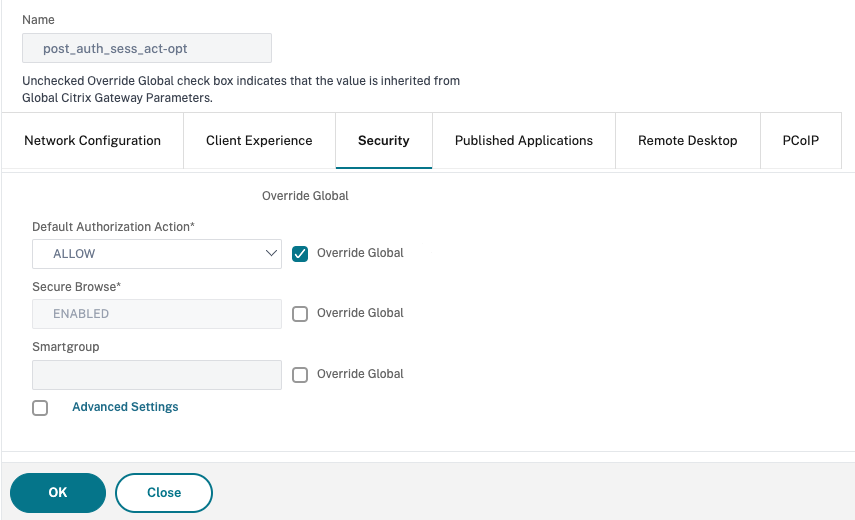
Ensure that ALLOW is selected from the Default Authorization Action list.
-
Click the Published Applications tab.
-
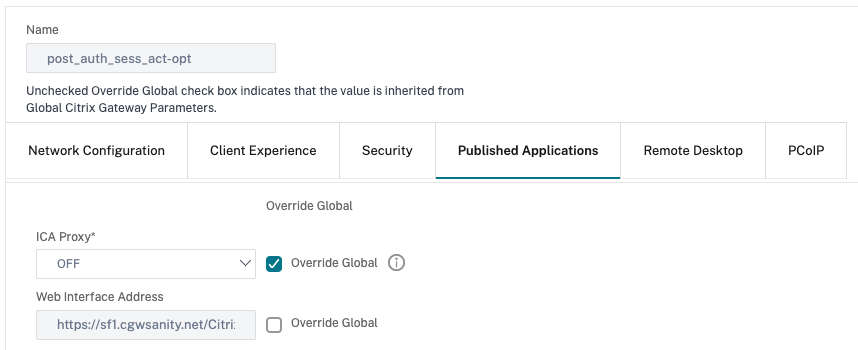
Ensure that OFF is selected from the ICA® Proxy list under the Published Applications option.
-
Click Create.
-
Click Close.
-
Click the Policies tab of the NetScaler Gateway Session Policies and Profiles page in the virtual server or activate the Session Policies at the GROUP/USER Level as required.
-
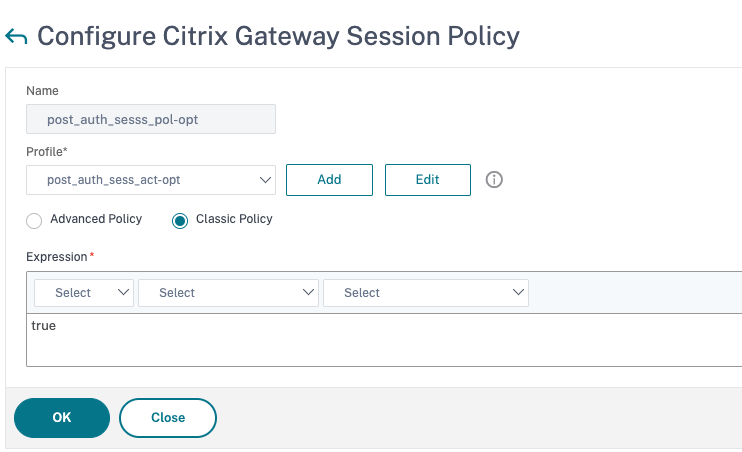
Create a session policy with a required expression or true, as shown in the following screenshot:
-
Bind the Session policy to the VPN virtual server. For details, see Bind session policies.If Split Tunnel was configured to ON, you must configure the Intranet Applications you would like the users to access when connected to the VPN. For details on Intranet Applications, see Configure intranet applications for the Citrix Secure Access client.
-
Go to NetScaler Gateway > Resources > Intranet Applications.
-
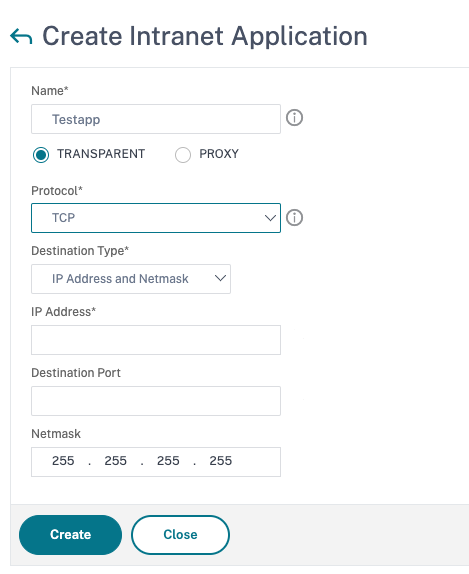
Create an Intranet Application. Select Transparent for FullVPN with Windows client. Select the protocol that you would like to allow (TCP, UDP, or ANY), destination type (IP address and mask, IP address range, or host name).
-
If necessary, set a new policy for VPN on iOS and Android using the following expression:
HTTP.REQ.HEADER("User-Agent").CONTAINS("CitrixVPN")&&HTTP.REQ.HEADER("User-Agent").CONTAINS("NSGiOSplugin")&&HTTP.REQ.HEADER("User-Agent").CONTAINS("Android") -
Bind the Intranet Applications created at the USER/GROUP/VSERVER level as required.
-
Note:
Web applications published on port 80 (HTTP) are automatically blocked even when an access policy explicitly permits them. To resolve this issue, run the following command in the NetScaler Gateway shell:
nsapimgr -y -s vpn_http_port80=0
For persistency across reboots, add this command to
/nsconfig/rc.netscaler.
Configure split tunneling
-
Navigate to Configuration > NetScaler Gateway > Policies > Session.
-
In the details pane, on the Profiles tab, select a profile and then click Edit.
-
On the Client Experience tab, next to Split Tunnel, select Global Override, select an option, and then click OK.Configuring Split Tunneling and AuthorizationWhen planning your NetScaler Gateway deployment, it is important to consider split tunneling and the default authorization action and authorization policies.For example, you have an authorization policy that allows access to a network resource. You have split tunneling set to ON and you do not configure intranet applications to send network traffic through NetScaler Gateway. When NetScaler Gateway has this type of configuration, access to the resource is allowed, but users cannot access the resource.
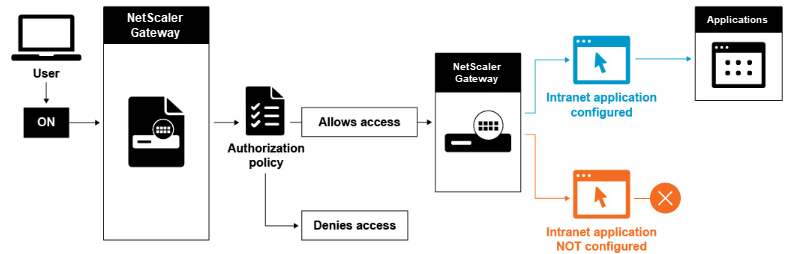
If the authorization policy denies access to a network resource, the Citrix Secure Access client sends traffic to NetScaler Gateway, but access to the resource is denied in the following conditions.
-
You have split tunneling set to ON.
-
Intranet applications are configured to route network traffic through NetScaler Gateway
For more information about authorization policies, review the following:
To configure network access to internal network resources
-
Navigate to Configuration > NetScaler Gateway > Resources > Intranet Applications.
-
In the details pane, click Add.
-
Complete the parameters for allowing network access, click Create, and then click Close.
When we do not set up the intranet IPs for the VPN users, the user sends the traffic to the NetScaler Gateway VIP and then from there the NetScaler appliance builds a new packet to the intranet application resource on the internal LAN. This new packet is going to be sourced from the SNIP toward the intranet application. From here, the intranet application gets the packet, processes it and then attempts to reply to the source of that packet (the SNIP in this case). The SNIP gets the packet and sends the reply to the client who made the request.
When an Intranet IP address is used, the user sends the traffic to the NetScaler Gateway VIP and then from there the NetScaler appliance is going to map the client IP into one of the configured INTRANET IPs from the Pool. Be advised that the NetScaler appliance is going to own the Intranet IP pool and for this reason these ranges must not be used in the internal network. The NetScaler appliance assigns an Intranet IP for the incoming VPN connections like a DHCP server would do. The NetScaler appliance builds a new packet to the intranet application on the LAN that the user would access. This new packet is going to be sourced from one of the Intranet IPs toward the intranet application. From here, intranet applications get the packet, process it and then attempt to reply to the source of that packet (the INTRANET IP). In this case the reply packet needs to be routed back to the NetScaler appliance, where the INTRANET IPs are located (Remember, the NetScaler appliance owns the Intranet IPs subnets). To accomplish this task, the network administrator must have a route to the INTRANET IP, pointing to one of the SNIPs. It is recommended to point the traffic back to the SNIP that holds the route from which the packet leaves the NetScaler appliance the first time to avoid any asymmetric traffic.
Split tunneling options
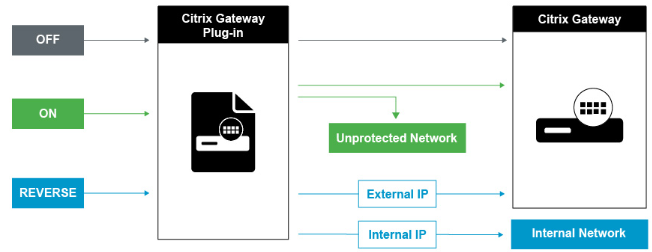
The following are the various split tunneling options.
Split tunnel OFF
When the split tunnel is set to off, the Citrix Secure Access client captures all network traffic originating from a user device and sends the traffic through the VPN tunnel to NetScaler Gateway. In other words, the VPN client establishes a default route from the client PC pointing to the NetScaler Gateway VIP, meaning that all the traffic needs to be sent through the tunnel to get to the destination. Since all the traffic is going to be sent through the tunnel, authorization policies must determine whether the traffic is allowed to pass through to internal network resources or be denied.
While set to “off,” all traffic is going through the tunnel including Standard Web traffic to websites. If the goal is to monitor and control this web traffic then you must forward these requests to an external Proxy using the NetScaler appliance. User devices can connect through a proxy server for access to internal networks as well.NetScaler Gateway supports the HTTP, SSL, FTP, and SOCKS protocols. To enable proxy support for user connections, you must specify these settings on NetScaler Gateway. You can specify the IP address and port used by the proxy server on NetScaler Gateway. The proxy server is used as a forward proxy for all further connections to the internal network.
For more information review the following links:
Split tunnel ON
You can enable split tunneling to prevent the Citrix Secure Access client from sending unnecessary network traffic to NetScaler Gateway. If the split tunnel is enabled, the Citrix Secure Access client sends only traffic destined for networks protected (intranet applications) by NetScaler Gateway through the VPN tunnel. The Citrix Secure Access client does not send network traffic destined for unprotected networks to NetScaler Gateway. When the Citrix Secure Access client starts, it obtains the list of intranet applications from NetScaler Gateway and establishes a route for each subnet defined on the intranet application tab in the client PC. The Citrix Secure Access client examines all packets transmitted from the user device and compares the addresses within the packets to the list of intranet applications (routing table created when the VPN connection was started). If the destination address in the packet is within one of the intranet applications, the Citrix Secure Access client sends the packet through the VPN tunnel to NetScaler Gateway. If the destination address is not in a defined intranet application, the packet is not encrypted and the user device then routes the packet appropriately using the default routing originally defined on the client PC. "When you enable split tunneling, intranet applications define the network traffic that is intercepted and send through the tunnel".
Reverse split tunnel
NetScaler Gateway also supports reverse split tunneling, which defines the network traffic that NetScaler Gateway does not intercept. If you set split tunneling to reverse, intranet applications define the network traffic that NetScaler Gateway does not intercept. When you enable reverse split tunneling, all network traffic directed to internal IP addresses bypasses the VPN tunnel, while other traffic goes through NetScaler Gateway. Reverse split tunneling can be used to log all non-local LAN traffic. For example, if users have a home wireless network and are logged on with the Citrix Secure Access client, NetScaler Gateway does not intercept network traffic destined to a printer or another device within the wireless network.
Note:
Citrix Secure Access client for Windows, macOS, iOS, and Android supports FQDN-based reverse split tunneling. For Windows clients, starting from Citrix Secure Access 22.6.1.5, this feature works only if the WFP driver is enabled.
Points to note
IP-based reverse split-tunneling:
-
Number of IP address-based rules is limited to 1024.
-
Supported with both DNE and WFP drivers.
Host name-based reverse split-tunneling:
-
The number of host names that can be accessed during a VPN session is restricted by the number of usable IP addresses specified in the FQDN spoofing range. This is because every host name takes up one IP address from the FQDN spoofing range. Once the IP range is exhausted, the least recently assigned IP address is reused for the next new host name.
-
DNS suffixes must be configured.Note:For Windows clients, host name-based reverse split-tunneling is supported only with the WFP driver. Enable the WFP driver mode by setting "EnableWFP" registry value to
1. For more information, see Windows Citrix Secure Access client using Windows Filtering Platform.
IP-based and host name-based reverse split-tunneling:
-
Supported only with the WFP driver. All the other guidelines mentioned in IP-based reverse split-tunneling and host name-based reverse split-tunneling are applicable.
Configure name service resolution
During installation of NetScaler Gateway, you can use the NetScaler Gateway wizard to configure other settings, including name service providers. The name service providers translate the fully qualified domain name (FQDN) to an IP address. In the NetScaler Gateway wizard, you can also perform the following:
-
Configure a DNS or WINS server
-
Set the priority of the DNS lookup
-
Set the number of times to retry the connection to the server.
When you run the NetScaler Gateway wizard, you can add a DNS server then. You can add another DNS servers and a WINS server to NetScaler Gateway by using a session profile. You can then direct users and groups to connect to a name resolution server that is different from the one you originally used the wizard to configure.
Before configuring another DNS server on NetScaler Gateway, create a virtual server that acts as a DNS server for name resolution.
To add a DNS or WINS server within a session profile
-
In the configuration utility, configuration tab > NetScaler Gateway > Policies > Session.
-
In the details pane, on the Profiles tab, select a profile and then click Open.
-
On the Network Configuration tab, do one of the following:
-
To configure a DNS server, next to DNS Virtual Server, click Override Global, select the server, and then click OK.
-
To configure a WINS server, next to WINS Server IP, click Override Global, type the IP address and then click OK.
-