
Convert a certificate from the PFX format to the PEM format
SSL certificates are used for SSL load balancing virtual servers and NetScaler Gateway virtual servers. The PEM certificates are Base64 encoded ASCII files. The PEM certificates can be opened in the Text Editor/Notepad and you find that they contain "-----BEGIN CERTIFICATE-----" and "-----END CERTIFICATE-----" statements.
For secure, trusted access you must install an SSL server certificate on the NetScaler Gateway server. The uploaded certificate file must have the following characteristics:
-
Certification Authority (CA) that is trusted by end users must issue the server certificate. For best results, use a commercial CA such as Verisign, Thawte, or GeoTrust.
-
The certificate must be in Privacy Enhanced Mail (PEM) format, a text-based format that is a Base64 encoding of the binary Distinguished Encoding Rules (DER) format.
-
The certificate file must include a private key and the private key must not be encrypted. There must be no password required to use the PEM file.
-
Any necessary intermediate certificates must be appended to the end of the PEM file.
Complete the following procedure to convert a PFX certificate to PEM format using the NetScaler Gateway Wizard:
-
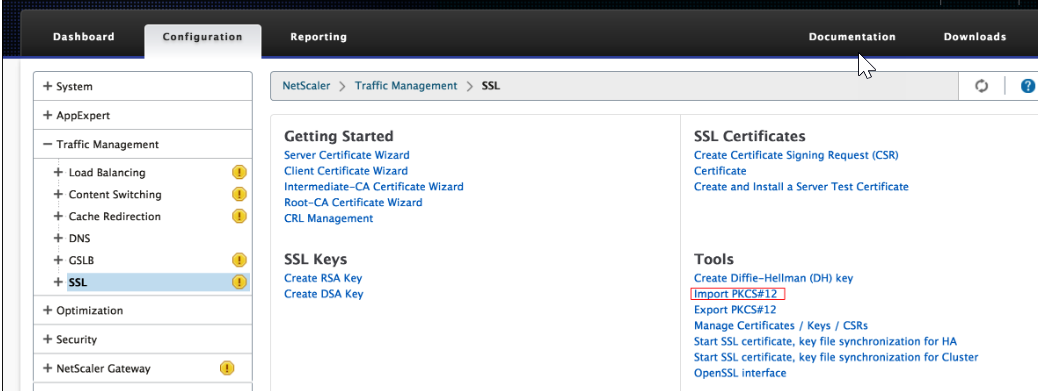
Navigate to Traffic Management, Select the SSL node.
-
Click the Import PKCS#12 link.
-
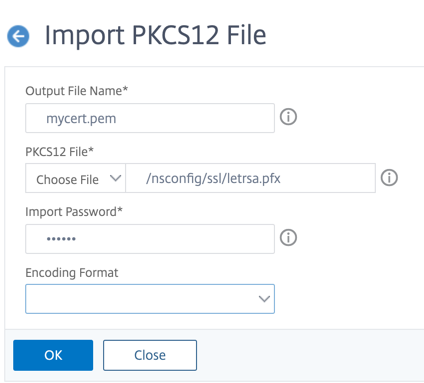
Specify a file name you want for the PEM certificate in the Output File Name field.
-
Click Browse and select the PFX certificate that you want to convert to PEM format. Some users prefer to upload the certificate to the /ncsonfig/SSL directory and use it from there. If the PFX certificate is stored on NetScaler Gateway then choose the option Appliance, and if it stored on your workstation then uses Local.
-
Specify the Import Password.
-
If the file is encoded, then select DES or 3DES as the Encoding Format:
-
Click OK.
-
Specify the PEM Passphrase and the Verify PEM Passphrase.
-
Click the Manage Certificates / Keys / CSRs link to view the converted PEM certificate files.
-
You can view the uploaded PFX file with the converted PEM file.

-
Expand the SSL node.
-
Select the Certificates node.
-
Click Install.
-
Specify a Certificate-Key Pair Name in the Install Certificate wizard.
-
Browse to the PEM file for both the Certificate File Name and Private Key File Name.
-
Specify the Password.
-
Click Install.
OpenSSL utility
If you have requested and installed a certificate onto a Windows server using the Internet Information Service (IIS) certificate wizard, you can export that certificate with its private key to a Personal Information Exchange (PFX) file. To import this certificate onto NetScaler Gateway, you must convert the PFX file to unencrypted PEM format.
You can use the open source utility
OpenSSL to perform the conversion from PFX to PEM. Download a Win32 distribution of OpenSSL from Win32 OpenSSL.
You might also need C++ redistributable files if you want to use
OpenSSL. Download this from the Microsoft Visual C++ 2008 Redistributable Package (x86).
To convert a PFX file to a PEM file, complete the following steps on a Windows machine:
-
Download and install the Win32
OpenSSLpackage from Win32OpenSSL. -
Create a folder c:\certs and copy the file yourcert.pfx into the c:\certs folder.
-
Open the command prompt and change into the
OpenSSL\bin directory:cd %homedrive%\OpenSSL\bin -
Run the following command to convert the PFX file to an unencrypted PEM file (all in one line):
OpenSSLpkcs12 -in c:\certs\yourcert.pfx -out c:\certs\cag.pem –nodes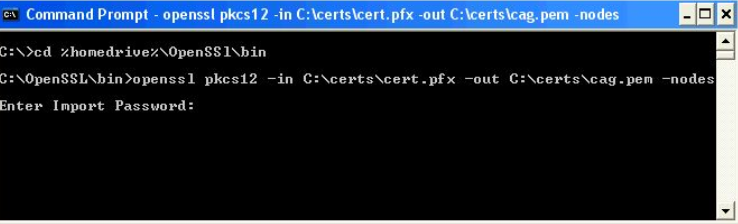
-
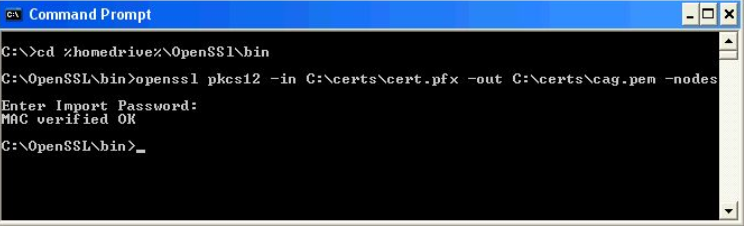
When prompted for the import password, enter the password you used when exporting the certificate to a PFX file. You must receive a message that says MAC verified OK.
-
Point a browser to the NetScaler Gateway administration portal or HTTPS port 9001:
https://netscaler-gateway-server:9001. -
Log on as root. The default password is
rootadmin. -
Click the Maintenance link at the top of the page.
-
Click the Browse button next to the Upload Private Key+Certificate (.pem) field. Browse to the c:\certs\cag.pem file, and click Upload.
-
Restart NetScaler Gateway for the new SSL certificate to be applied.