
Install a NetScaler VPX instance on Citrix Hypervisor/XenServer
To install VPX instances on the Citrix Hypervisor/XenServer, you must first install the Hypervisor on a machine with adequate system resources. To install the NetScaler VPX instance, use Citrix XenCenter, which must be installed on a remote machine with network access to the Hypervisor host.
For more information about Hypervisor, see Citrix Hypervisor documentation.
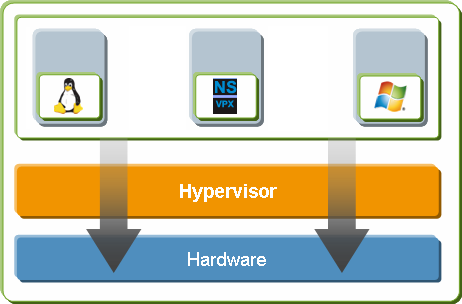
The following figure shows the bare-metal solution architecture of NetScaler VPX instance on Hypervisor.
Figure. A NetScaler VPX instance on Citrix Hypervisor/XenServer
Prerequisites for installing a NetScaler VPX instance on Hypervisor
Before you begin installing a virtual appliance, do the following:
-
Install Hypervisor version 6.0 or later on hardware that meets the minimum requirements.
-
Install XenCenter® on a management workstation that meets the minimum system requirements.
-
Obtain virtual appliance license files. For more information about virtual appliance licenses, see the NetScaler Licensing Guide.
Hypervisor hardware requirements
The following table describes the minimum hardware requirements for a Hypervisor platform running a NetScaler VPX instance.
Table 1. Minimum system requirements for Hypervisor running a nCore VPX instance
| Component | Requirement |
|---|---|
| CPU | 2 or more 64-bit x86 CPUs with virtualization assist (Intel-VT or AMD-V) enabled. To run the NetScaler VPX instance, hardware support for virtualization must be enabled on the Hypervisor host. Make sure that the BIOS option for virtualization support is not disabled. For more details, see the BIOS documentation. |
| RAM | 3 GB |
| Disk space | Locally attached storage (PATA, SATA, SCSI) with 40 GB of disk space.
Note: Hypervisor installation creates a 4 GB partition for the Hypervisor host control domain. The remaining space is available for NetScaler VPX instances and other virtual machines.
|
| NIC | One 1 Gbps NIC; recommended: two 1 Gbps NICs |
For more information, see the XenServer documentation.
The following table lists the virtual computing resources that Hypervisor must provide for each nCore VPX virtual appliance.
Table 2. Minimum virtual computing resources required for running a nCore VPX instance
| Component | Requirement |
|---|---|
| Memory | 2 GB |
| Virtual CPU (vCPU) | 2 |
| Virtual network interfaces | 2 |
Note:
For production use of NetScaler VPX instance, Citrix recommends that CPU priority (in virtual machine properties) must be set to the highest level, to improve scheduling behavior and network latency.
XenCenter system requirements
XenCenter is a Windows client application. It cannot run on the same machine as the Hypervisor host. For more information about minimum system requirements and installing XenCenter, see the following Hypervisor documents:
Install NetScaler VPX instances on Hypervisor by using XenCenter
After you have installed and configured Hypervisor and XenCenter, you can use XenCenter to install virtual appliances on Hypervisor. The number of virtual appliances that you can install depends on the amount of memory available on the hardware that is running Hypervisor.
To install NetScaler VPX instances on Hypervisor by using XenCenter, follow these steps:
-
Start XenCenter on your workstation.
-
On the Server menu, click Add.
-
In the Add New Server dialog box, in the host name text box, type the IP address or DNS name of the Hypervisor that you want to connect to.
-
In the User Name and Password text boxes, type the administrator credentials, and then click Connect. The Hypervisor name appears in the navigation pane with a green circle, which indicates that the Hypervisor is connected.
-
In the navigation pane, click the name of the Hypervisor on which you want to install the NetScaler VPX instance.
-
On the VM menu, click Import.
-
In the Import dialog box, in the Import file name, browse to the location at which you saved the NetScaler VPX instance
.xvaimage file. Make sure that the Exported VM option is selected, and then click Next. -
Select the Hypervisor on which you want to install the virtual appliance, and then click Next.
-
Select the local storage repository in which to store the virtual appliance, and then click Import to begin the import process.
-
You can add, modify, or delete the virtual network interfaces as required. When finished, click Next.
-
Click Finish to complete the import process.Note:To view the status of the import process, click the Log tab.
-
If you want to install another virtual appliance, repeat steps 5 through 11.
Note:
After the initial configuration of the VPX instance, if you want to upgrade the appliance to the latest software release, see Upgrading or Downgrading the System Software.