
Configure multiple IP addresses for a NetScaler VPX standalone instance by using PowerShell commands
In an Azure environment, a NetScaler VPX virtual appliance can be deployed with multiple NICs. Each NIC can have multiple IP addresses. This section describes how to deploy a NetScaler VPX instance with a single NIC and multiple IP addresses, by using PowerShell commands. You can use the same script for multi-NIC and multi-IP deployment.
Note:
In this document, IP-Config refers to a pair of IP addresses, public IP, and private IP, that is associated with an individual NIC. For more information, see the Azure terminology section.
Use case
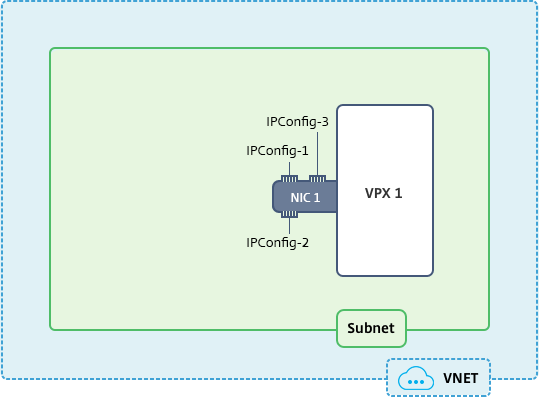
In this use case, a single NIC is connected to a virtual network (VNET). The NIC is associated with three IP configurations, as shown in the following table.
| IP Config | Associated with |
|---|---|
| IPConfig-1 | Static public IP address; static private IP address |
| IPConfig-2 | Static public IP address; static private address |
| IPConfig-3 | Static private IP address |
Note:
IPConfig-3 is not associated with any public IP address.
Diagram: Topology
Here is the visual representation of the use case.
Note:
In a multi-NIC, multi-IP Azure NetScaler VPX deployment, the private IP address associated with the primary (first)
IPConfig of the primary (first) NIC is automatically added as the management NSIP address of the appliance. The remaining private IP addresses associated with IPConfigs must be added in the VPX instance as VIPs or SNIPs by using the add ns ip command, as determined by your requirements.
Here is the summary of the steps required for configuring multiple IP addresses for a NetScaler VPX virtual appliance in standalone mode:
-
Create Resource Group
-
Create Storage Account
-
Create Availability Set
-
Create Network service group
-
Create Virtual Network
-
Create Public IP Address
-
Assign IP Configuration
-
Create NIC
-
Create NetScaler VPX Instance
-
Check NIC Configurations
-
Check VPX-side Configurations
Script
Parameters
Following are sample parameters settings for the use case in this document.
 $locName="westcentralus"

 $rgName="Azure-MultiIP"

 $nicName1="VM1-NIC1"

 $vNetName="Azure-MultiIP-vnet"

 $vNetAddressRange="11.6.0.0/16"

 $frontEndSubnetName="frontEndSubnet"

 $frontEndSubnetRange="11.6.1.0/24"

 $prmStorageAccountName="multiipstorage"

 $avSetName="multiip-avSet"

 $vmSize="Standard\_DS4\_V2" (This parameter creates a VM with up to four NICs.)
Note:
The minimum requirement for a VPX instance is 2 vCPUs and 2 GB RAM.
 $publisher="Citrix"

 $offer="netscalervpx110-6531" (You can use different offers.)

 $sku="netscalerbyol" (According to your offer, the SKU can be different.)

 $version="latest"

 $pubIPName1="PIP1"

 $pubIPName2="PIP2"

 $domName1="multiipvpx1"

 $domName2="multiipvpx2"

 $vmNamePrefix="VPXMultiIP"

 $osDiskSuffix="osmultiipalbdiskdb1"

 **Network Security Group (NSG)-related information**:

 $nsgName="NSG-MultiIP"

 $rule1Name="Inbound-HTTP"

 $rule2Name="Inbound-HTTPS"

 $rule3Name="Inbound-SSH"

 $IpConfigName1="IPConfig1"

 $IPConfigName2="IPConfig-2"

 $IPConfigName3="IPConfig-3"
1. Create Resource Group
New-AzureRmResourceGroup -Name $rgName -Location $locName
2. Create Storage Account
$prmStorageAccount = New-AzureRMStorageAccount -Name $prmStorageAccountName -ResourceGroupName $rgName -Type Standard_LRS -Location $locName
3. Create Availability Set
$avSet = New-AzureRMAvailabilitySet -Name $avSetName -ResourceGroupName $rgName -Location $locName
4. Create Network Security Group
-
Add rules. You must add a rule to the network security group for any port that serves traffic.
$rule1=New-AzureRmNetworkSecurityRuleConfig -Name $rule1Name -Description "Allow HTTP" -Access Allow -Protocol Tcp -Direction Inbound -Priority 101 -SourceAddressPrefix Internet -SourcePortRange * -DestinationAddressPrefix * -DestinationPortRange 80$rule2=New-AzureRmNetworkSecurityRuleConfig -Name $rule2Name -Description "Allow HTTPS" -Access Allow -Protocol Tcp -Direction Inbound -Priority 110 -SourceAddressPrefix Internet -SourcePortRange * -DestinationAddressPrefix * -DestinationPortRange 443$rule3=New-AzureRmNetworkSecurityRuleConfig -Name $rule3Name -Description "Allow SSH" -Access Allow -Protocol Tcp -Direction Inbound -Priority 120 -SourceAddressPrefix Internet -SourcePortRange * -DestinationAddressPrefix * -DestinationPortRange 22 -
Create network security group object.
$nsg=New-AzureRmNetworkSecurityGroup -ResourceGroupName $rgName -Location $locName -Name $nsgName -SecurityRules $rule1,$rule2,$rule3
5. Create Virtual Network
-
Add subnets.
$frontendSubnet=New-AzureRmVirtualNetworkSubnetConfig -Name $frontEndSubnetName -AddressPrefix $frontEndSubnetRange -
Add virtual network object.
$vnet=New-AzureRmVirtualNetwork -Name $vNetName -ResourceGroupName $rgName -Location $locName -AddressPrefix $vNetAddressRange -Subnet $frontendSubnet -
Retrieve subnets.
$subnetName="frontEndSubnet"$subnet1=$vnet.Subnets|?{$_.Name -eq $subnetName}
6. Create Public IP Address
$pip1=New-AzureRmPublicIpAddress -Name $pubIPName1 -ResourceGroupName $rgName -DomainNameLabel $domName1 -Location $locName -AllocationMethod Static $pip2=New-AzureRmPublicIpAddress -Name $pubIPName2 -ResourceGroupName $rgName -DomainNameLabel $domName2 -Location $locName -AllocationMethod Static
Note:
Check availability of domain names before using.
Allocation method for IP addresses can be dynamic or static.
7. Assign IP Configuration
In this use case, consider the following points before assigning IP addresses:
-
IPConfig-1 belongs to subnet1 of VPX1.
-
IPConfig-2 belongs to subnet 1 of VPX1.
-
IPConfig-3 belongs to subnet 1 of VPX1.
Note:
When you assign multiple IP configurations to a NIC, one configuration must be assigned as primary.
$IPAddress1="11.6.1.27"
 $IPConfig1=New-AzureRmNetworkInterfaceIpConfig -Name $IPConfigName1 -Subnet $subnet1 -PrivateIpAddress $IPAddress1 -PublicIpAddress $pip1 –Primary
 $IPAddress2="11.6.1.28"
 $IPConfig2=New-AzureRmNetworkInterfaceIpConfig -Name $IPConfigName2 -Subnet $subnet1 -PrivateIpAddress $IPAddress2 -PublicIpAddress $pip2
 $IPAddress3="11.6.1.29"
 $IPConfig3=New-AzureRmNetworkInterfaceIpConfig -Name $IPConfigName3 -Subnet $subnet1 -PrivateIpAddress $IPAddress3 -Primary
Use a valid IP address that meets your subnet requirements and check its availability.
8. Create NIC
$nic1=New-AzureRmNetworkInterface -Name $nicName1 -ResourceGroupName $rgName -Location $locName -IpConfiguration $IpConfig1,$IpConfig2,$IPConfig3 -NetworkSecurityGroupId $nsg.Id
9. Create NetScaler VPX Instance
-
Initialize variables.
$suffixNumber = 1$vmName = $vmNamePrefix + $suffixNumber -
Create VM config object.
$vmConfig=New-AzureRMVMConfig -VMName $vmName -VMSize $vmSize -AvailabilitySetId $avSet.Id -
Set credentials, OS, and image.
$cred=Get-Credential -Message "Type the name and password for VPX login."$vmConfig=Set-AzureRMVMOperatingSystem -VM $vmConfig -Linux -ComputerName $vmName -Credential $cred$vmConfig=Set-AzureRMVMSourceImage -VM $vmConfig -PublisherName $publisher -Offer $offer -Skus $sku -Version $version -
Add NIC.
$vmConfig=Add-AzureRMVMNetworkInterface -VM $vmConfig -Id $nic1.Id -PrimaryNote:In a multi-NIC NetScaler VPX deployment, one NIC must be primary. So, "-Primary" must be appended while adding that NIC to the NetScaler VPX instance. -
Specify OS disk and create VM.
$osDiskName=$vmName + "-" + $osDiskSuffix1$osVhdUri=$prmStorageAccount.PrimaryEndpoints.Blob.ToString() + "vhds/" + $osDiskName + ".vhd"$vmConfig=Set-AzureRMVMOSDisk -VM $vmConfig -Name $osDiskName -VhdUri $osVhdUri -CreateOption fromImageSet-AzureRmVMPlan -VM $vmConfig -Publisher $publisher -Product $offer -Name $skuNew-AzureRMVM -VM $vmConfig -ResourceGroupName $rgName -Location $locName
10. Check NIC Configurations
After the NetScaler VPX instance starts, you can check the IP addresses allocated to
IPConfigs of the NetScaler VPX NIC by using the following command.
$nic.IPConfig
11. Check VPX-side Configurations
When the NetScaler VPX instance starts, a private IP address associated with primary
IPconfig of the primary NIC is added as the NSIP address. The remaining private IP addresses must be added as VIP or SNIP addresses, as determined by your requirements. Use the following command.
add nsip <Private IPAddress><netmask> -type VIP/SNIP
You've now configured multiple IP addresses for a NetScaler VPX instance in standalone mode.