
Configure a NetScaler VPX standalone instance
You can provision a single NetScaler VPX instance in Azure Resource Manager (ARM) portal in a standalone mode by creating the virtual machine and configuring other resources.
Before you begin
Ensure that you have the following:
-
A Microsoft Azure user account
-
Access to Microsoft Azure Resource Manager
-
Microsoft Azure SDK
-
Microsoft Azure PowerShell
On the Microsoft Azure Portal page, log on to the Azure Resource Manager portal by providing your user name and password.
Note:
In ARM portal, clicking an option in one pane opens a new pane to the right. Navigate from one pane to another to configure your device.
Summary of configuration steps
-
Configure a resource group
-
Configure a network security group
-
Configure virtual network and its subnets
-
Configure a storage account
-
Configure an availability set
-
Configure a NetScaler VPX instance.
Configure a resource group
Create a new resource group that is a container for all your resources. Use the resource group to deploy, manage, and monitor your resources as a group.
-
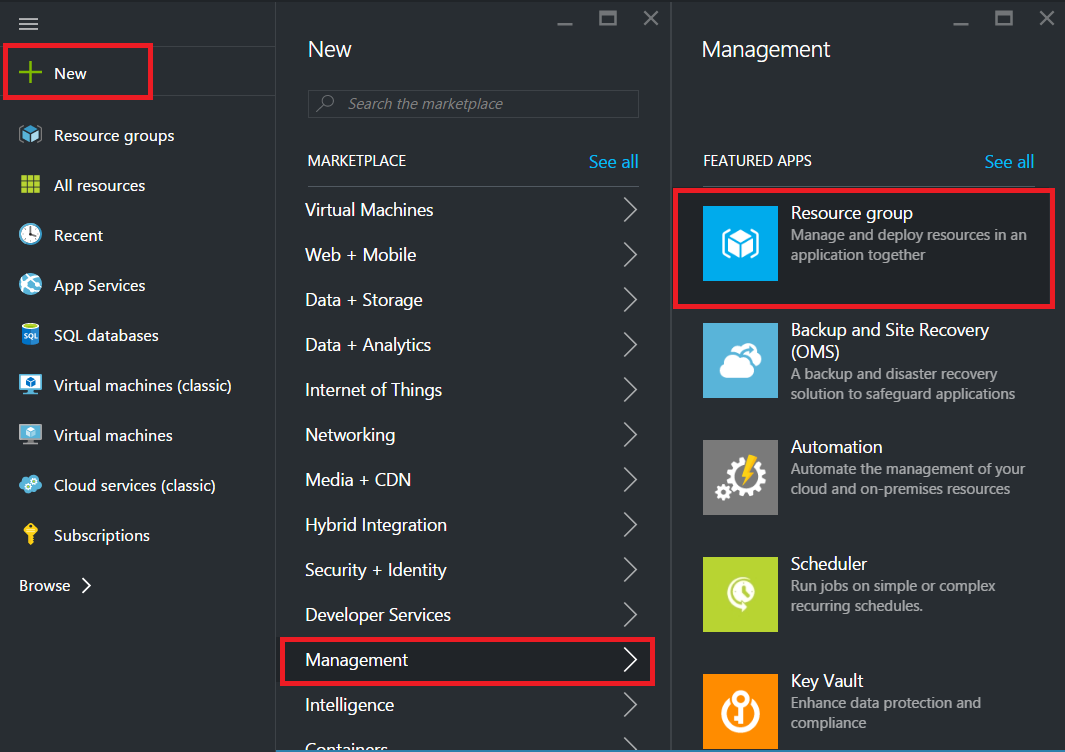
Click New > Management > Resource group.
-
In the Resource group pane, enter the following details:
-
Resource group name
-
Resource group location
-
-
Click Create.
Configure a network security group
Create a network security group to assign inbound and outbound rules to control the incoming and outgoing traffic within the virtual network. Network security group allows you to define security rules for a single virtual machine and also to define security rules for a virtual network subnet.
-
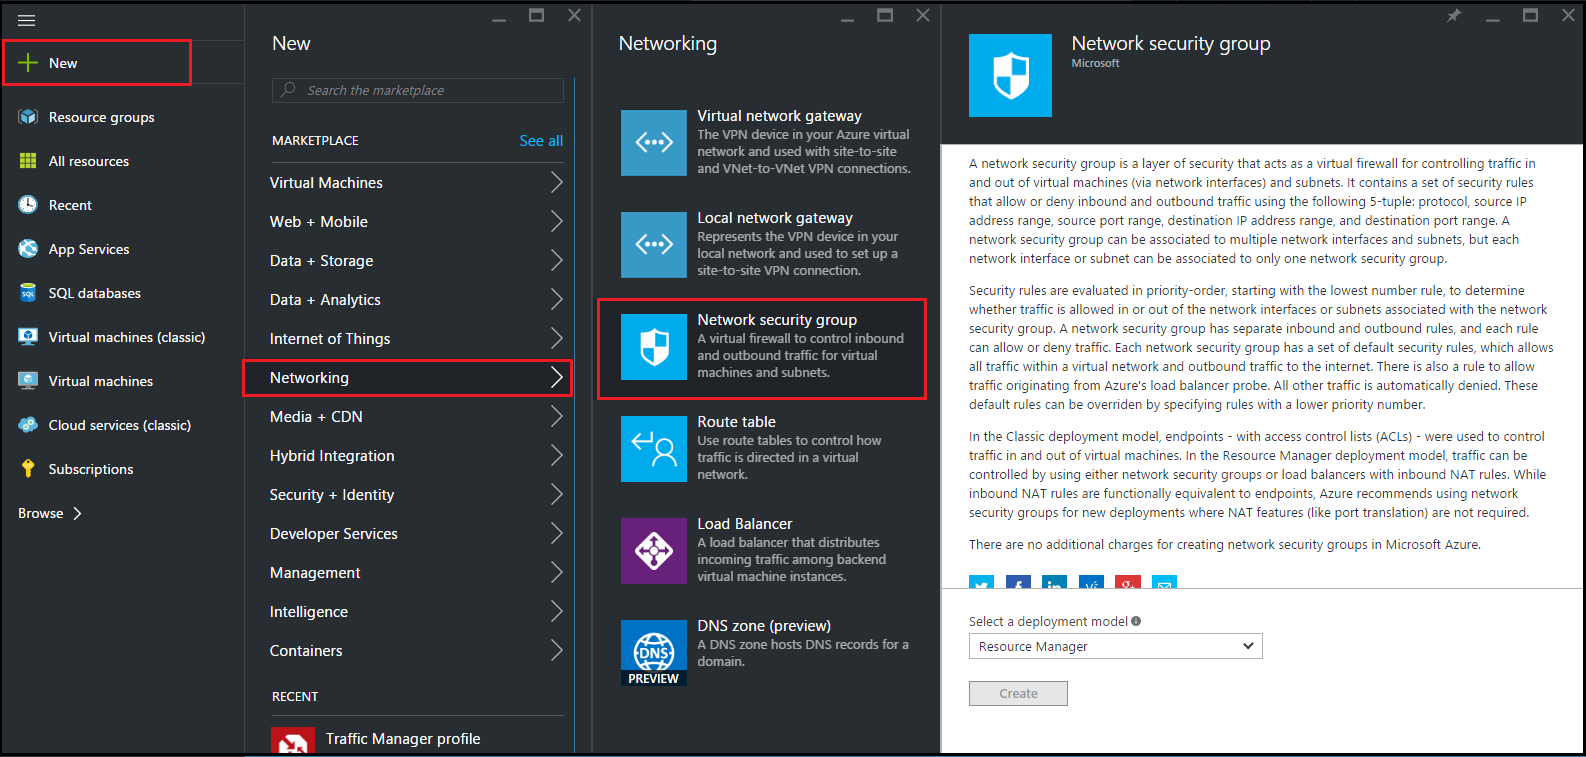
Click New > Networking > Network security group.
-
In the Create network security group pane, enter the following details, and then click Create.
-
Name - type a name for the security group
-
Resource group - select the resource group from the drop-down list
-
Note:
Ensure that you have selected the correct location. The list of resources that appear in the drop-down list is different for different locations.
Configure a virtual network and subnets
Virtual networks in ARM provide a layer of security and isolation to your services. VMs and services that are part of the same virtual network can access each other.
For these steps to create a virtual network and subnets.
-
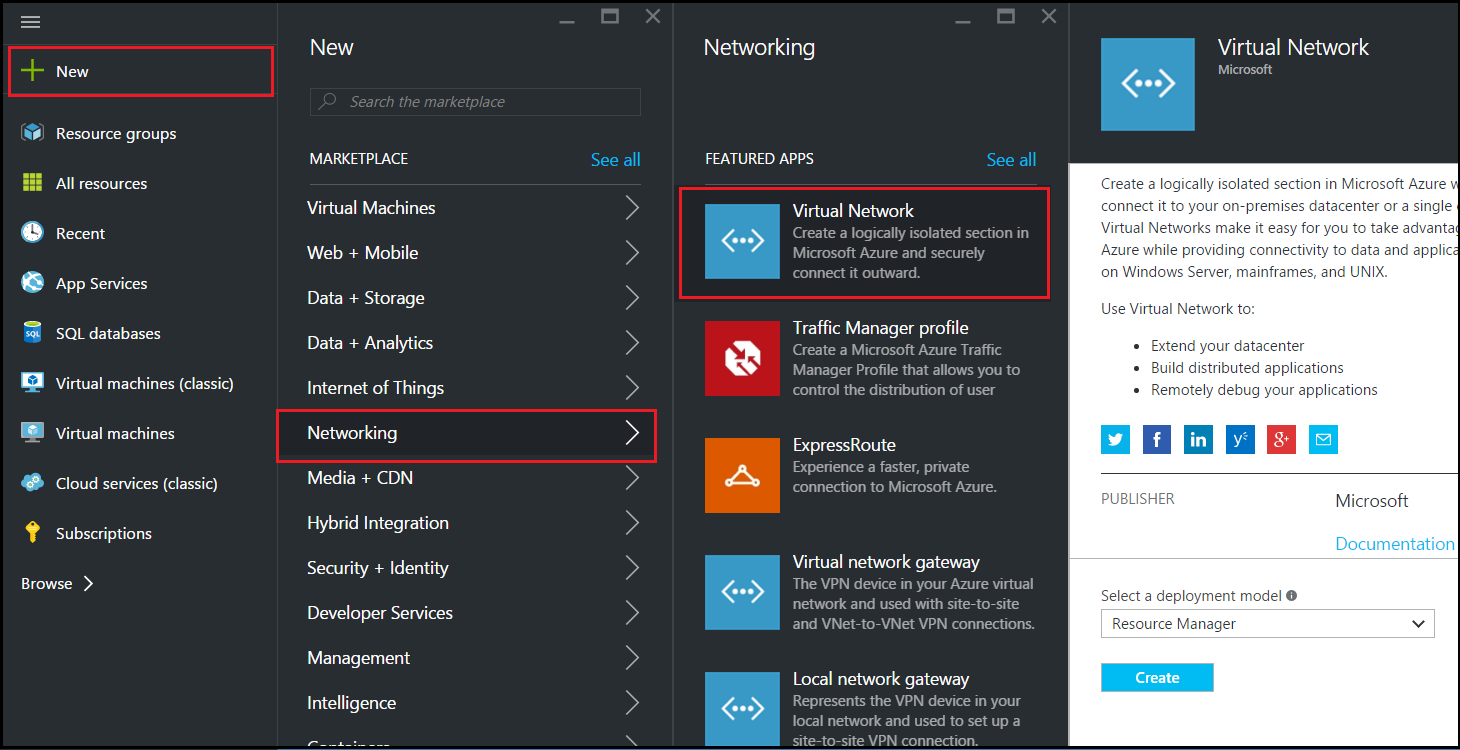
Click New > Networking > Virtual Network.
-
In the Virtual Network pane, ensure the deployment mode is Resource Manager and click Create.
-
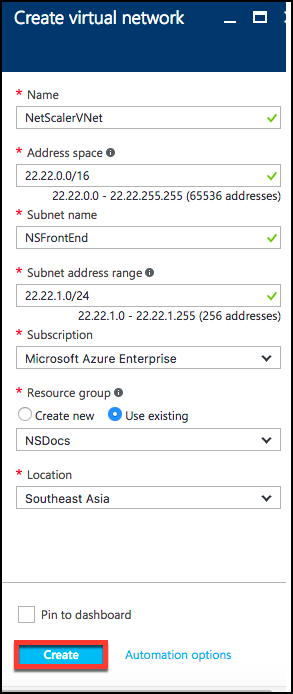
In the Create virtual network pane, enter the following values, and then click Create.
-
Name of the virtual network
-
Address space - type the reserved IP address block for the virtual network
-
Subnet - type the name of the first subnet (you create the second subnet later in this step)
-
Subnet address range - type the reserved IP address block of the subnet
-
Resource group - select the resource group created earlier from the drop-down list
-
Configure the second subnet
-
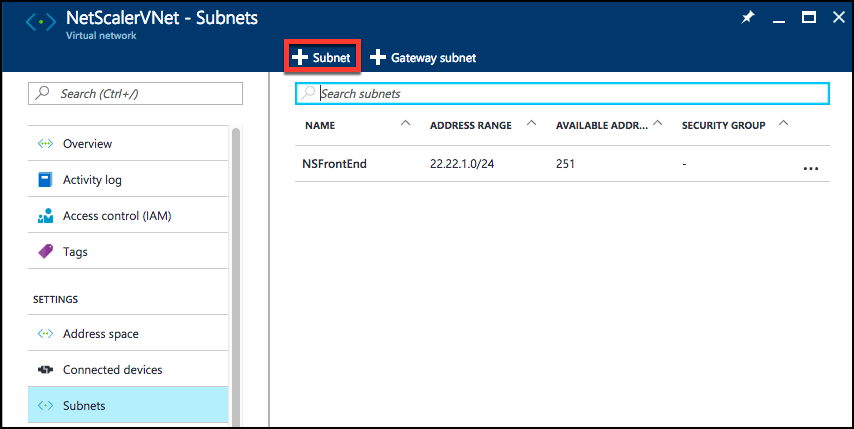
Select the newly created virtual network from All resources pane and in the Settings pane, click Subnets.
-
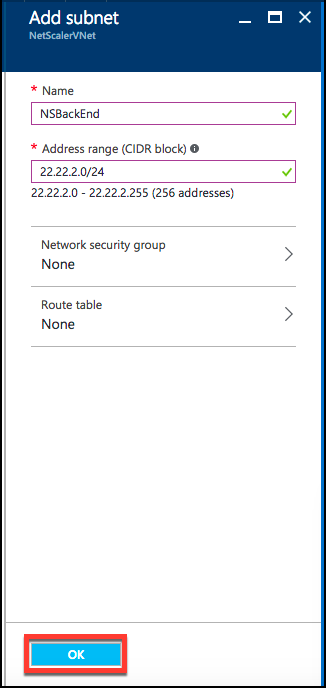
Click +Subnet and create the second subnet by entering the following details.
-
Name of the second subnet
-
Address range - type the reserved IP address block of the second subnet
-
Network security group - select the network security group from the drop-down list
-
-
Click Create.
Configure a storage account
The ARM IaaS infrastructure storage includes all services where we can store data in the form of blobs, tables, queues, and files. You can also create applications using these forms of storage data in ARM.
Create a storage account to store all your data.
-
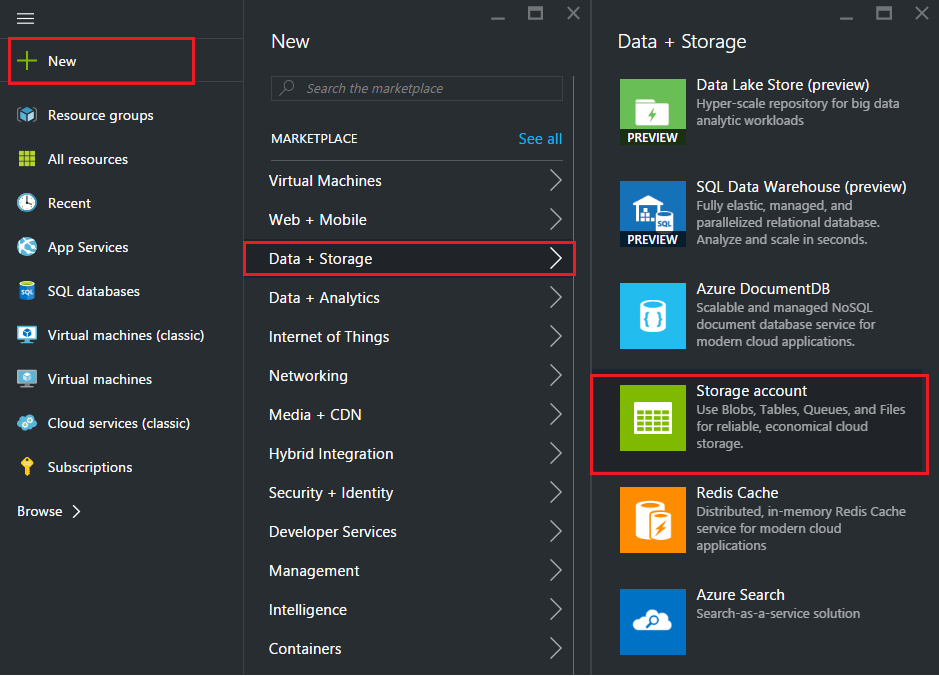
Click +New > Data + Storage > Storage account.
-
In the Create storage account pane, enter the following details:
-
Name of the account
-
Deployment mode - make sure to select Resource Manager
-
Account kind - select General purpose from the drop-down list
-
Replication - select Locally redundant storage from the drop-down list
-
Resource group - select the newly created resource group from the drop-down list
-
-
Click Create.
Configure an availability set
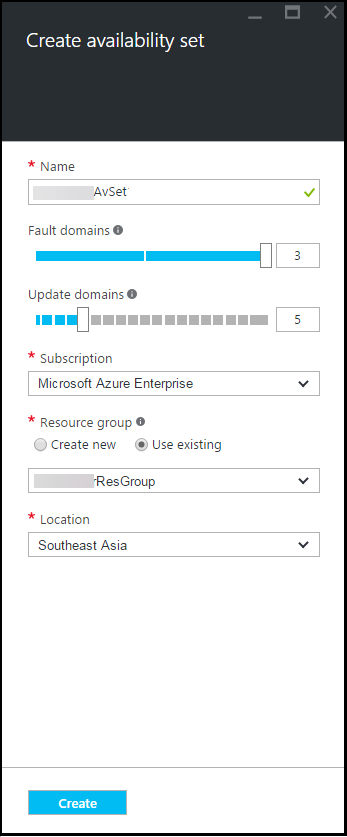
An availability set guarantee that at least one VM is kept up and running in case of planned or unplanned maintenance. Two or more VMs under the same ‘availability set’ are placed on different fault domains to achieve redundant services.
-
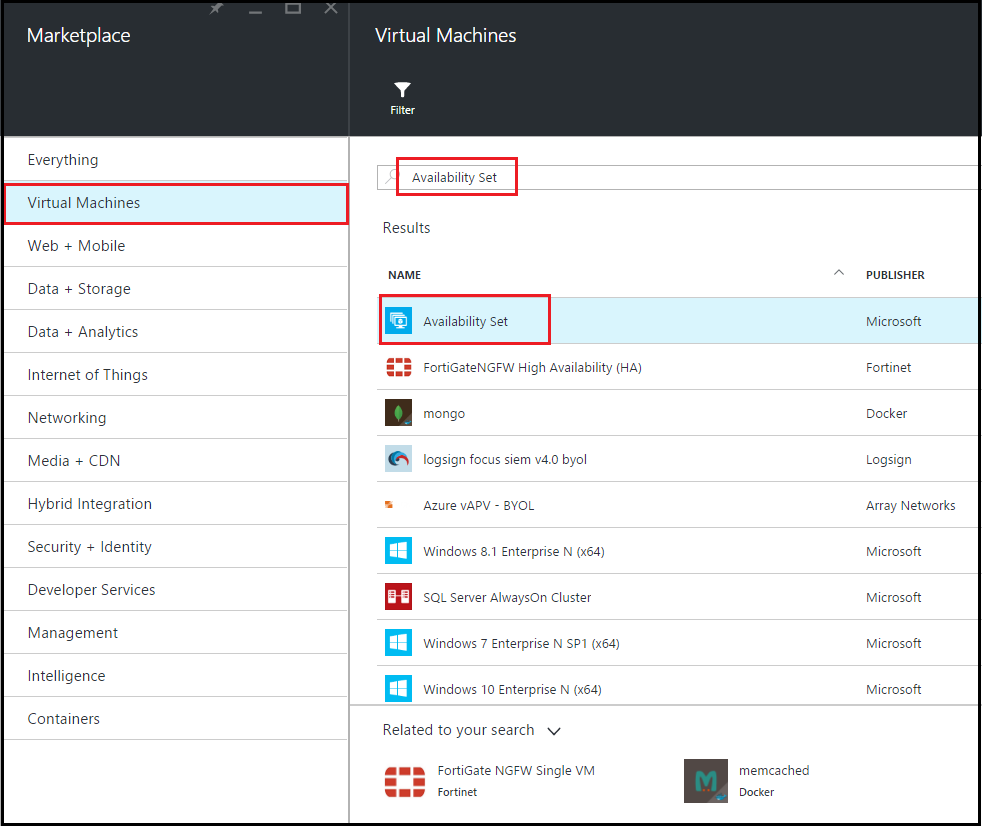
Click +New.
-
Click See all in the MARKETPLACE pane and click Virtual Machines.
-
Search for availability set, and then select Availability set entity from the list displayed.
-
Click Create, and in the Create availability set pane, enter the following details:
-
Name of the set
-
Resource group - select the newly created resource group from the drop-down list
-
-
Click Create.
Configure a NetScaler VPX instance
Create an instance of NetScaler VPX in the virtual network. Obtain the NetScaler VPX image from the Azure Marketplace, and then use the Azure Resource Manager portal to create a NetScaler VPX instance.
Before you begin creating the NetScaler VPX instance, make sure that you have created a virtual network with required subnets in which the instance resides. You can create virtual networks during VM provisioning, but without the flexibility to create different subnets.
Optionally, configure DNS server and VPN connectivity that allows a virtual machine to access internet resources.
Note:
Citrix recommends that you create resource group, network security group, virtual network, and other entities before you provision the NetScaler VPX VM, so that the network information is available during provisioning.
-
Click +New \> Networking.
-
Click See All and in the Networking pane, click NetScaler 13.0.
-
Select NetScaler 13.0 VPX Bring Your Own License from the list of software plans.As a quick way to find any entity on ARM portal, you can also type the name of the entity in the Azure Marketplace search box and press \<Enter\>. Type NetScaler in the search box to find the NetScaler images.
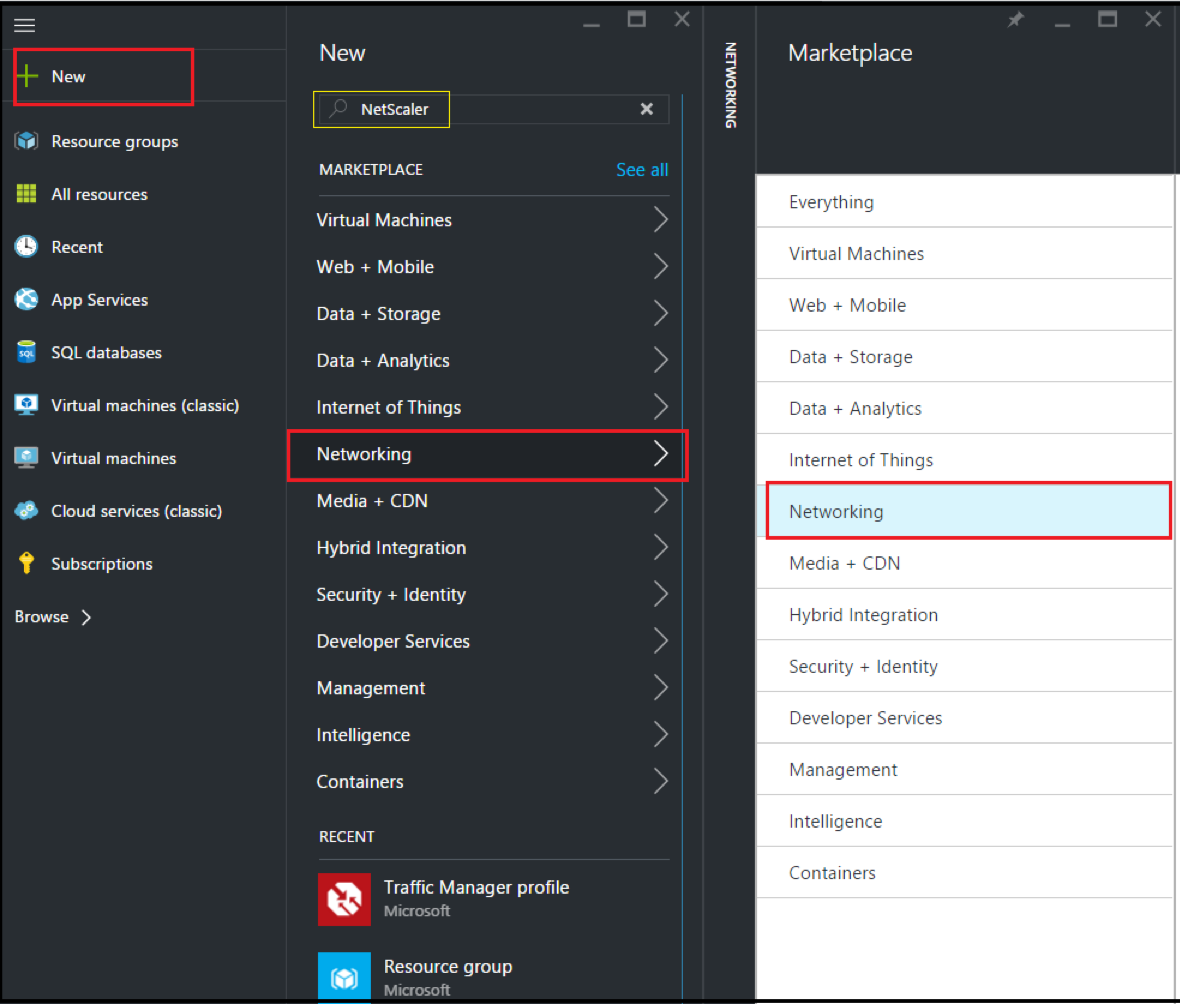 Note:Ensure to select the latest image. Your NetScaler® image might have the release number in the name.
 -
On the NetScaler VPX Bring Your Own License page, from the drop-down list, select Resource Manager and click Create.
-
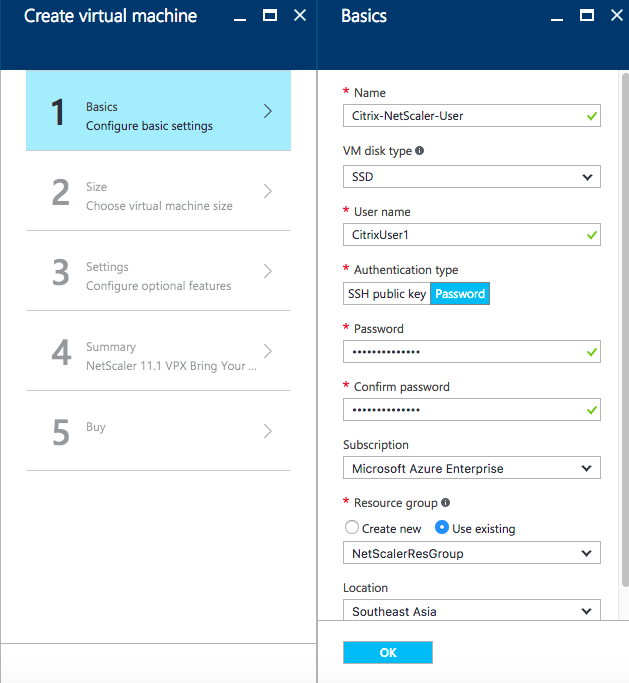
In the Create virtual machine pane, specify the required values in each section to create a virtual machine. Click OK in each section to save your configuration.
Basic:
-
Name - specify a name for the NetScaler VPX instance
-
VM disk type - select SSD (default value) or HDD from the drop-down menu
-
User name and Password - specify a user name and password to access the resources in the resource group that you have created
-
Authentication Type - select SSH Public Key or Password
-
Resource group - select the resource group you have created from the drop-down list
You can create a resource group here, but Citrix® recommends that you create a resource group from Resource groups in Azure Resource Manager and then select the group from the drop-down list.
Note:
In an Azure stack environment, in addition to the basic parameters, specify the following parameters:
-
Azure stack domain
-
Azure stack tenant (Optional)
-
Azure client (Optional)
-
Azure client secret (Optional)
Size:
Depending on the VM disk type, SDD, or HDD, you selected in Basic settings, the disk sizes are displayed.
-
Select a disk size according to your requirement and click Select.
Settings:
-
Select the default (Standard) disk type
-
Storage account - select the storage account
-
Virtual network - select the virtual network
-
Subnet - set the subnet address
-
Public IP address - select the type of IP address assignment
-
Network security group - select the security group that you have created. Ensure that inbound and outbound rules are configured in the security group.
-
Availability Set - select the availability set from the drop-down menu box
Summary:
The configuration settings are validated and the Summary page displays the result of the validation. If the validation fails, the Summary page displays the reason of the failure. Go back to the particular section and make changes as required. If the validation passes, click OK.
Buy:
Review the offer details and legal terms on the Purchase page and click Purchase.
For high availability deployment, create two independent instances of NetScaler VPX in the same availability set and in the same resource group to deploy them in active-standby configuration.