
Provision the NetScaler VPX instance by using the Virtual Machine Manager
The Virtual Machine Manager is a desktop tool for managing VM guests. It enables you to create new VM guests and various types of storage, and manage virtual networks. You can access the graphical console of VM guests with the built-in VNC viewer and view performance statistics, either locally or remotely.
After installing your preferred Linux distribution, with KVM virtualization enabled, you can proceed with provisioning virtual machines.
While using the Virtual Machine Manager to provision a NetScaler VPX instance, you have two options:
-
Enter the IP address, gateway, and netmask manually
-
Assign the IP address, gateway, and netmask automatically (auto-provisioning)
You can use two kinds of images to provision a NetScaler VPX instance:
-
RAW
-
QCOW2
You can convert a NetScaler VPX RAW image to a QCOW2 image and provision the NetScaler VPX instance. To convert the RAW image to a QCOW2 image, type the following command:
qemu-img convert -O qcow2 original-image.raw image-converted.qcow2
For example:
qemu-img convert -O qcow2 NSVPX-KVM-11.1-12.5_nc.raw NSVPX-KVM-11.1-12.5_nc.qcow2
A typical NetScaler VPX deployment on KVM includes the following steps:
-
Checking prerequisites for auto-provisioning a NetScaler VPX instance
-
Provisioning the NetScaler VPX instance by using a RAW image
-
Provisioning the NetScaler VPX instance by using a QCOW2 image
-
Adding more interfaces to a VPX instance by using a virtual machine manager
Check prerequisites for auto-provisioning a NetScaler VPX instance
Auto-provisioning is an optional feature, and it involves using data from the CDROM drive. If this feature is enabled, you need not enter the management IP address, network mask, and default gateway of the NetScaler VPX instance during initial setup.
You need to complete the following tasks before you can auto-provision a VPX instance:
-
Create a customized Open Virtualization Format (OVF) XML file or user data file.
-
Convert the OVF file into an ISO image by using an online application (for example PowerISO).
-
Mount the ISO image on the KVM host by using any secure copy (SCP)-based tools.
Sample OVF XML file:
Here's is an example of the contents an OVF XML file, which you can use as a sample to create your file.
<?xml version="1.0" encoding="UTF-8" standalone="no"?>

 <Environment xmlns:oe="`http://schemas.dmtf.org/ovf/environment/1"`

 xmlns:xsi="`http://www.w3.org/2001/XMLSchema-instance"`

 oe:id=""

 xmlns="`http://schemas.dmtf.org/ovf/environment/1"`

 xmlns:cs="`http://schemas.citrix.com/openstack">`

 <PlatformSection>

 <Kind></Kind>

 <Version>2016.1</Version>

 <Vendor>VPX</Vendor>

 <Locale>en</Locale>

 </PlatformSection>

 <PropertySection>

 <Property oe:key="com.citrix.netscaler.ovf.version" oe:value="1.0"/>

 <Property oe:key="com.citrix.netscaler.platform" oe:value="NSVPX"/>

 <Property oe:key="com.citrix.netscaler.orch\_env" oe:value="KVM"/>

 <Property oe:key="com.citrix.netscaler.mgmt.ip" oe:value="10.1.2.22"/>

 <Property oe:key="com.citrix.netscaler.mgmt.netmask" oe:value="255.255.255.0"/>

 <Property oe:key="com.citrix.netscaler.mgmt.gateway" oe:value="10.1.2.1"/>

 </PropertySection>

 </Environment>
In the OVF XML file preceding, "PropertySection" is used for NetScaler® networking configuration. When you create the file, specify values for the parameters that are highlighted at the end of the example:
-
Management IP address
-
Netmask
-
Gateway
Important:
If the OVF file is not properly XML formatted, the VPX instance is assigned the default network configuration, not the values specified in the file.
Provision the NetScaler VPX instance by using a RAW image
The Virtual Machine Manager enables you to provision a NetScaler VPX instancy by using a RAW image.
To provision a NetScaler VPX instance by using the Virtual Machine Manager, follow these steps:
-
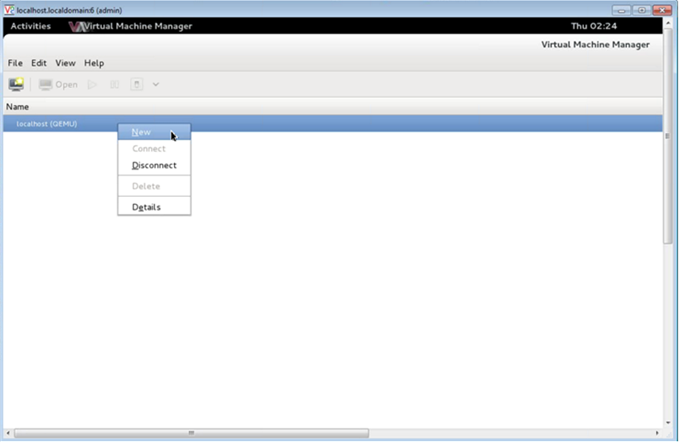
Open the Virtual Machine Manager (Application > System Tools > Virtual Machine Manager) and enter the logon credentials in the Authenticate window.
-
Click the
 icon or right-click localhost (QEMU) to create a new NetScaler VPX instance.
-
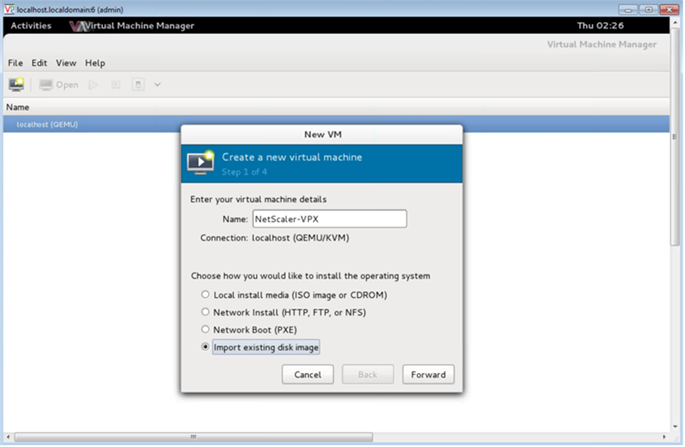
In the Name text box, enter a name for the new VM (for example, NetScaler-VPX).
-
In the New VM window, under "Choose how you would like to install the operating system," select Import existing disk image, and then and click Forward.
-
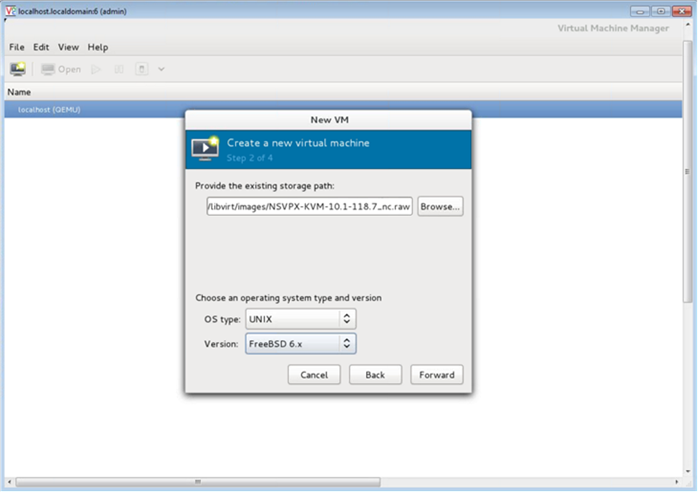
In the Provide the existing storage path field, navigate the path to the image. Choose the OS type as UNIX and Version as FreeBSD 6.x. Then, click Forward.
-
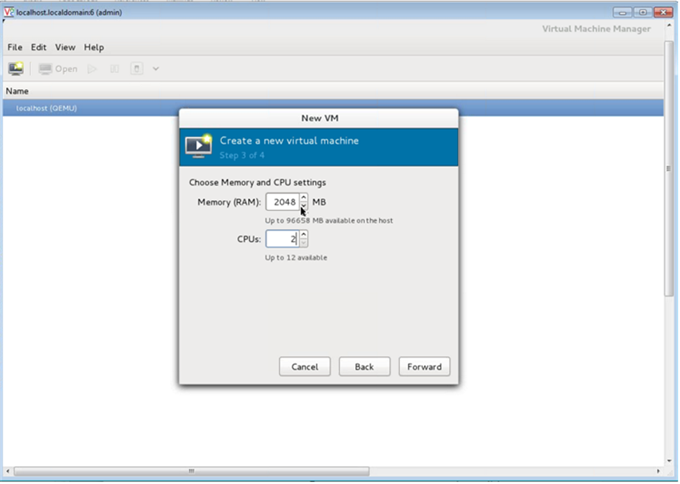
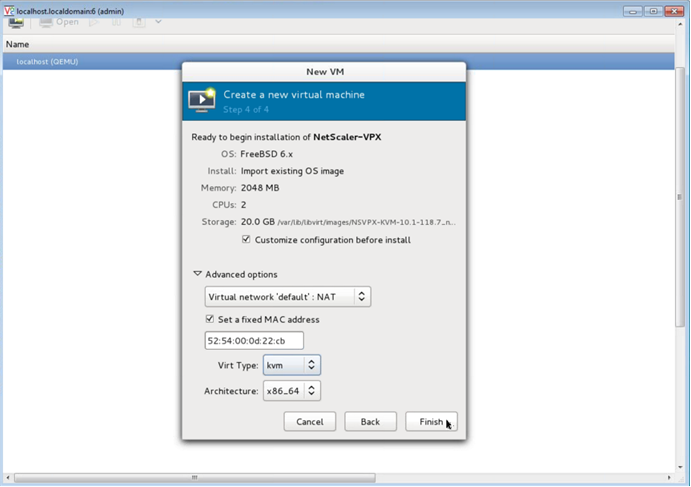
Under Choose Memory and CPU settings select the following settings, and then click Forward:
-
Memory (RAM)— 2048 MB
-
CPUs— 2
-
-
Select the Customize configuration before install check box. Optionally, under Advanced options you can customize the MAC address. Make sure the Virt Type selected is KVM and the Architecture selected is x86\_64. Click Finish.
-
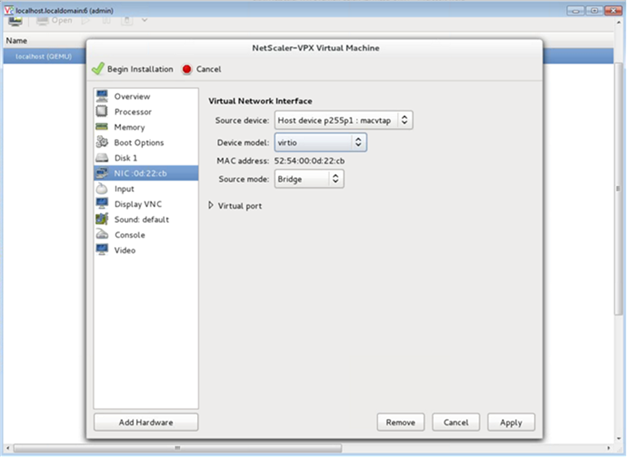
Select a NIC and provide the following configuration:
-
Source device—
ethX macvtapor Bridge -
Device model—
virtio -
Source mode— Bridge
-
-
Click Apply.
-
If you want to auto-provision the VPX instance, see the section Enabling Auto-Provisioning by Attaching a CDROM Drive in this document. Otherwise, click Begin Installation. After you have provisioned the NetScaler VPX on KVM, you can add more interfaces.
Provision the NetScaler VPX instance by using a QCOW2 image
Using the Virtual Machine Manager, you can provision the NetScaler VPX instance by using a QCOW2 image.
To provision a NetScaler VPX instance by using a QCOW2 image, follow these steps:
-
Follow step 1 to step 8 in Provision the NetScaler VPX instance by using a RAW image.Note:Ensure that you select qcow2 image in step 5.
-
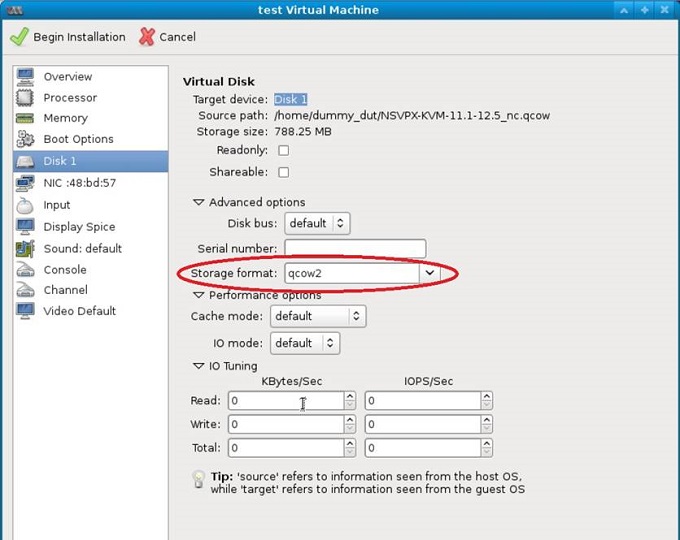
Select Disk 1 and click Advanced options.
-
Select qcow2 from the Storage format drop-down list.
-
Click Apply, and then click Begin Installation. After you have provisioned the NetScaler VPX on KVM, you can add more interfaces.
Enable auto-provisioning by attaching a CDROM drive
-
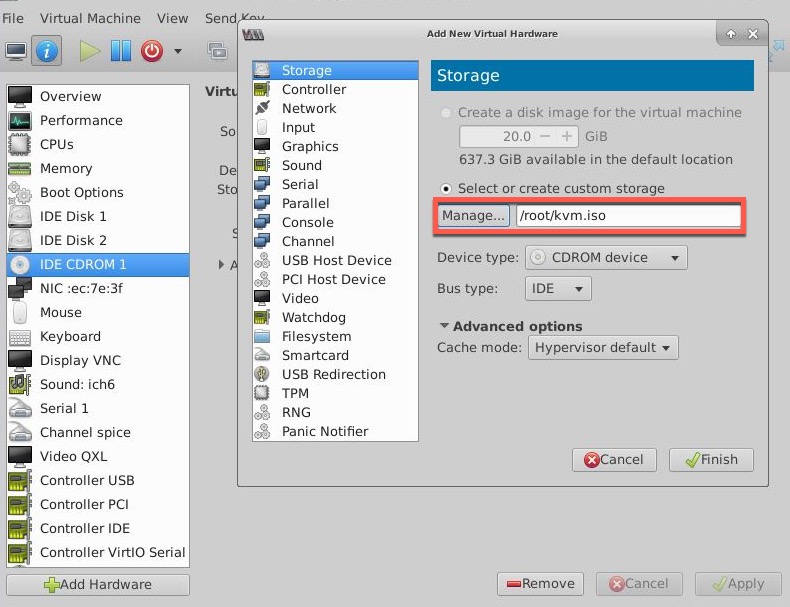
Click Add Hardware > Storage > Device type > CDROM device.
-
Click Manage and select the correct ISO file that you mounted in the "Prerequisites for Auto-Provisioning a NetScaler VPX Instance" section, and click Finish. A new CDROM under Resources on your NetScaler VPX instance is created.
-
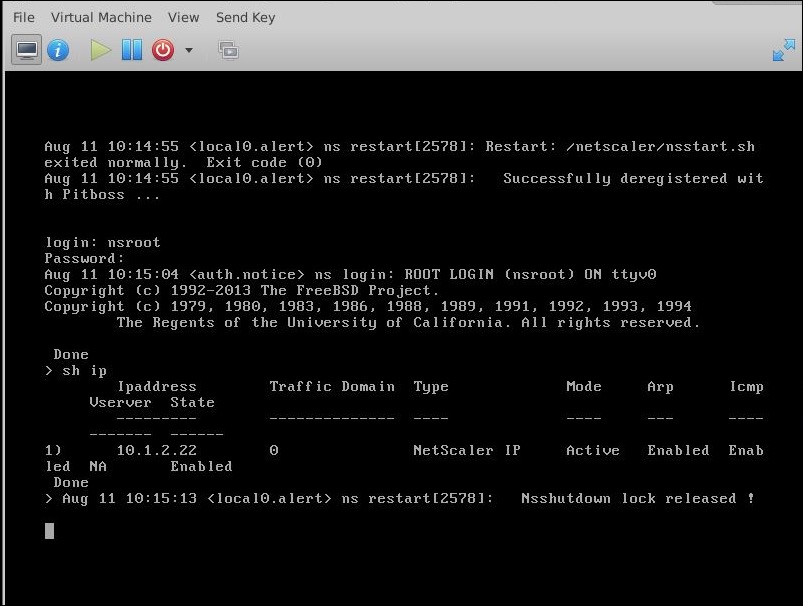
Power on the VPX instance, and it auto-provisions with the network configuration provided in the OVF file, as shown in the example screen capture.
-
If auto-provision fails, the instance comes up with the default IP address (192.168.100.1). In that case, you must complete the initial configuration manually. For more information, see Configure the ADC for the first time.
Add more interfaces to the NetScaler VPX instance by using the Virtual Machine Manager
After you have provisioned the NetScaler VPX™ instance on KVM, you can add more interfaces.
To add more interfaces, follow these steps.
-
Shut down the NetScaler VPX instance running on the KVM.
-
Right-click the VPX instance and choose Open from the pop-up menu.
-
Click the
 icon in the header to view the virtual hardware details.
-
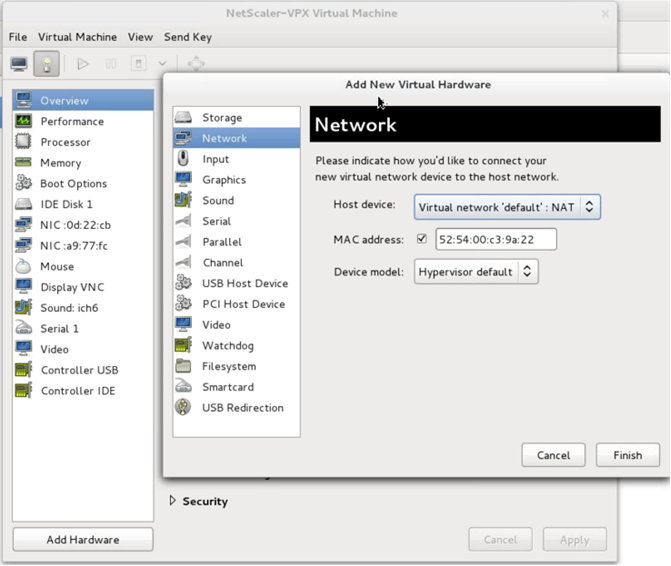
Click Add Hardware. In the Add New Virtual Hardware window, select Network from the navigation menu.
-
In Host Device field, select the physical interface type. The host device type can be either Bridge or MacVTap. In case of MacVTap, four modes possible are VEPA, Bridge, Private, and Pass-through.
-
For Bridge
-
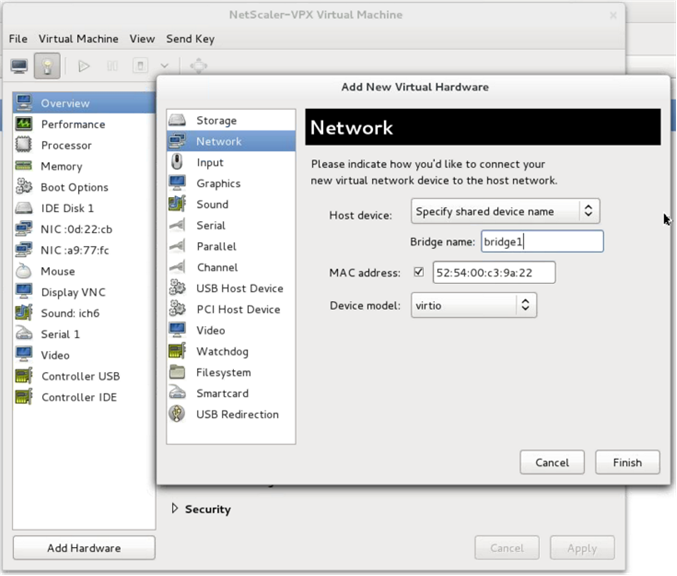
Host device— Select the "Specify shared device name" option.
-
Provide the Bridge name that is configured in the KVM host.Note:Make sure that you have configured a Linux bridge in the KVM host, bound the physical interface to the bridge, and put the bridge in the UP state.
-
Device model—
virtio. -
Click Finish.
-
-
For MacVTap
-
Host device—Select the physical interface from the menu.
-
Device model—
virtio.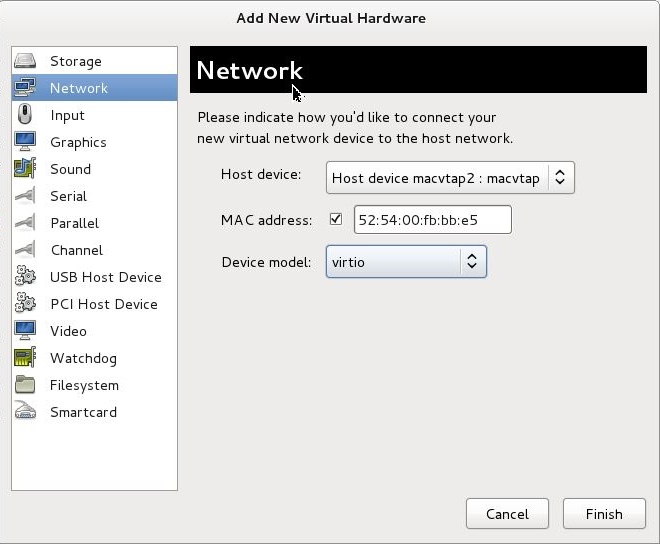
-
Click Finish. You can view the newly added NIC in the navigation pane.
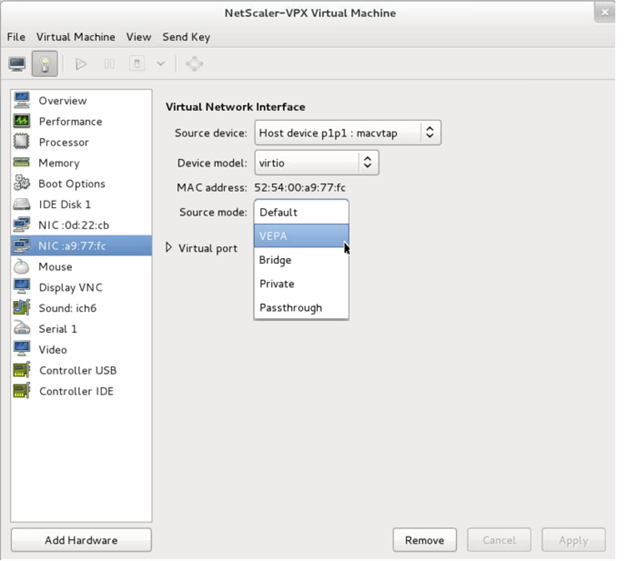
-
Select the newly added NIC and select the Source mode for this NIC. The available modes are VEPA, Bridge, Private, and Passthrough. For more details on the interface and modes, see Source Interface and Modes.
-
Click Apply.
-
-
-
If you want to auto-provision the VPX instance, see the section "Adding a Config Drive to Enable Auto-Provisioning" in this document. Otherwise, power on the VPX instance to complete the initial configuration manually.
Important:
Interface parameter configurations such as speed, duplex, and autonegotiation are not supported.