
Configure a NetScaler VPX instance to use SR-IOV network interface
After you have installed and configured the NetScaler VPX instance on VMware ESX, you can use the VMware vSphere web client to configure the virtual appliance to use single root I/O v virtualization (SR-IOV) network interfaces.
Limitations
A NetScaler VPX configured with SR-IOV network interface has the following limitations:
-
The following features are not supported on SR-IOV interfaces using the Intel 82599 10G NIC on ESX VPX:
-
L2 mode switching
-
Static Link Aggregation and LACP
-
Clustering
-
Admin partitioning \[Shared VLAN mode\]
-
High Availability \[Active - Active mode\]
-
Jumbo frames
-
IPv6
-
-
The following features are not supported on the SR-IOV interface with an Intel 82599 10G NIC on KVM VPX:
-
Static Link Aggregation and LACP
-
L2 mode switching
-
Clustering
-
Admin partitioning \[Shared VLAN mode\]
-
High Availability \[Active – Active mode\]
-
Jumbo frames
-
IPv6
-
VLAN configuration on Hypervisor for SR-IOV VF interface through
ip linkcommand is not supported
-
Prerequisite
-
Make sure that you add any of the following NICs to the ESX host:
-
Intel 82599 NIC, IXGBE driver version 3.7.13.7.14iov or later is recommended.
-
Mellanox ConnectX-4 NIC
-
-
Enable SR-IOV on the host physical adapter.Follow this procedure to enable SR-IOV on the host physical adapter:
-
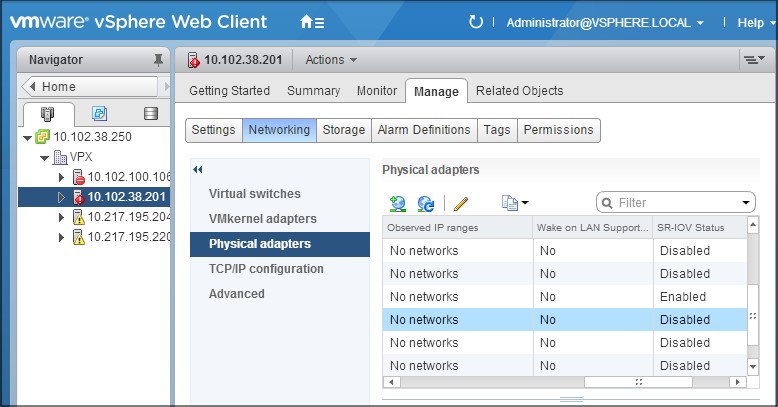
In the vSphere Web Client, navigate to the Host.
-
On the Manage > Networking tab, select Physical adapters. The SR-IOV Status field shows whether a physical adapter supports SR-IOV.
-
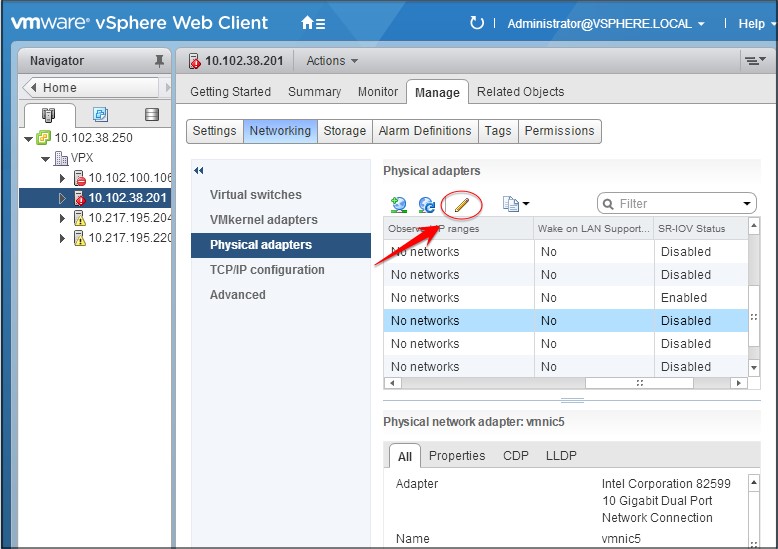
Select the physical adapter, and then click the pencil icon to open the Edit Settings dialog box.
-
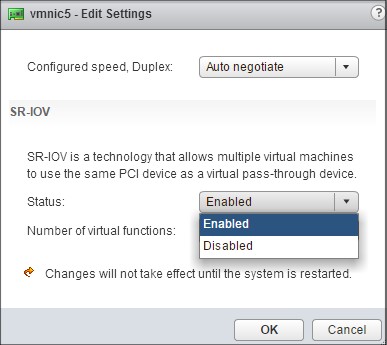
Under SR-IOV, select Enabled from the Status drop-down list.
-
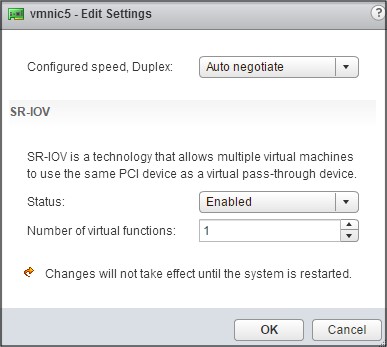
In the Number of virtual functions field, enter the number of virtual functions that you want to configure for the adapter.
-
Click OK.
-
Restart the host.
-
-
Create a Distributed Virtual Switch (DVS) and
Portgroups. For instructions, see the VMware Documentation.Note:Citrix has qualified the SR-IOV configuration on DVS andPortgroupsonly.
To configure NetScaler VPX instances to use SR-IOV network interface by using VMware vSphere Web Client:
-
In the vSphere Web Client, select Hosts and Clusters.
-
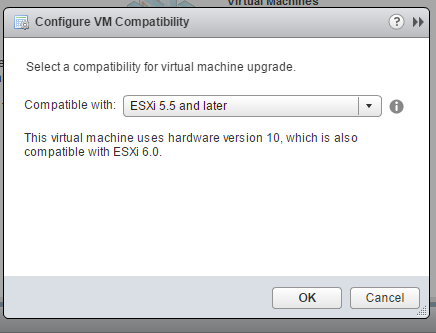
Upgrade the Compatibility setting of the NetScaler VPX instance to ESX 5.5 or later, as follows:a. Power off the NetScaler VPX instance.b. Right-click the NetScaler VPX instance and select Compatibility > Upgrade VM Compatibility.c. In the Configure VM Compatibility dialog box, select ESXi 5.5 and later from the Compatible with drop-down list and click OK.
-
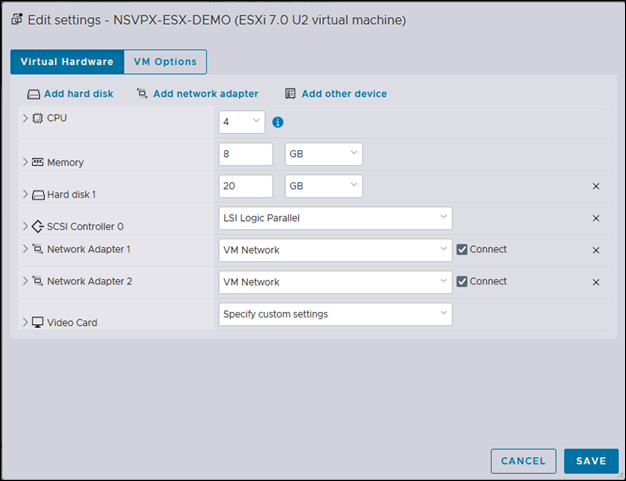
Right-click on the NetScaler VPX instance and click Edit Settings.
-
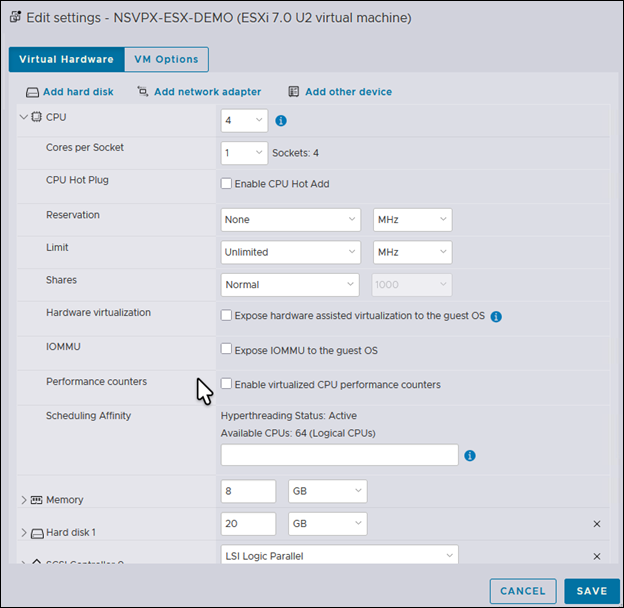
In the \<virtual\_appliance\> - Edit Settings dialog box, click the CPU section.
-
In the CPU section, update the following settings:
-
Number of CPUs
-
Number of Sockets
-
Reservations
-
Limit
-
Shares
Set the values as follows:a. In the CPU drop-down list, select the number of CPUs to assign to the virtual appliance.b. In the Cores per Socket drop-down list, select the number of sockets.c. (Optional) In the CPU Hot Plug field, select or clear the Enable CPU Hot Add check box.Note:Citrix® recommends accepting the default (disabled).d. In the Reservation drop-down list, select the number that is shown as the maximum value.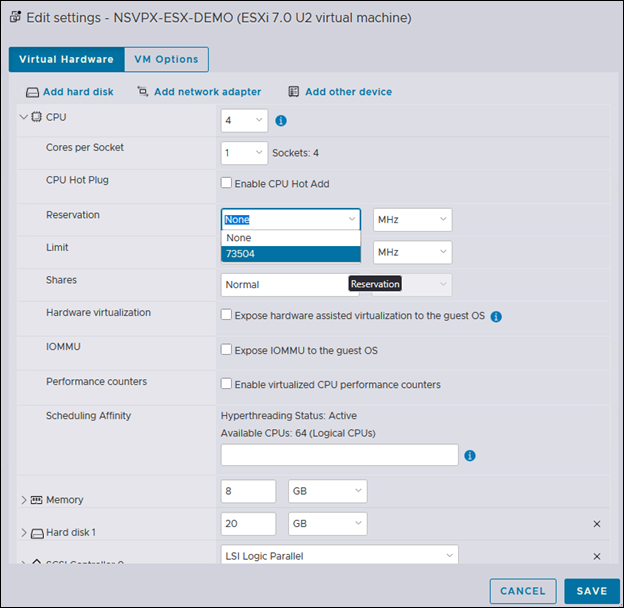 e. In the Limit drop-down list, select the number that is shown as the maximum value.
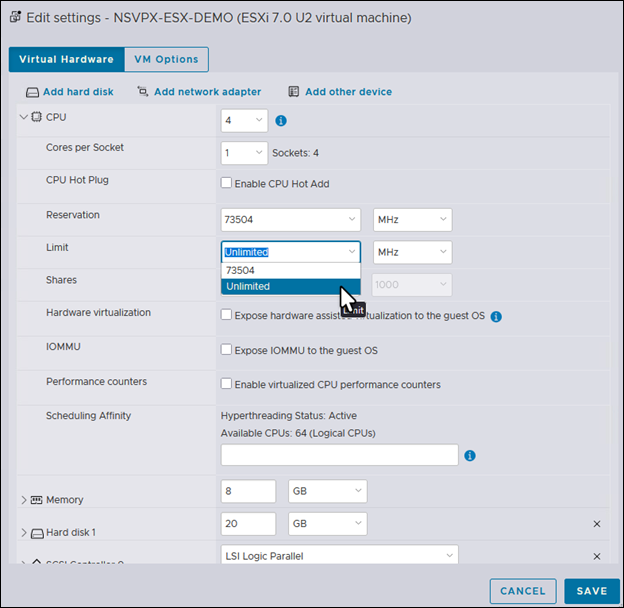 f. In the Shares drop-down lists, select Custom and the number that is shown as the maximum value.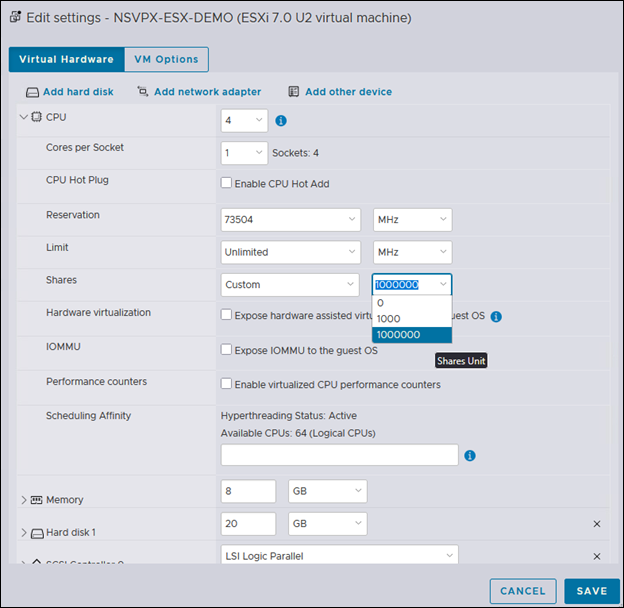
-
-
In the Memory section, update the following settings:
-
Size of RAM
-
Reservations
-
Limit
-
Shares
Set the values as follows:a. In the RAM drop-down list, select the size of the RAM. It must be the number of vCPUs x 2 GB. For example, if the number of vCPU is 4 then RAM = 4 x 2 GB = 8 GB.Note:For Advanced or Premium edition of the NetScaler VPX appliance, make sure that you allocate 4 GB of RAM to each vCPU. For example, if the number of vCPU is 4 then RAM = 4 x 4 GB = 16 GB.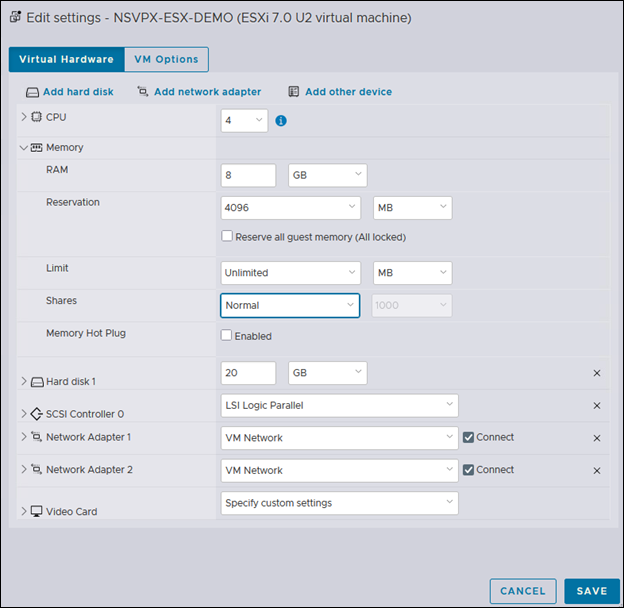 b. In the Reservation drop-down list, enter the value for the memory reservation, and select the Reserve all guest memory (All locked) check box. The memory reservation must be number of vCPUs x 2 GB. For example, if the number of vCPUs is 4, the memory reservation must be 4 x 2 GB = 8 GB.Note:For Advanced or Premium edition of the NetScaler VPX appliance, make sure that you allocate 4 GB of RAM to each vCPU. For example, if the number of vCPU is 4 then RAM = 4 x 4 GB = 16 GB.
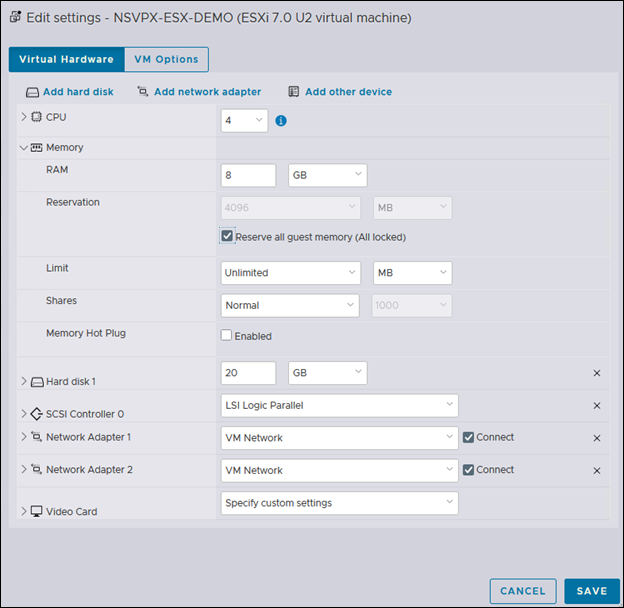 c. In the Limit drop-down list, select the number that is shown as the maximum value.
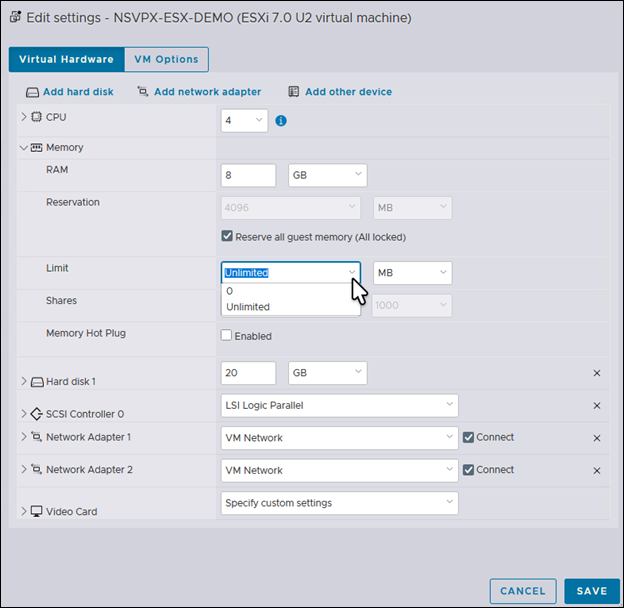 d. In the Shares drop-down lists, select Custom, and select the number that is shown as the maximum value.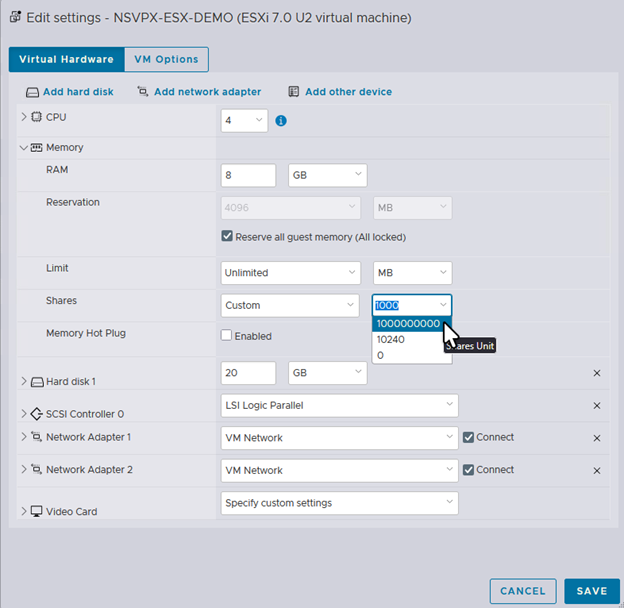
-
-
Add an SR-IOV network interface. From the New device drop-down list, select Network and click Add.
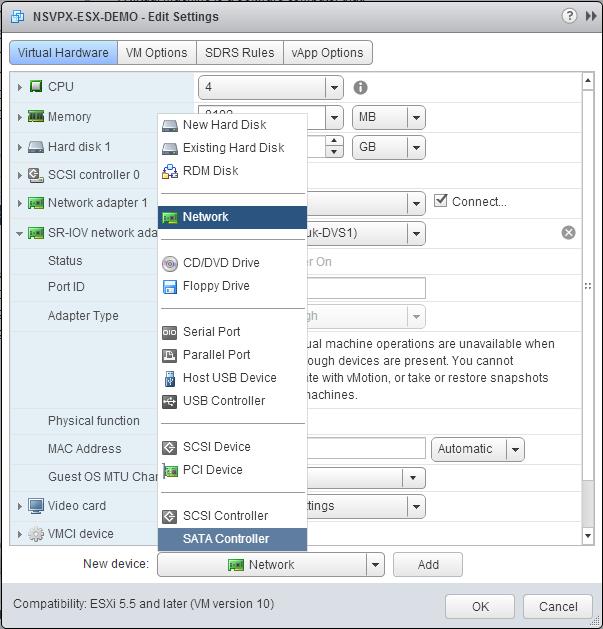
-
In the New Network section. From the drop-down list, select the
Portgroupthat you created, and do the following:a. In the Adapter Type drop-down list, select SR-IOV passthrough.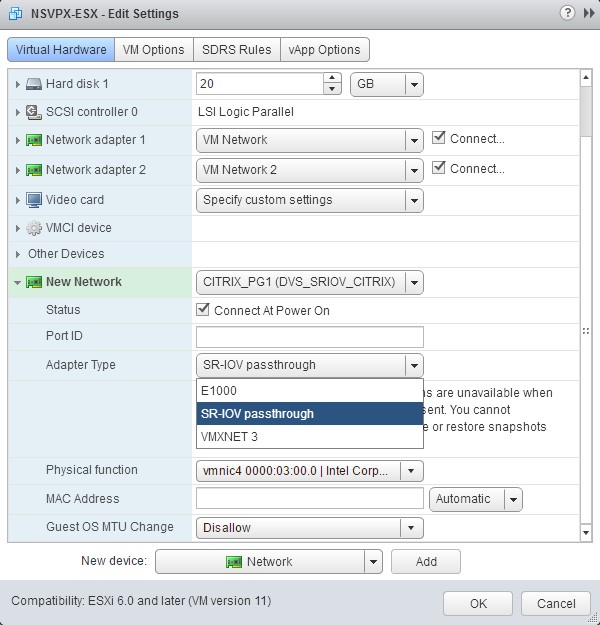 b. In the Physical function drop-down list, select the physical adapter mapped with the
Portgroup.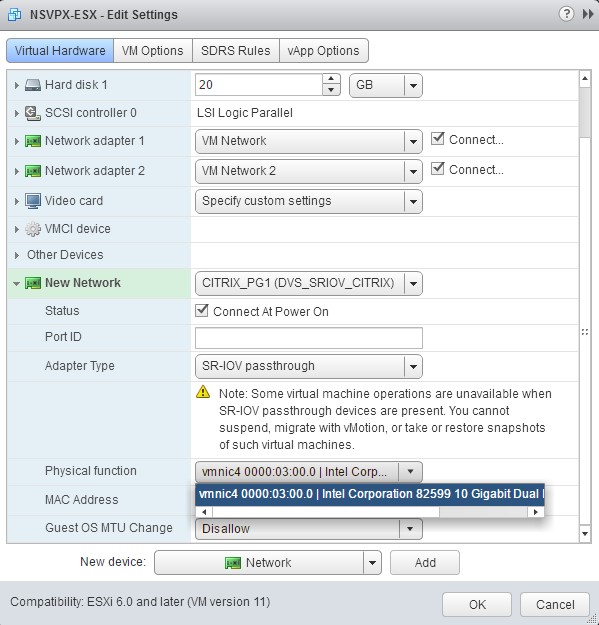 c. In the Guest OS MTU Change drop-down list, select Disallow.
 -
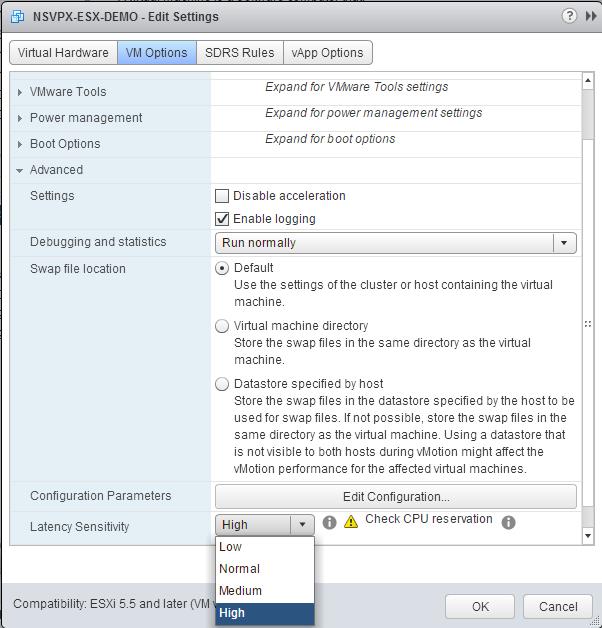
In the \<virtual\_appliance\> - Edit Settings dialog box, click the VM Options tab.
-
On the VM Options tab, select the Advanced section. From the Latency Sensitivity drop-down list, select High.
-
Click OK.
-
Power on the NetScaler VPX instance.
-
Once the NetScaler VPX instance powers on, you can use the following command to verify the configuration:show interface summary
The output must show all the interfaces that you configured:
> show interface summary
 --------------------------------------------------------------------------------
       Interface  MTU        MAC                  Suffix
 --------------------------------------------------------------------------------
 1     0/1        1500       00:0c:29:1b:81:0b    NetScaler Virtual Interface
 2     10/1       1500       00:50:56:9f:0c:6f    Intel 82599 10G VF Interface
 3     10/2       1500       00:50:56:9f:5c:1e    Intel 82599 10G VF Interface
 4     10/3       1500       00:50:56:9f:02:1b    Intel 82599 10G VF Interface
 5     10/4       1500       00:50:56:9f:5a:1d    Intel 82599 10G VF Interface
 6     10/5       1500       00:50:56:9f:4e:0b    Intel 82599 10G VF Interface
 7     LO/1       1500       00:0c:29:1b:81:0b    Netscaler Loopback interface
  Done
 > show inter 10/1
 1)      Interface 10/1 (Intel 82599 10G VF Interface) #1
         flags=0xe460 <ENABLED, UP, UP, HAMON, 802.1q>
         MTU=1500, native vlan=55, MAC=00:50:56:9f:0c:6f, uptime 0h21m53s
         Actual: media FIBER, speed 10000, duplex FULL, fctl NONE, throughput 10000
         LLDP Mode: NONE,                 LR Priority: 1024

         RX: Pkts(838020742) Bytes(860888485431) Errs(0) Drops(2527) Stalls(0)
         TX: Pkts(838149954) Bytes(860895860507) Errs(0) Drops(0) Stalls(0)
         NIC: InDisc(0) OutDisc(0) Fctls(0) Stalls(0) Hangs(0) Muted(0)
         Bandwidth thresholds are not set.
  Done