
Scenario: standalone instance
This scenario illustrates how to deploy a NetScaler VPX standalone EC2 instance in AWS by using the AWS GUI. Create a standalone VPX instance with three NICs. The instance, which is configured as a load balancing virtual server, communicates with back-end servers (the server farm). For this configuration, set up the required communication routes between the instance and the back-end servers, and between the instance and the external hosts on the public internet.
For more details about the procedure for deploying a VPX instance, see Deploy a NetScaler VPX standalone instance on AWS.
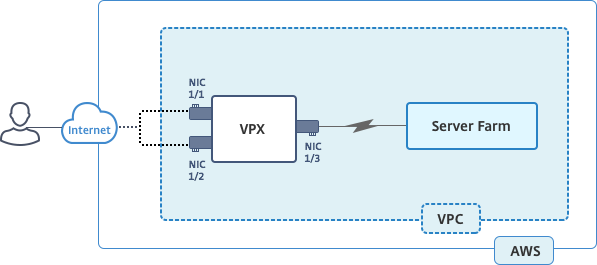
Create three NICs. Each NIC can be configured with a pair of IP addresses (public and private). The NICs serve the following purposes.
| NIC | Purpose | Associated with |
|---|---|---|
| eth0 | Serves management traffic (NSIP) | A public IP address and a private IP address |
| eth1 | Serves client-side traffic (VIP) | A public IP address and a private IP address |
| eth2 | Communicates with back-end servers (SNIP) | A public IP address (Private IP address not mandatory) |
Step 1: Create a VPC.
-
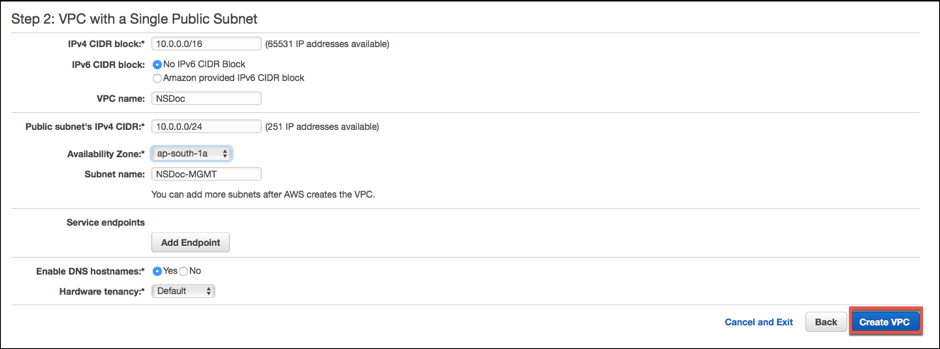
Log on to the AWS web console and navigate to Networking & Content Delivery \> VPC. Click Start VPC Wizard.
-
Select VPC with a Single Public Subnet and click Select.
-
Set the IP CIDR Block to 10.0.0.0/16, for this scenario.
-
Give a name for the VPC.
-
Set the public subnet to 10.0.0.0/24. (This is the management network).
-
Select an availability zone.
-
Give a name for the subnet.
-
Click Create VPC.
Step 2: Create extra subnets.
-
Open the Amazon VPC console at
<https://console.aws.amazon.com/vpc/>. -
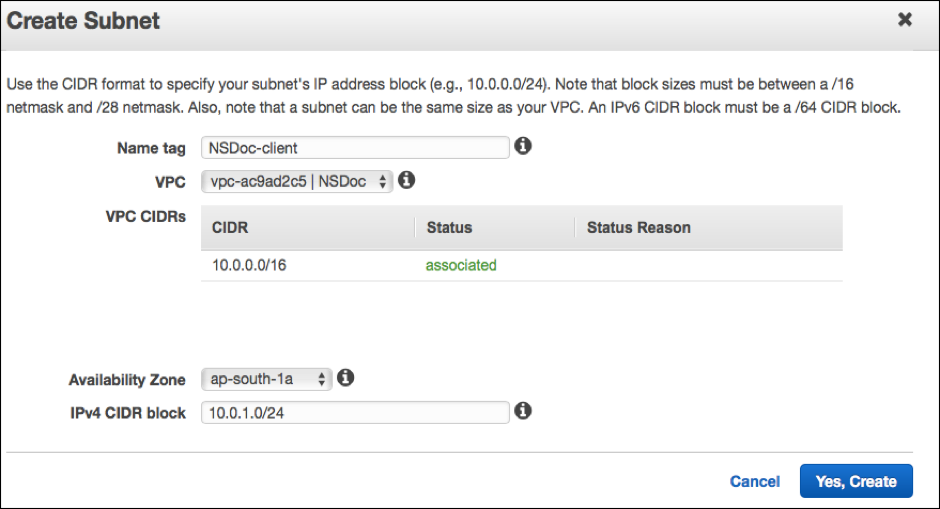
In the navigation pane, choose Subnets, Create Subnet after you enter the following details.
-
Name tag: Provide a name for your subnet.
-
VPC: Choose the VPC for which you're creating the subnet.
-
Availability Zone: Choose the availability zone in which you created the VPC in step 1.
-
IPv4 CIDR block: Specify an IPv4 CIDR block for your subnet. For this scenario, choose 10.0.1.0/24.
-
-
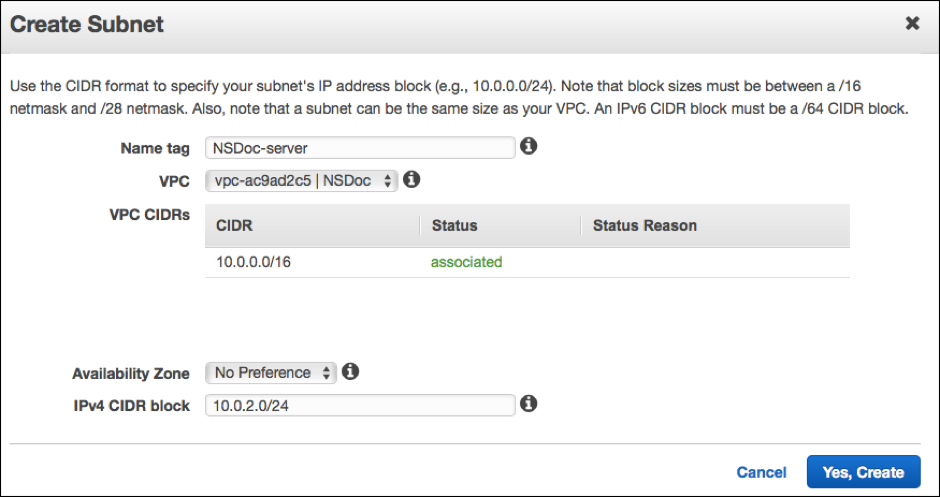
Repeat the steps to create one more subnet for back-end servers.
Step 3: Create a route table.
-
Open the Amazon VPC console at
<https://console.aws.amazon.com/vpc/>. -
In the navigation pane, choose Route Tables > Create Route Table.
-
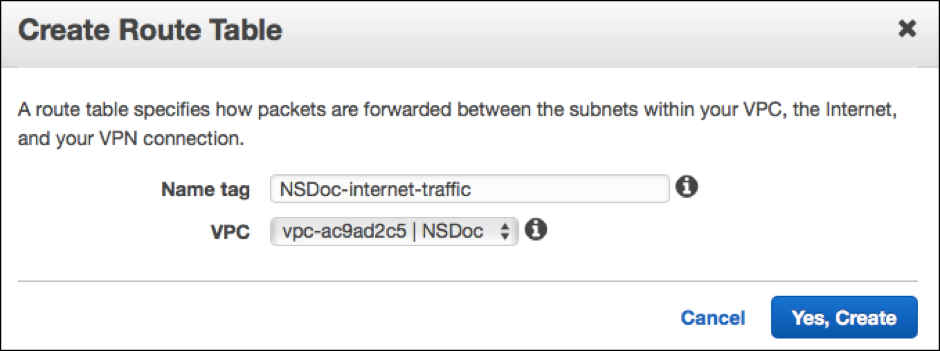
In the Create Route Table window, add a name and select the VPC that you created in step 1.
-
Click Yes, Create.
 The route table is assigned to all the subnets that you created for this VPC, so that routing of traffic from an instance in one subnet can reach an instance in another subnet.
 -
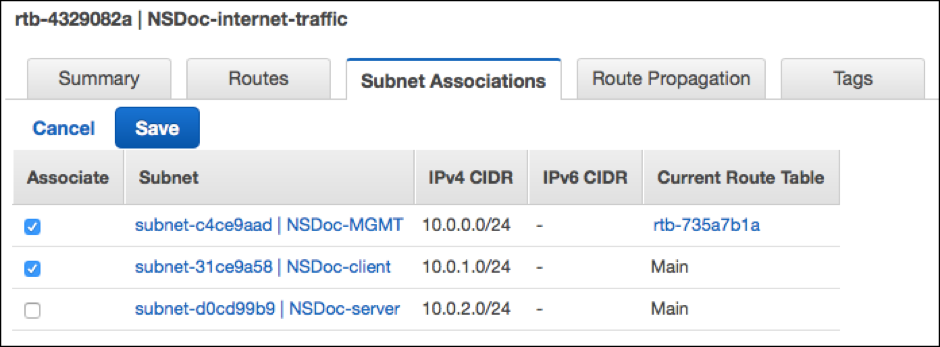
Click Subnet Associations, and then click Edit.
-
Click the management and client subnet and click Save. This creates a route table for internet traffic only.
-
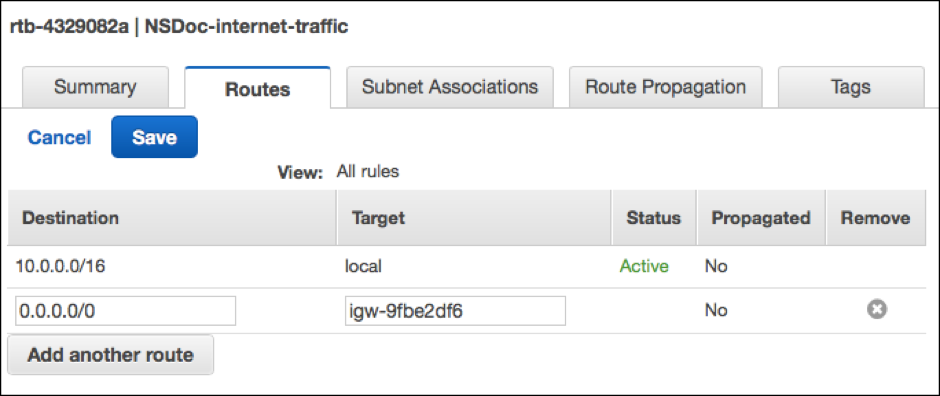
Click Routes > Edit > Add another route.
-
In the Destination field add 0.0.0.0/0, and click the Target field to select igw-\<xxxx\> the Internet Gateway that the VPC Wizard created automatically.
-
Click Save.
-
Follow the steps to create a route table for server-side traffic.
Step 4: Create a NetScaler VPX instance.
-
Log on the AWS management console and click EC2 under Compute.
-
Click AWS Marketplace. In the Search AWS Marketplace bar, type NetScaler VPX and press Enter. The available NetScaler VPX editions are displayed.
-
Click Select to choose the desired NetScaler VPX edition. The EC2 instance wizard starts.
-
In the Choose Instance Type page, select m4. Xlarge (recommended) and click Next: Configure Instance Details.
-
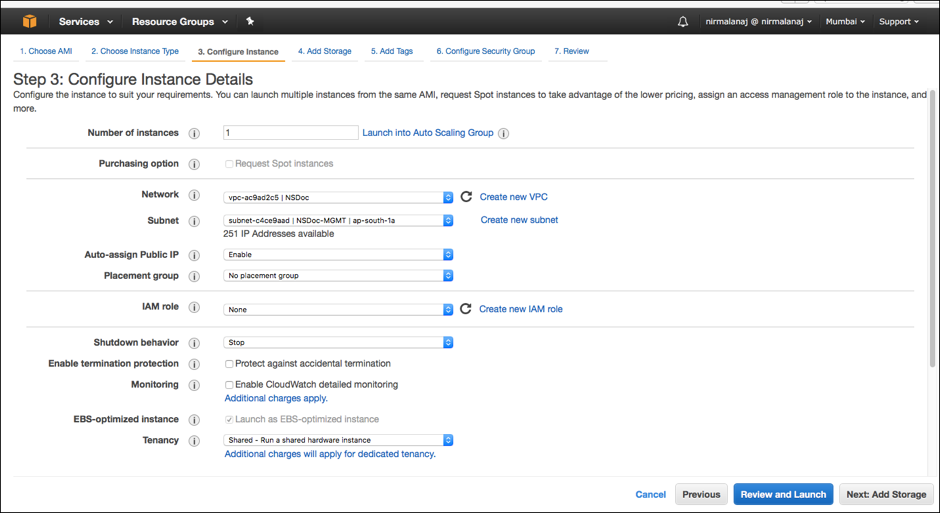
In the Configure Instance Details page, select the following, and then click Next: Add Storage.
-
Number of instances: 1
-
Network: the VPC that created in Step 1
-
Subnet: the management subnet
-
Auto-assign Public IP: Enable
-
-
In the Add Storage page, select the default option, and click Next: Add Tags.
-
In the Add Tags page, add a name for the instance, and click Next: Configure Security Group.
-
In the Configure Security Group page, select the default option (which is generated by AWS Marketplace and is based on recommended settings by Citrix® Systems) and then click Review and Launch > Launch.
-
You are prompted to select an existing key pair or create and new key pair. From the Select a key pair drop-down list, select the key pair that you created as a prerequisite (See the Prerequisite section.)
-
Check the box to acknowledge the key pair and click Launch Instances.
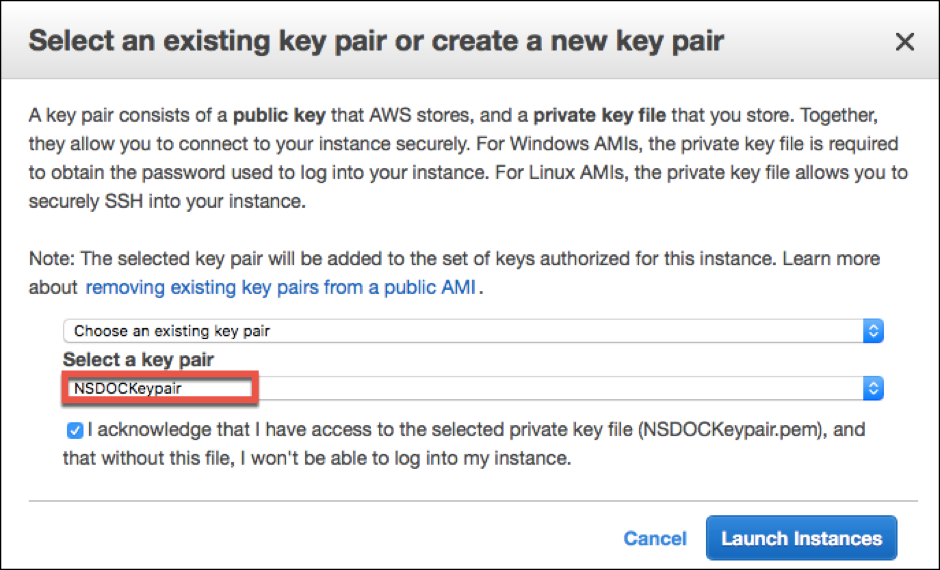
Launch Instance Wizard displays the Launch Status, and the instance appears in the list of instances when it is fully launched.
The check instance, go the AWS console click EC2 > Running Instances. Select the instance and add a name. Make sure the Instance State is running and Status Checks is complete.
Step 5: Create and attach more network interfaces.
When you created the VPC, only one network interface associated with it. Now add two more network interfaces to the VPC, for the VIP and SNIP.
-
Open the Amazon EC2 console at
<https://console.aws.amazon.com/ec2/>. -
In the navigation pane, choose Network Interfaces.
-
Choose Create Network Interface.
-
For Description, enter a descriptive name.
-
For Subnet, select the subnet that you created previously for the VIP.
-
For Private IP, leave the default option.
-
For Security groups, select the group.
-
Click Yes, Create.
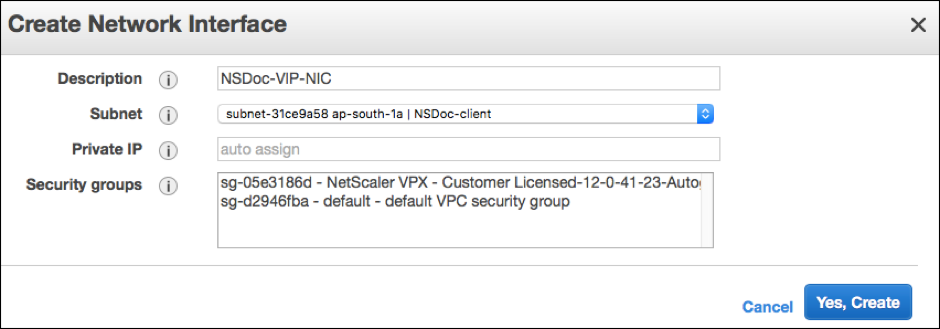
-
After the network interface is created, add a name to the interface.
-
Repeat the steps to create a network interface for server-side traffic.
Attach the network interfaces:
-
In the navigation pane, choose Network Interfaces.
-
Select the network interface and choose Attach.
-
In the Attach Network Interface dialog box, select the instance and choose Attach.
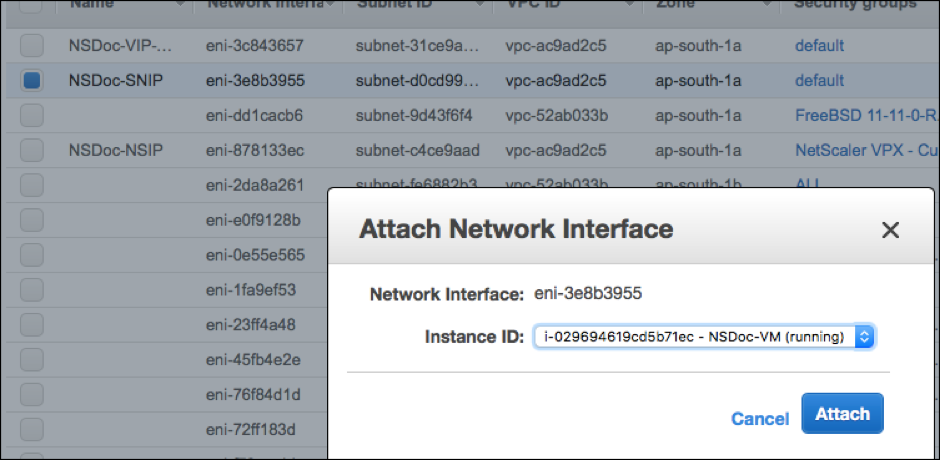
Step 6: Attach an elastic IP to the NSIP.
-
From the AWS management console, go to NETWORK & SECURITY > Elastic IPs.
-
Check for available free EIP to attach. If none, click Allocate new address.
-
Select the newly allocated IP address and choose Actions > Associate address.
-
Click the Network interface radio button.
-
From the Network interface drop-down list, select the management NIC.
-
From the Private IP drop-down menu, select the AWS-generated IP address.
-
Select the Reassociation check box.
-
Click Associate.
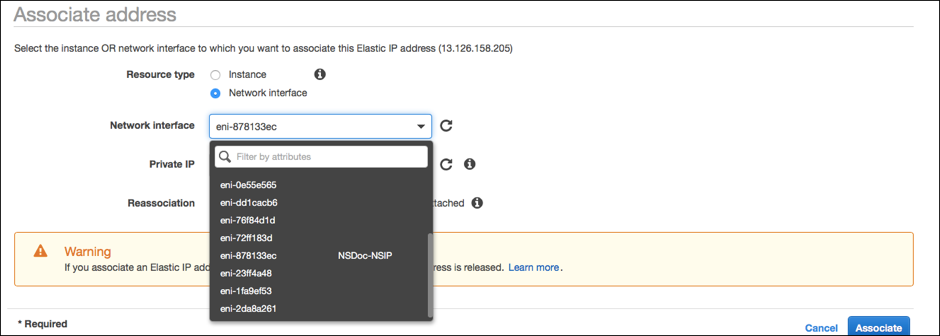
Access the VPX instance:
After you’ve configured a standalone NetScaler VPX instance with three NICs, log on to the VPX instance to complete the NetScaler-side configuration. Use of the following options:
-
GUI: Type the public IP of the management NIC in the browser. Log on by using
nsrootas the user name and the instance ID (i-0c1ffe1d987817522) as the password.
Note:
On your first logon, you are prompted to change the password for security reasons. After changing the password, you must save the configuration. If the configuration is not saved and the instance restarts, you must log on with the default password. Change the password again at the prompt and save the configuration.
-
SSH: Open an SSH client and type:
ssh -i \<location of your private key\> ns root@\<public DNS of the instance\>
To find the public DNS, click the instance, and click Connect.
Related information:
-
To configure the NetScaler-owned IP addresses (NSIP, VIP, and SNIP), see Configuring NetScaler-Owned IP Addresses.
-
You’ve configured a BYOL version of the NetScaler VPX appliance, for more information see the VPX Licensing Guide at
<https://support.citrix.com/s/article/CTX255959-how-to-allocate-and-install-citrix-netscaler-vpx-licenses?language=en_US>