
Apply NetScaler VPX configurations at the first boot of the NetScaler appliance in cloud
You can apply the NetScaler VPX configurations during the first boot of the NetScaler appliance in a cloud environment. This stage is addressed as the preboot stage in this document. Therefore in certain cases like ADC pooled licensing, a specific VPX instance is brought up in much lesser time. This feature is available in Microsoft Azure, Google Cloud platform, and AWS clouds.
What is user data
When you provision a VPX instance in a cloud environment, you have the option of passing user data to the instance. The user data allows you to perform common automated configuration tasks, customize the startup behaviors of instances, and run scripts after the instance starts. At the first boot, the NetScaler VPX instance performs the following tasks:
-
Reads the user data.
-
Interprets the configuration provided in user data.
-
Applies the newly added configuration as it boots up.
How to provide preboot user data in cloud instance
You can provide preboot user data to the cloud instance in XML format. Different clouds have different interfaces for providing user data.
Provide preboot user data using the AWS console
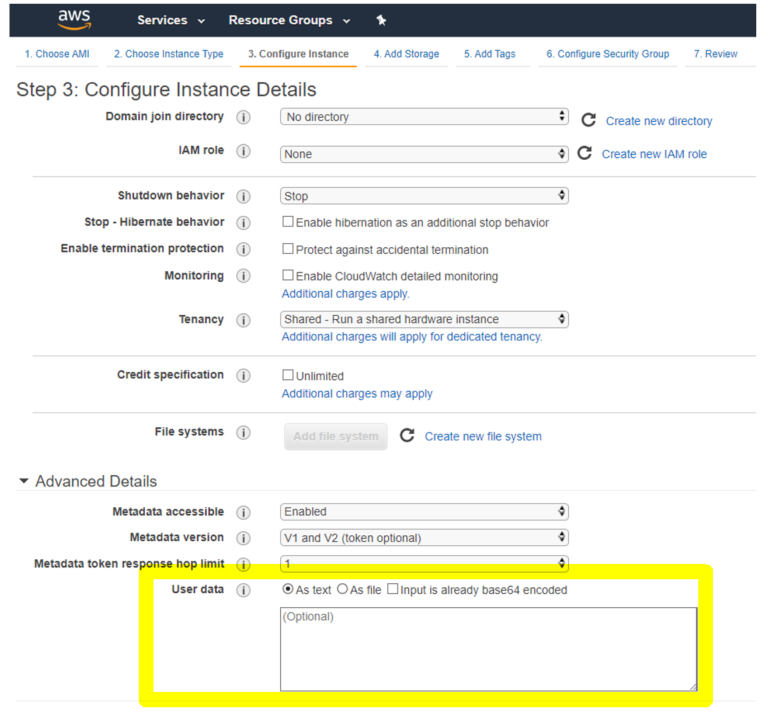
When you provision a NetScaler VPX instance using the AWS console, navigate to Configure Instance Details > Advanced Details, and provide the preboot user data configuration in the User data field.
For detailed instructions on each of the steps, see Deploy a NetScaler VPX instance on AWS by using the AWS web console. For more information, see AWS documentation on Launching an instance.
Note:
AWS IMDSv2 only mode for the preboot user data feature is supported from NetScaler VPX release 13.1.48.x and later releases.
Provide preboot user data using AWS CLI
Type the following command in the AWS CLI:
aws ec2 run-instances \
     --image-id ami-0abcdef1234567890 \
     --instance-type t2.micro \
     --count 1 \
     --subnet-id subnet-08fc749671b2d077c \
     --key-name MyKeyPair \
     --security-group-ids sg-0b0384b66d7d692f9 \
     --user-data file://my_script.txt
For more information, see AWS documentation on Running instances.
For more information, see AWS documentation on Using instance user data
Provide preboot user data using the Azure console
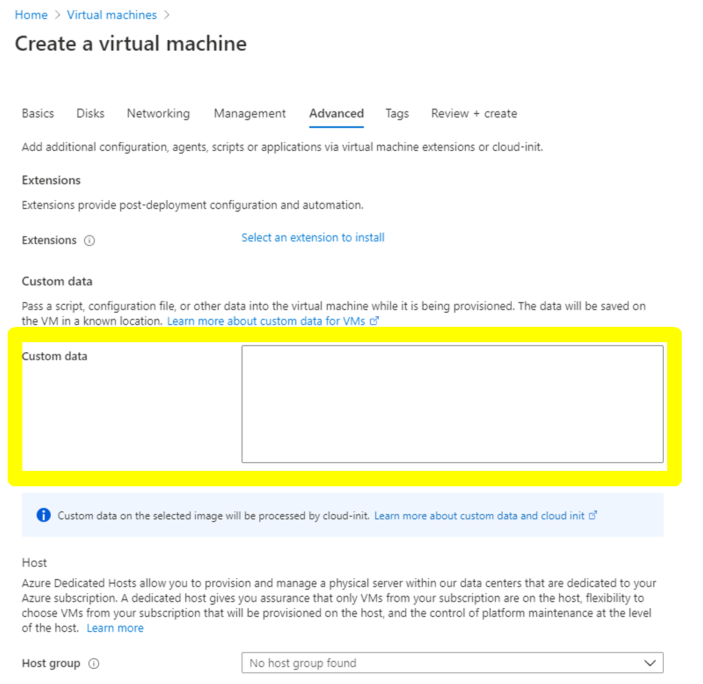
When you provision a NetScaler VPX instance using Azure console, navigate to Create a virtual machine > Advanced tab. In the Custom data field, provide preboot user data configuration.
Provide preboot user data using the Azure CLI
Type the following command in the Azure CLI:
az vm create \
   --resource-group myResourceGroup \
   --name MyVm \
   --image debian \
   --custom-data MyCloudInitScript.txt \
Example:
az vm create --resource-group MyResourceGroup -name MyVm --image debian --custom-data MyCloudInitScript.txt
You can pass your custom data or preboot configuration as a file to "--custom-data" parameter. In this example, the file name is MyCloudInitScript.txt.
For more information, see Azure CLI documentation.
Provide preboot user data using the GCP console
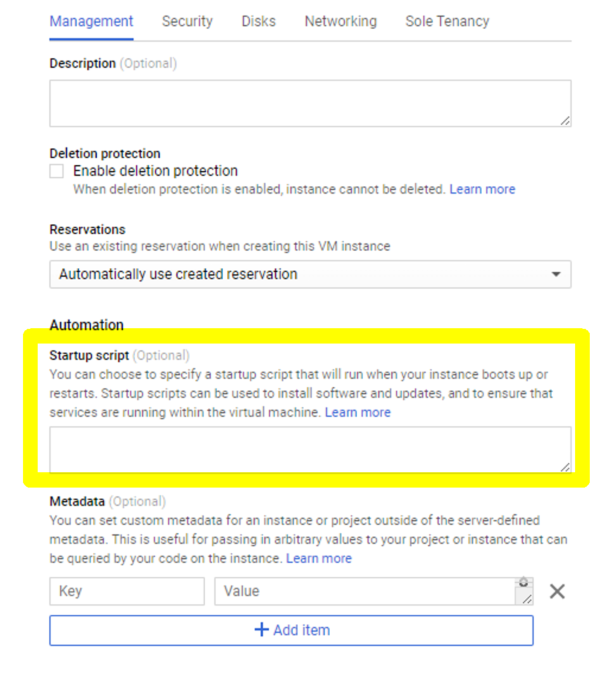
When you provision a NetScaler VPX instance using GCP console, fill in the properties of instance. Expand Management, security, disks, networking, sole tenancy. Navigate to the Management tab. In the Automation section, provide preboot user data configuration in the Startup Script field.
For detailed information on creating the VPX instance using GCP, see Deploy a NetScaler VPX instance on Google Cloud Platform.
Provide preboot user data using the gcloud CLI
Type the following command in the GCP CLI:
gcloud compute instances create INSTANCE_NAMES --metadata-from-file=startup-script=LOCAL_FILE_PATH
metadata-from-file - Reads the value or user data from a file stored at the <LOCAL_FILE_PATH>.
For more information, see gcloud CLI documentation
Preboot user data format
The preboot user data must be provided to the cloud instance in XML format. The NetScaler preboot user data that you provide through the cloud infrastructure during boot can comprise the following four sections:
-
NetScaler configuration represented with the
<NS-CONFIG>tag. -
Custom bootstrapping the NetScaler represented with the
<NS-BOOTSTRAP>tag. -
Storing user-scripts in NetScaler represented with the
<NS-SCRIPTS>tag. -
Pooled licensing configuration represented with the
<NS-LICENSE-CONFIG>tag.
You can provide the preceding four sections in any order within the ADC preboot configuration. Ensure to strictly follow the formatting shown in the following sections while providing the preboot user data.
Note:
The entire preboot user data configuration must be enclosed in the
<NS-PRE-BOOT-CONFIG> tag as shown in the following examples.
Example 1:
<NS-PRE-BOOT-CONFIG>
      <NS-CONFIG>          </NS-CONFIG>
      <NS-BOOTSTRAP>       </NS-BOOTSTRAP>
      <NS-SCRIPTS>         </NS-SCRIPTS>
      <NS-LICENSE-CONFIG>  </NS-LICENSE-CONFIG>
 </NS-PRE-BOOT-CONFIG>
Example 2:
<NS-PRE-BOOT-CONFIG>
     <NS-LICENSE-CONFIG> </NS-LICENSE-CONFIG>
     <NS-SCRIPTS>        </NS-SCRIPTS>
     <NS-BOOTSTRAP>      </NS-BOOTSTRAP>
     <NS-CONFIG>         </NS-CONFIG>
 </NS-PRE-BOOT-CONFIG>
Use the
<NS-CONFIG> tag to provide the specific NetScaler VPX configurations that needs to be applied to the VPX instance at the preboot stage.
Note:
The
<NS-CONFIG> section must have valid ADC CLI commands. The CLIs are not verified for the syntactic errors or format.
NetScaler configurations
Use the
<NS-CONFIG> tag to provide the specific NetScaler VPX configurations that needs to be applied to the VPX instance at the preboot stage.
Note:
The
<NS-CONFIG> section must have valid ADC CLI commands. The CLIs are not verified for the syntactic errors or format.
Example:
In the following example, the
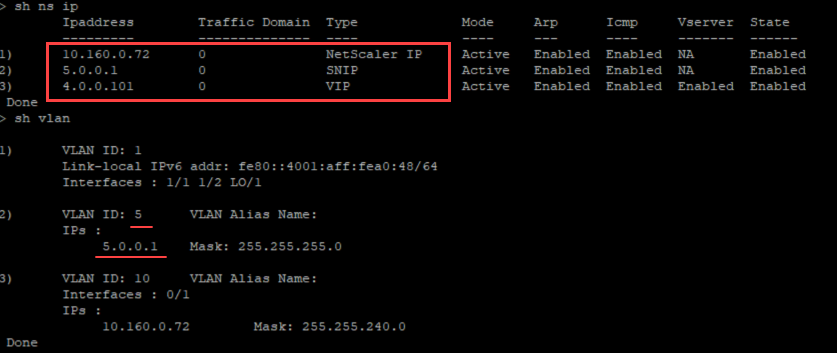
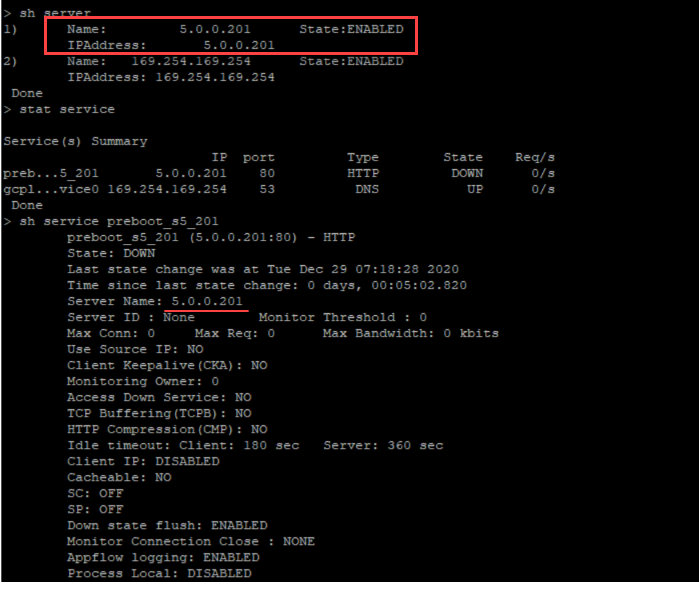
<NS-CONFIG> section has the details of the configurations. A VLAN of ID '5' is configured and bound to the SNIP (5.0.0.1). A load balancing virtual server (4.0.0.101) is also configured.
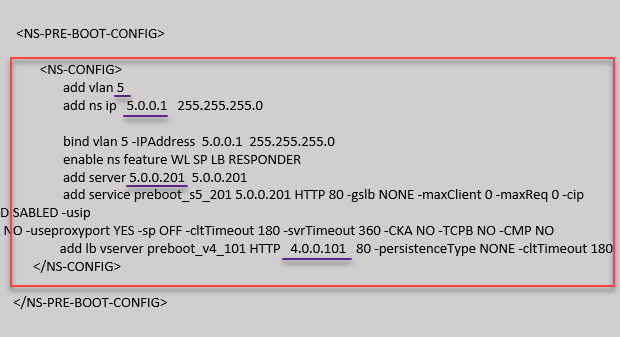
You can copy the configuration shown in the preceding screenshot from here:
<NS-PRE-BOOT-CONFIG>
      <NS-CONFIG>
          add vlan 5
          add ns ip 5.0.0.1 255.255.255.0
          bind vlan 5 -IPAddress 5.0.0.1 255.255.255.0
          enable ns feature WL SP LB RESPONDER
          add server 5.0.0.201 5.0.0.201
          add service preboot_s5_201 5.0.0.201 HTTP 80 -gslb NONE -maxClient 0 -maxReq 0 -cip DISABLED -usip
  NO -useproxyport YES -sp OFF -cltTimeout 180 -svrTimeout 360 -CKA NO -TCPB NO -CMP NO
          add lb vserver preboot_v4_101 HTTP 4.0.0.101 80 -persistenceType NONE -cltTimeout 180
      </NS-CONFIG>
 </NS-PRE-BOOT-CONFIG>
The NetScaler VPX instance comes up with the configuration applied in the
<NS-CONFIG> section as shown in the following illustrations.
User scripts
Use the
<NS-SCRIPTS> tag to provide any script that must be stored and ran in NetScaler VPX instance.
You can include many scripts within the
<NS-SCRIPTS> tag. Each script must be included within the <SCRIPT> tag. Each <SCRIPT> section corresponds to one script and contains all the details of the script using the following sub tags.
-
<SCRIPT-NAME>:Indicates the name of the script file that must be stored. -
<SCRIPT-CONTENT>:Indicates the content of the file that must be stored. -
<SCRIPT-TARGET-LOCATION>:Indicates the designated target location where this file must be stored. If the target location is not provided, by default, the file, or script is saved in the "/nsconfig" directory. -
<SCRIPT-NS-BOOTUP>:Specify the commands that you use to run the script.-
If you use the
<SCRIPT-NS-BOOTUP>section, the commands provided in the section are stored in "/nsconfig/nsafter.sh", and the commands are run after the packet engine boots up as part of "nsafter.sh" execution. -
If you do not use the
<SCRIPT-NS-BOOTUP>section, the script file is stored in the target location that you specify.
-
Example 1:
In this example, the
<NS-SCRIPTS> tag contains details of only one script: script-1.sh. The "script-1.sh" script is saved at the "/var" directory. The script is populated with the specified contents, and is run with the "sh /var/script-1.sh" command after packet engine boots up.
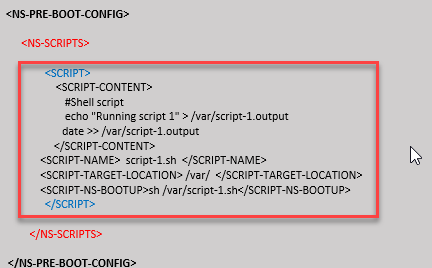
You can copy the configuration shown in the preceding screenshot from here:
<NS-PRE-BOOT-CONFIG>
     <NS-SCRIPTS>
     <SCRIPT>
             <SCRIPT-CONTENT>
                 #Shell script
                 echo "Running script 1" > /var/script-1.output
                 date >> /var/script-1.output
             </SCRIPT-CONTENT>

                 <SCRIPT-NAME> script-1.sh </SCRIPT-NAME>
                 <SCRIPT-TARGET-LOCATION> /var/ </SCRIPT-TARGET-LOCATION>
                 <SCRIPT-NS-BOOTUP>sh /var/script-1.sh</SCRIPT-NS-BOOTUP>
         </SCRIPT>
     </NS-SCRIPTS>
 </NS-PRE-BOOT-CONFIG>
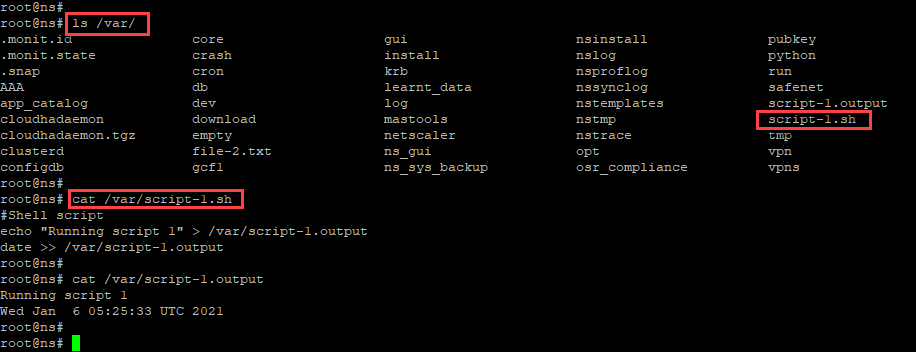
In the following snapshot, you can verify that "script-1.sh" script is saved in the "/var/" directory. The "Script-1.sh" script is run, and the output file is created appropriately.
Example 2:
In the following example, the
<NS-SCRIPTS> tag contains details of two scripts.
-
The first script is saved as "script-1.sh" at the "/var" directory. The script is populated with the specified contents, and is run with command "sh /var/script-1.sh" after packet engine boots up.
-
The second script is saved as "file-2.txt" at the "/var" directory. This file is populated with the specified contents. But it is not run because the bootup execution command
<SCRIPT-NS-BOOTUP>is not provided.
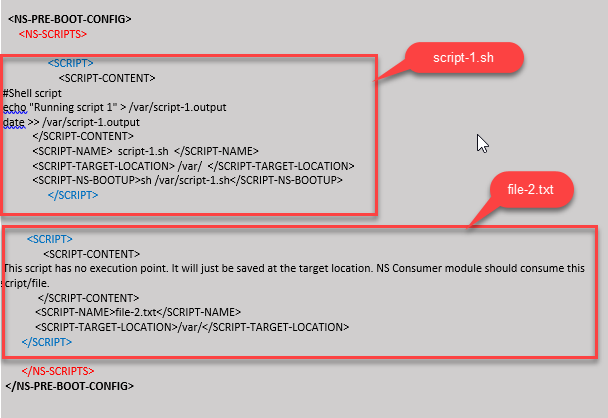
You can copy the configuration shown in the preceding screenshot from here:
<NS-PRE-BOOT-CONFIG>
     <NS-SCRIPTS>
         <SCRIPT>
             <SCRIPT-CONTENT>
                #Shell script
                echo "Running script 1" > /var/script-1.output
                date >> /var/script-1.output
             </SCRIPT-CONTENT>

             <SCRIPT-NAME>  script-1.sh  </SCRIPT-NAME>
             <SCRIPT-TARGET-LOCATION> /var/  </SCRIPT-TARGET-LOCATION>
             <SCRIPT-NS-BOOTUP>sh /var/script-1.sh</SCRIPT-NS-BOOTUP>
             </SCRIPT>

         <SCRIPT>
             <SCRIPT-CONTENT>
                 This script has no execution point.
                 It will just be saved at the target location
                 NS Consumer module should consume this script/file
             </SCRIPT-CONTENT>
             <SCRIPT-NAME>file-2.txt</SCRIPT-NAME>
             <SCRIPT-TARGET-LOCATION>/var/</SCRIPT-TARGET-LOCATION>
         </SCRIPT>
     </NS-SCRIPTS>
 </NS-PRE-BOOT-CONFIG>
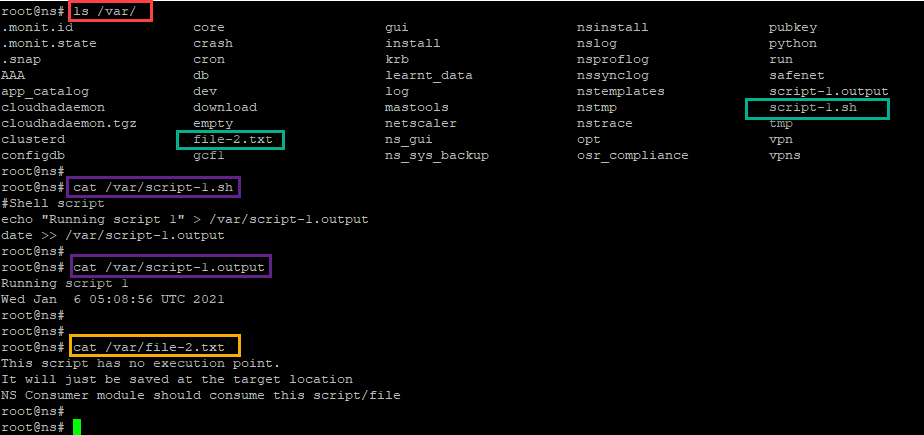
In the following snapshot, you can verify that script-1.sh and file-2.txt are created in the "/var/" directory. The Script-1.sh is run, and the output file is created appropriately.
Licensing
Use the
<NS-LICENSE-CONFIG> tag to apply NetScaler pooled licensing while booting up the VPX instance. Use the <LICENSE-COMMANDS> tag within <NS-LICENSE-CONFIG> section to provide the pooled license commands. These commands must be syntactically valid.
You can specify the pooled licensing details such as, license type, capacity, and license server in the
<LICENSE-COMMANDS> section using the standard pooled licensing commands. For more information, see Configure NetScaler pooled capacity licensing.
After applying the
<NS-LICENSE-CONFIG>, the VPX comes up with the requested edition upon boot, and VPX tries to check out the configured licenses from the license server.
-
If the license checkout is successful, the configured bandwidth is applied to VPX.
-
If the license checkout fails, the license is not retrieved from license server within 10–12 minutes approximately. As a result, the system reboots and enters an unlicensed state.
Example:
In the following example, after applying the
<NS-LICENSE-CONFIG>, the VPX comes up with the Premium edition upon boot, and VPX tries to check out the configured licenses from the license server (10.102.38.214).
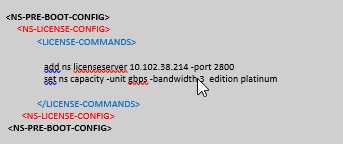
You can copy the configuration shown in the preceding screenshot from here:
<NS-PRE-BOOT-CONFIG>
    <NS-LICENSE-CONFIG>
         <LICENSE-COMMANDS>
             add ns licenseserver 10.102.38.214 -port 2800
             set ns capacity -unit gbps -bandwidth 3  edition platinum
         </LICENSE-COMMANDS>
     </NS-LICENSE-CONFIG>
 </NS-PRE-BOOT-CONFIG>
As shown in the following illustration, you can run the "show license server" command, and verify that the license server (10.102.38.214) is added to the VPX.

Bootstrapping
Use the
<NS-BOOTSTRAP> tag to provide the custom bootstrapping information. You can use the <SKIP-DEFAULT-BOOTSTRAP> and <NEW-BOOTSTRAP-SEQUENCE> tags within the <NS-BOOTSTRAP> section. This section informs NetScaler appliance whether to avoid the default bootstrap or not. If the default bootstrapping is avoided, this section provides you an option to provide a new bootstrapping sequence.
Default bootstrap configuration
The default bootstrap configuration in NetScaler appliance follows these interface assignments:
-
Eth0 - Management interface with a certain NSIP address.
-
Eth1 - Client-facing interface with a certain VIP address.
-
Eth2 - Server-facing interface with a certain SNIP address.
Customize bootstrap configuration
You can skip the default bootstrap sequence and provide a new bootstrap sequence for the NetScaler VPX instance. Use the
<NS-BOOTSTRAP> tag to provide the custom bootstrapping information. For example, you can change the default bootstrapping, where the Management interface (NSIP), Client-facing interface (VIP), and server-facing interface (SNIP) are always provided in certain order.
The following table indicates the bootstrapping behavior with the different values that are allowed for
<SKIP-DEFAULT-BOOTSTRAP> and <NEW-BOOTSTRAP-SEQUENCE> tags.
SKIP-DEFAULT-BOOTSTRAP |
NEW-BOOTSTRAP-SEQUENCE |
Bootstrap behavior |
|---|---|---|
| YES | YES | The default bootstrapping behavior is skipped, and a new custom bootstrap sequence provided in the <NS-BOOTSTRAP> section is run. |
| YES | NO | The default bootstrapping behavior is skipped. The bootstrap commands provided in the <NS-CONFIG> section is run. |
You can customize the bootstrap configuration by the following three methods:
-
Provide only the interface details
-
Provide the interface details along with IP addresses and subnet mask
-
Provide bootstrap related commands in the
<NS-CONFIG>section
Method 1: Custom bootstrap by specifying only the interface details
You specify the management, client-facing and server-facing interfaces but not their IP addresses and subnet masks. The IP addresses and subnet masks are populated by querying the cloud infrastructure.
Custom bootstrap example for AWS
You provide the custom bootstrap sequence as shown in the following example. For more information, see How to provide preboot user data in cloud instance. Eth1 interface is assigned as the management interface (NSIP), Eth0 interface as the client interface (VIP), and Eth2 interface as the server interface (SNIP). The
<NS-BOOTSTRAP> section contains only the interface details and not the details of IP addresses and subnet masks.
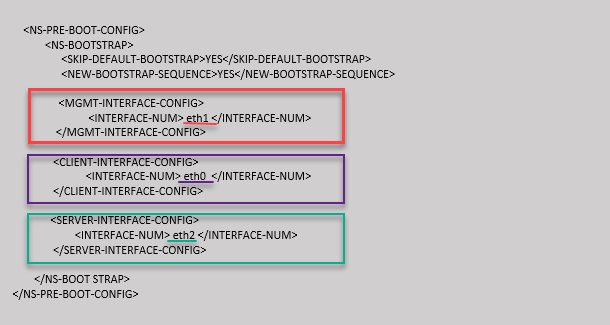
After the VM instance is created, in the AWS portal, you can verify the network interface properties as follows:
-
Navigate to the AWS Portal > EC2 instances, and select the instance that you have created by providing the custom bootstrap information.
-
In the Description tab, you can verify the properties of each network interface as shown in the following illustrations.
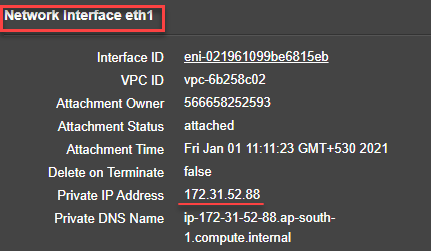
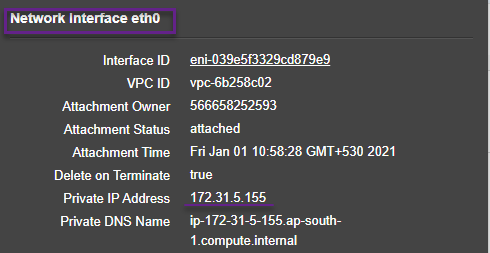
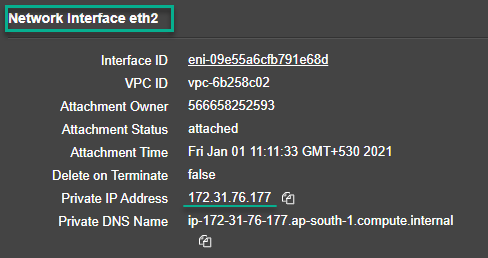
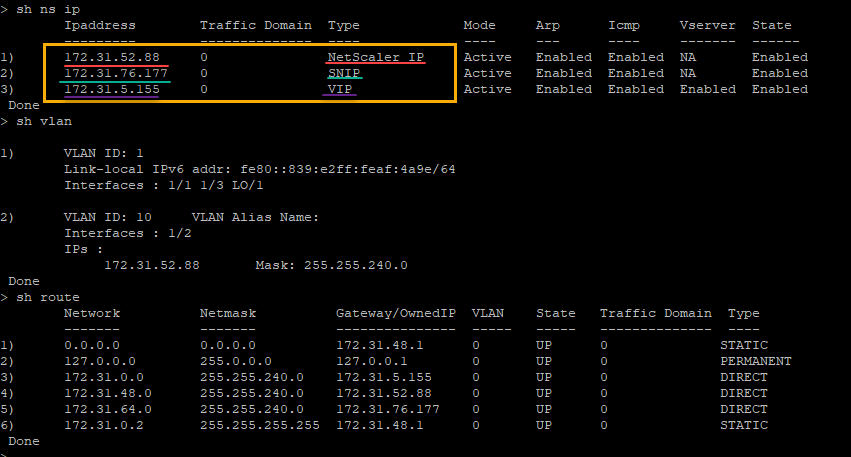
You can run the
show nsip command in ADC CLI, and verify the network interfaces applied to the NetScaler VPX instance during the first boot of the ADC appliance.
Custom bootstrap example for Azure
You provide the custom bootstrap sequence as shown in the following example. For more information, see How to provide preboot user data in cloud instance. Eth2 interface is assigned as the management interface (NSIP), Eth1 interface as the client interface (VIP), and Eth0 interface as the server interface (SNIP). The
<NS-BOOTSTRAP> section contains only the interface details and not the details of IP addresses and subnet masks.
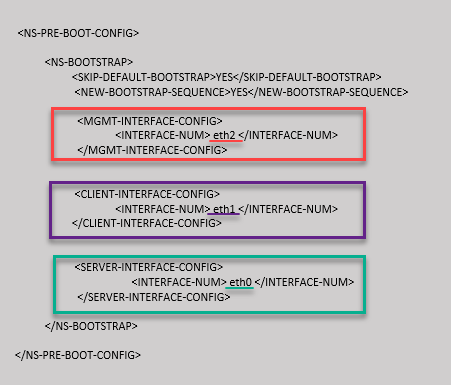
You can see that the NetScaler VPX instance is created with three network interfaces. Navigate to the Azure portal > VM instance > Networking, and verify the networking properties of the three NICs as shown in the following illustrations.



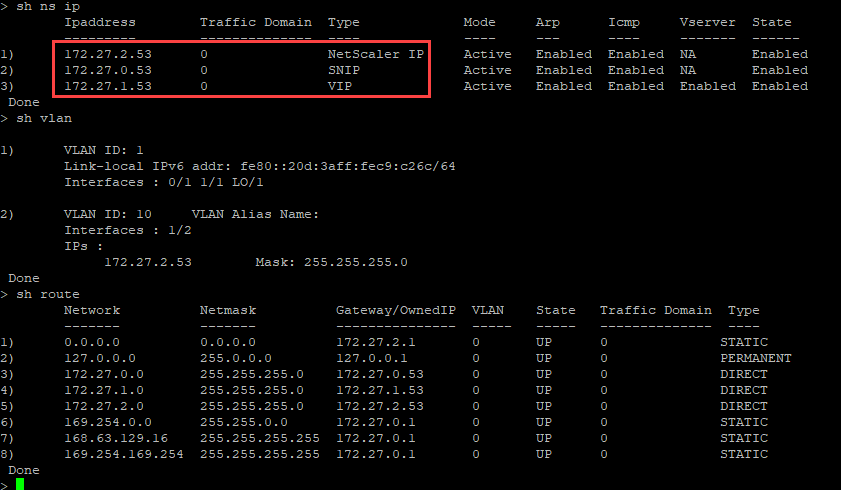
You can run the "show nsip" command in the ADC CLI, and verify that the new bootstrap sequence specified in the
<NS-BOOTSTRAP> section is applied. You can run the "show route" command to verify the subnet mask.
Custom bootstrap examples for GCP
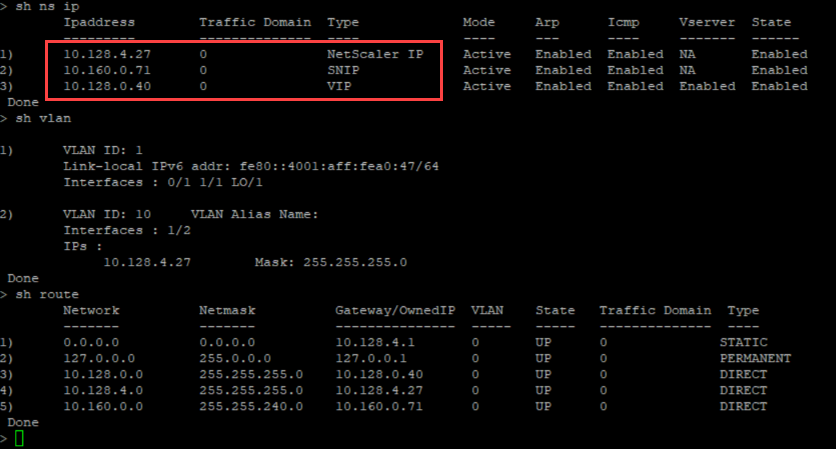
You provide the custom bootstrap sequence as shown in the following example. For more information, see How to provide preboot user data in cloud instance. Eth1 interface is assigned as the management interface (NSIP), Eth0 interface as the client interface (VIP), and Eth2 interface as the server interface (SNIP). The
<NS-BOOTSTRAP> section contains only the interface details and not the details of IP addresses and subnet masks.
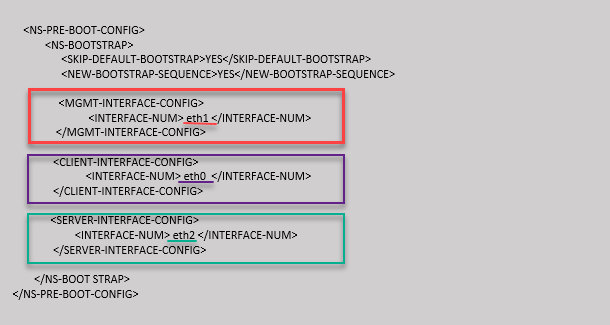
After the VM instance is created in the GCP portal, you can verify the network interface properties as follows:
-
Select the instance that you have created by providing the custom bootstrap information.
-
Navigate to the Network interface properties and verify the NIC details as follows:
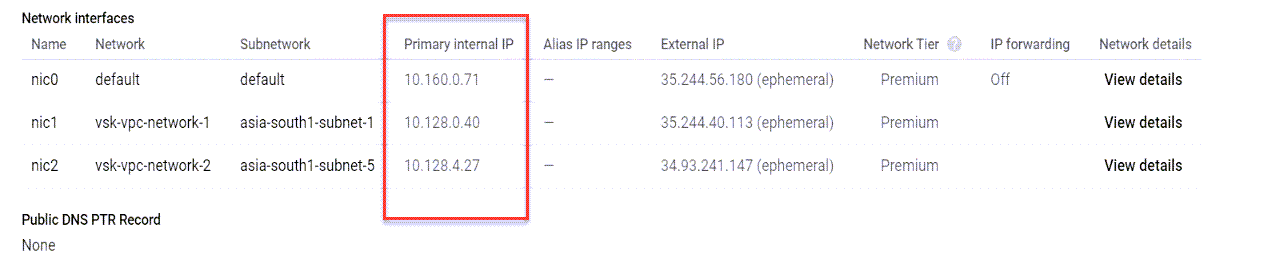
You can run the
show nsip command in ADC CLI, and verify the network interfaces applied to the NetScaler VPX instance during the first boot of the ADC appliance.
Method 2: Custom bootstrap by specifying the interfaces, IP addresses, and subnet masks
You specify the management, client-facing and server-facing interfaces along with their IP addresses and subnet mask.
Custom bootstrap examples for AWS
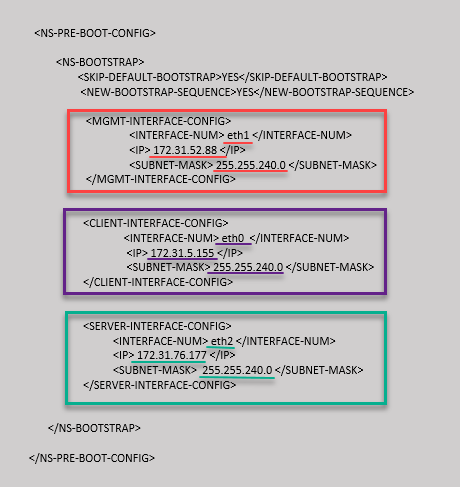
In the following example, you skip the default bootstrap and run a new bootstrap sequence for the NetScaler appliance. For the new bootstrap sequence, you specify the following details:
-
Management interface: Interface - Eth1, NSIP - 172.31.52.88, and subnet mask - 255.255.240.0
-
Client facing interface: Interface - Eth0, VIP - 172.31.5.155, and subnet mask - 255.255.240.0.
-
Server facing interface: Interface - Eth2, SNIP - 172.31.76.177, and subnet mask - 255.255.240.0.
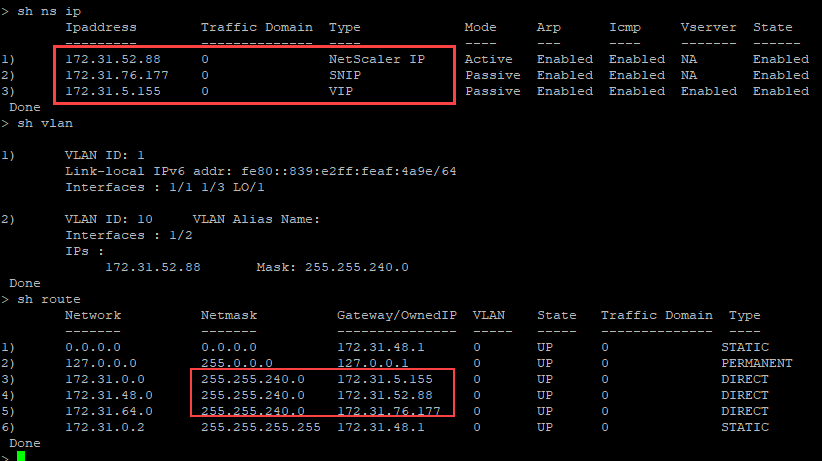
You can run the
show nsip command in the ADC CLI, and verify that the new bootstrap sequence specified in the <NS-BOOTSTRAP> section is applied. You can run the "show route" command to verify the subnet mask.
Custom bootstrap example for Azure
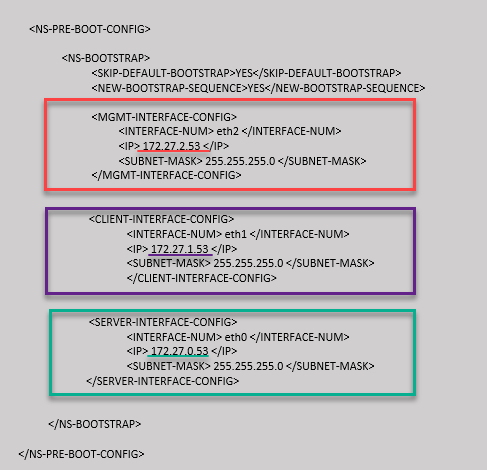
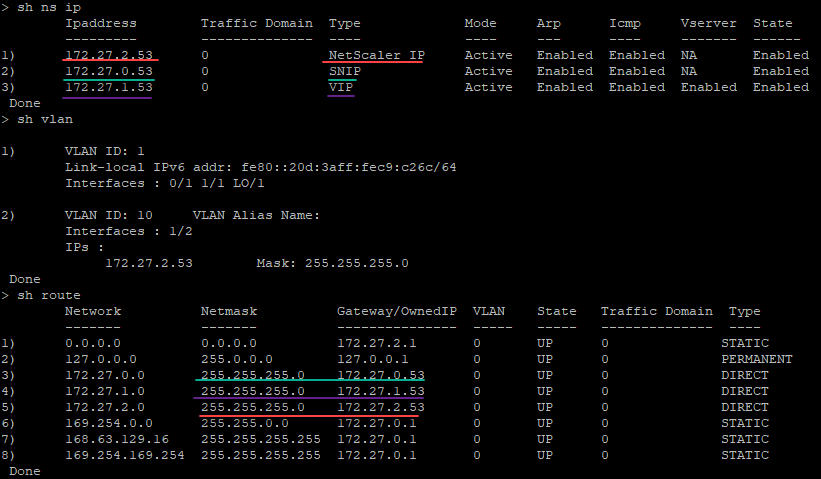
In the following example, a new bootstrap sequence for ADC is mentioned and default bootstrap is skipped. You provide the interface details along with the IP addresses and subnet masks as follows:
-
Management interface (eth2), NSIP (172.27.2.53), and subnet mask (255.255.255.0)
-
Client facing interface (eth1), VIP (172.27.1.53), and subnet mask (255.255.255.0)
-
Server facing interface (eth0), SNIP (172.27.0.53), and subnet mask (255.255.255.0)
You can see that the NetScaler VPX instance is created with three network interfaces. Navigate to the Azure portal > VM instance > Networking, and verify the networking properties of the three NICs as shown in the following illustrations.



You can run the
show nsip command in the ADC CLI, and verify that the new bootstrap sequence specified in the <NS-BOOTSTRAP> section is applied. You can run the "show route" command to verify the subnet mask.
Custom bootstrap example for GCP
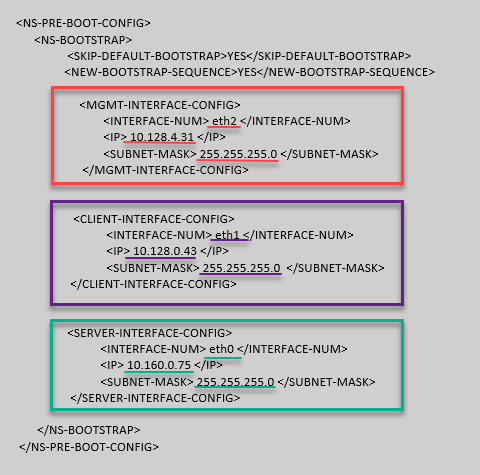
In the following example, a new bootstrap sequence for ADC is mentioned and default bootstrap is skipped. You provide the interface details along with the IP addresses and subnet masks as follows:
-
Management interface (eth2), NSIP (10.128.4.31), and subnet mask (255.255.255.0)
-
Client facing interface (eth1), VIP (10.128.0.43), and subnet mask (255.255.255.0)
-
Server facing interface (eth0), SNIP (10.160.0.75), and subnet mask (255.255.255.0)
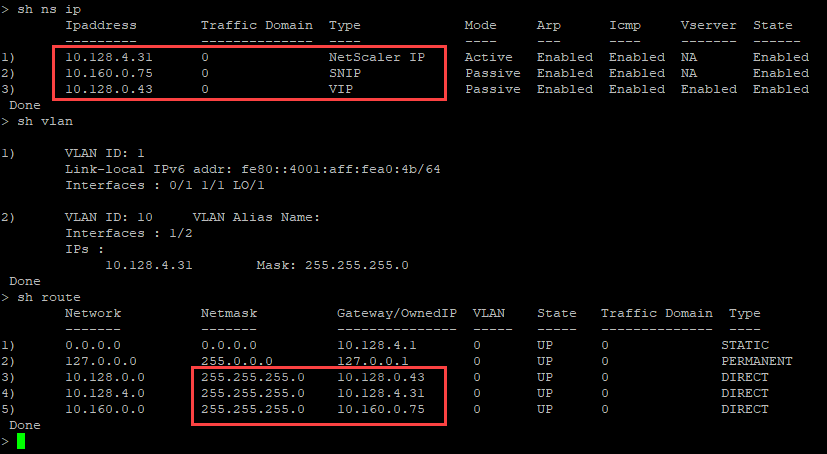
After the VM instance is created in the GCP portal with the custom bootstrap, you can verify the network interface properties as follows:
-
Select the instance that you have created by providing the custom bootstrap information.
-
Navigate to the Network interface properties and verify the NIC details as follows.

You can run the
show nsip command in the ADC CLI, and verify that the new bootstrap sequence specified in the <NS-BOOTSTRAP> section is applied. You can run the "show route" command to verify the subnet mask.
Method 3: Custom bootstrap by providing bootstrap related commands in the <NS-CONFIG> section
You can provide the bootstrap related commands in the
<NS-CONFIG> section. In the <NS-BOOTSTRAP> section, you must specify the <NEW-BOOTSTRAP-SEQUENCE> as "No" to run the bootstrapping commands in the <NS-CONFIG> section. You must also provide the commands to assign NSIP, default route, and NSVLAN. In addition, provide the commands relevant for the cloud that you use.
Before providing a custom bootstrap, ensure that your cloud infrastructure supports a particular interface configuration.
Custom bootstrap example for AWS
In this example, bootstrap related commands are provided in the
<NS-CONFIG> section. The <NS-BOOTSTRAP> section indicates that the default bootstrapping is skipped, and the custom bootstrap information provided in the <NS-CONFIG> section is run. You must also provide the commands to create NSIP, add default route, and add NSVLAN.
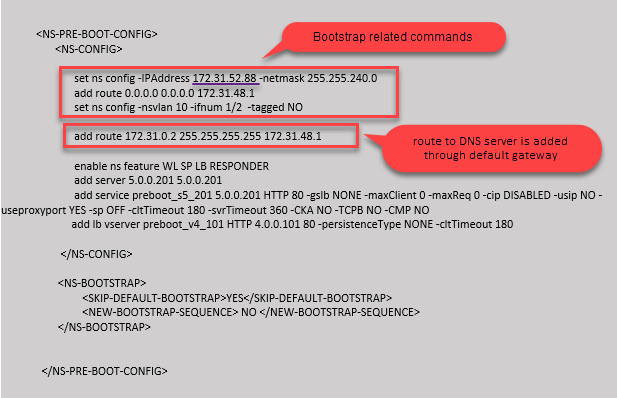
You can copy the configuration shown in the preceding screenshot from here:
<NS-PRE-BOOT-CONFIG>
     <NS-CONFIG>

         set ns config -IPAddress 172.31.52.88 -netmask 255.255.240.0
         add route 0.0.0.0 0.0.0.0 172.31.48.1
         set ns config -nsvlan 10 -ifnum 1/2  -tagged NO
         add route 172.31.0.2 255.255.255.255 172.31.48.1

         enable ns feature WL SP LB RESPONDER
         add server 5.0.0.201 5.0.0.201
         add service preboot_s5_201 5.0.0.201 HTTP 80 -gslb NONE -maxClient 0 -maxReq 0 -cip DISABLED -usip NO - useproxyport YES -sp OFF -cltTimeout 180 -svrTimeout 360 -CKA NO -TCPB NO -CMP NO
         add lb vserver preboot_v4_101 HTTP 4.0.0.101 80 -persistenceType NONE -cltTimeout 180

     </NS-CONFIG>

     <NS-BOOTSTRAP>
      <SKIP-DEFAULT-BOOTSTRAP>YES</SKIP-DEFAULT-BOOTSTRAP>
      <NEW-BOOTSTRAP-SEQUENCE> NO </NEW-BOOTSTRAP-SEQUENCE>
     </NS-BOOTSTRAP>


 </NS-PRE-BOOT-CONFIG>
After the VM instance is created, in the AWS portal, you can verify the network interface properties as follows:
-
Navigate to the AWS Portal > EC2 instances, and select the instance that you have created by providing the custom bootstrap information.
-
In the Description tab, you can verify the properties of each network interface as shown in the following illustrations.
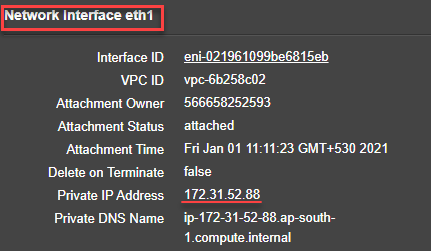
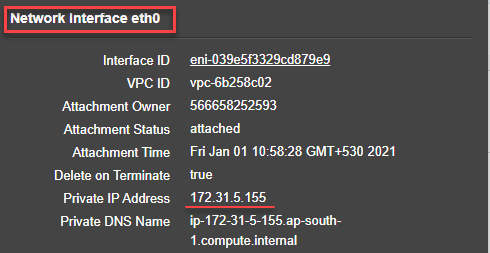
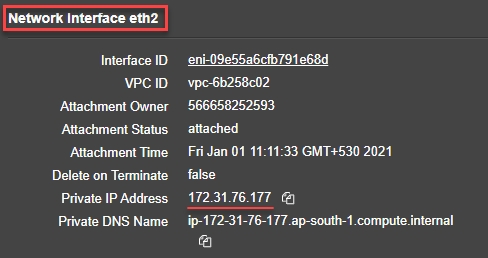
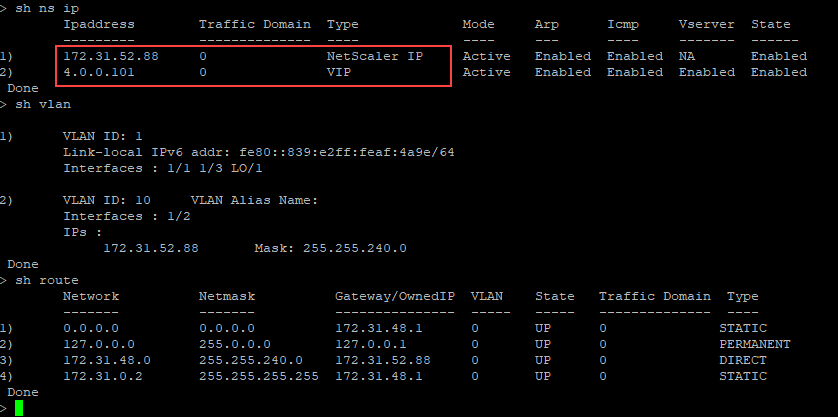
You can run the
show nsip command in ADC CLI, and verify the network interfaces applied to the NetScaler VPX instance during the first boot of the ADC appliance.
Custom bootstrap example for Azure
In this example, bootstrap related commands are provided in the
<NS-CONFIG> section. The <NS-BOOTSTRAP> section indicates that the default bootstrapping is skipped, and the custom bootstrap information provided in the <NS-CONFIG> section is run.
Note:
For Azure cloud, Instance Metadata Server (IMDS) and DNS servers are accessible only through primary interface (Eth0). Therefore, if Eth0 interface is not used as management interface (NSIP), Eth0 interface must at least be configured as SNIP for IMDS or DNS access to work. The route to IMDS endpoint (169.254.169.254) and DNS endpoint (168.63.129.16) through Eth0's gateway must also be added.
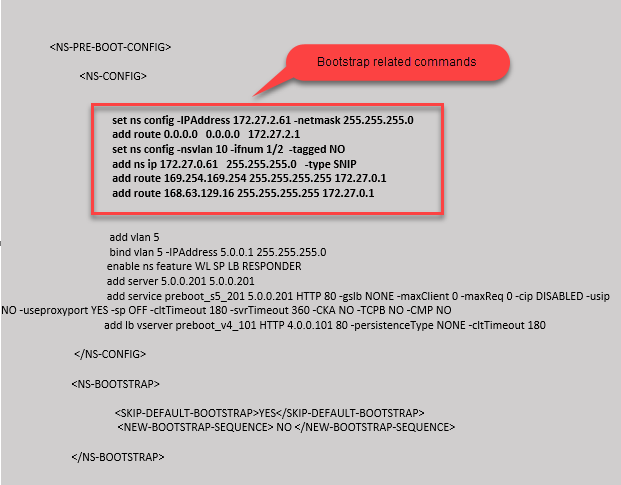
<NS-PRE-BOOT-CONFIG>

    <NS-CONFIG>

         set ns config -IPAddress 172.27.2.61 -netmask 255.255.255.0
         add route 0.0.0.0   0.0.0.0   172.27.2.1
         set ns config -nsvlan 10 -ifnum 1/2  -tagged NO
         add ns ip 172.27.0.61   255.255.255.0   -type SNIP
         add route 169.254.169.254 255.255.255.255 172.27.0.1
         add route 168.63.129.16 255.255.255.255 172.27.0.1

         add vlan 5
         bind vlan 5 -IPAddress 5.0.0.1 255.255.255.0
         enable ns feature WL SP LB RESPONDER
         add server 5.0.0.201 5.0.0.201
         add service preboot_s5_201 5.0.0.201 HTTP 80 -gslb NONE -maxClient 0 -maxReq 0 -cip DISABLED -usip NO -useproxyport YES -sp OFF -cltTimeout 180 -svrTimeout 360 -CKA NO -TCPB NO -CMP NO
         add lb vserver preboot_v4_101 HTTP 4.0.0.101 80 -persistenceType NONE -cltTimeout 180

     </NS-CONFIG>

     <NS-BOOTSTRAP>

     <SKIP-DEFAULT-BOOTSTRAP>YES</SKIP-DEFAULT-BOOTSTRAP>
     <NEW-BOOTSTRAP-SEQUENCE> NO </NEW-BOOTSTRAP-SEQUENCE>

     </NS-BOOTSTRAP>

 </NS-PRE-BOOT-CONFIG>
You can see that the NetScaler VPX instance is created with three network interfaces. Navigate to the Azure portal > VM instance > Networking, and verify the networking properties of the three NICs as shown in the following illustrations.
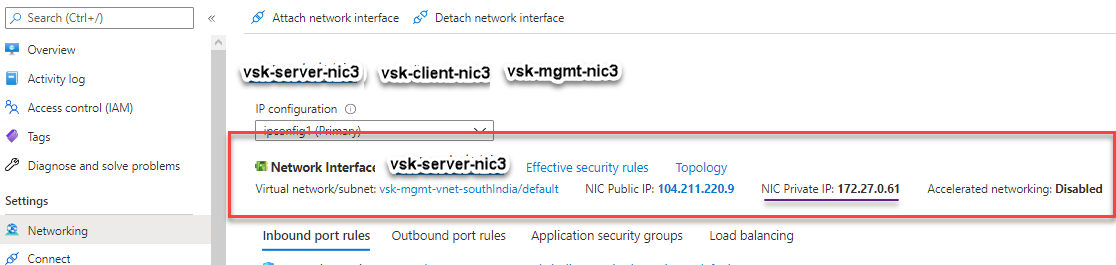


You can run the
show nsip command in the ADC CLI, and verify that the new bootstrap sequence specified in the <NS-BOOTSTRAP> section is applied. You can run the "show route" command to verify the subnet mask.
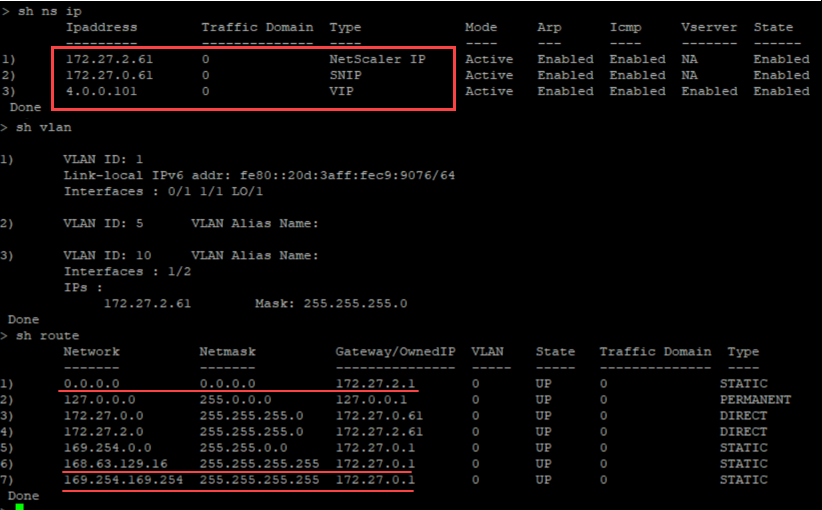
Custom bootstrap example for GCP
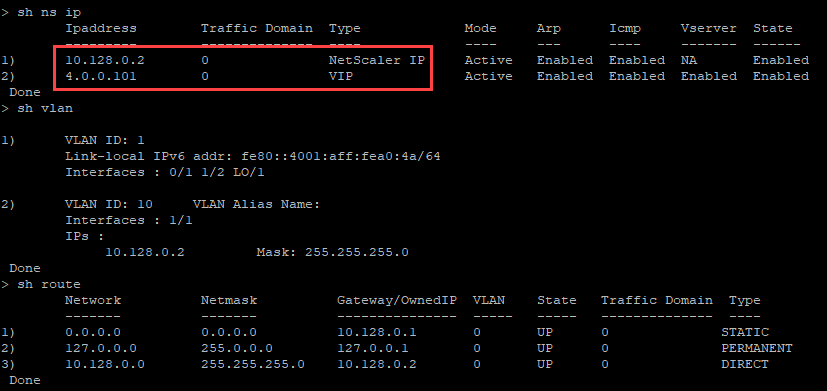
In this example, bootstrap related commands are provided in the
<NS-CONFIG> section. The <NS-BOOTSTRAP> section indicates that the default bootstrapping is skipped, and the custom bootstrap information provided in the <NS-CONFIG> section is applied.
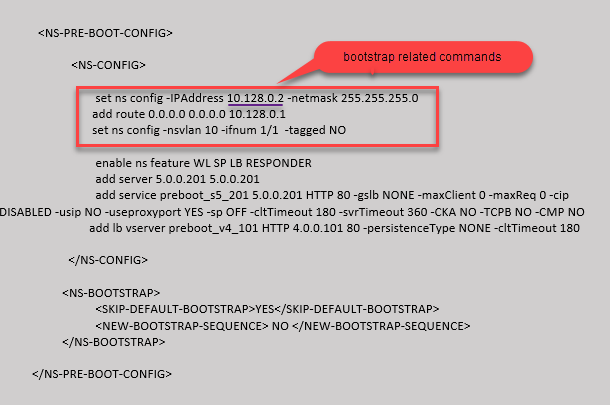
You can copy the configuration shown in the preceding screenshot from here:
<NS-PRE-BOOT-CONFIG>

     <NS-CONFIG>

         set ns config -IPAddress 10.128.0.2 -netmask 255.255.255.0
         add route 0.0.0.0 0.0.0.0 10.128.0.1
         set ns config -nsvlan 10 -ifnum 1/1  -tagged NO

         enable ns feature WL SP LB RESPONDER
         add server 5.0.0.201 5.0.0.201
         add service preboot_s5_201 5.0.0.201 HTTP 80 -gslb NONE -maxClient 0 -maxReq 0 -cip DISABLED -usip NO -useproxyport YES -sp OFF -cltTimeout 180 -svrTimeout 360 -CKA NO -TCPB NO -CMP NO
         add lb vserver preboot_v4_101 HTTP 4.0.0.101 80 -persistenceType NONE -cltTimeout 180

     </NS-CONFIG>

     <NS-BOOTSTRAP>
         <SKIP-DEFAULT-BOOTSTRAP>YES</SKIP-DEFAULT-BOOTSTRAP>
         <NEW-BOOTSTRAP-SEQUENCE> NO </NEW-BOOTSTRAP-SEQUENCE>
     </NS-BOOTSTRAP>

 </NS-PRE-BOOT-CONFIG>
After the VM instance is created in the GCP portal with the custom bootstrap, you can verify the network interface properties as follows:
-
Select the instance that you have created by providing the custom bootstrap information.
-
Navigate to the Network interface properties and verify the NIC details as shown in the illustration.

You can run the
show nsip command in ADC CLI, and verify that the configurations provided in the preceding <NS-CONFIG> section are applied at the first boot of the ADC appliance.
Impact of attaching and detaching NICs in AWS and Azure
AWS and Azure provide the option to attach a network interface to an instance, and detach a network interface from an instance. Attaching or detaching interfaces might alter interface positions. Hence, Citrix recommends you to refrain from detaching interfaces from the NetScaler VPX instance. If you detach or attach an interface when custom bootstrapping is configured, NetScaler VPX instance reassigns the primary IP of the newly available interface in the management interface's position as NSIP. If no further interfaces are available after the one you detached, then the first interface is made the management interface for the NetScaler VPX instance.
For example, a NetScaler VPX instance is brought up with 3 interfaces: Eth0 (SNIP), Eth1 (NSIP), and Eth2 (VIP). If you detach Eth1 interface from the instance, which is a management interface, ADC configures the next available interface (Eth2) as the management interface. Thereby, the NetScaler VPX instance is still accessed through the primary IP of Eth2 interface. If Eth2 is also not available, then the remaining interface (Eth0) is made the management interface. Therefore, the access to NetScaler VPX instance continues to exist.
Let's consider a different assignment of interfaces as follows: Eth0 (SNIP), Eth1 (VIP), and Eth2 (NSIP). If you detach Eth2 (NSIP), because no new interface is available after Eth2, the first interface (Eth0) is made the management interface.